

Accessory Catalog
Page 13
...on lightweight fabric. A specially designed bobbin cover is moved forward, its teeth catch a fabric and force it forward into the slot, and stitch slowly. 3. Brother Embellishment Feet 23 Bed Runner & Pillowcase Innov-is Project Book (See pages 16 and 17 for most consistent results. Move fabric about 1" (2.5 cm) past ... portion of the presser foot is also included with evenly spaced tucks and gathers. The intervals of tucks can be adjusted. 1. Install and manually thread a twin needle. 2. Adjust the amount of tuck or gather by placing the completed row in the center position. 3.
...on lightweight fabric. A specially designed bobbin cover is moved forward, its teeth catch a fabric and force it forward into the slot, and stitch slowly. 3. Brother Embellishment Feet 23 Bed Runner & Pillowcase Innov-is Project Book (See pages 16 and 17 for most consistent results. Move fabric about 1" (2.5 cm) past ... portion of the presser foot is also included with evenly spaced tucks and gathers. The intervals of tucks can be adjusted. 1. Install and manually thread a twin needle. 2. Adjust the amount of tuck or gather by placing the completed row in the center position. 3.

Accessory Catalog
Page 34
...be used on a wide range of colors specifically designed for Brother Embroidery machines, but compatible with other sewing and embroidery machine brands. Consult your sewing counter or can stand on your instruction manual for advice on how to be hung on the top surface...Innov-is 4000D, 2500D, 1500D, 1200 series, PC and ULT series machines and the PE-400D and Innov-is ideal for our embroidery only machines, PE750D and PE700II. Brother Embroidery Accessories PacesetterTM Polyester Threads 65 Brother Country Yarn Embroidery Threads Metallic Threads For the best embroidery results...
...be used on a wide range of colors specifically designed for Brother Embroidery machines, but compatible with other sewing and embroidery machine brands. Consult your sewing counter or can stand on your instruction manual for advice on how to be hung on the top surface...Innov-is 4000D, 2500D, 1500D, 1200 series, PC and ULT series machines and the PE-400D and Innov-is ideal for our embroidery only machines, PE750D and PE700II. Brother Embroidery Accessories PacesetterTM Polyester Threads 65 Brother Country Yarn Embroidery Threads Metallic Threads For the best embroidery results...
Users Manual - English
Page 2
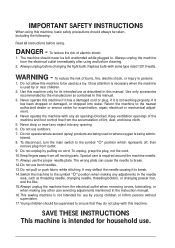
...should always be taken, including the following: Read all moving parts. DANGER - The machine should never be left unattended while plugged in this manual. 3. WARNING - Close attention is necessary when the machine is used or where oxygen is intended for its intended use bent needles. 13.Do...with same type rated 12V 5 watts. Never drop or insert any other user servicing adjustments mentioned in this manual. Do not unplug by the manufacturer as described in the instruction manual. 16.This sewing machine is required around the machine needle. 11. To unplug, grasp the plug, ...
...should always be taken, including the following: Read all moving parts. DANGER - The machine should never be left unattended while plugged in this manual. 3. WARNING - Close attention is necessary when the machine is used or where oxygen is intended for its intended use bent needles. 13.Do...with same type rated 12V 5 watts. Never drop or insert any other user servicing adjustments mentioned in this manual. Do not unplug by the manufacturer as described in the instruction manual. 16.This sewing machine is required around the machine needle. 11. To unplug, grasp the plug, ...

Users Manual - English
Page 4
...can damage the case and machine, and should never be used. 3. Be sure to keep your local authorized Brother dealer. Always consult the operation manual when replacing or installing any other parts to assure correct installation. For additional product information and updates, visit our ...web site at www.brother.com Introduction A-3 Plug the machine directly into the wall. When storing this machine, avoid direct...
...can damage the case and machine, and should never be used. 3. Be sure to keep your local authorized Brother dealer. Always consult the operation manual when replacing or installing any other parts to assure correct installation. For additional product information and updates, visit our ...web site at www.brother.com Introduction A-3 Plug the machine directly into the wall. When storing this machine, avoid direct...
Users Manual - English
Page 7
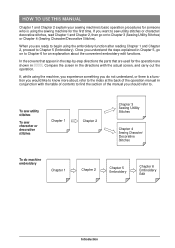
... time. Once you understand the steps explained in the directions with the table of contents to find the section of the operation manual in operation. . When you are shown in conjunction with the actual screen, and carry out the If, while using the machine...to Chapter 6 for an explanation about , refer to the index at the back of the manual you do machine embroidery Chapter 1 Chapter 2 Chapter 5 Embroidery Chapter 6 Embroidery Edit A-6 Introduction HOW TO USE THIS MANUAL Chapter 1 and Chapter 2 explain your sewing machine's basic operation procedures for someone who is...
... time. Once you understand the steps explained in the directions with the table of contents to find the section of the operation manual in operation. . When you are shown in conjunction with the actual screen, and carry out the If, while using the machine...to Chapter 6 for an explanation about , refer to the index at the back of the manual you do machine embroidery Chapter 1 Chapter 2 Chapter 5 Embroidery Chapter 6 Embroidery Edit A-6 Introduction HOW TO USE THIS MANUAL Chapter 1 and Chapter 2 explain your sewing machine's basic operation procedures for someone who is...

Users Manual - English
Page 8
CONTENTS WHAT YOU CAN DO WITH THIS MACHINE Special Features HOW TO USE THIS MANUAL Chapter 1 Setting Up PRINCIPAL PARTS AND THEIR OPERATION 1-1 Principal Parts 1-1 s Embroidery Unit 1-2 s Hard Case 1-2 s Embroidery Unit Storage Case ........ 1-2 s Operation Buttons 1-3 s Balance Wheel 1-4 s Presser Foot Lever 1-4 s ...
CONTENTS WHAT YOU CAN DO WITH THIS MACHINE Special Features HOW TO USE THIS MANUAL Chapter 1 Setting Up PRINCIPAL PARTS AND THEIR OPERATION 1-1 Principal Parts 1-1 s Embroidery Unit 1-2 s Hard Case 1-2 s Embroidery Unit Storage Case ........ 1-2 s Operation Buttons 1-3 s Balance Wheel 1-4 s Presser Foot Lever 1-4 s ...
Users Manual - English
Page 20
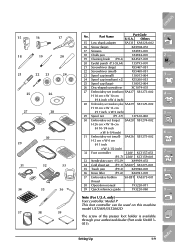
... sheet set (P.7-1) SA507 X81277-001 35 Touch pen (P.9-3) XA9940-001 36 Knee lifter (P.1-6) XA6941-001 37 Embroidery bobbin SA-EBT XA8375-001 thread 38 Operation manual 193220-011 39 Quick reference guide 193220-060 Note (For U.S.A. CONTENTS 15 16 17 18 19 20 21 22 23 24 25 26 27 28...
... sheet set (P.7-1) SA507 X81277-001 35 Touch pen (P.9-3) XA9940-001 36 Knee lifter (P.1-6) XA6941-001 37 Embroidery bobbin SA-EBT XA8375-001 thread 38 Operation manual 193220-011 39 Quick reference guide 193220-060 Note (For U.S.A. CONTENTS 15 16 17 18 19 20 21 22 23 24 25 26 27 28...

Users Manual - English
Page 26
Display Key Name Needle mode selection key (single/double) Stitch width and stitch length key Thread tension key Manual memory key Reset key Explanation Press this key to return the selected stitch pattern's saved settings to the original settings. Shows the thread tension setting ...
Display Key Name Needle mode selection key (single/double) Stitch width and stitch length key Thread tension key Manual memory key Reset key Explanation Press this key to return the selected stitch pattern's saved settings to the original settings. Shows the thread tension setting ...
Users Manual - English
Page 47
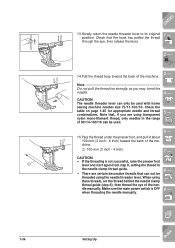
... of the machine. 1 100 mm (3 inch - 4 inch) 6 - 7 - Note that the hook has pulled the thread 1 - when threading the needle manually. ?! 1-36 Setting Up Index Make sure the main power switch is not successful, raise the presser foot lever and start again from step 8, setting the... There are using transparent nylon mono-filament thread, only needles in the range of the machine. When using the needle threader lever. dle manually. 5 6 CONTENTS 13.Slowly return the needle threader lever to its original position. Check the table on page 1-45 for appropriate needle and thread...
... of the machine. 1 100 mm (3 inch - 4 inch) 6 - 7 - Note that the hook has pulled the thread 1 - when threading the needle manually. ?! 1-36 Setting Up Index Make sure the main power switch is not successful, raise the presser foot lever and start again from step 8, setting the... There are using transparent nylon mono-filament thread, only needles in the range of the machine. When using the needle threader lever. dle manually. 5 6 CONTENTS 13.Slowly return the needle threader lever to its original position. Check the table on page 1-45 for appropriate needle and thread...
Users Manual - English
Page 60
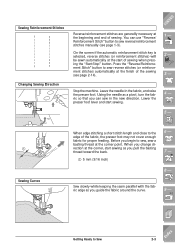
... curve. 9 - ?! CONTENTS 1 - 2 - 3 - Lower the presser foot lever and start sewing. 4 - 5 - 1 Sewing Curves When edge stitching a short stitch length and close to sew reverse/reinforcement stitches manually (see page 2-14). Getting Ready to sew, sew a basting thread at the corner point. On the screen if the automatic reinforcement stitch key is selected...
... curve. 9 - ?! CONTENTS 1 - 2 - 3 - Lower the presser foot lever and start sewing. 4 - 5 - 1 Sewing Curves When edge stitching a short stitch length and close to sew reverse/reinforcement stitches manually (see page 2-14). Getting Ready to sew, sew a basting thread at the corner point. On the screen if the automatic reinforcement stitch key is selected...

Users Manual - English
Page 67
... (3/32 - 3/16) 4.0 0.0 - 7.0 (3/16) (0 - 1/4) 5.0 2.5 - 7.0 (3/16) (3/32 - 1/4) 7.0 0.0 - 7.0 (1/4) (0 - 1/4) Stitch length [mm (inch.)] Auto. Index Manual 2.5 0.2 - 5.0 (3/32) (1/64 - 3/16) 2.5 0.2 - 5.0 (3/32) (1/64 - 3/16) 2.5 0.2 - 5.0 (3/32) (1/64 - 3/16) 2.5 0.2 - 5.0 (3/32) (1/64 ... (1/16 - 3/16) Stitch width [mm (inch.)] Pattern Auto. s Stitch Pattern Width/ Stitch Length Settings Table CONTENTS Stitch width [mm (inch.)] Pattern Auto. Manual 4.0 1.0 - 4.0 (3/16) (1/16 - 3/16) 3.0 1.0 - 4.0 (1/8) (1/16 - 3/16) 1.8 1.0 - 4.0 (1/16) (1/16 - 3/16)...
... (3/32 - 3/16) 4.0 0.0 - 7.0 (3/16) (0 - 1/4) 5.0 2.5 - 7.0 (3/16) (3/32 - 1/4) 7.0 0.0 - 7.0 (1/4) (0 - 1/4) Stitch length [mm (inch.)] Auto. Index Manual 2.5 0.2 - 5.0 (3/32) (1/64 - 3/16) 2.5 0.2 - 5.0 (3/32) (1/64 - 3/16) 2.5 0.2 - 5.0 (3/32) (1/64 - 3/16) 2.5 0.2 - 5.0 (3/32) (1/64 ... (1/16 - 3/16) Stitch width [mm (inch.)] Pattern Auto. s Stitch Pattern Width/ Stitch Length Settings Table CONTENTS Stitch width [mm (inch.)] Pattern Auto. Manual 4.0 1.0 - 4.0 (3/16) (1/16 - 3/16) 3.0 1.0 - 4.0 (1/8) (1/16 - 3/16) 1.8 1.0 - 4.0 (1/16) (1/16 - 3/16)...

Users Manual - English
Page 68
... 3/16) 0.4 0.2 - 1.0 (1/64) (1/64 - 1/16) 0.4 0.2 - 1.0 (1/64) (1/64 - 1/16) 0.4 0.2 - 1.0 (1/64) (1/64 - 1/16) 0.4 0.2 - 1.0 (1/64) (1/64 - 1/16) 0.4 0.2 - 1.0 (1/64) (1/64 - 1/16) Getting Ready to Sew 2-11 1 - 2 - 3 - 4 - 5 - 6 - 7 - 8 - 9 - ?! Manual 5.0 1.5 - 7.0 (3/16) (1/16 - 1/4) 5.0 1.5 - 7.0 (3/16) (1/16 - 1/4) 5.0 1.5 - 7.0 (3/16) (1/16 - 1/4) 4.0 1.5 - 7.0 (3/16) (1/16 - 1/4) 5.0 1.5 - 7.0 (3/16) (1/16 - 1/4) 6.0 1.5 - 7.0 (15/64) (1/16 - 1/4) 6.0 1.5 - 7.0 (15/64) (1/16 - 1/4) 6.0 1.5 - 7.0 (15/64) (1/16 - 1/4) 6.0 1.5 - 7.0 (15/64...
... 3/16) 0.4 0.2 - 1.0 (1/64) (1/64 - 1/16) 0.4 0.2 - 1.0 (1/64) (1/64 - 1/16) 0.4 0.2 - 1.0 (1/64) (1/64 - 1/16) 0.4 0.2 - 1.0 (1/64) (1/64 - 1/16) 0.4 0.2 - 1.0 (1/64) (1/64 - 1/16) Getting Ready to Sew 2-11 1 - 2 - 3 - 4 - 5 - 6 - 7 - 8 - 9 - ?! Manual 5.0 1.5 - 7.0 (3/16) (1/16 - 1/4) 5.0 1.5 - 7.0 (3/16) (1/16 - 1/4) 5.0 1.5 - 7.0 (3/16) (1/16 - 1/4) 4.0 1.5 - 7.0 (3/16) (1/16 - 1/4) 5.0 1.5 - 7.0 (3/16) (1/16 - 1/4) 6.0 1.5 - 7.0 (15/64) (1/16 - 1/4) 6.0 1.5 - 7.0 (15/64) (1/16 - 1/4) 6.0 1.5 - 7.0 (15/64) (1/16 - 1/4) 6.0 1.5 - 7.0 (15/64...

Users Manual - English
Page 69
... - 1/16) - - - - 6.0 3.0 - 6.0 1.5 (15/64) (1/8 - 15/64) (1/16) 1.0 - 3.0 (1/1 - 1/8) - - - - 5.0 (3/16) 0.0 - 6.0 (0 - 15/64) 2.0 0.2 - 4.0 (1/16) (1/64 - 3/16) - - - - 7.0 3.0 - 7.0 0.5 0.3 - 1.0 (1/4) (1/8 - 1/4) (1/32) (1/64 - 1/16) *- : Non - Manual Auto. adjustable 7.0 3.0 - 7.0 0.5 0.3 - 1.0 (1/4) (1/8 - 1/4) (1/32) (1/64 - 1/16) 7.0 3.0 - 7.0 0.5 0.3 - 1.0 (1/4) (1/8 - 1/4) (1/32) (1/64 - 1/16) 7.0 2.5 - 7.0 2.0 0.4 - 2.5 (1/4) (3/32 - 1/4) (1/16) (1/64 - 1/16) 7.0 2.5 - 7.0 2.0 0.4 - 2.5 (1/4) (3/32 - 1/4) (1/16) (1/64 - 1/16...
... - 1/16) - - - - 6.0 3.0 - 6.0 1.5 (15/64) (1/8 - 15/64) (1/16) 1.0 - 3.0 (1/1 - 1/8) - - - - 5.0 (3/16) 0.0 - 6.0 (0 - 15/64) 2.0 0.2 - 4.0 (1/16) (1/64 - 3/16) - - - - 7.0 3.0 - 7.0 0.5 0.3 - 1.0 (1/4) (1/8 - 1/4) (1/32) (1/64 - 1/16) *- : Non - Manual Auto. adjustable 7.0 3.0 - 7.0 0.5 0.3 - 1.0 (1/4) (1/8 - 1/4) (1/32) (1/64 - 1/16) 7.0 3.0 - 7.0 0.5 0.3 - 1.0 (1/4) (1/8 - 1/4) (1/32) (1/64 - 1/16) 7.0 2.5 - 7.0 2.0 0.4 - 2.5 (1/4) (3/32 - 1/4) (1/16) (1/64 - 1/16) 7.0 2.5 - 7.0 2.0 0.4 - 2.5 (1/4) (3/32 - 1/4) (1/16) (1/64 - 1/16...

Users Manual - English
Page 122
... rotating the balance wheel. 3. Insert needle size 130/705H, 100/16 Wing needle. CONTENTS 1 - 2 - 3 - 4 - 5 - 6 - 7 - 8 - 9 - ?! If using a wing needle and the stitch width has been set manually, check that the needle will not touch the presser foot before starting sewing by hand, from front to medium weight homespun fabric with a little stiffness...
... rotating the balance wheel. 3. Insert needle size 130/705H, 100/16 Wing needle. CONTENTS 1 - 2 - 3 - 4 - 5 - 6 - 7 - 8 - 9 - ?! If using a wing needle and the stitch width has been set manually, check that the needle will not touch the presser foot before starting sewing by hand, from front to medium weight homespun fabric with a little stiffness...
Users Manual - English
Page 316
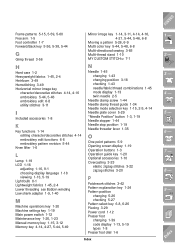
..., 2-4 Lower threading see Bobbin winding Low shank adapter 1-9, 1-40 M Machine operations key 1-20 Machine settings key 1-19 Main power switch 1-12 Maintenance key 1-20, 1-23 Manual memory key 1-15, 3-12 Memory key 4-14, 4-27, 5-44, 5-49 N Needle 1-45 changing 1-43 changing position 3-18 checking 1-43 needle/fabric/thread combinations 1-45 mode...
..., 2-4 Lower threading see Bobbin winding Low shank adapter 1-9, 1-40 M Machine operations key 1-20 Machine settings key 1-19 Main power switch 1-12 Maintenance key 1-20, 1-23 Manual memory key 1-15, 3-12 Memory key 4-14, 4-27, 5-44, 5-49 N Needle 1-45 changing 1-43 changing position 3-18 checking 1-43 needle/fabric/thread combinations 1-45 mode...


