
Instruction Manual - English and Spanish
Page 2
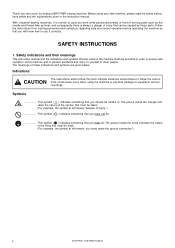
... for buying a BROTHER sewing machine. This symbol ( ) indicates something that are used on the machine itself are given below and the explanations given in the instruction manual. With industrial sewing machines, it correctly. The meanings of these parts. Thank you will know how to use it is normal to carry out work while positioned directly in front of moving parts such as the needle and thread take-up lever, and...
... for buying a BROTHER sewing machine. This symbol ( ) indicates something that are used on the machine itself are given below and the explanations given in the instruction manual. With industrial sewing machines, it correctly. The meanings of these parts. Thank you will know how to use it is normal to carry out work while positioned directly in front of moving parts such as the needle and thread take-up lever, and...
Instruction Manual - English and Spanish
Page 3
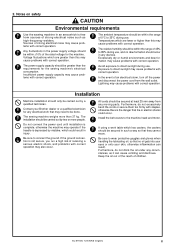
.... Installation Machine installation should be within the range of 45% to 85% during use, and no oil gets into your eyes or onto your Brother dealer or a qualified electrician for the machine. Be sure to the machine head and motor. Install the belt covers to connect the ground. SU-877A/B, TU-878A/B (English) ii Do not connect the power cord until installation is complete, otherwise the machine may operate...
.... Installation Machine installation should be within the range of 45% to 85% during use, and no oil gets into your eyes or onto your Brother dealer or a qualified electrician for the machine. Be sure to the machine head and motor. Install the belt covers to connect the ground. SU-877A/B, TU-878A/B (English) ii Do not connect the power cord until installation is complete, otherwise the machine may operate...

Instruction Manual - English and Spanish
Page 4
... out some adjustment, be covered by the warranty. If the power switch needs to the machine will keep turn off as the rotary hook, needle and needle bar with your Brother dealer or a qualified electrician to carry out any safety devices have received the necessary training in injury. • When threading the needle • When replacing the needle and bobbin • When not using the machine and...
... out some adjustment, be covered by the warranty. If the power switch needs to the machine will keep turn off as the rotary hook, needle and needle bar with your Brother dealer or a qualified electrician to carry out any safety devices have received the necessary training in injury. • When threading the needle • When replacing the needle and bobbin • When not using the machine and...

Instruction Manual - English and Spanish
Page 16
...presser foot height 55 10-3. Adjusting the walking foot, inner presser foot and needle timing 66 10-6. INSTALLATION 9 5-1. Installing the machine head 11 5-3. Threading the upper thread 31 6-6. REPLACING GAUGE PARTS (CHANGING THE NEEDLE WIDTH-878A/878B 83 13. WORK TABLE AND MOTOR 7 5. Installing the bobbin [877A, 877B, 878A 29 6-4-2. THREAD TENSION 39 8-1. Tension Release (877B, 878B 67 10-7. Winding the lower thread 26 6-4. SEWING 37 7-1. Adjusting the forward/back position of the feed dog height 56 10-4. TROUBLESHOOTING GUIDE 100 SU-877A/B, TU-878A...
...presser foot height 55 10-3. Adjusting the walking foot, inner presser foot and needle timing 66 10-6. INSTALLATION 9 5-1. Installing the machine head 11 5-3. Threading the upper thread 31 6-6. REPLACING GAUGE PARTS (CHANGING THE NEEDLE WIDTH-878A/878B 83 13. WORK TABLE AND MOTOR 7 5. Installing the bobbin [877A, 877B, 878A 29 6-4-2. THREAD TENSION 39 8-1. Tension Release (877B, 878B 67 10-7. Winding the lower thread 26 6-4. SEWING 37 7-1. Adjusting the forward/back position of the feed dog height 56 10-4. TROUBLESHOOTING GUIDE 100 SU-877A/B, TU-878A...
Instruction Manual - English and Spanish
Page 26
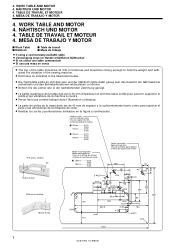
... pour pouvoir supporter le poids et les vibrations de la machine à coudre. ¡ Percer les trous comme indiqué dans l'illustration ci-dessous. ¡ La parte de arriba de la mesa debe ser de 40 mm de espesor y lo suficientemente fuerte como para soportar el peso y las vibraciones de la máquina de coser. ¡...
... pour pouvoir supporter le poids et les vibrations de la machine à coudre. ¡ Percer les trous comme indiqué dans l'illustration ci-dessous. ¡ La parte de arriba de la mesa debe ser de 40 mm de espesor y lo suficientemente fuerte como para soportar el peso y las vibraciones de la máquina de coser. ¡...
Instruction Manual - English and Spanish
Page 37
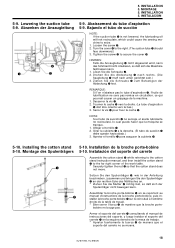
... pourrait causer un grippage de la machine. 1. q * Securely tighten the nut w so that the cotton stand does not move. MONTAGE 5. Loosen the screw w. 2. Instalación del soporte del carrete Assemble the cotton stand q while referring to the cotton stand instruction manual, and then install the cotton stand q to secure the cover e. Setzen Sie den Spulenträger...
... pourrait causer un grippage de la machine. 1. q * Securely tighten the nut w so that the cotton stand does not move. MONTAGE 5. Loosen the screw w. 2. Instalación del soporte del carrete Assemble the cotton stand q while referring to the cotton stand instruction manual, and then install the cotton stand q to secure the cover e. Setzen Sie den Spulenträger...
Instruction Manual - English and Spanish
Page 64
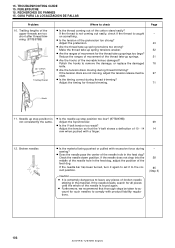
... Pedals in injury. * When using a clutch motor, the motor will operate if the treadle is for the walking foot q and inner presser foot w to move up and down alternately. ¡ The standard setting is depressed by identical distances. ¡ The height of the walking foot q can be adjusted to a maximum of 5.5 mm (1 mm feed dog height + 4.5 mm), and the height of the inner presser foot w can be adjusted...
... Pedals in injury. * When using a clutch motor, the motor will operate if the treadle is for the walking foot q and inner presser foot w to move up and down alternately. ¡ The standard setting is depressed by identical distances. ¡ The height of the walking foot q can be adjusted to a maximum of 5.5 mm (1 mm feed dog height + 4.5 mm), and the height of the inner presser foot w can be adjusted...
Instruction Manual - English and Spanish
Page 69
...TU-878A/B Attendre que le moteur se soit complètement arrêté avant de commencer le travail. S'il faut que la machine soit laissée sous tension pendant qu'on ait coupé l'alimentation électrique en raison de l'inertie du moteur. Wait until the motor stops fully before using a clutch motor, the motor.... STANDARD ADJUSTMENTS 10. Turn off the power switch and disconnect the power cord from the wall outlet at the following times, otherwise the machine may operate if the treadle is switched off as the rotary hook * When using the machine. AJUSTES ...
...TU-878A/B Attendre que le moteur se soit complètement arrêté avant de commencer le travail. S'il faut que la machine soit laissée sous tension pendant qu'on ait coupé l'alimentation électrique en raison de l'inertie du moteur. Wait until the motor stops fully before using a clutch motor, the motor.... STANDARD ADJUSTMENTS 10. Turn off the power switch and disconnect the power cord from the wall outlet at the following times, otherwise the machine may operate if the treadle is switched off as the rotary hook * When using the machine. AJUSTES ...

Instruction Manual - English and Spanish
Page 94
... cover w. 2. Install the connecting rod q to the shoulder of the shoulder screw e. 4. STANDARDEINSTELLUNGEN 10. AJUSTES ESTANDARES 10-10. Cambio de la resistencia del levantador de rodilla ¡ If the installation position for the connecting rod q is changed from screw hole A to screw hole B, the heaviness when the knee lifter is pressed decreases by about 20%. (However, the presser foot lift height drops from screw hole...
... cover w. 2. Install the connecting rod q to the shoulder of the shoulder screw e. 4. STANDARDEINSTELLUNGEN 10. AJUSTES ESTANDARES 10-10. Cambio de la resistencia del levantador de rodilla ¡ If the installation position for the connecting rod q is changed from screw hole A to screw hole B, the heaviness when the knee lifter is pressed decreases by about 20%. (However, the presser foot lift height drops from screw hole...
Instruction Manual - English and Spanish
Page 119
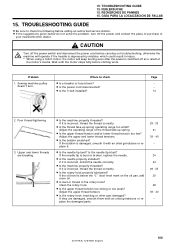
... upper thread tension too strong or too weak? Adjust the upper thread tension. ¡ Is the rotary hook, feed dog or other part damaged? Problem 1. Sewing machine pulley doesn't turn off as a result of the thread take -up spring. ¡ Is the upper thread tension and/or lower thread tension too low? 15. TROUBLESHOOTING GUIDE ¡ Be sure to check ¡ Is a breaker or fuse blown? ¡ Is the power cord disconnected? ¡ Is the V-belt installed...
... upper thread tension too strong or too weak? Adjust the upper thread tension. ¡ Is the rotary hook, feed dog or other part damaged? Problem 1. Sewing machine pulley doesn't turn off as a result of the thread take -up spring. ¡ Is the upper thread tension and/or lower thread tension too low? 15. TROUBLESHOOTING GUIDE ¡ Be sure to check ¡ Is a breaker or fuse blown? ¡ Is the power cord disconnected? ¡ Is the V-belt installed...
Instruction Manual - English and Spanish
Page 120
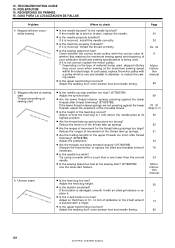
... the upper feed timing incorrect? Adjust the walking foot, inner presser foot and needle timing. 66 101 SU-877A/B, TU-878A/B (English) RECHERCHES DE PANNES 15. tion manual 66 5. Adjust so that there is incorrect, thread the thread correctly. ¡ Is the sewing speed too fast? Uneven seam ¡ Is the feed dog too low? 15. FEHLERSUCHE 15. Check whether the correct motor pulley (with the correct outer diameter) that is being used , skipped stitches...
... the upper feed timing incorrect? Adjust the walking foot, inner presser foot and needle timing. 66 101 SU-877A/B, TU-878A/B (English) RECHERCHES DE PANNES 15. tion manual 66 5. Adjust so that there is incorrect, thread the thread correctly. ¡ Is the sewing speed too fast? Uneven seam ¡ Is the feed dog too low? 15. FEHLERSUCHE 15. Check whether the correct motor pulley (with the correct outer diameter) that is being used , skipped stitches...

Instruction Manual - English and Spanish
Page 121
... than the light-alloy bobbins specified by Brother. 29 · 30 26 28 29 · 30 28 SU-877A/B, TU-878A/B (English) 102 GUIA PARA LA LOCALIZACION DE FALLAS Where to install them correctly. 92 9. errors (877B/878B) Are the tips of the movable knives too low? Attach the anti-racing spring. ¡ Is the bobbin turning smoothly? TROUBLESHOOTING GUIDE 15. Adjust the positions of the...
... than the light-alloy bobbins specified by Brother. 29 · 30 26 28 29 · 30 28 SU-877A/B, TU-878A/B (English) 102 GUIA PARA LA LOCALIZACION DE FALLAS Where to install them correctly. 92 9. errors (877B/878B) Are the tips of the movable knives too low? Attach the anti-racing spring. ¡ Is the bobbin turning smoothly? TROUBLESHOOTING GUIDE 15. Adjust the positions of the...
Instruction Manual - English and Spanish
Page 122
... remove the damage, or replace the damaged knife. ¡ Are the tension discs moving , adjust the tension release mechanism. ¡ Is the timing correct during thread trimming? Needle up stop position is not coming out of movement for the thread take -up spring tensions too strong? If the needle does not drop into the middle of the needle hole in the feed dog, adjust the position of broken needle sticking in the feed dog...
... remove the damage, or replace the damaged knife. ¡ Are the tension discs moving , adjust the tension release mechanism. ¡ Is the timing correct during thread trimming? Needle up stop position is not coming out of movement for the thread take -up spring tensions too strong? If the needle does not drop into the middle of the needle hole in the feed dog, adjust the position of broken needle sticking in the feed dog...
Hand Book - English
Page 1
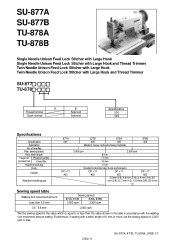
... in the table in accordance with the walking foot movement amount setting. sewing speed Max. Furthermore, if sewing with Large Hook and Thread Trimmer SU-877 TU-878 - A Thread trimmer Quick reverse B Solenoid Solenoid Specifications 005 305 Specifications Specification Application No. SU-877A SU-877B TU-878A TU-878B Single Needle Unison Feed Lock Stitcher with Large Hook Single Needle Unison Feed Lock Stitcher with Large Hook and Thread Trimmer Twin Needle Unison Feed Lock Stitcher with Large Hook Twin Needle Unison Feed Lock Stitcher with a stitch length of...
... in the table in accordance with the walking foot movement amount setting. sewing speed Max. Furthermore, if sewing with Large Hook and Thread Trimmer SU-877 TU-878 - A Thread trimmer Quick reverse B Solenoid Solenoid Specifications 005 305 Specifications Specification Application No. SU-877A SU-877B TU-878A TU-878B Single Needle Unison Feed Lock Stitcher with Large Hook Single Needle Unison Feed Lock Stitcher with Large Hook and Thread Trimmer Twin Needle Unison Feed Lock Stitcher with Large Hook Twin Needle Unison Feed Lock Stitcher with a stitch length of...

Hand Book - English
Page 2
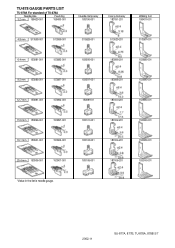
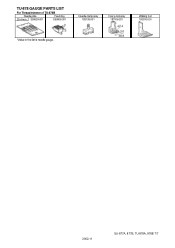
..., TU-878A, 878B 2/7 2002.11 Inner p-foot assy 183016-001 183017-001 183018-001 SU-877 GAUGE PARTS LIST For standard of SU-877A (Standard parts) Needle plate Feed dog 150959-001 150960-001 Inner p-foot assy 183181-101 Walking foot 150962-001 For Thread trimmer of SU-877B (Standard parts) Needle plate assy, TR Feed dog 156374-001 156376-001 Inner p-foot assy 183007-201 Walking foot 150962-001 Welting feet 3.2 mm...
..., TU-878A, 878B 2/7 2002.11 Inner p-foot assy 183016-001 183017-001 183018-001 SU-877 GAUGE PARTS LIST For standard of SU-877A (Standard parts) Needle plate Feed dog 150959-001 150960-001 Inner p-foot assy 183181-101 Walking foot 150962-001 For Thread trimmer of SU-877B (Standard parts) Needle plate assy, TR Feed dog 156374-001 156376-001 Inner p-foot assy 183007-201 Walking foot 150962-001 Welting feet 3.2 mm...

Hand Book - English
Page 3
Inner p-foot assy 183019-001 183020-001 183021-001 Inner p-foot assy 183022-001 183023-001 183024-001 183025-001 183026-001 2002.11 SU-877A, 877B, TU-878A, 878B 3/7 SU-877 GAUGE PARTS LIST Welting feet with teeth on inner p-foot assy Walking foot 4.8 mm 151542-001 6.4 mm 151544-001 7.9 mm 151546-001 Curved welting feet 4.8 mm Walking foot 151548-001 6.4 mm 151550-001 7.9 mm 151552-001 9.5 mm 151554-001 12.7 mm 151556-001 *Value in the list is welting width.
Inner p-foot assy 183019-001 183020-001 183021-001 Inner p-foot assy 183022-001 183023-001 183024-001 183025-001 183026-001 2002.11 SU-877A, 877B, TU-878A, 878B 3/7 SU-877 GAUGE PARTS LIST Welting feet with teeth on inner p-foot assy Walking foot 4.8 mm 151542-001 6.4 mm 151544-001 7.9 mm 151546-001 Curved welting feet 4.8 mm Walking foot 151548-001 6.4 mm 151550-001 7.9 mm 151552-001 9.5 mm 151554-001 12.7 mm 151556-001 *Value in the list is welting width.

Hand Book - English
Page 4
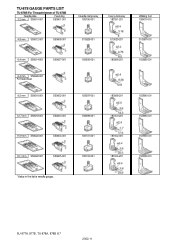
SU-877 GAUGE PARTS LIST Double welting feet Walking foot 4.8 mm 151588-001 6.4 mm 151560-001 9.5 mm 151562-001 *Value in the list is welting width. Feet with teeth, right Walking foot 151564-001 Feet with teeth, left Walking foot 151566-001 Narrow type feet for leather Walking foot 151568-001 Inner p-foot assy 183027-001 183028-001 183029-001 Inner p-foot assy 183030-001 Inner p-foot assy 183031-001 Inner p-foot assy 183032-001 SU-877A, 877B, TU-878A, 878B 4/7 2002.11
SU-877 GAUGE PARTS LIST Double welting feet Walking foot 4.8 mm 151588-001 6.4 mm 151560-001 9.5 mm 151562-001 *Value in the list is welting width. Feet with teeth, right Walking foot 151564-001 Feet with teeth, left Walking foot 151566-001 Narrow type feet for leather Walking foot 151568-001 Inner p-foot assy 183027-001 183028-001 183029-001 Inner p-foot assy 183030-001 Inner p-foot assy 183031-001 Inner p-foot assy 183032-001 SU-877A, 877B, TU-878A, 878B 4/7 2002.11
Hand Book - English
Page 5
TU-878 GAUGE PARTS LIST TU-878A For standard of TU-878A Needle plate Feed dog 3.2 mm 158429-001 158430-001 Needle clamp assy 183190-001 Inner p-foot assy 183191-201 Walking foot 158431-001 4.8 mm S13585-001 S13588-001 S13628-001 S13629-201 S13587-001 6.4 mm 153881-001 153882-001 183095-001 183096-201 153885-001 9.5 mm ... 153901-001 153902-001 183103-001 183104-201 153905-001 25.4 mm 153906-001 153907-001 183105-001 183106-201 153910-001 *Value in the list is needle gauge. 2002.11 SU-877A, 877B, TU-878A, 878B 5/7
TU-878 GAUGE PARTS LIST TU-878A For standard of TU-878A Needle plate Feed dog 3.2 mm 158429-001 158430-001 Needle clamp assy 183190-001 Inner p-foot assy 183191-201 Walking foot 158431-001 4.8 mm S13585-001 S13588-001 S13628-001 S13629-201 S13587-001 6.4 mm 153881-001 153882-001 183095-001 183096-201 153885-001 9.5 mm ... 153901-001 153902-001 183103-001 183104-201 153905-001 25.4 mm 153906-001 153907-001 183105-001 183106-201 153910-001 *Value in the list is needle gauge. 2002.11 SU-877A, 877B, TU-878A, 878B 5/7
Hand Book - English
Page 6
SU-877A, 877B, TU-878A, 878B 6/7 2002.11 TU-878 GAUGE PARTS LIST TU-878B For Thread trimmer of TU-878B Needle plate Feed dog 3.2 mm S50610-001 S50601-001 Needle clamp assy 183190-001 Inner p-foot assy 183191-201 Walking foot 158431-001 4.8 mm S50612-001 S50608-001 S13628-001 S13629-201 S13587-001 6.4 mm S50614-001 S50607-001 6.4 mm S50626-001 For Kevlar thread 9.5 mm S50616-001... S50620-001 S50604-001 183101-001 183102-001 153900-001 19.1 mm S50622-001 S50605-001 183103-001 183104-201 153905-001 *Value in the list is needle gauge.
SU-877A, 877B, TU-878A, 878B 6/7 2002.11 TU-878 GAUGE PARTS LIST TU-878B For Thread trimmer of TU-878B Needle plate Feed dog 3.2 mm S50610-001 S50601-001 Needle clamp assy 183190-001 Inner p-foot assy 183191-201 Walking foot 158431-001 4.8 mm S50612-001 S50608-001 S13628-001 S13629-201 S13587-001 6.4 mm S50614-001 S50607-001 6.4 mm S50626-001 For Kevlar thread 9.5 mm S50616-001... S50620-001 S50604-001 183101-001 183102-001 153900-001 19.1 mm S50622-001 S50605-001 183103-001 183104-201 153905-001 *Value in the list is needle gauge.
Hand Book - English
Page 7
TU-878 GAUGE PARTS LIST For Thread trimmer of TU-878B Needle plate Feed dog 25.4 mm S50624-001 S50606-001 Needle clamp assy 183105-001 Inner p-foot assy 183106-201 Walking foot 153910-001 *Value in the list is needle gauge. 2002.11 SU-877A, 877B, TU-878A, 878B 7/7
TU-878 GAUGE PARTS LIST For Thread trimmer of TU-878B Needle plate Feed dog 25.4 mm S50624-001 S50606-001 Needle clamp assy 183105-001 Inner p-foot assy 183106-201 Walking foot 153910-001 *Value in the list is needle gauge. 2002.11 SU-877A, 877B, TU-878A, 878B 7/7


