Users Guide
Page 2
... ...6 Set Up Your Printer ...7 Parts Description...8 Load the RD Roll...10 Check the Sensor Position...13 Connect the Power Cord...16 Turn Power On/Off ...17 Install Software...18 Install Printer Drivers and Software on a Computer 19 Available Applications...20 Connect the Printer to a Computer ...21 Connect the Printer to a Computer Using a USB Cable 22 Connect the Printer to a Computer Using a Wired LAN 23 Create Labels and Print Using Computer 24 Create Labels Using P-touch Editor (Windows 25 Main Window of P-touch Editor Express Mode (Windows...
... ...6 Set Up Your Printer ...7 Parts Description...8 Load the RD Roll...10 Check the Sensor Position...13 Connect the Power Cord...16 Turn Power On/Off ...17 Install Software...18 Install Printer Drivers and Software on a Computer 19 Available Applications...20 Connect the Printer to a Computer ...21 Connect the Printer to a Computer Using a USB Cable 22 Connect the Printer to a Computer Using a Wired LAN 23 Create Labels and Print Using Computer 24 Create Labels Using P-touch Editor (Windows 25 Main Window of P-touch Editor Express Mode (Windows...
Users Guide
Page 11
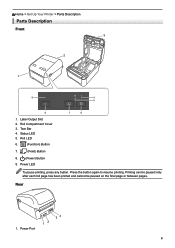
Status LED 5. Rear 1. Power LED 7 6 To pause printing, press any button. Power Port 2 1 4 3 8 Roll Compartment Cover 3. Home > Set Up Your Printer > Parts Description Parts Description Front 3 2 1 9 4 5 8 1. Label Output Slot 2. Printing can be paused only after each full page has been printed and cannot be paused on the final page or between pages. Roll LED 6. (Function) Button 7. (Feed) Button 8. (Power) Button 9. Tear Bar 4. Press the button again to resume printing.
Status LED 5. Rear 1. Power LED 7 6 To pause printing, press any button. Power Port 2 1 4 3 8 Roll Compartment Cover 3. Home > Set Up Your Printer > Parts Description Parts Description Front 3 2 1 9 4 5 8 1. Label Output Slot 2. Printing can be paused only after each full page has been printed and cannot be paused on the final page or between pages. Roll LED 6. (Function) Button 7. (Feed) Button 8. (Power) Button 9. Tear Bar 4. Press the button again to resume printing.
Users Guide
Page 26
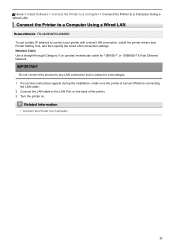
... Related Models: TD-4420DN/TD-4520DN To use a static IP address to a Computer 23 Connect the LAN cable to the LAN Port on . Turn the printer on the back of the printer. 3. IMPORTANT Do not connect this product to overvoltages. 1. If on-screen instructions appear during the installation, make sure the printer is subject to any LAN connection that is turned off before connecting the LAN cable. 2. Network Cable Use...
... Related Models: TD-4420DN/TD-4520DN To use a static IP address to a Computer 23 Connect the LAN cable to the LAN Port on . Turn the printer on the back of the printer. 3. IMPORTANT Do not connect this product to overvoltages. 1. If on-screen instructions appear during the installation, make sure the printer is subject to any LAN connection that is turned off before connecting the LAN cable. 2. Network Cable Use...

Users Guide
Page 28
...; Windows 8/Windows 8.1/Windows Server 2012/Windows Server 2012 R2: Click the P-touch Editor 5.2 icon on the Apps screen, or double-click the P-touch Editor 5.2 icon on the desktop. • Windows 7/Windows Server 2008/Windows Server 2008 R2: Click Start > All Programs > Brother P-touch > P-touch Editor 5.2, or double-click the P-touch Editor 5.2 icon on the Brother support website at support.brother.com. 1. Home > Create Labels and Print Using Computer > Create Labels Using P-touch Editor (Windows) Create Labels Using P-touch Editor (Windows) To use your printer with your model's Downloads...
...; Windows 8/Windows 8.1/Windows Server 2012/Windows Server 2012 R2: Click the P-touch Editor 5.2 icon on the Apps screen, or double-click the P-touch Editor 5.2 icon on the desktop. • Windows 7/Windows Server 2008/Windows Server 2008 R2: Click Start > All Programs > Brother P-touch > P-touch Editor 5.2, or double-click the P-touch Editor 5.2 icon on the Brother support website at support.brother.com. 1. Home > Create Labels and Print Using Computer > Create Labels Using P-touch Editor (Windows) Create Labels Using P-touch Editor (Windows) To use your printer with your model's Downloads...
Users Guide
Page 34
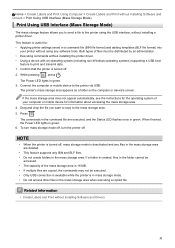
...-Windows operating systems) supporting a USB host feature to print and transmit data. 1. Connect the computer or mobile device to the printer via USB. If the mass storage area does not appear automatically, see the instructions for the operating system of your printer without using the USB interface, without installing a printer driver. Related Information • Create Labels and Print without Installing Software and Drivers 31 The Power LED lights in green. 6. To turn mass storage mode off, turn the printer...
...-Windows operating systems) supporting a USB host feature to print and transmit data. 1. Connect the computer or mobile device to the printer via USB. If the mass storage area does not appear automatically, see the instructions for the operating system of your printer without using the USB interface, without installing a printer driver. Related Information • Create Labels and Print without Installing Software and Drivers 31 The Power LED lights in green. 6. To turn mass storage mode off, turn the printer...
Users Guide
Page 35
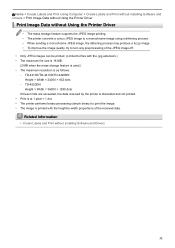
... Printer Driver Print Image Data without Installing Software and Drivers 32 Related Information • Create Labels and Print without Using the Printer Driver • The mass storage feature supports the JPEG image printing. • The printer converts a colour JPEG image to a monochrome image using a dithering process. • When sending a monochrome JPEG image, the dithering process may produce a fuzzy image. • To improve the image quality, try to files...
... Printer Driver Print Image Data without Installing Software and Drivers 32 Related Information • Create Labels and Print without Using the Printer Driver • The mass storage feature supports the JPEG image printing. • The printer converts a colour JPEG image to a monochrome image using a dithering process. • When sending a monochrome JPEG image, the dithering process may produce a fuzzy image. • To improve the image quality, try to files...

Users Guide
Page 38
... then individually crops and prints the barcodes you specify. Home > Create Labels and Print Using Computer > Print Barcode Labels Using Crop Print (Windows) Print Barcode Labels Using Crop Print (Windows) Related Models: TD-4520DN You can print one or multiple barcodes from the Windows printer driver, and cannot be executed using P-touch Editor. • The accuracy of the Crop Print feature depends on the user's environment, printing material, and label content. For more information, visit the Brother support website at support.brother.com. A D00XXU001 B D00XXU002 C D00XXU003 D00VXY004...
... then individually crops and prints the barcodes you specify. Home > Create Labels and Print Using Computer > Print Barcode Labels Using Crop Print (Windows) Print Barcode Labels Using Crop Print (Windows) Related Models: TD-4520DN You can print one or multiple barcodes from the Windows printer driver, and cannot be executed using P-touch Editor. • The accuracy of the Crop Print feature depends on the user's environment, printing material, and label content. For more information, visit the Brother support website at support.brother.com. A D00XXU001 B D00XXU002 C D00XXU003 D00VXY004...

Users Guide
Page 40
... Print (Windows) Related Models: TD-4520DN To use the Crop Print function, create a barcode document and save it as a PDF file. Make sure barcodes start in the top left corner and run down the column, continuing at the top of the next column to the right. Make sure the final barcode PDF meets the following conditions are satisfied: • The label is surrounded by ruled lines. • The label includes horizontal lines...
... Print (Windows) Related Models: TD-4520DN To use the Crop Print function, create a barcode document and save it as a PDF file. Make sure barcodes start in the top left corner and run down the column, continuing at the top of the next column to the right. Make sure the final barcode PDF meets the following conditions are satisfied: • The label is surrounded by ruled lines. • The label includes horizontal lines...

Users Guide
Page 42
...Click the Basic tab, and do one of the following: • For Die-cut labels, clear the Cut Every check box. • For Continuous Rolls, select the Cut Every check box. 8. If you want to a computer or mobile device via a USB cable or network connection. 1. Select the Extract individual labels with barcodes. Home > Create Labels and Print Using Computer > Print Barcode Labels Using Crop Print (Windows) > Print Barcode Labels Using Crop Print (Windows) Print Barcode Labels Using Crop Print (Windows) Related Models: TD-4520DN Make sure your printer. 4. check box. 9. Click Properties...
...Click the Basic tab, and do one of the following: • For Die-cut labels, clear the Cut Every check box. • For Continuous Rolls, select the Cut Every check box. 8. If you want to a computer or mobile device via a USB cable or network connection. 1. Select the Extract individual labels with barcodes. Home > Create Labels and Print Using Computer > Print Barcode Labels Using Crop Print (Windows) > Print Barcode Labels Using Crop Print (Windows) Print Barcode Labels Using Crop Print (Windows) Related Models: TD-4520DN Make sure your printer. 4. check box. 9. Click Properties...

Users Guide
Page 49
...; Logos, symbols, and graphics downloaded to the printer are automatically scaled to the resident font or any of data in the transferred file must be printed. Notes on the printer is transferred to the printer, the barcode is transferred to the Printer Using P-touch Transfer Manager (Windows) 46 If this occurs, change the text object setting. • Although character styles can check a preview of the converted barcode cannot be edited. •...
...; Logos, symbols, and graphics downloaded to the printer are automatically scaled to the resident font or any of data in the transferred file must be printed. Notes on the printer is transferred to the printer, the barcode is transferred to the Printer Using P-touch Transfer Manager (Windows) 46 If this occurs, change the text object setting. • Although character styles can check a preview of the converted barcode cannot be edited. •...

Users Guide
Page 79
...; Make sure the printer driver has been installed correctly and you want to configure to the printer driver and other software when using the installer. • The Printer Setting Tool is installed in addition to the computer. 2. Connect the printer you can download the latest version from the Brother support website at support.brother.com/manuals. 76 The main window appears. 1 2 3 4 5 6 1. Communication Settings (TD-4420DN/TD-4520DN) (TD-4420DN/TD-4520DN) Specifies wired LAN communication settings. 3. For example, power settings. 4. For...
...; Make sure the printer driver has been installed correctly and you want to configure to the printer driver and other software when using the installer. • The Printer Setting Tool is installed in addition to the computer. 2. Connect the printer you can download the latest version from the Brother support website at support.brother.com/manuals. 76 The main window appears. 1 2 3 4 5 6 1. Communication Settings (TD-4420DN/TD-4520DN) (TD-4420DN/TD-4520DN) Specifies wired LAN communication settings. 3. For example, power settings. 4. For...
Users Guide
Page 88
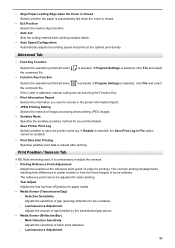
.... • Print Data after Printing Specifies whether print data is unnecessary to save the printer's print log. Mark Detection Sensitivity Adjusts the sensitivity of some software. Advanced Tab • Feed Key Function Selects the operation performed when the command file. • Function Key Function is closed. • Exit Position Selects the media output location. • Auto Cut Sets the cutting method when printing multiple labels. • Auto Speed Configuration Automatically adjusts the printing speed and prints at...
.... • Print Data after Printing Specifies whether print data is unnecessary to save the printer's print log. Mark Detection Sensitivity Adjusts the sensitivity of some software. Advanced Tab • Feed Key Function Selects the operation performed when the command file. • Function Key Function is closed. • Exit Position Selects the media output location. • Auto Cut Sets the cutting method when printing multiple labels. • Auto Speed Configuration Automatically adjusts the printing speed and prints at...

ESC/ P Command Reference
Page 57
... Reference 5.5 Vertical movement commands LF Line feed ASCII: LF Hexadecimal: 0A Parameters None Description Feeds the paper by the amount specified by a line feed command (ESC 0, ESC 2, ESC 3, ESC A). The print position becomes the beginning of the next line. The default value is a line feed of 32 dots. A carriage return immediately after a line feed is ignored. Auto-canceling double-width characters specified...
... Reference 5.5 Vertical movement commands LF Line feed ASCII: LF Hexadecimal: 0A Parameters None Description Feeds the paper by the amount specified by a line feed command (ESC 0, ESC 2, ESC 3, ESC A). The print position becomes the beginning of the next line. The default value is a line feed of 32 dots. A carriage return immediately after a line feed is ignored. Auto-canceling double-width characters specified...
ESC/ P Command Reference
Page 120
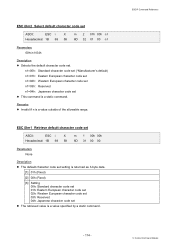
... i X Hexadecimal: 1B 69 58 m 1 00h 00h 6D 31 00 00 Parameters None Description The default character code set setting is returned as 3-byte data. [1] 01h (Fixed) [2] 00h (Fixed) [3] Setting 00h: Standard character code set 01h: Eastern European character code set 02h: Western European character code set 03h: Reserved 04h: Japanese character code set . ESC iXm2 Select default character code set ASCII: ESC i X Hexadecimal: 1B 69 58 m 2 01h 00h n1 6D 32 01 00 n1 Parameters...
... i X Hexadecimal: 1B 69 58 m 1 00h 00h 6D 31 00 00 Parameters None Description The default character code set setting is returned as 3-byte data. [1] 01h (Fixed) [2] 00h (Fixed) [3] Setting 00h: Standard character code set 01h: Eastern European character code set 02h: Western European character code set 03h: Reserved 04h: Japanese character code set . ESC iXm2 Select default character code set ASCII: ESC i X Hexadecimal: 1B 69 58 m 2 01h 00h n1 6D 32 01 00 n1 Parameters...

P-touch Template Manual/ Command Reference
Page 33
... a barcode in a template created with P-touch Editor causes an extremely long barcode, the barcode may differ from that barcode object is entered. A delimiter or print start text string should be fully printed. Do not insert line feed immediately before or immediately after the barcode data. - 26 - 4. In that case, the barcode will be created containing the line feed code, or the barcode will be transferred to Appendix B:Specifications for each model support...
... a barcode in a template created with P-touch Editor causes an extremely long barcode, the barcode may differ from that barcode object is entered. A delimiter or print start text string should be fully printed. Do not insert line feed immediately before or immediately after the barcode data. - 26 - 4. In that case, the barcode will be created containing the line feed code, or the barcode will be transferred to Appendix B:Specifications for each model support...
P-touch Template Manual/ Command Reference
Page 35
... Append settings specified in P-touch Editor is ignored. The barcode is partitioned when too much data is not affected. Printer: "002" The Remove Character setting specified in the P-touch Editor is invalid. The Code Spacing and Join Vertically in the Set Structured Append settings specified in between the message ID and the data. When inserting data, please add "00" in P-touch Editor are inconsistent with those on the head of data" of data. If the message...
... Append settings specified in P-touch Editor is ignored. The barcode is partitioned when too much data is not affected. Printer: "002" The Remove Character setting specified in the P-touch Editor is invalid. The Code Spacing and Join Vertically in the Set Structured Append settings specified in between the message ID and the data. When inserting data, please add "00" in P-touch Editor are inconsistent with those on the head of data" of data. If the message...

P-touch Template Manual/ Command Reference
Page 126
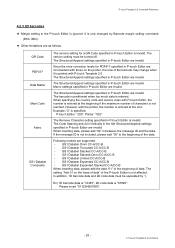
...when printer turned on Printer setting Select print setting after error occurs Set language Set home position of label Set label length Reverse field data color Set horizontal print position Set vertical print position Clear data after printing Feed setting Print Mode Media setting Unit setting Mirror printing Upside-down printing Copy printing Set print width Set print density Serialization Serialization Reverse feed length setting when printing Print printer settings Print list of the model. ・The pause command is not supported. ・Resolution settings are not supported. ・...
...when printer turned on Printer setting Select print setting after error occurs Set language Set home position of label Set label length Reverse field data color Set horizontal print position Set vertical print position Clear data after printing Feed setting Print Mode Media setting Unit setting Mirror printing Upside-down printing Copy printing Set print width Set print density Serialization Serialization Reverse feed length setting when printing Print printer settings Print list of the model. ・The pause command is not supported. ・Resolution settings are not supported. ・...

P-touch Template Manual/ Command Reference
Page 136
... relative to present position Move down relative to present position Move right and down relative to present position Line print mode left margin Set text darkness/width Character spacing Page width Line print mode pagination Form-feed Non-destructive backspace Line print mode top-of-form Distance between top-of-form and index Conditional advance/retract Retract after cut Cut * Models without cutters are not supported Print after idle time - 129 - 12.
... relative to present position Move down relative to present position Move right and down relative to present position Line print mode left margin Set text darkness/width Character spacing Page width Line print mode pagination Form-feed Non-destructive backspace Line print mode top-of-form Distance between top-of-form and index Conditional advance/retract Retract after cut Cut * Models without cutters are not supported Print after idle time - 129 - 12.
P-touch Template Manual/ Command Reference
Page 142
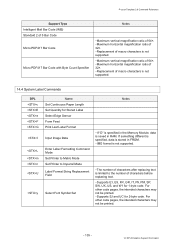
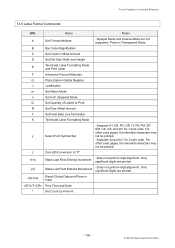
... stored in FROM. ・IMG format is not supported. ・The number of characters after replacing text is limited to Imperial Mode Label Format String Replacement Field Select Font Symbol Set Notes ・If "D" is specified in the Memory Module, data is not supported. 14.4 System Label Commands DPL c E e F G I L m n U y Name Set Continuous Paper Length Set Quantity for 2-byte code. For other code pages, the intended characters may not be printed. - 135 - 14.
... stored in FROM. ・IMG format is not supported. ・The number of characters after replacing text is limited to Imperial Mode Label Format String Replacement Field Select Font Symbol Set Notes ・If "D" is specified in the Memory Module, data is not supported. 14.4 System Label Commands DPL c E e F G I L m n U y Name Set Continuous Paper Length Set Quantity for 2-byte code. For other code pages, the intended characters may not be printed. - 135 - 14.
P-touch Template Manual/ Command Reference
Page 143
... characters may not be printed. z Zero (Ø) Conversion to Print R Set Row Offset Amount T Set Field Data Line Terminator X Terminate Label Formatting Mode y Select Font Symbol Set ・Supports E1, E9, FR, GR, IT, P9, PM, SP, SW, UK, US, and W1 for 2-byte code. Only significant digits are not supported. For other code pages, the intended characters may not be printed. ・Supports SJ and UC for 1-byte code. P-touch...
... characters may not be printed. z Zero (Ø) Conversion to Print R Set Row Offset Amount T Set Field Data Line Terminator X Terminate Label Formatting Mode y Select Font Symbol Set ・Supports E1, E9, FR, GR, IT, P9, PM, SP, SW, UK, US, and W1 for 2-byte code. Only significant digits are not supported. For other code pages, the intended characters may not be printed. ・Supports SJ and UC for 1-byte code. P-touch...


