

Software Users Manual - English
Page 1
.... 1 Introduction Customizing Labels Creating Labels TD-series Software User's Guide Ver.0 US ENG The contents of this guide and the specifications of the TD-4000/4100N software become available, this manual may find that the software and the contents in this guide are subject to the publications. Brother reserves the right to make changes...
.... 1 Introduction Customizing Labels Creating Labels TD-series Software User's Guide Ver.0 US ENG The contents of this guide and the specifications of the TD-4000/4100N software become available, this manual may find that the software and the contents in this guide are subject to the publications. Brother reserves the right to make changes...
Software Users Manual - English
Page 2
...) to the user 37 5. Saving the label template as a Transfer Package file (.pdz 35 4. Distributing the Transfer Package file (.pdz) and P-touch Transfer Express to TD-4000/4100N 38 Printing the list of label templates 40 2 Creating Labels Introduction Customizing Labels Contents Contents 2 Introduction 3 Trademarks ...3 About this Guide ...3 Manual Structure ...3 Symbols used...
...) to the user 37 5. Saving the label template as a Transfer Package file (.pdz 35 4. Distributing the Transfer Package file (.pdz) and P-touch Transfer Express to TD-4000/4100N 38 Printing the list of label templates 40 2 Creating Labels Introduction Customizing Labels Contents Contents 2 Introduction 3 Trademarks ...3 About this Guide ...3 Manual Structure ...3 Symbols used...
Software Users Manual - English
Page 3
...guide includes information you to read before using the machine, such as "the machine") enables you should read and understand them . Trademarks The Brother logo is included on the computer, you can also view it from the CD-ROM. Manual Structure The following guides are trademarks or registered... trademarks of Brother Industries, Ltd. This guide can be viewed from the Setup application when it is run from the Start menu. Make sure to ...
...guide includes information you to read before using the machine, such as "the machine") enables you should read and understand them . Trademarks The Brother logo is included on the computer, you can also view it from the CD-ROM. Manual Structure The following guides are trademarks or registered... trademarks of Brother Industries, Ltd. This guide can be viewed from the Setup application when it is run from the Start menu. Make sure to ...
Software Users Manual - English
Page 4
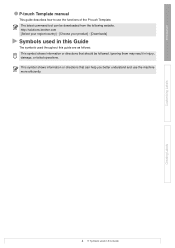
... the following website. Ignoring them may result in this guide are as follows: This symbol shows information or directions that can be followed. http://solutions.brother.com [Select your region/country] - [Choose your product] - [Downloads] Symbols used in this Guide The symbols used in injury, damage, or failed operations. The latest...
... the following website. Ignoring them may result in this guide are as follows: This symbol shows information or directions that can be followed. http://solutions.brother.com [Select your region/country] - [Choose your product] - [Downloads] Symbols used in this Guide The symbols used in injury, damage, or failed operations. The latest...
Software Users Manual - English
Page 5
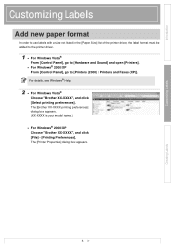
...", and click [File] - [Printing Preferences]. The [Printer Properties] dialog box appears. 5 Creating Labels For details, see Windows® Help. 2 • For Windows Vista® Choose "Brother XX-XXXX", and click [Select printing preferences]. Introduction Customizing Labels Customizing Labels Add new paper format In order to use labels with a size not listed...
...", and click [File] - [Printing Preferences]. The [Printer Properties] dialog box appears. 5 Creating Labels For details, see Windows® Help. 2 • For Windows Vista® Choose "Brother XX-XXXX", and click [Select printing preferences]. Introduction Customizing Labels Customizing Labels Add new paper format In order to use labels with a size not listed...
Software Users Manual - English
Page 6
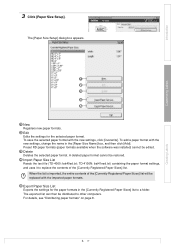
TD-4100N: bst41ned.txt) containing the paper format settings, and uses it to other computers. The [Paper Size Setup] dialog box appears. 1 2 3 4 5 1 New Registers new paper ... 8. 6 Creating Labels Preset RD paper formats (paper formats available when the software was installed) cannot be restored. 4 Import Paper Size List Reads the text file (TD-4000: bst40ed.txt; The exported list can then be replaced with the imported paper formats. 5 Export Paper Size List Exports the settings for the selected paper...
TD-4100N: bst41ned.txt) containing the paper format settings, and uses it to other computers. The [Paper Size Setup] dialog box appears. 1 2 3 4 5 1 New Registers new paper ... 8. 6 Creating Labels Preset RD paper formats (paper formats available when the software was installed) cannot be restored. 4 Import Paper Size List Reads the text file (TD-4000: bst40ed.txt; The exported list can then be replaced with the imported paper formats. 5 Export Paper Size List Exports the settings for the selected paper...

Software Users Manual - English
Page 7
Click [Advanced Printing Adjustments] to appear in the [Paper Size] list. 7 Creating Labels For details on the [Continuous length tape] setting, see "Setting the Printer Driver" on page 16. 5 Enter the settings for each paper size. If the application is displayed again, the added paper format will appear in order for the new paper format to specify the following settings for the paper to be used , select [Continuous length tape] check box. Under [Printing Reference Point Adjustment], the printing position can be adjusted. Introduction Customizing Labels 4 Click [New]. When ...
Click [Advanced Printing Adjustments] to appear in the [Paper Size] list. 7 Creating Labels For details on the [Continuous length tape] setting, see "Setting the Printer Driver" on page 16. 5 Enter the settings for each paper size. If the application is displayed again, the added paper format will appear in order for the new paper format to specify the following settings for the paper to be used , select [Continuous length tape] check box. Under [Printing Reference Point Adjustment], the printing position can be adjusted. Introduction Customizing Labels 4 Click [New]. When ...

Software Users Manual - English
Page 8
...'s computer. 4 Overwrite the contents of the sender's computer. 3 Copy the folder at [CD drive]:\your language\Drivers\TD-XXXX to other computers. TD-4000: BST40ed.txt, BST40ed.ptd, pdt3135.bin TD-4100N: BST41Ned.txt, BST41Ned.ptd, pdt3235.bin 2 Insert the CD-ROM into the CD-ROM drive of the folders ...at TD-XXXX\x64\custom and TD-XXXX\x86\custom (copied in step 3) with the three files created in step 1. 5 Save folder "TD-XXXX"...
...'s computer. 4 Overwrite the contents of the sender's computer. 3 Copy the folder at [CD drive]:\your language\Drivers\TD-XXXX to other computers. TD-4000: BST40ed.txt, BST40ed.ptd, pdt3135.bin TD-4100N: BST41Ned.txt, BST41Ned.ptd, pdt3235.bin 2 Insert the CD-ROM into the CD-ROM drive of the folders ...at TD-XXXX\x64\custom and TD-XXXX\x86\custom (copied in step 3) with the three files created in step 1. 5 Save folder "TD-XXXX"...

Software Users Manual - English
Page 9
Label examples Customizing Labels Creating Labels 2 Prepare the appropriate RD Roll for the label you want to show what is possible. For details on step-by-step instructions, see Help files. Choose the appropriate RD Roll for creating labels using the machine. Install the RD Roll. ÎUser's Guide 9 From label creation to create. Here are some label design examples to create. From label creation to printing 1 Decide the type of label you want to printing Introduction Creating Labels Label creation overview This section describes the general procedure for the type...
Label examples Customizing Labels Creating Labels 2 Prepare the appropriate RD Roll for the label you want to show what is possible. For details on step-by-step instructions, see Help files. Choose the appropriate RD Roll for creating labels using the machine. Install the RD Roll. ÎUser's Guide 9 From label creation to create. Here are some label design examples to create. From label creation to printing 1 Decide the type of label you want to printing Introduction Creating Labels Label creation overview This section describes the general procedure for the type...
Software Users Manual - English
Page 10
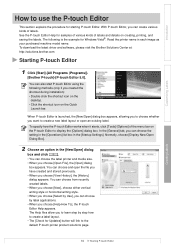
... Use], you can create various kinds of labels. To download the latest driver and software, please visit the Brother Solutions Center at: http://solutions.brother.com Starting P-touch Editor 1 Click [Start]-[All Programs (Programs)]- [Brother P-touch]-[P-touch Editor 5.0]. Creating Labels 10 Starting P-touch Editor See the P-touch Editor Help for samples of various...
... Use], you can create various kinds of labels. To download the latest driver and software, please visit the Brother Solutions Center at: http://solutions.brother.com Starting P-touch Editor 1 Click [Start]-[All Programs (Programs)]- [Brother P-touch]-[P-touch Editor 5.0]. Creating Labels 10 Starting P-touch Editor See the P-touch Editor Help for samples of various...
Software Users Manual - English
Page 11
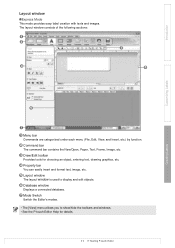
The layout window consists of the following sections: 1 2 3 4 5 Customizing Labels Creating Labels 6 7 1 Menu bar Commands are categorized under each menu (File, Edit, View, and Insert, etc.) by function. 2 Command bar The command bar contains the New/Open, Paper, Text, Frame, Image, etc. 3 Draw/Edit toolbar Provides tools for choosing an object, entering text, drawing graphics, etc. 4 Property bar You can easily insert and format text, image, etc. 5 Layout window The layout window is used to display and edit objects. 6 Database window Displays a connected database. 7 Mode Switch Switch...
The layout window consists of the following sections: 1 2 3 4 5 Customizing Labels Creating Labels 6 7 1 Menu bar Commands are categorized under each menu (File, Edit, View, and Insert, etc.) by function. 2 Command bar The command bar contains the New/Open, Paper, Text, Frame, Image, etc. 3 Draw/Edit toolbar Provides tools for choosing an object, entering text, drawing graphics, etc. 4 Property bar You can easily insert and format text, image, etc. 5 Layout window The layout window is used to display and edit objects. 6 Database window Displays a connected database. 7 Mode Switch Switch...
Software Users Manual - English
Page 12
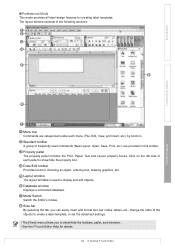
Click on the left side of each pallet to show/hide the property box. 4 Draw/Edit toolbar Provides tools for choosing an object, entering text, drawing graphics, etc. 5 Layout window The layout window is used commands (New Layout, Open, Save, Print, etc.) are categorized under each menu (File, Edit, View, and Insert, etc.) by function. 2 Standard toolbar A group of frequently used to show/hide the toolbars, pallet, and windows. • See the P-touch Editor Help for creating label templates. Introduction „Professional Mode This mode provides all label design features for ...
Click on the left side of each pallet to show/hide the property box. 4 Draw/Edit toolbar Provides tools for choosing an object, entering text, drawing graphics, etc. 5 Layout window The layout window is used commands (New Layout, Open, Save, Print, etc.) are categorized under each menu (File, Edit, View, and Insert, etc.) by function. 2 Standard toolbar A group of frequently used to show/hide the toolbars, pallet, and windows. • See the P-touch Editor Help for creating label templates. Introduction „Professional Mode This mode provides all label design features for ...
Software Users Manual - English
Page 13
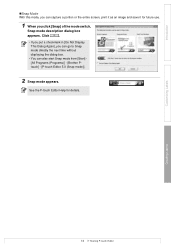
... go to Snap mode directly the next time without displaying the dialog box. • You can also start Snap mode from [Start] [All Programs (Programs)] - [Brother Ptouch] - [P-touch Editor 5.0 (Snap mode)]. 2 Snap mode appears. Introduction „Snap Mode With this mode, you can capture a portion or the entire screen, print it...
... go to Snap mode directly the next time without displaying the dialog box. • You can also start Snap mode from [Start] [All Programs (Programs)] - [Brother Ptouch] - [P-touch Editor 5.0 (Snap mode)]. 2 Snap mode appears. Introduction „Snap Mode With this mode, you can capture a portion or the entire screen, print it...
Software Users Manual - English
Page 14
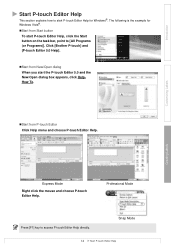
Snap Mode 14 Start P-touch Editor Help The following is the example for Windows®. Click [Brother P-touch] and [P-touch Editor 5.0 Help]. „Start from New/Open dialog When you start the P-touch Editor 5.0 and the New/Open dialog box appears, click ...
Snap Mode 14 Start P-touch Editor Help The following is the example for Windows®. Click [Brother P-touch] and [P-touch Editor 5.0 Help]. „Start from New/Open dialog When you start the P-touch Editor 5.0 and the New/Open dialog box appears, click ...
Software Users Manual - English
Page 15
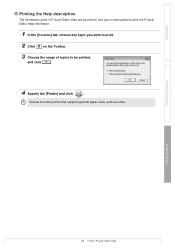
Customizing Labels Creating Labels 15 Start P-touch Editor Help Choose a normal printer that supports general paper sizes, such as Letter. Use your normal printer to print the P-touch Editor Help information. 1 In the [Contents] tab, choose any topic you want to print. 2 Click on the Toolbar. 3 Choose the range of topics to be printed. Introduction Printing the Help description The information given in P-touch Editor Help can be printed, and click . 4 Specify the [Printer] and click .
Customizing Labels Creating Labels 15 Start P-touch Editor Help Choose a normal printer that supports general paper sizes, such as Letter. Use your normal printer to print the P-touch Editor Help information. 1 In the [Contents] tab, choose any topic you want to print. 2 Click on the Toolbar. 3 Choose the range of topics to be printed. Introduction Printing the Help description The information given in P-touch Editor Help can be printed, and click . 4 Specify the [Printer] and click .
Software Users Manual - English
Page 16
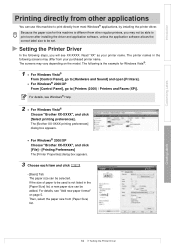
...-XXXX printing preferences] dialog box appears. • For Windows® 2000/XP Choose "Brother XX-XXXX", and click [File] - [Printing Preferences] The [Printer Properties] dialog box appears. 3 Choose each item and click . • [Basic] Tab The paper size ... a new paper size can be added. Creating Labels 16 Setting the Printer Driver For details, see Windows® Help. 2 • For Windows Vista® Choose "Brother XX-XXXX", and click [Select printing preferences]. Because the paper size for Windows Vista®. 1 • For Windows Vista® From [Control Panel], go to...
...-XXXX printing preferences] dialog box appears. • For Windows® 2000/XP Choose "Brother XX-XXXX", and click [File] - [Printing Preferences] The [Printer Properties] dialog box appears. 3 Choose each item and click . • [Basic] Tab The paper size ... a new paper size can be added. Creating Labels 16 Setting the Printer Driver For details, see Windows® Help. 2 • For Windows Vista® Choose "Brother XX-XXXX", and click [Select printing preferences]. Because the paper size for Windows Vista®. 1 • For Windows Vista® From [Control Panel], go to...
Software Users Manual - English
Page 17
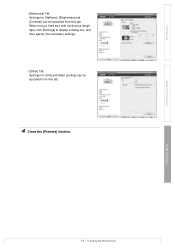
Introduction • [Advanced] Tab Settings for [Unit] and [Start printing] can be specified from this tab. 4 Close the [Printers] window. Customizing Labels Creating Labels 17 Setting the Printer Driver When using a fixed size with continuous length tape, click [Settings] to display a dialog box, and then specify the necessary settings. • [Other] Tab Settings for [Halftone], [Brightness] and [Contrast] can be specified from this tab.
Introduction • [Advanced] Tab Settings for [Unit] and [Start printing] can be specified from this tab. 4 Close the [Printers] window. Customizing Labels Creating Labels 17 Setting the Printer Driver When using a fixed size with continuous length tape, click [Settings] to display a dialog box, and then specify the necessary settings. • [Other] Tab Settings for [Halftone], [Brightness] and [Contrast] can be specified from this tab.

Software Users Manual - English
Page 18
... may differ from other applications We will see XX-XXXX. Then click Setup. The [Page Setup] dialog box appears. The [Print] dialog box appears. 2 Choose "Brother XX-XXXX". The specified labels are printed. 18 Printing from your printer name. to the right of the Microsoft® Word window is adjusted to...
... may differ from other applications We will see XX-XXXX. Then click Setup. The [Page Setup] dialog box appears. The [Print] dialog box appears. 2 Choose "Brother XX-XXXX". The specified labels are printed. 18 Printing from your printer name. to the right of the Microsoft® Word window is adjusted to...

Software Users Manual - English
Page 19
...]-[Database]-[Label List]. • The Add-In function supports the following is the example for Windows Vista®. 1 Click [Start]-[All Programs(Programs)]-[Brother P-touch]-[P-touch Tools]-[P-touch Editor 5.0 Add-Ins Utility]. Depending on the setting, the character string that is downloaded by using the Add-In function ... by using the Add-In function When installing the software, if you can create and print labels quickly and easily. The [Brother P-touch Add-In Settings] dialog box appears. For details or installation information, see the Help files for exclusively P-touch Editor.
...]-[Database]-[Label List]. • The Add-In function supports the following is the example for Windows Vista®. 1 Click [Start]-[All Programs(Programs)]-[Brother P-touch]-[P-touch Tools]-[P-touch Editor 5.0 Add-Ins Utility]. Depending on the setting, the character string that is downloaded by using the Add-In function ... by using the Add-In function When installing the software, if you can create and print labels quickly and easily. The [Brother P-touch Add-In Settings] dialog box appears. For details or installation information, see the Help files for exclusively P-touch Editor.
Software Users Manual - English
Page 20
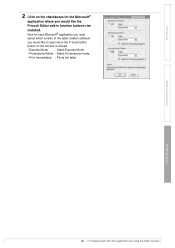
Customizing Labels Creating Labels 20 Creating labels with other applications by using the Add-In function Now for the Microsoft® application where you would like to be installed. Introduction 2 Click on the checkboxes for each Microsoft® application you must select which version of the label creation software you would like the P-touch Editor add-in function button to open when the P-touch Editor button on the tool bar is clicked. • Express Mode : Starts Express Mode. • Professional Mode : Starts Professional mode. • Print Immediately : Prints ...
Customizing Labels Creating Labels 20 Creating labels with other applications by using the Add-In function Now for the Microsoft® application where you would like to be installed. Introduction 2 Click on the checkboxes for each Microsoft® application you must select which version of the label creation software you would like the P-touch Editor add-in function button to open when the P-touch Editor button on the tool bar is clicked. • Express Mode : Starts Express Mode. • Professional Mode : Starts Professional mode. • Print Immediately : Prints ...
