

Software Users Manual - English
Page 1
... different. 1 Introduction Customizing Labels Creating Labels TD-series Software User's Guide Ver.0 US ENG The contents of this guide and the specifications of the TD-4000/4100N software become available, this guide can be responsible for any damages (including consequential) caused by reliance on your OS or printer. Brother reserves the right to the publications.
... different. 1 Introduction Customizing Labels Creating Labels TD-series Software User's Guide Ver.0 US ENG The contents of this guide and the specifications of the TD-4000/4100N software become available, this guide can be responsible for any damages (including consequential) caused by reliance on your OS or printer. Brother reserves the right to the publications.
Software Users Manual - English
Page 2
...Transfer Package file (.pdz 35 4. Transferring the label template to TD-4000/4100N 38 Printing the list of label templates 40 2 Creating Labels Distributing the Transfer Package file (.pdz) and P-touch Transfer Express to the printer via network 29 Backing up label templates 30 Deleting label templates ...use the P-touch Editor 10 Starting P-touch Editor 10 Start P-touch Editor Help 14 Printing directly from other applications 16 Setting the Printer Driver 16 Printing from other applications 18 Creating labels with other applications by using the Add-In function 19 How to use P-...
...Transfer Package file (.pdz 35 4. Transferring the label template to TD-4000/4100N 38 Printing the list of label templates 40 2 Creating Labels Distributing the Transfer Package file (.pdz) and P-touch Transfer Express to the printer via network 29 Backing up label templates 30 Deleting label templates ...use the P-touch Editor 10 Starting P-touch Editor 10 Start P-touch Editor Help 14 Printing directly from other applications 16 Setting the Printer Driver 16 Printing from other applications 18 Creating labels with other applications by using the Add-In function 19 How to use P-...
Software Users Manual - English
Page 3
...also view it from the Start menu. Each company whose software title is a registered trademark of Brother Industries, Ltd. © 2009 Brother Industries, Ltd. Manual Structure The following guides are trademarks or registered trademarks of their respective companies....of the main unit. • Also included is a registered trademark of Brother Industries, Ltd. Introduction Customizing Labels Introduction The Brother label printer (hereafter referred to as general precautions for managing Brother network connected devices. Make sure to a computer. User's Guide •...
...also view it from the Start menu. Each company whose software title is a registered trademark of Brother Industries, Ltd. © 2009 Brother Industries, Ltd. Manual Structure The following guides are trademarks or registered trademarks of their respective companies....of the main unit. • Also included is a registered trademark of Brother Industries, Ltd. Introduction Customizing Labels Introduction The Brother label printer (hereafter referred to as general precautions for managing Brother network connected devices. Make sure to a computer. User's Guide •...
Software Users Manual - English
Page 5
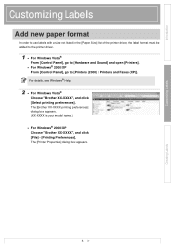
... model name.) • For Windows® 2000/XP Choose "Brother XX-XXXX", and click [File] - [Printing Preferences]. Introduction Customizing Labels Customizing Labels Add new paper format In order to use labels with a size not listed in the [Paper Size] list of the printer driver, the label format must be added to the...
... model name.) • For Windows® 2000/XP Choose "Brother XX-XXXX", and click [File] - [Printing Preferences]. Introduction Customizing Labels Customizing Labels Add new paper format In order to use labels with a size not listed in the [Paper Size] list of the printer driver, the label format must be added to the...

Software Users Manual - English
Page 7
...Click [New]. Under [Energy Rank], the print energy (density) can be adjusted. For details on the [Continuous length tape] setting, see "Setting the Printer Driver" on page 16. 5 Enter the settings for each paper size. Click [Advanced Printing Adjustments] to appear in the [Paper Size] list of the... printer driver. If continuous length label is displayed again, the added paper format will appear in the [Paper Size] list. 7 Creating Labels A new ...
...Click [New]. Under [Energy Rank], the print energy (density) can be adjusted. For details on the [Continuous length tape] setting, see "Setting the Printer Driver" on page 16. 5 Enter the settings for each paper size. Click [Advanced Printing Adjustments] to appear in the [Paper Size] list of the... printer driver. If continuous length label is displayed again, the added paper format will appear in the [Paper Size] list. 7 Creating Labels A new ...

Software Users Manual - English
Page 8
... 3 Copy the folder at [CD drive]:\your language\Drivers\TD-XXXX to be distributed. 1 At the sender's computer, specify the paper format settings, and then click [Export Paper Size List...]. TD-4000: BST40ed.txt, BST40ed.ptd, pdt3135.bin TD-4100N: BST41Ned.txt, BST41Ned.ptd, pdt3235.bin 2 Insert the...the three files created in step 3) with the installer for the printer driver. 1 At the sender's computer, specify the paper format settings, and then click [Export Paper Size List...]. TD-4000: BST40ed.txt, BST40ed.ptd, pdt3135.bin TD-4100N: BST41Ned.txt, BST41Ned.ptd, pdt3235.bin 2 Save bst40ed....
... 3 Copy the folder at [CD drive]:\your language\Drivers\TD-XXXX to be distributed. 1 At the sender's computer, specify the paper format settings, and then click [Export Paper Size List...]. TD-4000: BST40ed.txt, BST40ed.ptd, pdt3135.bin TD-4100N: BST41Ned.txt, BST41Ned.ptd, pdt3235.bin 2 Insert the...the three files created in step 3) with the installer for the printer driver. 1 At the sender's computer, specify the paper format settings, and then click [Export Paper Size List...]. TD-4000: BST40ed.txt, BST40ed.ptd, pdt3135.bin TD-4100N: BST41Ned.txt, BST41Ned.ptd, pdt3235.bin 2 Save bst40ed....
Software Users Manual - English
Page 10
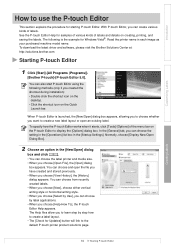
...10 Starting P-touch Editor To download the latest driver and software, please visit the Brother Solutions Center at: http://solutions.brother.com Starting P-touch Editor 1 Click [Start]-[All Programs (Programs)]- [Brother P-touch]-[P-touch Editor 5.0]. To specify how the P-touch Editor works when it ...starts, click [Tools]-[Options] of labels. You can choose the label printer and media size. • When you created the shortcut during...
...10 Starting P-touch Editor To download the latest driver and software, please visit the Brother Solutions Center at: http://solutions.brother.com Starting P-touch Editor 1 Click [Start]-[All Programs (Programs)]- [Brother P-touch]-[P-touch Editor 5.0]. To specify how the P-touch Editor works when it ...starts, click [Tools]-[Options] of labels. You can choose the label printer and media size. • When you created the shortcut during...
Software Users Manual - English
Page 15
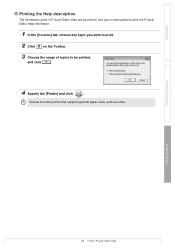
Customizing Labels Creating Labels 15 Start P-touch Editor Help Use your normal printer to print the P-touch Editor Help information. 1 In the [Contents] tab, choose any topic you want to print. 2 Click on the Toolbar. 3 Choose the range of topics to be printed. Choose a normal printer that supports general paper sizes, such as Letter. Introduction Printing the Help description The information given in P-touch Editor Help can be printed, and click . 4 Specify the [Printer] and click .
Customizing Labels Creating Labels 15 Start P-touch Editor Help Use your normal printer to print the P-touch Editor Help information. 1 In the [Contents] tab, choose any topic you want to print. 2 Click on the Toolbar. 3 Choose the range of topics to be printed. Choose a normal printer that supports general paper sizes, such as Letter. Introduction Printing the Help description The information given in P-touch Editor Help can be printed, and click . 4 Specify the [Printer] and click .
Software Users Manual - English
Page 16
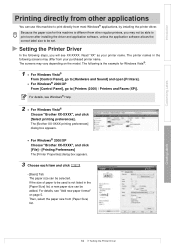
...-XXXX printing preferences] dialog box appears. • For Windows® 2000/XP Choose "Brother XX-XXXX", and click [File] - [Printing Preferences] The [Printer Properties] dialog box appears. 3 Choose each item and click . • [Basic] Tab The paper size can be set. The screens ...In the following steps, you may differ from (Paper Size) list. Creating Labels 16 Setting the Printer Driver For details, see Windows® Help. 2 • For Windows Vista® Choose "Brother XX-XXXX", and click [Select printing preferences]. If the size of paper to be selected. The...
...-XXXX printing preferences] dialog box appears. • For Windows® 2000/XP Choose "Brother XX-XXXX", and click [File] - [Printing Preferences] The [Printer Properties] dialog box appears. 3 Choose each item and click . • [Basic] Tab The paper size can be set. The screens ...In the following steps, you may differ from (Paper Size) list. Creating Labels 16 Setting the Printer Driver For details, see Windows® Help. 2 • For Windows Vista® Choose "Brother XX-XXXX", and click [Select printing preferences]. If the size of paper to be selected. The...
Software Users Manual - English
Page 17
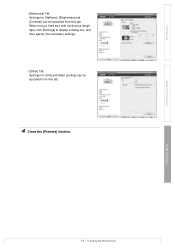
Customizing Labels Creating Labels 17 Setting the Printer Driver When using a fixed size with continuous length tape, click [Settings] to display a dialog box, and then specify the necessary settings. • [Other] Tab Settings for [Halftone], [Brightness] and [Contrast] can be specified from this tab. Introduction • [Advanced] Tab Settings for [Unit] and [Start printing] can be specified from this tab. 4 Close the [Printers] window.
Customizing Labels Creating Labels 17 Setting the Printer Driver When using a fixed size with continuous length tape, click [Settings] to display a dialog box, and then specify the necessary settings. • [Other] Tab Settings for [Halftone], [Brightness] and [Contrast] can be specified from this tab. Introduction • [Advanced] Tab Settings for [Unit] and [Start printing] can be specified from this tab. 4 Close the [Printers] window.

Software Users Manual - English
Page 18
...paper size that you will use Microsoft® Word 2007 as your purchased printer name. The size of the Microsoft® Word window is adjusted to print. The [Print] dialog box appears. 2 Choose "Brother XX-XXXX". Set page margins in the following steps, you have just ...chosen. Read "XX" as an example. The specified labels are printed. 18 Printing from your printer name. The printer names in the [Margins] tab as needed. 7 Click...
...paper size that you will use Microsoft® Word 2007 as your purchased printer name. The size of the Microsoft® Word window is adjusted to print. The [Print] dialog box appears. 2 Choose "Brother XX-XXXX". Set page margins in the following steps, you have just ...chosen. Read "XX" as an example. The specified labels are printed. 18 Printing from your printer name. The printer names in the [Margins] tab as needed. 7 Click...
Software Users Manual - English
Page 26
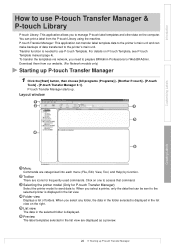
... is displayed in the list view are icons for P-touch Transfer Manager) Select the printer model to send data to. P-touch Transfer Manager starts up P-touch Transfer Manager 1 Click the [Start] button, then choose [All programs (Programs)] - [Brother P-touch] - [P-touch Tools] - [P-touch Transfer Manager 2.1]. Layout window 1 2 3 5 4 6 Creating Labels 1 Menu Commands are categorized...
... is displayed in the list view are icons for P-touch Transfer Manager) Select the printer model to send data to. P-touch Transfer Manager starts up P-touch Transfer Manager 1 Click the [Start] button, then choose [All programs (Programs)] - [Brother P-touch] - [P-touch Tools] - [P-touch Transfer Manager 2.1]. Layout window 1 2 3 5 4 6 Creating Labels 1 Menu Commands are categorized...
Software Users Manual - English
Page 27
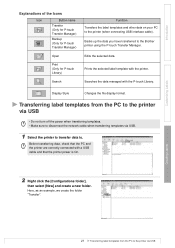
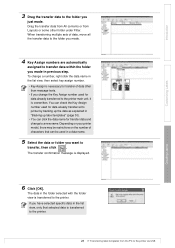
Edits the selected data. Display Style Changes the file display format. Before transferring data, check that the printer power is On. 2 Right click the [Configurations folder], then select [New] and create a new folder. Here, as an example, we create the ...Search Function Transfers the label templates and other data on your PC to the printer via USB. 1 Select the printer to transfer data to the Brother printer using the P-touch Transfer Manager. Transferring label templates from the PC to the printer (when connecting USB interface cable). Backs up the data you have transferred to...
Edits the selected data. Display Style Changes the file display format. Before transferring data, check that the printer power is On. 2 Right click the [Configurations folder], then select [New] and create a new folder. Here, as an example, we create the ...Search Function Transfers the label templates and other data on your PC to the printer via USB. 1 Select the printer to transfer data to the Brother printer using the P-touch Transfer Manager. Transferring label templates from the PC to the printer (when connecting USB interface cable). Backs up the data you have transferred to...
Software Users Manual - English
Page 28
... may be used for transfer data and change the Key Assign number used in the folder selected with the folder view is transferred to the printer. 28 Transferring label templates from Layouts or some other than message texts. • If you want to transfer, then click . Creating Labels 6 Click [OK]. The... transfer data within the folder you just made in the list view, only that can click the data name for data already transferred to the printer main unit, it is displayed. Introduction Customizing Labels 3 Drag the transfer data to the folder you made .
... may be used for transfer data and change the Key Assign number used in the folder selected with the folder view is transferred to the printer. 28 Transferring label templates from Layouts or some other than message texts. • If you want to transfer, then click . Creating Labels 6 Click [OK]. The... transfer data within the folder you just made in the list view, only that can click the data name for data already transferred to the printer main unit, it is displayed. Introduction Customizing Labels 3 Drag the transfer data to the folder you made .
Software Users Manual - English
Page 29
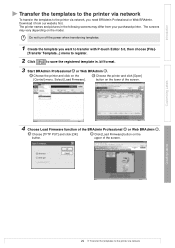
... and pictures in .blf format. 3 Start BRAdmin Professional A or Web BRAdmin B . B Choose the printer and click [Open] button on the button. A Choose [TFTP PUT] and click [OK] B Click [Load Firmware] button on the lower of the screen. 4...Professional A or Web BRAdmin B . Select [Load Firmware]. The screens may differ from our website first. Introduction Transfer the templates to the printer via network To transfer the templates to the printer via network, you want to transfer with P-touch Editor 5.0, then choose [File]- [Transfer Template...] menu to register. 2 Click to ...
... and pictures in .blf format. 3 Start BRAdmin Professional A or Web BRAdmin B . B Choose the printer and click [Open] button on the button. A Choose [TFTP PUT] and click [OK] B Click [Load Firmware] button on the lower of the screen. 4...Professional A or Web BRAdmin B . Select [Load Firmware]. The screens may differ from our website first. Introduction Transfer the templates to the printer via network To transfer the templates to the printer via network, you want to transfer with P-touch Editor 5.0, then choose [File]- [Transfer Template...] menu to register. 2 Click to ...
Software Users Manual - English
Page 30
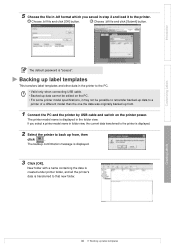
... the PC. • Valid only when connecting USB cable. • Backed up data cannot be possible to retransfer backed-up data to a printer of a different model than the one the data was originally backed up from , then click . The default password is "access". Backing up ... label templates If you saved in folder view, the current data transferred to the printer is displayed. 2 Select the printer to back up from . 1 Connect the PC and the printer by USB cable and switch on the printer power. Introduction Customizing Labels 5 Choose the file in .blf format which you select...
... the PC. • Valid only when connecting USB cable. • Backed up data cannot be possible to retransfer backed-up data to a printer of a different model than the one the data was originally backed up from , then click . The default password is "access". Backing up ... label templates If you saved in folder view, the current data transferred to the printer is displayed. 2 Select the printer to back up from . 1 Connect the PC and the printer by USB cable and switch on the printer power. Introduction Customizing Labels 5 Choose the file in .blf format which you select...
Software Users Manual - English
Page 31
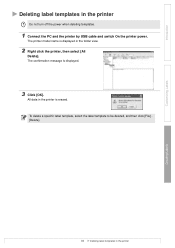
All data in the printer is displayed in the folder view. 2 Right click the printer, then select [All Delete]. To delete a specific label template, select the label template to be deleted, and then click [File] [Delete]. The printer model name is erased. The confirmation message is displayed. 3 Click [OK]. Introduction Deleting label templates in the printer Customizing Labels Creating Labels 31 Deleting label templates in the printer Do not turn off the power when deleting templates. 1 Connect the PC and the printer by USB cable and switch On the printer power.
All data in the printer is displayed in the folder view. 2 Right click the printer, then select [All Delete]. To delete a specific label template, select the label template to be deleted, and then click [File] [Delete]. The printer model name is erased. The confirmation message is displayed. 3 Click [OK]. Introduction Deleting label templates in the printer Customizing Labels Creating Labels 31 Deleting label templates in the printer Do not turn off the power when deleting templates. 1 Connect the PC and the printer by USB cable and switch On the printer power.

Software Users Manual - English
Page 32
The application associated with the data is printed by the connected printer. For example, for a P-touch template, P-touch Editor starts up P-touch Library Printing labels 1 Choose the label templates you want to print, then click . The label ... data 1 Choose the data you can start up the P-touch Library and edit and print labels. 1 Click the [Start] button, then choose [All programs (Programs)] - [Brother P-touch] - [P-touch Tools] - [P-touch Library 2.1]. Introduction Starting up P-touch Library You can edit the data.
The application associated with the data is printed by the connected printer. For example, for a P-touch template, P-touch Editor starts up P-touch Library Printing labels 1 Choose the label templates you want to print, then click . The label ... data 1 Choose the data you can start up the P-touch Library and edit and print labels. 1 Click the [Start] button, then choose [All programs (Programs)] - [Brother P-touch] - [P-touch Tools] - [P-touch Library 2.1]. Introduction Starting up P-touch Library You can edit the data.
Users Manual - English and Spanish
Page 2
... different from the online user registration window of Conformity (For USA Only) Responsible Party: Brother International Corporation 100 Somerset Corporate Boulevard Bridgewater, NJ 08807-0911 USA TEL: (908) 704-1700 Products Description: Product Name: Model Number: Label Printer TD-4000/TD-4100N TD-4000/TD-4100 This device complies with us by visiting us at: Online User Registration http...
... different from the online user registration window of Conformity (For USA Only) Responsible Party: Brother International Corporation 100 Somerset Corporate Boulevard Bridgewater, NJ 08807-0911 USA TEL: (908) 704-1700 Products Description: Product Name: Model Number: Label Printer TD-4000/TD-4100N TD-4000/TD-4100 This device complies with us by visiting us at: Online User Registration http...
Users Manual - English and Spanish
Page 6
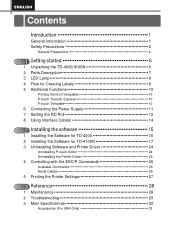
Contents Introduction 1 General Information 1 Safety Precautions 2 General Precautions 4 1 STEP Getting started 6 1 Unpacking the TD-4000/4100N 6 2 Parts Description 7 3 LED Lamp 8 4 Flow for Creating Labels 9 5 Additional Functions 10 Printing the list of ...Interface Cables 14 2 STEP Installing the software 15 1 Installing the Software for TD-4000 15 2 Installing the Software for TD-4100N 17 3 Uninstalling Software and Printer Driver 24 Uninstalling P-touch Editor 24 Uninstalling the Printer Driver 24 4 Controlling with the ESC/P Commands 26 Available Commands 26 Serial...
Contents Introduction 1 General Information 1 Safety Precautions 2 General Precautions 4 1 STEP Getting started 6 1 Unpacking the TD-4000/4100N 6 2 Parts Description 7 3 LED Lamp 8 4 Flow for Creating Labels 9 5 Additional Functions 10 Printing the list of ...Interface Cables 14 2 STEP Installing the software 15 1 Installing the Software for TD-4000 15 2 Installing the Software for TD-4100N 17 3 Uninstalling Software and Printer Driver 24 Uninstalling P-touch Editor 24 Uninstalling the Printer Driver 24 4 Controlling with the ESC/P Commands 26 Available Commands 26 Serial...


