Users Guide
Page 3
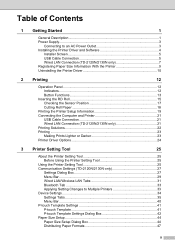
... 1 General Description 1 Power Supply...3 Connecting to an AC Power Outlet 3 Installing the Printer Driver and Software 4 Installer Screen 5 USB Cable Connection 5 Wired LAN Connection (TD-2120N/2130N only 7 Registering Paper Size Information With the Printer 9 Uninstalling the Printer Driver 10 2 Printing 12 Operation Panel 12 Indicators ...12 Button Functions 13 Inserting the RD Roll 15 Checking the Sensor Position 17 Cutting Roll Paper 18 Printing the Printer Setup Information 19 Connecting the Computer and Printer 21 USB Cable Connection 21...
... 1 General Description 1 Power Supply...3 Connecting to an AC Power Outlet 3 Installing the Printer Driver and Software 4 Installer Screen 5 USB Cable Connection 5 Wired LAN Connection (TD-2120N/2130N only 7 Registering Paper Size Information With the Printer 9 Uninstalling the Printer Driver 10 2 Printing 12 Operation Panel 12 Indicators ...12 Button Functions 13 Inserting the RD Roll 15 Checking the Sensor Position 17 Cutting Roll Paper 18 Printing the Printer Setup Information 19 Connecting the Computer and Printer 21 USB Cable Connection 21...
Users Guide
Page 5
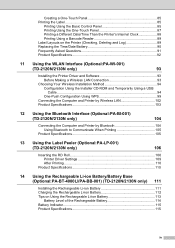
... the Printer's Internal Clock 88 Printing Using a Barcode Reader 89 Label Layouts on the Printer (Checking, Deleting and Log 89 Replacing the Time/Date Battery 90 Frequently Asked Questions 91 Product Specifications 92 11 Using the WLAN Interface (Optional:PA-WI-001) (TD-2120N/2130N only) 93 Installing the Printer Driver and Software 93 Before Making a Wireless LAN Connection 93 Choosing Your Wireless Installation Method 94 Configuration Using the Installer CD-ROM and Temporarily Using a USB Cable...
... the Printer's Internal Clock 88 Printing Using a Barcode Reader 89 Label Layouts on the Printer (Checking, Deleting and Log 89 Replacing the Time/Date Battery 90 Frequently Asked Questions 91 Product Specifications 92 11 Using the WLAN Interface (Optional:PA-WI-001) (TD-2120N/2130N only) 93 Installing the Printer Driver and Software 93 Before Making a Wireless LAN Connection 93 Choosing Your Wireless Installation Method 94 Configuration Using the Installer CD-ROM and Temporarily Using a USB Cable...

Users Guide
Page 11
... support website (Brother Solutions Center). Getting Started Installer Screen 1 1 2 3 4 5 1 Standard Installation Installs P-touch Editor 5.0, the printer driver, P-touch Update Software, Printer Setting Tool, the User's Guide, the Software User's Guide and the Network User's Guide (TD-2120N/2130N only). 2 User's Guides Displays or installs the User's Guide, the Software User's Guide and the Network User's Guide (TD-2120N/2130N only). 3 Custom Installation Allows P-touch Editor 5.0, the printer driver, P-touch Update Software and Printer Setting Tool to the terms and conditions. USB Cable...
... support website (Brother Solutions Center). Getting Started Installer Screen 1 1 2 3 4 5 1 Standard Installation Installs P-touch Editor 5.0, the printer driver, P-touch Update Software, Printer Setting Tool, the User's Guide, the Software User's Guide and the Network User's Guide (TD-2120N/2130N only). 2 User's Guides Displays or installs the User's Guide, the Software User's Guide and the Network User's Guide (TD-2120N/2130N only). 3 Custom Installation Allows P-touch Editor 5.0, the printer driver, P-touch Update Software and Printer Setting Tool to the terms and conditions. USB Cable...
Users Guide
Page 19
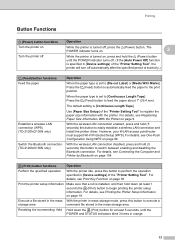
... (Feed) button to automatically feed the paper to the print position. Resetting the incrementing field Hold down (at least 5 seconds, until the POWER indicator turns off. (If the [Auto Power Off] function is [Continuous Length Tape]. Printing Button Functions 2 (Power) button functions Turn the printer on Turn the printer off Operation While the printer is turned off automatically after the specified period of the "Printer Setting Tool" to register the paper size information with the printer. For details, see Printing the Printer Setup...
... (Feed) button to automatically feed the paper to the print position. Resetting the incrementing field Hold down (at least 5 seconds, until the POWER indicator turns off. (If the [Auto Power Off] function is [Continuous Length Tape]. Printing Button Functions 2 (Power) button functions Turn the printer on Turn the printer off Operation While the printer is turned off automatically after the specified period of the "Printer Setting Tool" to register the paper size information with the printer. For details, see Printing the Printer Setup...
Users Guide
Page 43
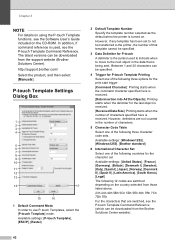
... last number printed. Available settings: [Cont From Last], [From Starting#] 5 Save Printer Print Log Select whether nor not to save the printer's print log. Available settings: -2-+2 3 Media Sensor (Reflective/Bar) The following transmissive/gap sensor parameters can be adjusted. [Detection Sensitivity] Adjust the precision of the sensor that detects the gaps (spacing) for [Printer]. http://support.brother.com/ Sensor Adjustment Tab 3 If RD Rolls are added around barcodes. Printer Setting Tool 4 Serialize Mode Select...
... last number printed. Available settings: [Cont From Last], [From Starting#] 5 Save Printer Print Log Select whether nor not to save the printer's print log. Available settings: -2-+2 3 Media Sensor (Reflective/Bar) The following transmissive/gap sensor parameters can be adjusted. [Detection Sensitivity] Adjust the precision of the sensor that detects the gaps (spacing) for [Printer]. http://support.brother.com/ Sensor Adjustment Tab 3 If RD Rolls are added around barcodes. Printer Setting Tool 4 Serialize Mode Select...
Users Guide
Page 48
... symbol used , see the Software User's Guide included on the CD-ROM. http://support.brother.com/ Select the product, and then select [Manuals]. Between 1 and 20 characters can be downloaded from the support website (Brother Solutions Center). The latest versions can be specified. 3 Data Delimiter for P-touch A delimiter is being sent. Available settings: [Windows1252], [Windows1250], [Brother standard] 6 International Character Set Select one of the following three options for the print start trigger. [Command Character]: Printing...
... symbol used , see the Software User's Guide included on the CD-ROM. http://support.brother.com/ Select the product, and then select [Manuals]. Between 1 and 20 characters can be downloaded from the support website (Brother Solutions Center). The latest versions can be specified. 3 Data Delimiter for P-touch A delimiter is being sent. Available settings: [Windows1252], [Windows1250], [Brother standard] 6 International Character Set Select one of the following three options for the print start trigger. [Command Character]: Printing...
Users Guide
Page 61
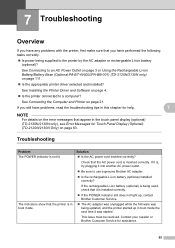
.... Is power being supplied to a computer? See Installing the Printer Driver and Software on page 111. Is the appropriate printer driver selected and installed? Troubleshooting 7 Problem The POWER indicator is inserted correctly. If you have problems, read the troubleshooting tips in the touch panel display (optional) (TD-2120N/2130N only), see Error Messages for assistance. 55 Solution Is the AC power cord inserted correctly? Check that appear in this chapter for help. 7 NOTE...
.... Is power being supplied to a computer? See Installing the Printer Driver and Software on page 111. Is the appropriate printer driver selected and installed? Troubleshooting 7 Problem The POWER indicator is inserted correctly. If you have problems, read the troubleshooting tips in the touch panel display (optional) (TD-2120N/2130N only), see Error Messages for assistance. 55 Solution Is the AC power cord inserted correctly? Check that appear in this chapter for help. 7 NOTE...

Users Guide
Page 95
... touch panel display. Using the Touch Panel Display (Optional:PA-TDU-001) (TD-2120N/2130N only) NOTE • If settings have been specified to add/subtract a period of time to the date/time in a template, the specified time period will be saved on the printer. To check the label layouts on the printer and 10 select the data to be used to check the print log. http://support.brother.com/ Printing Using a Barcode...
... touch panel display. Using the Touch Panel Display (Optional:PA-TDU-001) (TD-2120N/2130N only) NOTE • If settings have been specified to add/subtract a period of time to the date/time in a template, the specified time period will be saved on the printer. To check the label layouts on the printer and 10 select the data to be used to check the print log. http://support.brother.com/ Printing Using a Barcode...

Users Guide
Page 101
...-WI-001) (TD-2120N/2130N only) For configuring wireless LAN settings, a USB cable must know the SSID and network key of your network policy (or its device settings. c Click [Standard Installation]. NOTE • For Windows® XP/Windows Vista®/Windows® 7: If the installer screen does not automatically appear, display the contents of your language. Make a note of the CD-ROM drive folder, and then double-click [start...
...-WI-001) (TD-2120N/2130N only) For configuring wireless LAN settings, a USB cable must know the SSID and network key of your network policy (or its device settings. c Click [Standard Installation]. NOTE • For Windows® XP/Windows Vista®/Windows® 7: If the installer screen does not automatically appear, display the contents of your language. Make a note of the CD-ROM drive folder, and then double-click [start...

Users Guide
Page 112
... (Power) button to turn the printer off labels while printing: Be sure to use genuine Brother roll media. Be sure to open from the factory. 106 Before using the label peeler, the setting for using the peeling function of the label peeler to load the correct paper. 13 Using the Label Peeler (Optional:PA-LP-001) (TD-2120N/2130N only) 13 If the label peeler is useful when affixing a large amount...
... (Power) button to turn the printer off labels while printing: Be sure to use genuine Brother roll media. Be sure to open from the factory. 106 Before using the label peeler, the setting for using the peeling function of the label peeler to load the correct paper. 13 Using the Label Peeler (Optional:PA-LP-001) (TD-2120N/2130N only) 13 If the label peeler is useful when affixing a large amount...
Quick Reference Guide
Page 1
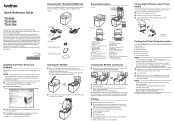
... your Brother reseller. • Printer • AC adapter • AC power cord • USB cable • CD‑ROM • Product Safety Guide • Quick Reference Guide Inserting the RD Roll a Press and hold the (Power) button to turn the printer on. f Print receipts or labels. For details, refer to fit the width of the paper. In order to avoid injuries when the printer is not being used, attach...
... your Brother reseller. • Printer • AC adapter • AC power cord • USB cable • CD‑ROM • Product Safety Guide • Quick Reference Guide Inserting the RD Roll a Press and hold the (Power) button to turn the printer on. f Print receipts or labels. For details, refer to fit the width of the paper. In order to avoid injuries when the printer is not being used, attach...
Quick Reference Guide
Page 2
... or Brother customer service for example, type (die-cut label or continuous length tape) and die-cut label size, is turned on but not connected* (when using the optional WLAN interface) Now setting WPS* (when using the optional WLAN interface) Bluetooth switched* (when using the optional Bluetooth interface) „„ USB host port connected to a supported device G (Once every 3 seconds) G G (3 times) Wireless LAN on , and then press the (Power) button. An error...
... or Brother customer service for example, type (die-cut label or continuous length tape) and die-cut label size, is turned on but not connected* (when using the optional WLAN interface) Now setting WPS* (when using the optional WLAN interface) Bluetooth switched* (when using the optional Bluetooth interface) „„ USB host port connected to a supported device G (Once every 3 seconds) G G (3 times) Wireless LAN on , and then press the (Power) button. An error...

Software Users Guide
Page 16
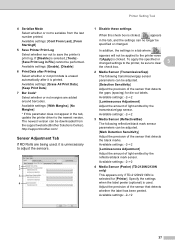
Use a downloaded template Printing with only the printer - Creating Labels Using an application from another publisher Microsoft® Word/Excel®/Outlook® - Use a P-touch template Refer to the P-touch Template Manual. (Search for your model name at http://solutions.brother.com/, click [Downloads], and then download the utility.) 12 Import the text 3 Printing a label with a connected external input device (TD-2120N/2130N/4100N only) - Use a preset template - Add-In functions -
Use a downloaded template Printing with only the printer - Creating Labels Using an application from another publisher Microsoft® Word/Excel®/Outlook® - Use a P-touch template Refer to the P-touch Template Manual. (Search for your model name at http://solutions.brother.com/, click [Downloads], and then download the utility.) 12 Import the text 3 Printing a label with a connected external input device (TD-2120N/2130N/4100N only) - Use a preset template - Add-In functions -
Software Users Guide
Page 25
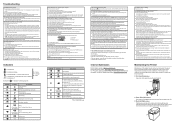
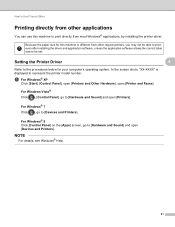
... for this machine to print directly from other applications 4 You can use this machine is displayed to represent the printer model number. For Windows® 8 Click [Control Panel] on the [Apps] screen, go to [Devices and Printers]. How to Use P-touch Editor Printing directly from other regular printers, you may not be able to print even after installing the driver and application software, unless the application software allows the correct label size to be...
... for this machine to print directly from other applications 4 You can use this machine is displayed to represent the printer model number. For Windows® 8 Click [Control Panel] on the [Apps] screen, go to [Devices and Printers]. How to Use P-touch Editor Printing directly from other regular printers, you may not be able to print even after installing the driver and application software, unless the application software allows the correct label size to be...

ESC/ P Command Reference
Page 55
... Hexadecimal: 0A Parameters None Description Feeds the paper by the amount specified by a line feed command (ESC 0, ESC 2, ESC 3, ESC A). The print position becomes the beginning of the next line. The default value is a line feed of 32 dots. A carriage return immediately after a line feed is ignored. Auto-canceling double-width characters specified with SO or ESC SO are...
... Hexadecimal: 0A Parameters None Description Feeds the paper by the amount specified by a line feed command (ESC 0, ESC 2, ESC 3, ESC A). The print position becomes the beginning of the next line. The default value is a line feed of 32 dots. A carriage return immediately after a line feed is ignored. Auto-canceling double-width characters specified with SO or ESC SO are...

P-touch Template Manual/ Command Reference
Page 5
...53 Select object (object number 54 Select object (object name 55 Directly insert object 56 Select command mode 57 Select print start trigger 58 Specify print start command text string 59 Specify print start received character count 60 Specify delimiter 61 Specify non-printed text strings 62 Select command mode 63 Select template 64 Change the prefix character 65 Select printer settings (cut options 66 Select printer settings (cut options-specifying number of labels) ...... 67 Select character code set 68 Select international character set 69 Specify line feed command text string...
...53 Select object (object number 54 Select object (object name 55 Directly insert object 56 Select command mode 57 Select print start trigger 58 Specify print start command text string 59 Specify print start received character count 60 Specify delimiter 61 Specify non-printed text strings 62 Select command mode 63 Select template 64 Change the prefix character 65 Select printer settings (cut options 66 Select printer settings (cut options-specifying number of labels) ...... 67 Select character code set 68 Select international character set 69 Specify line feed command text string...

P-touch Template Manual/ Command Reference
Page 106
... of label Set label length Reverse field data color Set horizontal print position Set vertical print position Clear data after printing Feed setting Media setting Unit setting Mirror printing Upside-down printing Copy printing Set print width Set print density Serialization Serialization Reverse feed length setting when printing Print printer settings Print list of stored files Command required at beginning of format Recall format stored with ^DF Recall format stored with ^DG or ^DG Command required at end of format - 100 - 8. ZPL II supported by TD-2020/2120N/2130N...
... of label Set label length Reverse field data color Set horizontal print position Set vertical print position Clear data after printing Feed setting Media setting Unit setting Mirror printing Upside-down printing Copy printing Set print width Set print density Serialization Serialization Reverse feed length setting when printing Print printer settings Print list of stored files Command required at beginning of format Recall format stored with ^DF Recall format stored with ^DG or ^DG Command required at end of format - 100 - 8. ZPL II supported by TD-2020/2120N/2130N...

P-touch Template Manual/ Command Reference
Page 115
... Move right and down relative to present position Line print mode left margin Set text darkness/width Character spacing Page width Line print mode pagination Form-feed Non-destructive backspace Line print mode top-of-form Distance between top-of-form and index Conditional advance/retract Retract after cut Print after idle time Any linear barcode or graphics command are able to be used in Line Print Mode. - 109 - 9. CPCL supported by TD-2020/2120N/2130N
... Move right and down relative to present position Line print mode left margin Set text darkness/width Character spacing Page width Line print mode pagination Form-feed Non-destructive backspace Line print mode top-of-form Distance between top-of-form and index Conditional advance/retract Retract after cut Print after idle time Any linear barcode or graphics command are able to be used in Line Print Mode. - 109 - 9. CPCL supported by TD-2020/2120N/2130N
Network Users Guide
Page 20
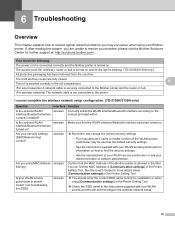
... according to the manual provided with it. Are you may be used as the default security settings. • See the instructions supplied with your security settings (SSID/Network Key) correct? See the User's Guide for further support at: http://solutions.brother.com/. 6 Troubleshooting 6 Overview 6 This chapter explains how to resolve typical network problems you using MAC Address wireless filtering? Confirm that the WLAN interface/Bluetooth interface has been turned on ? If...
... according to the manual provided with it. Are you may be used as the default security settings. • See the instructions supplied with your security settings (SSID/Network Key) correct? See the User's Guide for further support at: http://solutions.brother.com/. 6 Troubleshooting 6 Overview 6 This chapter explains how to resolve typical network problems you using MAC Address wireless filtering? Confirm that the WLAN interface/Bluetooth interface has been turned on ? If...
Quick Setup Guide Touch Panel Display
Page 4
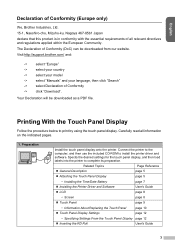
...; Inserting the RD Roll User's Guide 3 Printing With the Touch Panel Display Follow the procedure below to install the printer driver and software. Carefully read all relevant directives and regulations applied within the European Community. Visit http://support.brother.com/ and: -> select "Europe" -> select your country -> select your model -> select "Manuals" and your language, then click "Search" -> select Declaration of Conformity -> click "Download". Specify the desired settings for the touch panel display, and then load labels into the printer...
...; Inserting the RD Roll User's Guide 3 Printing With the Touch Panel Display Follow the procedure below to install the printer driver and software. Carefully read all relevant directives and regulations applied within the European Community. Visit http://support.brother.com/ and: -> select "Europe" -> select your country -> select your model -> select "Manuals" and your language, then click "Search" -> select Declaration of Conformity -> click "Download". Specify the desired settings for the touch panel display, and then load labels into the printer...


