
Users Manual - English
Page 8
...j Needle bar thread guide Pass the upper thread through the needle bar thread guide. g Quick-set the bobbin. i Needle plate The needle plate is depressed. Operation buttons The operation buttons help you to raise and ...details, refer to "Starting to sew in the opposite direction. h Bobbin cover Open the bobbin cover to hold the presser foot holder in place. k Needle clamp screw Use the needle clamp screw... to set bobbin (for models equipped with guides for models ...
...j Needle bar thread guide Pass the upper thread through the needle bar thread guide. g Quick-set the bobbin. i Needle plate The needle plate is depressed. Operation buttons The operation buttons help you to raise and ...details, refer to "Starting to sew in the opposite direction. h Bobbin cover Open the bobbin cover to hold the presser foot holder in place. k Needle clamp screw Use the needle clamp screw... to set bobbin (for models equipped with guides for models ...
Users Manual - English
Page 17
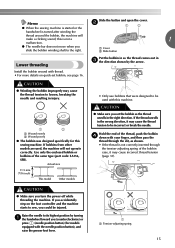
a Cover b Slide button Lower threading Put the bobbin in so the thread comes out in the right direction. Raise the needle to loosen, breaking the needle and resulting in the wrong direction, it may cause the thread tension to the right. CAUTION ● Winding the bobbin improperly may cause the ... shown. • If the thread is started or the Slide the button and open the cover. Memo ● When the sewing machine is not correctly inserted through the tension-adjusting spring of the bobbin case, it may cause incorrect thread tension (page 31). Hold the end of the same ...
a Cover b Slide button Lower threading Put the bobbin in so the thread comes out in the right direction. Raise the needle to loosen, breaking the needle and resulting in the wrong direction, it may cause the thread tension to the right. CAUTION ● Winding the bobbin improperly may cause the ... shown. • If the thread is started or the Slide the button and open the cover. Memo ● When the sewing machine is not correctly inserted through the tension-adjusting spring of the bobbin case, it may cause incorrect thread tension (page 31). Hold the end of the same ...
Users Manual - English
Page 18
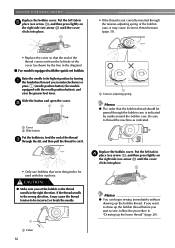
... arrow a), and then press lightly on the right side (see arrow b) until the cover clicks into place. If the thread unrolls in "Drawing up the bobbin thread. KNOWING YOUR SEWING MACHINE Replace the bobbin cover. Slide the button and open the cover. CAUTION ● Make sure you start to sew, follow the procedure in the... the left side of the thread c through the slit, and then pull the thread to be incorrect or break the needle. 1 a Cutter 16 Replace the bobbin cover. Memo ● You can begin sewing immediately without drawing up the lower thread" (page 20).
... arrow a), and then press lightly on the right side (see arrow b) until the cover clicks into place. If the thread unrolls in "Drawing up the bobbin thread. KNOWING YOUR SEWING MACHINE Replace the bobbin cover. Slide the button and open the cover. CAUTION ● Make sure you start to sew, follow the procedure in the... the left side of the thread c through the slit, and then pull the thread to be incorrect or break the needle. 1 a Cutter 16 Replace the bobbin cover. Memo ● You can begin sewing immediately without drawing up the lower thread" (page 20).
Users Manual - English
Page 22
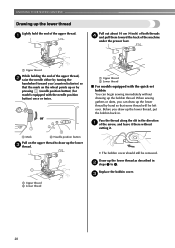
... the handwheel toward the back of the upper thread. When sewing gathers or darts, you can begin sewing immediately without cutting it. • The bobbin cover should still be left over. a Upper thread b Lower thread a Upper thread b Lower thread ■ For models equipped with the needle position button... lower thread Lightly hold the end of the machine under the presser foot. Replace the bobbin cover. Draw up the lower thread as described in b steps 1 to draw up the lower thread, put the bobbin back in the direction a of the upper thread, b raise the needle either by ...
... the handwheel toward the back of the upper thread. When sewing gathers or darts, you can begin sewing immediately without cutting it. • The bobbin cover should still be left over. a Upper thread b Lower thread a Upper thread b Lower thread ■ For models equipped with the needle position button... lower thread Lightly hold the end of the machine under the presser foot. Replace the bobbin cover. Draw up the lower thread as described in b steps 1 to draw up the lower thread, put the bobbin back in the direction a of the upper thread, b raise the needle either by ...
Users Manual - English
Page 33
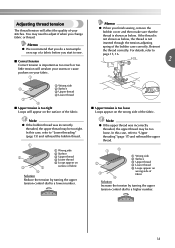
... weaken your seams or cause puckers on the wrong side of the fabric. In this case, refer to "Lower threading" (page 15) and rethread the bobbin thread. 1 2 3 a Wrong side b Surface c Upper thread d Lower thread e Loops appear on 5 surface of fabric 4 Solution Reduce the tension by turning the ... on your stitches. For details, refer to adjust it when you finish sewing, remove the bobbin cover and then make sure that the thread is not inserted through the tension-adjusting spring of the bobbin case correctly. If the thread is not shown as below , the thread is shown as...
... weaken your seams or cause puckers on the wrong side of the fabric. In this case, refer to "Lower threading" (page 15) and rethread the bobbin thread. 1 2 3 a Wrong side b Surface c Upper thread d Lower thread e Loops appear on 5 surface of fabric 4 Solution Reduce the tension by turning the ... on your stitches. For details, refer to adjust it when you finish sewing, remove the bobbin cover and then make sure that the thread is not inserted through the tension-adjusting spring of the bobbin case correctly. If the thread is not shown as below , the thread is shown as...
Users Manual - English
Page 72
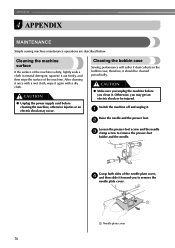
... you unplug the machine before cleaning the machine, otherwise injuries or an electric shock may get an electric shock or be cleaned periodically. a Needle plate cover 70 After cleaning it once with a wet cloth, wipe it . b Loosen the presser-foot screw and the needle c clamp screw to remove the needle ...If the surface of the machine. therefore, it out firmly, and then wipe the surface of the machine is dirty, lightly soak a cloth in the bobbin case; Cleaning the bobbin case Sewing performance will suffer if dust collects in neutral detergent, squeeze it should be injured.
... you unplug the machine before cleaning the machine, otherwise injuries or an electric shock may get an electric shock or be cleaned periodically. a Needle plate cover 70 After cleaning it once with a wet cloth, wipe it . b Loosen the presser-foot screw and the needle c clamp screw to remove the needle ...If the surface of the machine. therefore, it out firmly, and then wipe the surface of the machine is dirty, lightly soak a cloth in the bobbin case; Cleaning the bobbin case Sewing performance will suffer if dust collects in neutral detergent, squeeze it should be injured.

Users Manual - English
Page 73
...the tabs on the needle plate cover into the h needle plate, and then slide the cover back on the race. • Align the S and z marks. a b S z mark mark • Make sure that you fit the bobbin case properly, otherwise the needle may suffer. Insert the bobbin case so that is scratched, ... become tangled, the needle may break or sewing performance may break. • Do not put oil on the bobbin case. e Grasp the bobbin case, and then pull it out. For a new bobbin case (part code: XE7560-001), contact your nearest authorized service center. 4 ● Make sure that the ...
...the tabs on the needle plate cover into the h needle plate, and then slide the cover back on the race. • Align the S and z marks. a b S z mark mark • Make sure that you fit the bobbin case properly, otherwise the needle may suffer. Insert the bobbin case so that is scratched, ... become tangled, the needle may break or sewing performance may break. • Do not put oil on the bobbin case. e Grasp the bobbin case, and then pull it out. For a new bobbin case (part code: XE7560-001), contact your nearest authorized service center. 4 ● Make sure that the ...

Users Manual - English
Page 76
... You have not moved the needle holder to put it right Sew with stabilizer material under the needle plate or in the bobbin case, clean the bobbin case. Remove the tangled thread. The sewing lamp is incorrect. Contact your retailer or the nearest authorized service center. Correct ...is too fine. Insert the needle properly. The stitch is incorrect. How to its highest position. Remove the needle plate cover and clean the plate and the bobbin case. If the thread is too thick. APPENDIX Symptom The fabric is not sewn correctly. The stitch is wrinkled. ...
... You have not moved the needle holder to put it right Sew with stabilizer material under the needle plate or in the bobbin case, clean the bobbin case. Remove the tangled thread. The sewing lamp is incorrect. Contact your retailer or the nearest authorized service center. Correct ...is too fine. Insert the needle properly. The stitch is incorrect. How to its highest position. Remove the needle plate cover and clean the plate and the bobbin case. If the thread is too thick. APPENDIX Symptom The fabric is not sewn correctly. The stitch is wrinkled. ...

Users Manual - English
Page 78
... stitch 42 A accessories 8 adjusting stitches 68 appliqués 53 B bar tack 57 basic stitching 43 blind hem stitching 44 bobbin 15 bobbin case 70 bobbin cover 6, 15 bobbin winder 12, 72, 75 button sewing 49 buttonhole foot 47 buttonhole lever 6, 48, 58 buttonhole sewing 46 C character stitch ... pocket corners 57 presser foot 6, 25 presser foot holder 6, 26 presser foot lever 6, 17 pre-tension disk 12 Q quick-set bobbin 6, 16 quilting 55 quilting foot 56 quilting guide 55 R reinforcement stitching 57 reverse/reinforcement stitch button 6 S scallop stitching 61 seam ...
... stitch 42 A accessories 8 adjusting stitches 68 appliqués 53 B bar tack 57 basic stitching 43 blind hem stitching 44 bobbin 15 bobbin case 70 bobbin cover 6, 15 bobbin winder 12, 72, 75 button sewing 49 buttonhole foot 47 buttonhole lever 6, 48, 58 buttonhole sewing 46 C character stitch ... pocket corners 57 presser foot 6, 25 presser foot holder 6, 26 presser foot lever 6, 17 pre-tension disk 12 Q quick-set bobbin 6, 16 quilting 55 quilting foot 56 quilting guide 55 R reinforcement stitching 57 reverse/reinforcement stitch button 6 S scallop stitching 61 seam ...


