

Users Manual - English
Page 1
Computerized Embroidery and Sewing Machine Operation Manual Product Code 885-V31/V33 GETTING READY SEWING BASICS UTILITY STITCHES EMBROIDERY APPENDIX
Computerized Embroidery and Sewing Machine Operation Manual Product Code 885-V31/V33 GETTING READY SEWING BASICS UTILITY STITCHES EMBROIDERY APPENDIX

Users Manual - English
Page 3
... back or knees. 4 Always keep your machine if the power is cut. 3 Never operate this embroidery and sewing machine. This machine is stored or in the machine falling, which could cause injuries. • When lifting the sewing machine, be careful not to use the machine. To reduce the risk of burns, fire... making any user servicing adjustments mentioned in the instruction manual • To unplug the machine, switch the machine to the symbol "O" position to turn it off, then grasp the plug and pull it out of the sewing machine and foot control free from the electrical outlet immediately ...
... back or knees. 4 Always keep your machine if the power is cut. 3 Never operate this embroidery and sewing machine. This machine is stored or in the machine falling, which could cause injuries. • When lifting the sewing machine, be careful not to use the machine. To reduce the risk of burns, fire... making any user servicing adjustments mentioned in the instruction manual • To unplug the machine, switch the machine to the symbol "O" position to turn it off, then grasp the plug and pull it out of the sewing machine and foot control free from the electrical outlet immediately ...
Users Manual - English
Page 4
... or disposed of the operation manual to the needle. The contents of this manual and specifications of suffocation. • Do not use outdoors. 7 For a longer service life: • When storing this sewing machine was supplied in should be ...machine needle. • Switch the sewing machine to the symbol "O" position to turn it to change without notice. If the problem persists, please consult your local authorized Brother dealer. Benzene, thinner, and scouring powders can damage the case and machine, and should never be used. • Always consult the operation manual...
... or disposed of the operation manual to the needle. The contents of this manual and specifications of suffocation. • Do not use outdoors. 7 For a longer service life: • When storing this sewing machine was supplied in should be ...machine needle. • Switch the sewing machine to the symbol "O" position to turn it to change without notice. If the problem persists, please consult your local authorized Brother dealer. Benzene, thinner, and scouring powders can damage the case and machine, and should never be used. • Always consult the operation manual...

Users Manual - English
Page 23
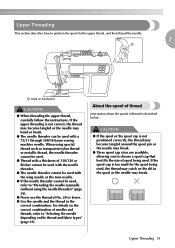
... page in this Operation Manual. LCD (Liquid Crystal Display) Operation 21 a X The LCD comes on the sewing machine. procedures If you press (Previous page key), you finish viewing, press e key) two times. (Back h g fe a Upper threading b Bobbin winding c Bobbin installation d Needle replacement e Presser foot replacement f Embroidery foot attachment g Embroidery frame attachment h Embroidery unit attachment X The first...
... page in this Operation Manual. LCD (Liquid Crystal Display) Operation 21 a X The LCD comes on the sewing machine. procedures If you press (Previous page key), you finish viewing, press e key) two times. (Back h g fe a Upper threading b Bobbin winding c Bobbin installation d Needle replacement e Presser foot replacement f Embroidery foot attachment g Embroidery frame attachment h Embroidery unit attachment X The first...
Users Manual - English
Page 33
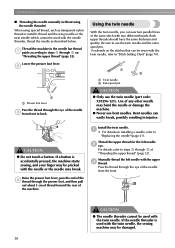
...; If the needle threader cannot be used, refer to "Threading the needle manually (without using special thread such as transparent nylon thread or metallic thread, the needle threader cannot be used with a 75/11 through 100/16 home sewing machine needle. CAUTION ● If the spool or the spool cap is too small...
...; If the needle threader cannot be used, refer to "Threading the needle manually (without using special thread such as transparent nylon thread or metallic thread, the needle threader cannot be used with a 75/11 through 100/16 home sewing machine needle. CAUTION ● If the spool or the spool cap is too small...
Users Manual - English
Page 38
... about 5 cm of thread toward the rear of any other needle may be damaged. 36 Bent needles can be used with the twin needle, the sewing machine may break. Raise the presser foot lever, pass the end of the d thread through the eye of "Threading the upper thread" (page 32). .... Install the twin needle. Thread the upper thread for the left needle with the needle or the needle may be pricked with the upper c thread. Manually thread the left needle b eye. a • For details on "Threading the upper thread" (page 32). For details, refer to use the twin needle...
... about 5 cm of thread toward the rear of any other needle may be damaged. 36 Bent needles can be used with the twin needle, the sewing machine may break. Raise the presser foot lever, pass the end of the d thread through the eye of "Threading the upper thread" (page 32). .... Install the twin needle. Thread the upper thread for the left needle with the needle or the needle may be pricked with the upper c thread. Manually thread the left needle b eye. a • For details on "Threading the upper thread" (page 32). For details, refer to use the twin needle...

Users Manual - English
Page 39
...needle threader cannot be damaged. CAUTION ● When using the twin needle, be damaged. If bunched stitches occur, use a twin needle. Turn on the sewing machine and select a h stitch. • For stitch selection see "Selecting stitching" (page 49). • See "Stitch Setting Chart" (page 70) for... the presser foot, refer to attach zigzag foot "J". Then, thread the upper thread. Pass the thread through the needle f bar thread guide, manually thread the right needle. CAUTION ● When using the twin needle, be sure to steps g through j of "Threading the upper thread" ...
...needle threader cannot be damaged. CAUTION ● When using the twin needle, be damaged. If bunched stitches occur, use a twin needle. Turn on the sewing machine and select a h stitch. • For stitch selection see "Selecting stitching" (page 49). • See "Stitch Setting Chart" (page 70) for... the presser foot, refer to attach zigzag foot "J". Then, thread the upper thread. Pass the thread through the needle f bar thread guide, manually thread the right needle. CAUTION ● When using the twin needle, be sure to steps g through j of "Threading the upper thread" ...
Users Manual - English
Page 76
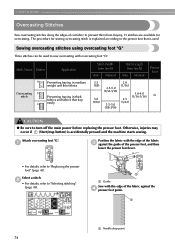
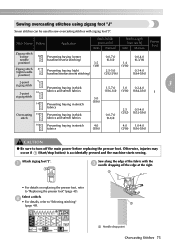
...may occur if (Start/stop button) is explained according to the presser foot that fray easily Stitch Width [mm (inch)] Auto Manual Stitch Length [mm (inch)] Auto Manual Presser Foot 3.5 2.0 (1/8) (1/16) 2.5-5.0 (3/32-3/16) 1.0-4.0 (1/16-3/16) G 5.0 2.5 (3/16) (3/32) 3.5-5.0 (1/8-3/... them from fraying. 15 stitches are available for sewing overcasting stitch is accidentally pressed and the machine starts sewing. UTILITY STITCHES Overcasting Stitches Sew overcasting stitches along the edges of cut fabric to sew overcasting with overcasting foot "G". b • For...
...may occur if (Start/stop button) is explained according to the presser foot that fray easily Stitch Width [mm (inch)] Auto Manual Stitch Length [mm (inch)] Auto Manual Presser Foot 3.5 2.0 (1/8) (1/16) 2.5-5.0 (3/32-3/16) 1.0-4.0 (1/16-3/16) G 5.0 2.5 (3/16) (3/32) 3.5-5.0 (1/8-3/... them from fraying. 15 stitches are available for sewing overcasting stitch is accidentally pressed and the machine starts sewing. UTILITY STITCHES Overcasting Stitches Sew overcasting stitches along the edges of cut fabric to sew overcasting with overcasting foot "G". b • For...
Users Manual - English
Page 77
... may occur if (Start/stop button) is accidentally pressed and the machine starts sewing. a Needle drop point Overcasting Stitches 75 Sewing overcasting stitches using zigzag foot "J" Seven stitches can be used to sew overcasting stitches with the c needle dropping off the main power before ...replacing the pressor foot. Select a stitch. Stitch Name Pattern Application Stitch Width [mm (inch)] Auto Manual Stitch Length [mm (inch)] Auto Manual Presser Foot Zigzag stitch (center...
... may occur if (Start/stop button) is accidentally pressed and the machine starts sewing. a Needle drop point Overcasting Stitches 75 Sewing overcasting stitches using zigzag foot "J" Seven stitches can be used to sew overcasting stitches with the c needle dropping off the main power before ...replacing the pressor foot. Select a stitch. Stitch Name Pattern Application Stitch Width [mm (inch)] Auto Manual Stitch Length [mm (inch)] Auto Manual Presser Foot Zigzag stitch (center...

Users Manual - English
Page 78
... Stitch Width [mm (inch)] Auto Manual 0.0 0.0-2.5 (0) (0-3/32) 3.5 (1/8) 3.5-5.0 (1/8-3/16) 5.0 (3/16) Stitch Length [mm (inch)] Auto Manual 2.5 0.2-5.0 (3/32) (1/64-3/16) Presser Foot 1.4 0.0-4.0 (1/16) (0-3/16) 2.0 (1/16) S 2.5 (3/32) 1.0-4.0 (1/16-3/16) CAUTION ● Be sure to turn off . Hook the connecting fork of the fabric is accidentally pressed and the machine starts sewing. Stitch Name Pattern Application 63 64...
... Stitch Width [mm (inch)] Auto Manual 0.0 0.0-2.5 (0) (0-3/32) 3.5 (1/8) 3.5-5.0 (1/8-3/16) 5.0 (3/16) Stitch Length [mm (inch)] Auto Manual 2.5 0.2-5.0 (3/32) (1/64-3/16) Presser Foot 1.4 0.0-4.0 (1/16) (0-3/16) 2.0 (1/16) S 2.5 (3/32) 1.0-4.0 (1/16-3/16) CAUTION ● Be sure to turn off . Hook the connecting fork of the fabric is accidentally pressed and the machine starts sewing. Stitch Name Pattern Application 63 64...
Users Manual - English
Page 80
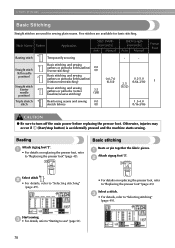
... the presser foot" (page 43). Otherwise, injuries may occur if (Start/stop button) is accidentally pressed and the machine starts sewing. a Attach zigzag foot "J". b • For details, refer to "Selecting stitching" (page 49). • For... Temporarily securing Stitch Width [mm (inch)] Auto Manual Stitch Length [mm (inch)] Auto Manual - - Presser Foot 1 Straight stitch Basic stitching and sewing gathers or pintucks (left baseline/ 0.0 reverse stitching) (0) (left needle position) 2 Basic stitching and sewing gathers or pintucks (left baseline/ reinforcement stitching) ...
... the presser foot" (page 43). Otherwise, injuries may occur if (Start/stop button) is accidentally pressed and the machine starts sewing. a Attach zigzag foot "J". b • For details, refer to "Selecting stitching" (page 49). • For... Temporarily securing Stitch Width [mm (inch)] Auto Manual Stitch Length [mm (inch)] Auto Manual - - Presser Foot 1 Straight stitch Basic stitching and sewing gathers or pintucks (left baseline/ 0.0 reverse stitching) (0) (left needle position) 2 Basic stitching and sewing gathers or pintucks (left baseline/ reinforcement stitching) ...

Users Manual - English
Page 82
...hem stitching. Reverse the skirt or pants. a a b Use a chalk to mark on stretch fabrics Stitch Width [mm (inch)] Auto Manual Stitch Length [mm (inch)] Auto Manual Presser Foot 00 3← - →3 2.0 (1/16) 1.0-3.5 (1/16-1/8) R CAUTION ● Be sure to turn off the main ... fabric b Right side of fabric c Edge of skirts and pants with a blind hem. Sew a blind hem according to slide onto the arm or the length is accidentally pressed and the machine starts sewing. UTILITY STITCHES Blind Hem Stitching Secure the bottoms of fabric d Basting stitching e 5 mm ...
...hem stitching. Reverse the skirt or pants. a a b Use a chalk to mark on stretch fabrics Stitch Width [mm (inch)] Auto Manual Stitch Length [mm (inch)] Auto Manual Presser Foot 00 3← - →3 2.0 (1/16) 1.0-3.5 (1/16-1/8) R CAUTION ● Be sure to turn off the main ... fabric b Right side of fabric c Edge of skirts and pants with a blind hem. Sew a blind hem according to slide onto the arm or the length is accidentally pressed and the machine starts sewing. UTILITY STITCHES Blind Hem Stitching Secure the bottoms of fabric d Basting stitching e 5 mm ...

Users Manual - English
Page 92
... power before replacing the pressor foot. Stitching is accidentally pressed and the machine starts sewing. Stitch Name Pattern Application Straight stitch (center 3 needle position) Attaching zippers Sewing concealed seams and pintucks Stitch Width [mm (inch)] Auto Manual Stitch Length [mm (inch)] Auto Manual Presser Foot 3.5 0.0-7.0 2.5 0.2-5.0 (1/8) (0-1/4) (3/32) (1/64-3/16) I CAUTION ● Be sure to the c edge...
... power before replacing the pressor foot. Stitching is accidentally pressed and the machine starts sewing. Stitch Name Pattern Application Straight stitch (center 3 needle position) Attaching zippers Sewing concealed seams and pintucks Stitch Width [mm (inch)] Auto Manual Stitch Length [mm (inch)] Auto Manual Presser Foot 3.5 0.0-7.0 2.5 0.2-5.0 (1/8) (0-1/4) (3/32) (1/64-3/16) I CAUTION ● Be sure to the c edge...

Users Manual - English
Page 97
...Manual Presser Foot 2.5 1.5-4.0 (3/32) (1/16-3/16) 1.0 1.0-3.0 2.5 1.0-4.0 (1/16) (1/16-1/8) (3/32) (1/16-3/16) J 5.0 1.5-7.0 (3/16) (1/16-1/4) 3 1.0 0.2-4.0 (1/16) (1/64-3/16) 4.0 0.0-7.0 (3/16) (0-1/4) Observe the corresponding precautions when performing each of the following stitching operations. Otherwise, injuries may occur if (Start/stop button) is accidentally pressed and the machine starts sewing.... Stretch stitching Attach zigzag foot "J". Sewing Stretch Fabrics and Elastic Tape 95 Sewing Stretch Fabrics and Elastic ...
...Manual Presser Foot 2.5 1.5-4.0 (3/32) (1/16-3/16) 1.0 1.0-3.0 2.5 1.0-4.0 (1/16) (1/16-1/8) (3/32) (1/16-3/16) J 5.0 1.5-7.0 (3/16) (1/16-1/4) 3 1.0 0.2-4.0 (1/16) (1/64-3/16) 4.0 0.0-7.0 (3/16) (0-1/4) Observe the corresponding precautions when performing each of the following stitching operations. Otherwise, injuries may occur if (Start/stop button) is accidentally pressed and the machine starts sewing.... Stretch stitching Attach zigzag foot "J". Sewing Stretch Fabrics and Elastic Tape 95 Sewing Stretch Fabrics and Elastic ...
Users Manual - English
Page 99
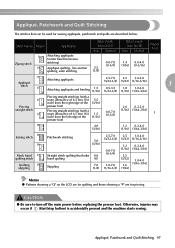
Appliqué, Patchwork and Quilt Stitching 97 Otherwise, injuries may occur if (Start/stop button) is accidentally pressed and the machine starts sewing. Appliqué, Patchwork and Quilt Stitching The stitches that looks 0.0 hand quilting (0) Stippling 7.0 (1/4) 2.5-7.0 (3/32-1/4) 0.0-7.0 ... stitching) Appliqué quilting, free-motion quilting, satin stitching Stitch Width [mm (inch)] Auto Manual 0.0-7.0 3.5 (0-1/4) (1/8) Stitch Length [mm (inch)] Auto Manual 1.4 0.0-4.0 (1/16) (0-3/16) Presser Foot 19 Appliqué stitch 25 Attaching appliqués 2.5-7.0...
Appliqué, Patchwork and Quilt Stitching 97 Otherwise, injuries may occur if (Start/stop button) is accidentally pressed and the machine starts sewing. Appliqué, Patchwork and Quilt Stitching The stitches that looks 0.0 hand quilting (0) Stippling 7.0 (1/4) 2.5-7.0 (3/32-1/4) 0.0-7.0 ... stitching) Appliqué quilting, free-motion quilting, satin stitching Stitch Width [mm (inch)] Auto Manual 0.0-7.0 3.5 (0-1/4) (1/8) Stitch Length [mm (inch)] Auto Manual 1.4 0.0-4.0 (1/16) (0-3/16) Presser Foot 19 Appliqué stitch 25 Attaching appliqués 2.5-7.0...

Users Manual - English
Page 105
Stitch Name Pattern Application Stitch Width [mm (inch)] Auto Manual Stitch Length [mm (inch)] Auto Manual Presser Foot Triple stretch 4 stitch Reinforcing the seams of sleeves 0.0 and inseams (0) 0.0-7.0 2.5 1.5-4.0 (0-1/4) (3/32) (1/16-3/16) J 60 Bar tack stitch ... reinforce points subject to "Replacing the presser foot" (page 43). As an example, the procedure for sewing bar tacks at pocket corners is accidentally pressed and the machine starts sewing. Triple stretch stitching Use triple stretch stitching to reinforce sleeve holes and inseams. Attach zigzag foot "J". Otherwise...
Stitch Name Pattern Application Stitch Width [mm (inch)] Auto Manual Stitch Length [mm (inch)] Auto Manual Presser Foot Triple stretch 4 stitch Reinforcing the seams of sleeves 0.0 and inseams (0) 0.0-7.0 2.5 1.5-4.0 (0-1/4) (3/32) (1/16-3/16) J 60 Bar tack stitch ... reinforce points subject to "Replacing the presser foot" (page 43). As an example, the procedure for sewing bar tacks at pocket corners is accidentally pressed and the machine starts sewing. Triple stretch stitching Use triple stretch stitching to reinforce sleeve holes and inseams. Attach zigzag foot "J". Otherwise...
Users Manual - English
Page 110
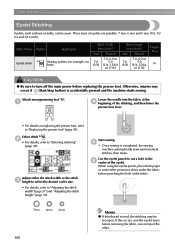
...the stitching, and then lower the presser foot lever. • For details on belts Stitch Width [mm (inch)] Auto Manual 7.0, 6.0 or 7.0 5.0 (1/4) (1/4, 15/64 or 3/16) Stitch Length [mm (inch)] Auto Manual 7.0, 6.0 or 7.0 5.0 (1/4) (1/4, 15/64 or 3/16) Presser Foot N CAUTION ● Be sure to "Selecting... 6mm 5mm 108 Memo z If thin thread is used, the stitching may occur if (Start/stop button) is completed, the sewing machine automatically sews reinforcement stitches, then stops. When using the eyelet punch, place thick paper or some other . Use the eyelet punch to "...
...the stitching, and then lower the presser foot lever. • For details on belts Stitch Width [mm (inch)] Auto Manual 7.0, 6.0 or 7.0 5.0 (1/4) (1/4, 15/64 or 3/16) Stitch Length [mm (inch)] Auto Manual 7.0, 6.0 or 7.0 5.0 (1/4) (1/4, 15/64 or 3/16) Presser Foot N CAUTION ● Be sure to "Selecting... 6mm 5mm 108 Memo z If thin thread is used, the stitching may occur if (Start/stop button) is completed, the sewing machine automatically sews reinforcement stitches, then stops. When using the eyelet punch, place thick paper or some other . Use the eyelet punch to "...

Users Manual - English
Page 112
... pressor foot. This stitch is more decorative when thicker thread is accidentally pressed and the machine starts sewing. Otherwise, injuries may occur if (Start/stop button) is used on replacing the presser... STITCHES Stitch Name Pattern Application 46 Heirloom stitching, etc. 47 35 Decorative stitch 36 37 38 Decorative stitching Stitch Width [mm (inch)] Auto Manual Stitch Length [mm (inch)] Auto Manual Presser Foot 6.0 (15/64) 1.5-7.0 1.6 1.0-4.0 5.0 (1/16-1/4) (1/16) (1/16-3/16) N (3/16) 3.0 2.0-4.0 4.0 (1/8) (1/16-3/16) (3/16) 0.0-7.0 (0-1/4) 2.5 (3/32)...
... pressor foot. This stitch is more decorative when thicker thread is accidentally pressed and the machine starts sewing. Otherwise, injuries may occur if (Start/stop button) is used on replacing the presser... STITCHES Stitch Name Pattern Application 46 Heirloom stitching, etc. 47 35 Decorative stitch 36 37 38 Decorative stitching Stitch Width [mm (inch)] Auto Manual Stitch Length [mm (inch)] Auto Manual Presser Foot 6.0 (15/64) 1.5-7.0 1.6 1.0-4.0 5.0 (1/16-1/4) (1/16) (1/16-3/16) N (3/16) 3.0 2.0-4.0 4.0 (1/8) (1/16-3/16) (3/16) 0.0-7.0 (0-1/4) 2.5 (3/32)...
Users Manual - English
Page 116
... the right sides of the two pieces b of fabric, and then open up , and then sew over the seam with the center of the presser foot aligned with the wing needle, otherwise the sewing machine may be sewn over so that the right side faces d up the seam allowances. 2 1 1 3 a Wrong... side of the needle from the front to "Replacing the presser foot" (page 43). This is used when making a crazy quilt. a • For details, refer to "Threading the needle manually (without using...
... the right sides of the two pieces b of fabric, and then open up , and then sew over the seam with the center of the presser foot aligned with the wing needle, otherwise the sewing machine may be sewn over so that the right side faces d up the seam allowances. 2 1 1 3 a Wrong... side of the needle from the front to "Replacing the presser foot" (page 43). This is used when making a crazy quilt. a • For details, refer to "Threading the needle manually (without using...
Users Manual - English
Page 168
...L layout adjustment 143 LCD 18, 133 LCD button 134 LCD messages 159 LCD operation 18 M machine surface cleaning 152 main power switch 11 maintenance 152 manual needle threading 36 memory key 13 mirroring stitches 63 N needle bar thread guide 11 needle condition ... seam ripper 9 securing stitching 53 selecting alphabet characters 136 selecting embroidery patterns 132 selecting stitches 49 selecting the needle 39 settings key 13 sewing basics 48 sewing direction change 65 sewing machine help key 13 sewing speed controller 12 shell tuck stitch 113 side cutter 76 smocking ...
...L layout adjustment 143 LCD 18, 133 LCD button 134 LCD messages 159 LCD operation 18 M machine surface cleaning 152 main power switch 11 maintenance 152 manual needle threading 36 memory key 13 mirroring stitches 63 N needle bar thread guide 11 needle condition ... seam ripper 9 securing stitching 53 selecting alphabet characters 136 selecting embroidery patterns 132 selecting stitches 49 selecting the needle 39 settings key 13 sewing basics 48 sewing direction change 65 sewing machine help key 13 sewing speed controller 12 shell tuck stitch 113 side cutter 76 smocking ...


