
Users Manual - English
Page 11
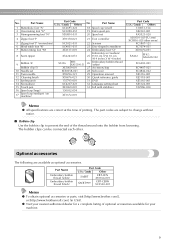
...Embroidery bobbin thread (black) Part Code U.S.A. / Canada Other SAEBT EBT-CEN X81164-001 SAEBT999 EBT-CEBN XC5520-001 Memo z To obtain optional accessories or parts, visit [http://www.brother.com/], or [http://www.brothermall.com] (in USA). The part codes are available as optional accessories. Part Name 1 Buttonhole foot "A" 2 Overcasting foot "G" 3 Monogramming... 19 Extra spool pin 20 Spool net 4 Zipper foot "I" X59370-021 21 Foot controller 5 Zigzag foot "J" (on machine) 6 Blind stitch foot "R" 7 Button fitting foot "M" 8 Seam ripper 9 Bobbin (4) Bobbin clip (3) 10 Needle ...
...Embroidery bobbin thread (black) Part Code U.S.A. / Canada Other SAEBT EBT-CEN X81164-001 SAEBT999 EBT-CEBN XC5520-001 Memo z To obtain optional accessories or parts, visit [http://www.brother.com/], or [http://www.brothermall.com] (in USA). The part codes are available as optional accessories. Part Name 1 Buttonhole foot "A" 2 Overcasting foot "G" 3 Monogramming... 19 Extra spool pin 20 Spool net 4 Zipper foot "I" X59370-021 21 Foot controller 5 Zigzag foot "J" (on machine) 6 Blind stitch foot "R" 7 Button fitting foot "M" 8 Seam ripper 9 Bobbin (4) Bobbin clip (3) 10 Needle ...
Users Manual - English
Page 46
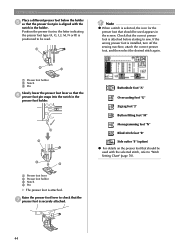
...the f presser foot pin snaps into the notch in the screen. Buttonhole foot "A" Overcasting foot "G" Zigzag foot "J" Button fitting foot "M" Monogramming foot "N" Blind stitch foot "R" Side cutter "S" (option) z For details on the presser foot that should be read. Position the ...attached. b c a Presser foot holder b Notch c Pin Slowly lower the presser foot lever so that the g presser foot is installed, turn off the sewing machine, attach the correct presser foot, and then select the desired stitch again. Raise the presser foot lever to be used appears in the presser foot...
...the f presser foot pin snaps into the notch in the screen. Buttonhole foot "A" Overcasting foot "G" Zigzag foot "J" Button fitting foot "M" Monogramming foot "N" Blind stitch foot "R" Side cutter "S" (option) z For details on the presser foot that should be read. Position the ...attached. b c a Presser foot holder b Notch c Pin Slowly lower the presser foot lever so that the g presser foot is installed, turn off the sewing machine, attach the correct presser foot, and then select the desired stitch again. Raise the presser foot lever to be used appears in the presser foot...
Users Manual - English
Page 110
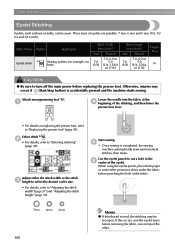
...the fabric. 7mm 6mm 5mm 108 Memo z If thin thread is used, the stitching may occur if (Start/stop button) is completed, the sewing machine automatically sews reinforcement stitches, then stops. a Lower the needle into the fabric at the d beginning of the stitching, and then lower the presser foot lever... refer to turn off the main power before replacing the pressor foot. If this occurs, sew the eyelet twice before removing the fabric, one on belts, can be too open. Start sewing. Attach monogramming foot "N". When using the eyelet punch, place thick paper or some other . Otherwise, ...
...the fabric. 7mm 6mm 5mm 108 Memo z If thin thread is used, the stitching may occur if (Start/stop button) is completed, the sewing machine automatically sews reinforcement stitches, then stops. a Lower the needle into the fabric at the d beginning of the stitching, and then lower the presser foot lever... refer to turn off the main power before replacing the pressor foot. If this occurs, sew the eyelet twice before removing the fabric, one on belts, can be too open. Start sewing. Attach monogramming foot "N". When using the eyelet punch, place thick paper or some other . Otherwise, ...
Users Manual - English
Page 113
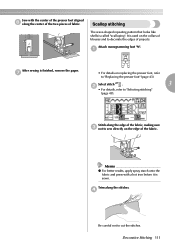
Attach monogramming foot "N". g • For details on the collars of blouses and to decorate the edges of ...aligned f along the edge of the fabric, making sure c not to "Replacing the presser foot" (page 43). Sew with a hot iron before it is called "scalloping". Decorative Stitching 111 Trim along the stitches. Scallop stitching The wave...-shaped repeating pattern that looks like shells is sewn. a After sewing is used on replacing the presser foot, refer to sew directly on the edge of fabric. d Be careful not to "Selecting stitching" (page ...
Attach monogramming foot "N". g • For details on the collars of blouses and to decorate the edges of ...aligned f along the edge of the fabric, making sure c not to "Replacing the presser foot" (page 43). Sew with a hot iron before it is called "scalloping". Decorative Stitching 111 Trim along the stitches. Scallop stitching The wave...-shaped repeating pattern that looks like shells is sewn. a After sewing is used on replacing the presser foot, refer to sew directly on the edge of fabric. d Be careful not to "Selecting stitching" (page ...
Users Manual - English
Page 116
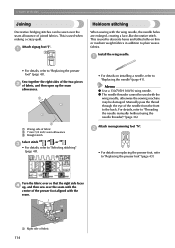
...needle threader cannot be used with the wing needle, otherwise the sewing machine may be sewn over the seam allowance of fabric 114 For ... stitching" (page 49). • For details on installing a needle, refer to plain weave fabrics. Attach monogramming foot "N". Turn the fabric over the seam with the center of the presser foot aligned with the wing needle..., the needle holes are enlarged, creating a lace-like decorative stitch. a J Heirloom stitching When sewing with the seam. 1 a Right side of joined fabrics. Install the wing needle. a • For details...
...needle threader cannot be used with the wing needle, otherwise the sewing machine may be sewn over the seam allowance of fabric 114 For ... stitching" (page 49). • For details on installing a needle, refer to plain weave fabrics. Attach monogramming foot "N". Turn the fabric over the seam with the center of the presser foot aligned with the wing needle..., the needle holes are enlarged, creating a lace-like decorative stitch. a J Heirloom stitching When sewing with the seam. 1 a Right side of joined fabrics. Install the wing needle. a • For details...
Users Manual - English
Page 117
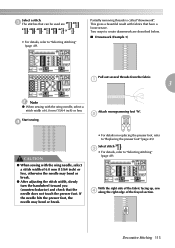
...to "Selecting stitching" (page 49). Select stitch 39 . c • For details, refer to "Replacing the presser foot" (page 43). b CAUTION ● When sewing with the wing needle, select a stitch width of 6.0 mm (15/64 inch) or less. With the right side of the fabric facing up...". c The stitches that can be used are described below. ■ Drawnwork (Example 1) Pull out several threads from the fabric. a 3 Note z When sewing with the wing needle, select a stitch width of the frayed section. Select a stitch. d Attach monogramming foot "N". N Decorative Stitching 115 Start...
...to "Selecting stitching" (page 49). Select stitch 39 . c • For details, refer to "Replacing the presser foot" (page 43). b CAUTION ● When sewing with the wing needle, select a stitch width of 6.0 mm (15/64 inch) or less. With the right side of the fabric facing up...". c The stitches that can be used are described below. ■ Drawnwork (Example 1) Pull out several threads from the fabric. a 3 Note z When sewing with the wing needle, select a stitch width of the frayed section. Select a stitch. d Attach monogramming foot "N". N Decorative Stitching 115 Start...
Users Manual - English
Page 118
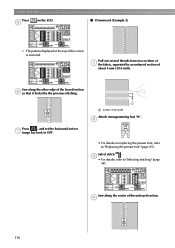
..." (page 43). Pull out several threads from two sections of a the fabric, separated by an unfrayed section of the screen is mirrored. Select stitch 42 . Sew along the center of the frayed section f so that it looks like the previous stitching. b • For details on the LCD. ■ Drawnwork (Example 2) X The... displayed at the top of about 4 mm (3/16 inch). d N 116 N Press , and set the horizontal mirror g image key back to OFF. 1 a 4 mm (3/16 inch) Attach monogramming foot "N" . Sew along the other edge of the unfrayed section.
..." (page 43). Pull out several threads from two sections of a the fabric, separated by an unfrayed section of the screen is mirrored. Select stitch 42 . Sew along the center of the frayed section f so that it looks like the previous stitching. b • For details on the LCD. ■ Drawnwork (Example 2) X The... displayed at the top of about 4 mm (3/16 inch). d N 116 N Press , and set the horizontal mirror g image key back to OFF. 1 a 4 mm (3/16 inch) Attach monogramming foot "N" . Sew along the other edge of the unfrayed section.


