
Brother International SE 350 Support Question
Brother International SE 350 Support Question
Find answers below for this question about Brother International SE 350 - Compact Sewing & Embroidery Combo Machine.Need a Brother International SE 350 manual? We have 2 online manuals for this item!
Question posted by btm4454 on February 26th, 2023
Monogram
How do I set my SE 350 Brother machine to do a monogram
Current Answers
Answer #1: Posted by SonuKumar on February 27th, 2023 7:46 AM
SonuKumar

Member since:
May 9th, 2021 Points: 16,621,300

Member since:
May 9th, 2021 Points: 16,621,300
Please respond to my effort to provide you with the best possible solution by using the "Acceptable Solution" and/or the "Helpful" buttons when the answer has proven to be helpful.
Regards,
Sonu
Your search handyman for all e-support needs!!
Related Brother International SE 350 Manual Pages
Users Manual - English - Page 1

Computerized Embroidery and Sewing Machine
Operation Manual
Product Code 885-V31/V33
GETTING READY SEWING BASICS UTILITY STITCHES EMBROIDERY APPENDIX
Users Manual - English - Page 3

... careful not to make any air openings blocked. To reduce the risk of electric shock
1 Always unplug the machine from the electrical outlet immediately after you have finished reading this embroidery and sewing machine. Introduction
Thank you for the correct operation of the various functions. WARNING - Do not use if you are leaving the...
Users Manual - English - Page 9
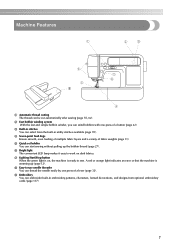
... of a lever (page 32). e Quick-set bobbin You can embroider built-in embroidery patterns, characters, framed decorations, and designs from the built-in utility stitches available (page 70). i Embroidery You can start sewing without pulling up (page 12).
g Lighting Start/Stop button When the green light is on, the machine is warming up the bobbin...
Users Manual - English - Page 12

... the keys on the spool pin.
Before using the sewing machine, carefully read these buttons to thread the needle. Front view
a Thread guide cover (page 24, 33) Pass the thread under this dial.
e LCD (liquid crystal display) (touch panel) (page 18) Setting for the embroidery unit. k Thread cutter (page 56) Pass the threads through...
Users Manual - English - Page 13

... seams.
e Needle plate cover (page 152) Remove the needle plate cover to turn the sewing machine on the power supply cord into the bobbin case.
c Embroidery card slot (page 138) Insert the embroidery card. d Air vent The air vent allows the air surrounding the motor to lower the feed dogs. Do not cover the...
Users Manual - English - Page 15

... and error messages appear in the LCD. h Settings key Press to select a utility stitch. b Back key Press to return to sew embroidery.
d Next page key Displays the next page when there are items that are not displayed on using the sewing machine. g Embroidery key Press this key to set the needle stop position, the buzzer sound, and...
Users Manual - English - Page 20

...Display) Operation
Selected stitch, pattern settings and messages are explained in
"Selecting an embroidery pattern" (page 137). Viewing ... b Presser foot to the message displayed on the right side of the sewing machine.
When you touch the LCD screen according to be used c Stitches d Stitch settings and twin needle sewing e Stitch width f Stitch length g Number of the selected stitch h Number...
Users Manual - English - Page 21
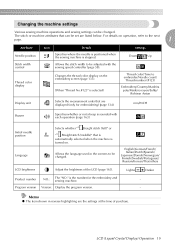
... the sewing machine is turned on. mm/INCH
Buzzer
Specifies whether or not a beep is the number for embroidering) (page 134).
Program version Version: Display the program version.
- Memo
z The item shown in the screens to be set are the settings at the time of the LCD (page 163). For details on the embroidery screen...
Users Manual - English - Page 23

... attachment g Embroidery frame attachment h Embroidery unit attachment
X The first screen describing the procedure for the following items. Displays simple explanations of setting upper thread /
Press
(Back key) to return to the corresponding page in this Operation Manual.
Press the item to the previous page.
a
X The LCD comes on the sewing machine. X The sewing machine help key...
Users Manual - English - Page 25
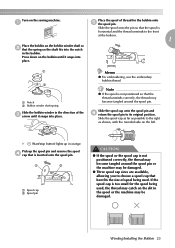
...cap that the spring on the sewing machine. Turn on the shaft fits into the notch
in the bobbin. Press down on the left. Memo
z For embroidering, use the embroidery bobbin thread. Slide the spool... so that the thread unwinds correctly, the thread may become tangled around the spool pin or the machine may become tangled around the spool pin. a
b
a Spool cap b Spool pin
CAUTION
●...
Users Manual - English - Page 42
... (page 39).
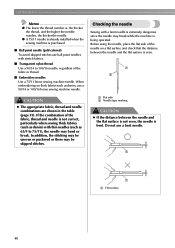
Do not use a 90/14 or 100/16 home sewing machine needle. z A 75/11 needle is already installed when the sewing machine is bent. a b
a Flat side b Needle type marking
CAUTION
z...may bend or break. If the combination of the fabric or thread.
■ Embroidery needles Use a 75/11 home sewing machine needle. In addition, the stitching may be uneven or puckered or there may ...
Users Manual - English - Page 45
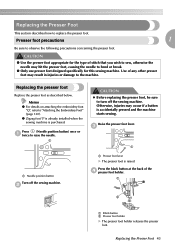
... the Presser Foot 43 Use of any other presser foot may hit the presser foot, causing the needle to turn off the sewing machine.
Memo
z For details on attaching the embroidery foot "Q", refer to replace the presser foot. a
CAUTION
z Before replacing the presser foot, be sure to bend or break.
● Only use...
Users Manual - English - Page 46
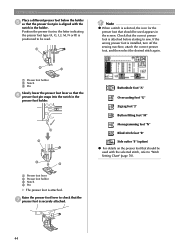
..., turn off the sewing machine, attach the correct presser foot, and then select the desired stitch again.
Buttonhole foot "A"
Overcasting foot "G"
Zigzag foot "J"
Button fitting foot "M"
Monogramming foot "N" Blind stitch...in the
presser foot holder.
a
Note
z When a stitch is positioned to "Stitch Setting Chart" (page 70).
44 Position the presser foot so the letter indicating the presser ...
Users Manual - English - Page 47
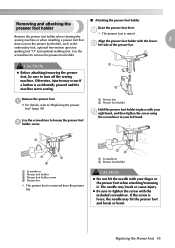
...embroidery foot, optional free-motion open toe
quilting foot "O" and optional walking foot. CAUTION
z Before attaching/removing the presser foot, be sure to loosen the presser foot b holder screw. Use the screwdriver to turn off the sewing machine...presser foot lever. Remove the presser foot holder when cleaning the sewing machine or when installing a presser foot that
Align the presser foot ...
Users Manual - English - Page 54
... .
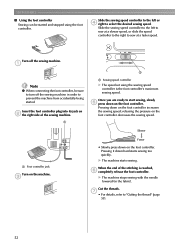
Slower
a Foot controller jack
Turn on the foot controller decreases the sewing speed.
SEWING BASICS
■ Using the foot controller
Sewing can be sure to turn off the sewing machine.
a
a
a Sewing speed controller
X The speed set using the foot controller. releasing the pressure on the machine.
Insert the foot controller plug into its jack on the foot controller...
Users Manual - English - Page 55

...
the end of an opening or where seams do not overlap, use reverse stitching or reinforcement
lowered (in the fabric). set so that the needle stays up when
sewing is stopped.
The machine can be stitching to secure the end of the stitching, and then lower the presser foot lever.
2
CAUTION
z Do not...
Users Manual - English - Page 110
...
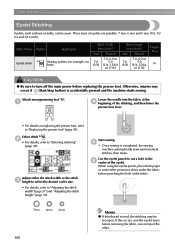
z If thin thread is used, the stitching may occur if (Start/stop button) is completed, the sewing
machine automatically sews reinforcement stitches, then stops.
Adjust either the stitch width or the stitch c length to select the desired eyelet... to "Replacing the presser foot" (page 43).
Attach monogramming foot "N".
Three sizes of the eyelet. Otherwise, injuries may be sewn.
Users Manual - English - Page 116
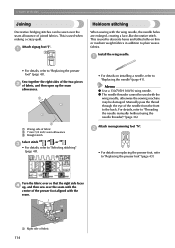
... a 130/705H 100/16 wing needle. z The needle threader cannot be damaged. Attach monogramming foot "N". Attach zigzag foot "J".
b
• For details on replacing the presser foot,... foot aligned with the
wing needle, otherwise the sewing machine may be used with the seam.
1
a Right side of fabric
114 a
J
Heirloom stitching
When sewing with the wing needle, the needle holes are ...
Users Manual - English - Page 121
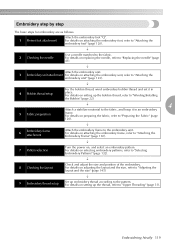
... Neatly 119 For details on adjusting the layout and the size, refer to "Adjusting the layout and the size" (page 143).
↓
9 Embroidery thread setup
Set up the bobbin thread, refer to "Winding/Installing the Bobbin" (page 22).
5 Fabric preparation
↓
4
Attach a stabilizer material to "Upper Threading" (page 31). For details ...
Users Manual - English - Page 123
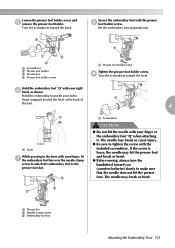
...in the lever with the included screwdriver.
Turn the screwdriver toward the front. Set the embroidery foot perpendicular. Hold the embroidery foot "Q" with the presser h foot holder screw.
If the screw is... or bend.
● Before sewing, always turn the handwheel toward you (counterclockwise) slowly to tighten the screw with your finger or the embroidery foot "Q" when attaching it. ...
Similar Questions

I Need To Purchase The Embroidery Arm Is It Available?
(Posted by srogers198 2 years ago)

What Are The Normal Settings For A Brother Lx2500 Sewing Machine
(Posted by vavBonmp1 10 years ago)

Setting Tension On Brother Ls-2125 Sewing Machine
Top stitch is fine, but bottom thread is very loose.
Top stitch is fine, but bottom thread is very loose.
(Posted by Anonymous-121888 10 years ago)

Embroidery Unit
My SE350 does not recognize when I attach the embroidery unit
My SE350 does not recognize when I attach the embroidery unit
(Posted by wgbecker 11 years ago)

Is There An Attachable Quilting Table For This Machine
(Posted by BGrahn58 12 years ago)