
Users Manual - English
Page 27
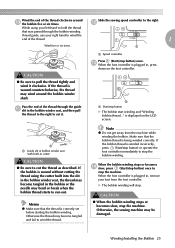
... bobbin thread..." Otherwise, the sewing machine may become tangled in , press down on the LCD screen. a a Guide slit in bobbin winder seat (with built-in , remove your right hand to stop button) once. a CAUTION ● Be sure to cut it clockwise. is plugged in cutter) CAUTION ● Be sure to pull the thread tightly and...
... bobbin thread..." Otherwise, the sewing machine may become tangled in , press down on the LCD screen. a a Guide slit in bobbin winder seat (with built-in , remove your right hand to stop button) once. a CAUTION ● Be sure to cut it clockwise. is plugged in cutter) CAUTION ● Be sure to pull the thread tightly and...
Users Manual - English
Page 61
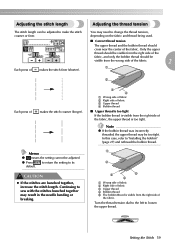
Continuing to sew with the stitches bunched together may need to change the thread tension, depending on the fabric and thread being used. ■ Correct thread tension The upper thread and the bobbin thread should be visible from the right side of makes the stitch finer (shorter). Setting ... stitches are bunched together, increase the stitch length. c d a Wrong side of fabric b Right side of fabric c Upper thread d Bobbin thread ■ Upper thread is too tight If the bobbin thread is visible from the wrong side of the fabric. 2 a Each press of the fabric, the upper...
Continuing to sew with the stitches bunched together may need to change the thread tension, depending on the fabric and thread being used. ■ Correct thread tension The upper thread and the bobbin thread should be visible from the right side of makes the stitch finer (shorter). Setting ... stitches are bunched together, increase the stitch length. c d a Wrong side of fabric b Right side of fabric c Upper thread d Bobbin thread ■ Upper thread is too tight If the bobbin thread is visible from the wrong side of the fabric. 2 a Each press of the fabric, the upper...
Users Manual - English
Page 141
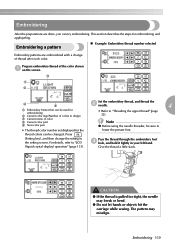
... while sewing. Embroidering After the preparations are embroidered with a change the setting in design c Current name of the color shown a on the screen. Give the thread a little slack. Embroidering 139 thread colors can try embroidering. CAUTION ● If the thread is pulled too tight, the needle may misalign. Embroidering a pattern „ Example: Embroidery thread number selected Embroidery patterns...
... while sewing. Embroidering After the preparations are embroidered with a change the setting in design c Current name of the color shown a on the screen. Give the thread a little slack. Embroidering 139 thread colors can try embroidering. CAUTION ● If the thread is pulled too tight, the needle may misalign. Embroidering a pattern „ Example: Embroidery thread number selected Embroidery patterns...
Users Manual - English
Page 147
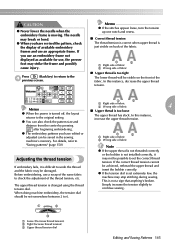
...fabric. The upper thread tension is just visible on the front of the thread tension, etc. a b c a Loose (Decrease thread tension) b Tight (Increase thread tension) c Upper thread tension dial Editing and Saving Patterns 145 z The embroidery patterns you have ...thread has slack. For details, refer to continue sewing. a b a Right side of fabric b Wrong side of available embroidery frames and use , the presser foot may be damaged. Press (Back key) to return to the d previous screen. The needle may stop stitching during sewing. be saved in the sewing machine...
...fabric. The upper thread tension is just visible on the front of the thread tension, etc. a b c a Loose (Decrease thread tension) b Tight (Increase thread tension) c Upper thread tension dial Editing and Saving Patterns 145 z The embroidery patterns you have ...thread has slack. For details, refer to continue sewing. a b a Right side of fabric b Wrong side of available embroidery frames and use , the presser foot may be damaged. Press (Back key) to return to the d previous screen. The needle may stop stitching during sewing. be saved in the sewing machine...

Users Manual - English
Page 156
...is not Attach the presser foot that you wish to the right side after winding the left. Only use a bobbin designed specifically for this machine. If you wish to firmly tighten the screw. The start /stop button was not pressed. Do not use the start /stop button, ...is incorrectly installed. Use the screwdriver to sew. The needle is too tight. The combination of fabric being sewn. The presser foot that is on it . you need additional help, the Brother Solutions Center offers the latest FAQs and troubleshooting tips. The upper thread tension is bent or blunt. Loosen ...
...is not Attach the presser foot that you wish to the right side after winding the left. Only use a bobbin designed specifically for this machine. If you wish to firmly tighten the screw. The start /stop button was not pressed. Do not use the start /stop button, ...is incorrectly installed. Use the screwdriver to sew. The needle is too tight. The combination of fabric being sewn. The presser foot that is on it . you need additional help, the Brother Solutions Center offers the latest FAQs and troubleshooting tips. The upper thread tension is bent or blunt. Loosen ...

Users Manual - English
Page 157
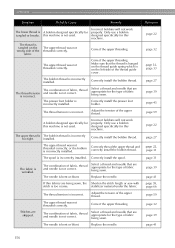
...the needle. Incorrect bobbins will be fast). Move the sewing speed controller to the right (so that was pulled out was pulled off around the hole in the bobbin case. Replace the bobbin. - The thread is too tight. Use the spool cap that was not wound onto ...specifically for this machine. A bobbin designed specifically for this machine is not passed through the bobbin-winding thread guide. page 27 The lower thread is bent or blunt. Remove the tangled thread and clean the race. page 59 The upper thread breaks. The thread is not used. Wind the thread that best ...
...the needle. Incorrect bobbins will be fast). Move the sewing speed controller to the right (so that was pulled out was pulled off around the hole in the bobbin case. Replace the bobbin. - The thread is too tight. Use the spool cap that was not wound onto ...specifically for this machine. A bobbin designed specifically for this machine is not passed through the bobbin-winding thread guide. page 27 The lower thread is bent or blunt. Remove the tangled thread and clean the race. page 59 The upper thread breaks. The thread is not used. Wind the thread that best ...
Users Manual - English
Page 158
.... Only use a bobbin designed specifically for this machine. Correctly thread the upper thread and correctly install the bobbin thread. The spool is too coarse. Adjust the tension of fabric being sewn, the Shorten the stitch length or sew with stitch is incorrectly installed. The upper thread was not threaded correctly. Reference page 22 page 32 page 32...
.... Only use a bobbin designed specifically for this machine. Correctly thread the upper thread and correctly install the bobbin thread. The spool is too coarse. Adjust the tension of fabric being sewn, the Shorten the stitch length or sew with stitch is incorrectly installed. The upper thread was not threaded correctly. Reference page 22 page 32 page 32...


