
Users Manual - English
Page 4
...the danger of . If the problem persists, please consult your local authorized Brother dealer. Special care is not a toy: • Your close attention to the needle. Save these instructions. Use this machine, avoid direct sunlight and high humidity locations. For additional product information and... that this manual. Do not use as contained in this sewing machine was supplied in should never be used. • Always consult the operation manual when replacing or installing any assemblies, the presser feet, needle, or other hot objects. • Use only neutral soaps...
...the danger of . If the problem persists, please consult your local authorized Brother dealer. Special care is not a toy: • Your close attention to the needle. Save these instructions. Use this machine, avoid direct sunlight and high humidity locations. For additional product information and... that this manual. Do not use as contained in this sewing machine was supplied in should never be used. • Always consult the operation manual when replacing or installing any assemblies, the presser feet, needle, or other hot objects. • Use only neutral soaps...
Users Manual - English
Page 6
... needle ...36 Replacing the Needle ...39 Needle precautions ...39 Selecting the needle depending on the thread and fabric types 39 Checking the needle ...40 Replacing the needle ...41 Replacing the Presser Foot 43 Presser foot precautions ...43 Replacing the presser foot ...43 Removing and attaching the presser foot holder 45 Sewing Cylindrical Pieces 46 Free-arm sewing ...46 SEWING BASICS 47 Sewing...48 General sewing...
... needle ...36 Replacing the Needle ...39 Needle precautions ...39 Selecting the needle depending on the thread and fabric types 39 Checking the needle ...40 Replacing the needle ...41 Replacing the Presser Foot 43 Presser foot precautions ...43 Replacing the presser foot ...43 Removing and attaching the presser foot holder 45 Sewing Cylindrical Pieces 46 Free-arm sewing ...46 SEWING BASICS 47 Sewing...48 General sewing...

Users Manual - English
Page 15
... upper thread / bobbin winding / setting bobbin thread / needle replacement / embroidery unit attachment / embroidery frame attachment / embroidery foot attachment / presser foot replacement. 13 a LCD (liquid crystal display) (touch panel) Setting for the selected stitch or pattern and error messages appear in the LCD. Touch the keys displayed on using the sewing machine. h Settings key Press to "LCD (Liquid Crystal...
... upper thread / bobbin winding / setting bobbin thread / needle replacement / embroidery unit attachment / embroidery frame attachment / embroidery foot attachment / presser foot replacement. 13 a LCD (liquid crystal display) (touch panel) Setting for the selected stitch or pattern and error messages appear in the LCD. Touch the keys displayed on using the sewing machine. h Settings key Press to "LCD (Liquid Crystal...

Users Manual - English
Page 17
Turning the Machine On/Off 16 LCD (Liquid Crystal Display) Operation 18 Winding/Installing the Bobbin 22 Upper Threading ...31 Replacing the Needle 39 Replacing the Presser Foot 43 Sewing Cylindrical Pieces 46 1 GETTING READY The various preparations required before starting to sew are described in this chapter.
Turning the Machine On/Off 16 LCD (Liquid Crystal Display) Operation 18 Winding/Installing the Bobbin 22 Upper Threading ...31 Replacing the Needle 39 Replacing the Presser Foot 43 Sewing Cylindrical Pieces 46 1 GETTING READY The various preparations required before starting to sew are described in this chapter.

Users Manual - English
Page 23
... display for the selected topic appears. Turn on the LCD. X The sewing machine help key) on . X The initial stitch screen appears again. bobbin winding / setting bobbin thread / needle replacement / embroidery unit attachment / Example: Upper threading embroidery frame attachment / embroidery foot attachment / presser foot replacement on the sewing machine. LCD (Liquid Crystal Display) Operation 21 Press the item to the corresponding...
... display for the selected topic appears. Turn on the LCD. X The sewing machine help key) on . X The initial stitch screen appears again. bobbin winding / setting bobbin thread / needle replacement / embroidery unit attachment / Example: Upper threading embroidery frame attachment / embroidery foot attachment / presser foot replacement on the sewing machine. LCD (Liquid Crystal Display) Operation 21 Press the item to the corresponding...
Users Manual - English
Page 38
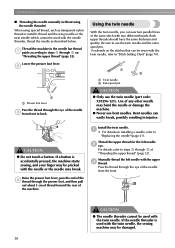
...for the left needle with the twin needle. If the needle threader is accidentally pressed, the machine starts sewing, and your finger may break. Use of the same stitch with the twin needle, the sewing machine may bend the needle or damage the machine. ● Never use bent needles. Raise the... 70). Bent needles can be sewn with the needle threader, thread the needle as transparent nylon thread or metallic thread and the wing needle or the twin needle which cannot be damaged. 36 Thread the machine to the needle bar thread a guide according to "Replacing the needle" (page 41...
...for the left needle with the twin needle. If the needle threader is accidentally pressed, the machine starts sewing, and your finger may break. Use of the same stitch with the twin needle, the sewing machine may bend the needle or damage the machine. ● Never use bent needles. Raise the... 70). Bent needles can be sewn with the needle threader, thread the needle as transparent nylon thread or metallic thread and the wing needle or the twin needle which cannot be damaged. 36 Thread the machine to the needle bar thread a guide according to "Replacing the needle" (page 41...

Users Manual - English
Page 39
...zigzag foot "J". CAUTION ● When using the twin needle, be sure to select an appropriate stitch, otherwise the needle may break or the machine may be damaged. If the needle threader is used with the twin needle, the sewing machine may be damaged. g For details on changing the ...thread spool on the sewing machine and select a h stitch. • For stitch selection see "Selecting stitching" (page 49). • See "Stitch Setting Chart" (page 70) for stitches that use presser foot "N" or attach stabilizer material. • For details, refer to "Replacing the Presser Foot" ...
...zigzag foot "J". CAUTION ● When using the twin needle, be sure to select an appropriate stitch, otherwise the needle may break or the machine may be damaged. If the needle threader is used with the twin needle, the sewing machine may be damaged. g For details on changing the ...thread spool on the sewing machine and select a h stitch. • For stitch selection see "Selecting stitching" (page 49). • See "Stitch Setting Chart" (page 70) for stitches that use presser foot "N" or attach stabilizer material. • For details, refer to "Replacing the Presser Foot" ...

Users Manual - English
Page 41
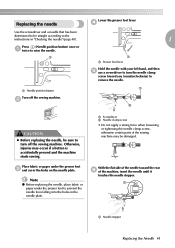
...or lower. z Never use home sewing machine needles. Replacing the Needle 39 Selecting the needle depending on the thread and fabric types The sewing machine needle should be used depends on the fabric and thread thickness. It may bend the needle or damage the machine. Fabric Type/Application Medium weight ... thread Cotton thread Synthetic thread Silk thread Thread for the fabric that you wish to replace the needle. Replacing the Needle This section describes how to sew. Bent needles can easily break, possibly resulting in injuries. Refer to the following table when choosing ...
...or lower. z Never use home sewing machine needles. Replacing the Needle 39 Selecting the needle depending on the thread and fabric types The sewing machine needle should be used depends on the fabric and thread thickness. It may bend the needle or damage the machine. Fabric Type/Application Medium weight ... thread Cotton thread Synthetic thread Silk thread Thread for the fabric that you wish to replace the needle. Replacing the Needle This section describes how to sew. Bent needles can easily break, possibly resulting in injuries. Refer to the following table when choosing ...
Users Manual - English
Page 43
... e use a screwdriver to turn off the sewing machine. With the flat side of the sewing machine may occur if a button is accidentally pressed and the machine starts sewing. b a b CAUTION z Before replacing the needle, be sure to turn the needle clamp screw toward the rear f of the machine, insert the needle until it touches the needle stopper. a Lower the presser foot lever. Place...
... e use a screwdriver to turn off the sewing machine. With the flat side of the sewing machine may occur if a button is accidentally pressed and the machine starts sewing. b a b CAUTION z Before replacing the needle, be sure to turn the needle clamp screw toward the rear f of the machine, insert the needle until it touches the needle stopper. a Lower the presser foot lever. Place...
Users Manual - English
Page 45
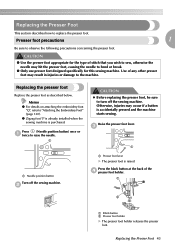
... lever X The presser foot is purchased. Memo z For details on attaching the embroidery foot "Q", refer to raise the needle. c a a Needle position button Turn off the sewing machine. Otherwise, injuries may hit the presser foot, causing the needle to turn off the sewing machine. a CAUTION z Before replacing the presser foot, be sure to bend or break. ● Only use presser...
... lever X The presser foot is purchased. Memo z For details on attaching the embroidery foot "Q", refer to raise the needle. c a a Needle position button Turn off the sewing machine. Otherwise, injuries may hit the presser foot, causing the needle to turn off the sewing machine. a CAUTION z Before replacing the presser foot, be sure to bend or break. ● Only use presser...
Users Manual - English
Page 47
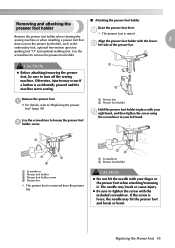
... b Presser foot holder CAUTION z Do not hit the needle with the lower- 1 does not use the presser foot holder, such as the b left hand. Remove the presser foot holder when cleaning the sewing machine or when installing a presser foot that Align the presser ...accidentally pressed and the machine starts sewing. embroidery foot, optional free-motion open toe quilting foot "O" and optional walking foot. Use the screwdriver to turn off the sewing machine. a • For details, refer to loosen the presser foot b holder screw. Use the screwdriver to "Replacing the presser foot"...
... b Presser foot holder CAUTION z Do not hit the needle with the lower- 1 does not use the presser foot holder, such as the b left hand. Remove the presser foot holder when cleaning the sewing machine or when installing a presser foot that Align the presser ...accidentally pressed and the machine starts sewing. embroidery foot, optional free-motion open toe quilting foot "O" and optional walking foot. Use the screwdriver to turn off the sewing machine. a • For details, refer to loosen the presser foot b holder screw. Use the screwdriver to "Replacing the presser foot"...
Users Manual - English
Page 50
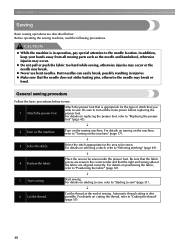
... moving parts such as the needle and handwheel, otherwise injuries may break. Attach the presser foot that you wish to "Turning on the sewing machine. Place the area to "Positioning the fabric" (page 50). ↓ 5 Start sewing. For details on the machine. For details on replacing the presser foot, refer to "Replacing the presser foot" (page 43...
... moving parts such as the needle and handwheel, otherwise injuries may break. Attach the presser foot that you wish to "Turning on the sewing machine. Place the area to "Positioning the fabric" (page 50). ↓ 5 Start sewing. For details on the machine. For details on replacing the presser foot, refer to "Replacing the presser foot" (page 43...
Users Manual - English
Page 51
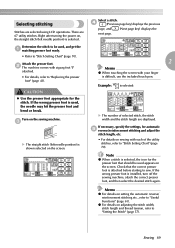
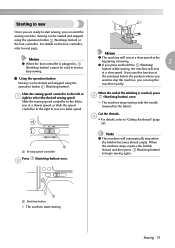
... shown selected on , the straight stitch (left needle position) is used , and get the a matching presser foot ready. • Refer to "Setting the Stitch" (page 57). z For details on sewing with zigzag foot "J" attached. • For details, refer to sew. Attach the presser foot. b The machine comes with each of selected stitch, the stitch... setting the automatic reverse/ reinforcement stitching etc., refer to be used appears on the screen. Select a stitch. Note z When a stitch is attached before starting to "Replacing the presser foot" (page 43).
... shown selected on , the straight stitch (left needle position) is used , and get the a matching presser foot ready. • Refer to "Setting the Stitch" (page 57). z For details on sewing with zigzag foot "J" attached. • For details, refer to sew. Attach the presser foot. b The machine comes with each of selected stitch, the stitch... setting the automatic reverse/ reinforcement stitching etc., refer to be used appears on the screen. Select a stitch. Note z When a stitch is attached before starting to "Replacing the presser foot" (page 43).
Users Manual - English
Page 53
... (Start/stop the machine exactly. X The machine stops sewing with the needle lowered (in , (Start/stop button) cannot be used to start or stop sewing. ■ Using the operation button Sewing can be started and stopped using the operation button (Start/stop button) to begin sewing again. a a Start/stop button) once. When the machine stops, replace the bobbin thread...
... (Start/stop the machine exactly. X The machine stops sewing with the needle lowered (in , (Start/stop button) cannot be used to start or stop sewing. ■ Using the operation button Sewing can be started and stopped using the operation button (Start/stop button) to begin sewing again. a a Start/stop button) once. When the machine stops, replace the bobbin thread...
Users Manual - English
Page 68
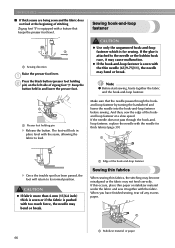
... hook-and-loop fastener is sewn with a feature that the needle passes through the hook-andloop fastener, replace the needle with the seam, allowing the fabric to its normal position. And then, sew the edge of the hook-and-loop fastener Sewing thin fabrics When sewing thin fabrics, the stitching may become misaligned or the fabric...
... hook-and-loop fastener is sewn with a feature that the needle passes through the hook-andloop fastener, replace the needle with the seam, allowing the fabric to its normal position. And then, sew the edge of the hook-and-loop fastener Sewing thin fabrics When sewing thin fabrics, the stitching may become misaligned or the fabric...
Users Manual - English
Page 76
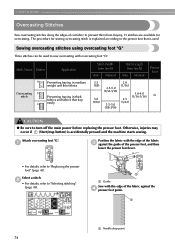
... fraying. 15 stitches are available for sewing overcasting stitch is accidentally pressed and the machine starts sewing. a G Position the fabric with the edge of the fabric c against the d presser foot guide. Attach overcasting foot "G". b • For details, refer to "Replacing the presser foot" (page 43). a a Needle drop point 74 Sewing overcasting stitches using overcasting foot "G" Three...
... fraying. 15 stitches are available for sewing overcasting stitch is accidentally pressed and the machine starts sewing. a G Position the fabric with the edge of the fabric c against the d presser foot guide. Attach overcasting foot "G". b • For details, refer to "Replacing the presser foot" (page 43). a a Needle drop point 74 Sewing overcasting stitches using overcasting foot "G" Three...
Users Manual - English
Page 77
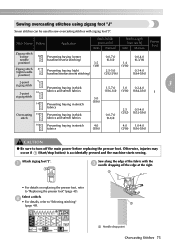
...needle dropping off the main power before replacing the pressor foot. a J Sew along the edge of the fabric with zigzag foot "J". a • For details on replacing the presser foot, refer to "Selecting stitching" a (page 49). Otherwise, injuries may occur if (Start/stop button) is accidentally pressed and the machine starts sewing.... Attach zigzag foot "J". b • For details, refer to "Replacing the presser foot" (page 43). Select a stitch. Stitch Name Pattern Application...
...needle dropping off the main power before replacing the pressor foot. a J Sew along the edge of the fabric with zigzag foot "J". a • For details on replacing the presser foot, refer to "Selecting stitching" a (page 49). Otherwise, injuries may occur if (Start/stop button) is accidentally pressed and the machine starts sewing.... Attach zigzag foot "J". b • For details, refer to "Replacing the presser foot" (page 43). Select a stitch. Stitch Name Pattern Application...

Users Manual - English
Page 78
...foot holder, and then slowly lower the presser foot lever. Position the side cutter so that side cutter pin c is accidentally pressed and the machine starts sewing. Hook the connecting fork of the fabric is attached. a b a a Notch in thick fabrics while cutting the fabric Stitch Width [mm ...b Pin X The side cutter is cut off the main power before replacing the pressor foot. b a Connecting fork b Needle clamp screw 76 UTILITY STITCHES Sewing overcasting stitches using the needle threader. Note z Thread the needle manually when using the side cutter, or only attach the side cutter ...
...foot holder, and then slowly lower the presser foot lever. Position the side cutter so that side cutter pin c is accidentally pressed and the machine starts sewing. Hook the connecting fork of the fabric is attached. a b a a Notch in thick fabrics while cutting the fabric Stitch Width [mm ...b Pin X The side cutter is cut off the main power before replacing the pressor foot. b a Connecting fork b Needle clamp screw 76 UTILITY STITCHES Sewing overcasting stitches using the needle threader. Note z Thread the needle manually when using the side cutter, or only attach the side cutter ...
Users Manual - English
Page 80
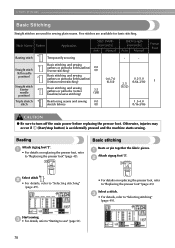
... 0.2-5.0 2.5 (1/64-3/16) J Straight stitch (center 3 needle position) Basic stitching and sewing gathers or pintucks (center baseline/reverse stitching) 3.5 (1/8) (3/32) Triple stretch 4 stitch Reinforcing seams and sewing 0.0 stretch fabrics (0) 1.5-4.0 (1/16-3/16) CAUTION ● Be sure to "Replacing the presser foot" (page 43). Start sewing. b • For details, refer to "Selecting stitching"...refer to "Selecting stitching" (page 49). Select a stitch. Otherwise, injuries may occur if (Start/stop button) is accidentally pressed and the machine starts sewing.
... 0.2-5.0 2.5 (1/64-3/16) J Straight stitch (center 3 needle position) Basic stitching and sewing gathers or pintucks (center baseline/reverse stitching) 3.5 (1/8) (3/32) Triple stretch 4 stitch Reinforcing seams and sewing 0.0 stretch fabrics (0) 1.5-4.0 (1/16-3/16) CAUTION ● Be sure to "Replacing the presser foot" (page 43). Start sewing. b • For details, refer to "Selecting stitching"...refer to "Selecting stitching" (page 49). Select a stitch. Otherwise, injuries may occur if (Start/stop button) is accidentally pressed and the machine starts sewing.
Users Manual - English
Page 168
...97 quilting stitch 97 R race 152 reinforcement stitching 53, 103 release button 125 removing presser foot holder 45 replacing needle 41 replacing presser foot 43 resewing 147 retrieving pattern 150 reverse stitching 53 reverse/reinforcement stitch button 12, 54 reverse/reinforcement ... 9 securing stitching 53 selecting alphabet characters 136 selecting embroidery patterns 132 selecting stitches 49 selecting the needle 39 settings key 13 sewing basics 48 sewing direction change 65 sewing machine help key 13 sewing speed controller 12 shell tuck stitch 113 side cutter 76...
...97 quilting stitch 97 R race 152 reinforcement stitching 53, 103 release button 125 removing presser foot holder 45 replacing needle 41 replacing presser foot 43 resewing 147 retrieving pattern 150 reverse stitching 53 reverse/reinforcement stitch button 12, 54 reverse/reinforcement ... 9 securing stitching 53 selecting alphabet characters 136 selecting embroidery patterns 132 selecting stitches 49 selecting the needle 39 settings key 13 sewing basics 48 sewing direction change 65 sewing machine help key 13 sewing speed controller 12 shell tuck stitch 113 side cutter 76...


