Quick Setup Guide - English and Spanish
Page 7
... other organic solvents. Do not install the PT-9500PC near a television, radio, etc. arising from the electrical outlet. ■ Tape (tape cassette) ● Use only Brother TZ tapes or Brother/Avery AV labels with thinner, benzene, alcohol..., or other or use a dark-colored label. ● Do not use two labels layered on the tape, otherwise the tape cassette may be damaged or personal injury could result. ● Do not touch the cutter. If dirty, clean the PT-9500PC...
... other organic solvents. Do not install the PT-9500PC near a television, radio, etc. arising from the electrical outlet. ■ Tape (tape cassette) ● Use only Brother TZ tapes or Brother/Avery AV labels with thinner, benzene, alcohol..., or other or use a dark-colored label. ● Do not use two labels layered on the tape, otherwise the tape cassette may be damaged or personal injury could result. ● Do not touch the cutter. If dirty, clean the PT-9500PC...
Quick Setup Guide - English and Spanish
Page 9
... display ...15 Preparations before creating labels 16 Connecting the PT-9500PC 17 Connecting to the power source ...17 Connecting to a personal computer 18 Installing the tape cassette 22 Authorized tape ...22 Installing the tape cassette...22 Installing the collection tray 24 2 Installing the... and PT-9500PC baud rate 45 Uninstalling the software ...48 Printer is no longer used ...49 Using Mac OS 8.6-9.x ...51 Installing P-touch Editor and the printer driver 51 Installing P-touch Quick Editor and the printer driver 53 Installing the printer driver only ...54 Selecting the printer ...56...
... display ...15 Preparations before creating labels 16 Connecting the PT-9500PC 17 Connecting to the power source ...17 Connecting to a personal computer 18 Installing the tape cassette 22 Authorized tape ...22 Installing the tape cassette...22 Installing the collection tray 24 2 Installing the... and PT-9500PC baud rate 45 Uninstalling the software ...48 Printer is no longer used ...49 Using Mac OS 8.6-9.x ...51 Installing P-touch Editor and the printer driver 51 Installing P-touch Quick Editor and the printer driver 53 Installing the printer driver only ...54 Selecting the printer ...56...

Quick Setup Guide - English and Spanish
Page 12
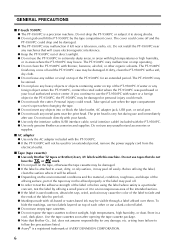
1 Before use This chapter contains information that should be confirmed before creating labels 16 Connecting the PT-9500PC 17 Installing the tape cassette 22 Installing the collection tray 24 Confirming the included accessories 12 PT-9500PC terms 14 Preparations before using the PT-9500PC.
1 Before use This chapter contains information that should be confirmed before creating labels 16 Connecting the PT-9500PC 17 Installing the tape cassette 22 Installing the collection tray 24 Confirming the included accessories 12 PT-9500PC terms 14 Preparations before using the PT-9500PC.
Quick Setup Guide - English and Spanish
Page 13
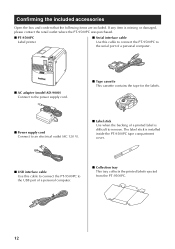
... any item is missing or damaged, please contact the retail outlet where the PT-9500PC was purchased. ■ PT-9500PC Label printer ■ Serial interface cable Use this cable to connect the PT-9500PC to the USB port of a printed label is installed inside the PT-9500PC tape compartment cover. ■ USB interface cable Use this cable to connect the...
... any item is missing or damaged, please contact the retail outlet where the PT-9500PC was purchased. ■ PT-9500PC Label printer ■ Serial interface cable Use this cable to connect the PT-9500PC to the USB port of a printed label is installed inside the PT-9500PC tape compartment cover. ■ USB interface cable Use this cable to connect the...

Quick Setup Guide - English and Spanish
Page 14
Before use ■ Quick Reference (this manual) Keep for future reference. ■ CD-ROM The CD-ROM contains software, etc., to install on a personal computer. ■ Tape catalog This catalog contains a list of tape cassettes designed exclusively for the P-touch series printers. 13
Before use ■ Quick Reference (this manual) Keep for future reference. ■ CD-ROM The CD-ROM contains software, etc., to install on a personal computer. ■ Tape catalog This catalog contains a list of tape cassettes designed exclusively for the P-touch series printers. 13

Quick Setup Guide - English and Spanish
Page 15
For details, refer to "2." PT-9500PC terms This section identifies the main PT-9500PC terms. Front view Tape compartment cover Label outlet Collection tray support Cover release button ERROR lamp Power button (including lamp) Feed/cut button Note ● If the tape compartment cover is usually set to "Changing the USB ID mode" (→ P.108). 14 Rear view AC adapter jack USB ID switch Serial port USB port Note ● The USB ID switch is left open, dust will collect on the print head. Always close the cover.
For details, refer to "2." PT-9500PC terms This section identifies the main PT-9500PC terms. Front view Tape compartment cover Label outlet Collection tray support Cover release button ERROR lamp Power button (including lamp) Feed/cut button Note ● If the tape compartment cover is usually set to "Changing the USB ID mode" (→ P.108). 14 Rear view AC adapter jack USB ID switch Serial port USB port Note ● The USB ID switch is left open, dust will collect on the print head. Always close the cover.

Quick Setup Guide - English and Spanish
Page 16
... close the No tape cassette tape compartment cover. During PT-9500PC standby Install the tape cassette and close the tape compartment cover. During printing No tape cassette Incorrect tape cassette Install the correct tape cassette and close the tape compartment cover. During printing Tape compartment cover is Close the cover. Empty tape cassette Install a tape cassette containing tape and close the tape compartment cover. If...
... close the No tape cassette tape compartment cover. During PT-9500PC standby Install the tape cassette and close the tape compartment cover. During printing No tape cassette Incorrect tape cassette Install the correct tape cassette and close the tape compartment cover. During printing Tape compartment cover is Close the cover. Empty tape cassette Install a tape cassette containing tape and close the tape compartment cover. If...

Quick Setup Guide - English and Spanish
Page 23
... with the PT-9500PC and explains the procedures to install the tape cassettes. Laminated " Tamper Evident Tape - Laminated " Fabric Iron-On Tape - This section explains the procedures to "Accessories" (→ P.118). Authorized tape Installing the tape cassette. The types of tape that may be used with the PT-9500PC are listed below. ■ TZ Tapes " Standard Laminated Tape " Extra Strength Adhesive Tape - Non...
... with the PT-9500PC and explains the procedures to install the tape cassettes. Laminated " Tamper Evident Tape - Laminated " Fabric Iron-On Tape - This section explains the procedures to "Accessories" (→ P.118). Authorized tape Installing the tape cassette. The types of tape that may be used with the PT-9500PC are listed below. ■ TZ Tapes " Standard Laminated Tape " Extra Strength Adhesive Tape - Non...

Quick Setup Guide - English and Spanish
Page 24
Power button →The power button will light (green). • If the tape compartment cover is not completely closed or if the tape cassette is removed from the PT-9500PC with the PT-9500PC turned on the 6 PT-9500PC. Press the power button on because the roller holder will not be produced. Press the feed/cut button. 7 Close the...
Power button →The power button will light (green). • If the tape compartment cover is not completely closed or if the tape cassette is removed from the PT-9500PC with the PT-9500PC turned on the 6 PT-9500PC. Press the power button on because the roller holder will not be produced. Press the feed/cut button. 7 Close the...

Quick Setup Guide - English and Spanish
Page 77
If the print properties box is not 0 displayed, click in the print a properties box. Start P-touch Editor. 1 Click . 2 →The page properties box appears. Set the tape length to 3 inches. 3 Set the tape width to create a nametag. Click in the property dock. →The print properties box appears. See label printing for Style. Creating...
If the print properties box is not 0 displayed, click in the print a properties box. Start P-touch Editor. 1 Click . 2 →The page properties box appears. Set the tape length to 3 inches. 3 Set the tape width to create a nametag. Click in the property dock. →The print properties box appears. See label printing for Style. Creating...
Quick Setup Guide - English and Spanish
Page 78
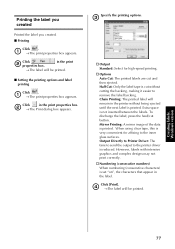
...When using clear tape, this is not inserted between the labels. To discharge the label, press the feed/cut without being ejected until the next label is printed. Click in the printer without cutting the backing, making it easier to the printer driver is set ...label will be printed. ■ Setting the printing options and label printing Click . 1 →The print properties box appears. Output Directly to Printer Driver: The time to send the output to remove the label backing. " Numbering (consecutive numbers) When numbering (consecutive characters) is reduced. Click...
...When using clear tape, this is not inserted between the labels. To discharge the label, press the feed/cut without being ejected until the next label is printed. Click in the printer without cutting the backing, making it easier to the printer driver is set ...label will be printed. ■ Setting the printing options and label printing Click . 1 →The print properties box appears. Output Directly to Printer Driver: The time to send the output to remove the label backing. " Numbering (consecutive numbers) When numbering (consecutive characters) is reduced. Click...
Quick Setup Guide - English and Spanish
Page 83
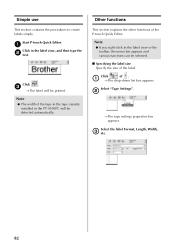
... Click of the P-touch Quick Editor. Note ● The width of the label. Note ● If you right-click in the label view or the toolbar, the menu bar appears and various functions can be detected automatically. Select "Tape Settings". 2 →The tape settings properties box appears...be selected. ■ Specifying the label size Specify the size of the tape in the tape cassette installed in the label view, and then type the 2 text. Start P-touch Quick Editor. 1 Click in the PT-9500PC will be printed. Other functions This section explains the other functions of ....
... Click of the P-touch Quick Editor. Note ● The width of the label. Note ● If you right-click in the label view or the toolbar, the menu bar appears and various functions can be detected automatically. Select "Tape Settings". 2 →The tape settings properties box appears...be selected. ■ Specifying the label size Specify the size of the tape in the tape cassette installed in the label view, and then type the 2 text. Start P-touch Quick Editor. 1 Click in the PT-9500PC will be printed. Other functions This section explains the other functions of ....
Quick Setup Guide - English and Spanish
Page 86
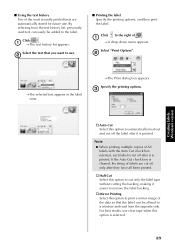
...; Importing text (for Windows only) P-touch Quick Editor can be set up so that appeared. →The Options dialog box appears. Specify the printing options. 3 " Auto Cut The printed labels are cut button. Use clear tape. Click in the printer without cutting the backing, making it easier... to display P-touch Quick Editor on the task tray. ■ Label printing Specify the printing options and print the label....
...; Importing text (for Windows only) P-touch Quick Editor can be set up so that appeared. →The Options dialog box appears. Specify the printing options. 3 " Auto Cut The printed labels are cut button. Use clear tape. Click in the printer without cutting the backing, making it easier... to display P-touch Quick Editor on the task tray. ■ Label printing Specify the printing options and print the label....
Quick Setup Guide - English and Spanish
Page 90
Click to a window and read from the text history list, previously used text can be added to cut only the label tape without cutting the backing, making it is cleared, the string of labels are automatically stored for future use. Select the text that the label can ... Select this option to the label. " Half Cut Select this option to print a mirror image of the data so that you want to use clear tape when this option to automatically feed out and cut off after it easier to remove the label backing. By selecting from the opposite side. Click...
Click to a window and read from the text history list, previously used text can be added to cut only the label tape without cutting the backing, making it is cleared, the string of labels are automatically stored for future use. Select the text that the label can ... Select this option to the label. " Half Cut Select this option to print a mirror image of the data so that you want to use clear tape when this option to automatically feed out and cut off after it easier to remove the label backing. By selecting from the opposite side. Click...
Quick Setup Guide - English and Spanish
Page 91
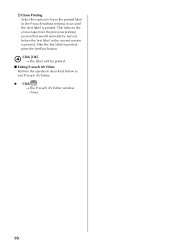
Click [OK]. 4 →The label will be fed out before the first label in the P-touch without feeding it out until the next label is printed, press the feed/cut button. " Chain Printing Select this option to exit P-touch AV Editor. ● Click . →The P-touch AV Editor window closes. 90 This reduces the excess tape from the previous printing session that would normally be printed. ■ Exiting P-touch AV Editor Perform the operation described below to leave the printed label in the current session is printed. After the last label is printed.
Click [OK]. 4 →The label will be fed out before the first label in the P-touch without feeding it out until the next label is printed, press the feed/cut button. " Chain Printing Select this option to exit P-touch AV Editor. ● Click . →The P-touch AV Editor window closes. 90 This reduces the excess tape from the previous printing session that would normally be printed. ■ Exiting P-touch AV Editor Perform the operation described below to leave the printed label in the current session is printed. After the last label is printed.
Quick Setup Guide - English and Spanish
Page 92
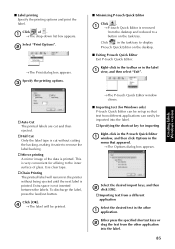
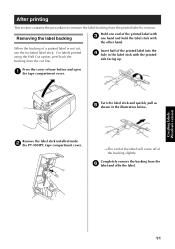
... hold the label stick with 3 one end of the printed label into the 4 hole in the illustration below. Remove the label stick installed inside 2 the PT-9500PC tape compartment cover. →The end of the label will come off of a printed label is not cut line. Completely remove the backing from the 6 label...
... hold the label stick with 3 one end of the printed label into the 4 hole in the illustration below. Remove the label stick installed inside 2 the PT-9500PC tape compartment cover. →The end of the label will come off of a printed label is not cut line. Completely remove the backing from the 6 label...

Quick Setup Guide - English and Spanish
Page 93
Close the cover. 8 Note ● There may be some cases where the use of the label stick may cause some of the printed text to wear off. ● Some tapes may have cut lines. 92 Peel the backing from the label using the label stick, install it inside 7 the PT-9500PC tape compartment cover. After using the cut lines in the backing.
Close the cover. 8 Note ● There may be some cases where the use of the label stick may cause some of the printed text to wear off. ● Some tapes may have cut lines. 92 Peel the backing from the label using the label stick, install it inside 7 the PT-9500PC tape compartment cover. After using the cut lines in the backing.
Quick Setup Guide - English and Spanish
Page 100
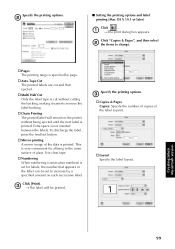
... The printed labels are cut button. To discharge the label, press the feed/cut and then ejected. Use clear tape. " Layout Specify the label layout. " Numbering When numbering (consecutive numbers) is printed. Specify the printing options. 3 " Copies & Pages Copies: ...Click . 1 →The print dialog box appears. " Pages The printing range is very convenient for labels, the number that appears in the printer without cutting the backing, making it easier to the inner surface of glass. " Chain Printing The printed label will be set for affixing to remove...
... The printed labels are cut button. To discharge the label, press the feed/cut and then ejected. Use clear tape. " Layout Specify the label layout. " Numbering When numbering (consecutive numbers) is printed. Specify the printing options. 3 " Copies & Pages Copies: ...Click . 1 →The print dialog box appears. " Pages The printing range is very convenient for labels, the number that appears in the printer without cutting the backing, making it easier to the inner surface of glass. " Chain Printing The printed label will be set for affixing to remove...
Quick Setup Guide - English and Spanish
Page 101
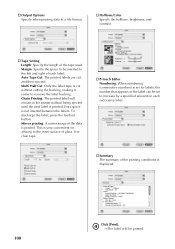
... Halftone/Color Specify the halftone, brightness, and contrast. This is very convenient for labels, the number that appears in the printer without cutting the backing, making it easier to the inner surface of the printing conditions is not inserted between the labels. Margin...will be set for affixing to remove the label backing. " Tape Setting Length: Specify the length of the data is cut without being ejected until the next label is set to the left and right of each successive label. " P-touch Editor Numbering: When numbering (consecutive numbers) is printed. " ...
... Halftone/Color Specify the halftone, brightness, and contrast. This is very convenient for labels, the number that appears in the printer without cutting the backing, making it easier to the inner surface of the printing conditions is not inserted between the labels. Margin...will be set for affixing to remove the label backing. " Tape Setting Length: Specify the length of the data is cut without being ejected until the next label is set to the left and right of each successive label. " P-touch Editor Numbering: When numbering (consecutive numbers) is printed. " ...

Quick Setup Guide - English and Spanish
Page 111
Press the cover release button and open 5 the tape compartment cover. Install the removed tape cassette, and 6 then close the tape compartment cover. Remove the tape cassette. 2 Close the tape compartment cover. 3 110 This section contains the procedures for maintaining the PT-9500PC. Feed & Cut button →Self-cleaning will gradually ...or the characters are not clear, the print head and head roller may be dirty. ■ Self-cleaning Use the PT-9500PC self-cleaning function to remove any dirt from the print head. Maintenance The internal parts of the PT-9500PC will start.
Press the cover release button and open 5 the tape compartment cover. Install the removed tape cassette, and 6 then close the tape compartment cover. Remove the tape cassette. 2 Close the tape compartment cover. 3 110 This section contains the procedures for maintaining the PT-9500PC. Feed & Cut button →Self-cleaning will gradually ...or the characters are not clear, the print head and head roller may be dirty. ■ Self-cleaning Use the PT-9500PC self-cleaning function to remove any dirt from the print head. Maintenance The internal parts of the PT-9500PC will start.


