Users Manual - English
Page 1
ELECTRONIC LABELING SYSTEM INTRODUCTION GETTING STARTED EDITING A LABEL LABEL PRINTING USING THE FILE MEMORY MAINTAINNING YOUR P-TOUCH LABELER TROUBLESHOOTING APPENDIX INDEX
ELECTRONIC LABELING SYSTEM INTRODUCTION GETTING STARTED EDITING A LABEL LABEL PRINTING USING THE FILE MEMORY MAINTAINNING YOUR P-TOUCH LABELER TROUBLESHOOTING APPENDIX INDEX
Users Manual - English
Page 8
...a Bar Code 40 LABEL PRINTING 41 Label Preview...41 Printing a Label ...41 Printing a Single Copy 42 Printing Multiple Copies 42 Auto-numbering Labels 43 Mirror Printing ...44 Setting Margin ...45 Adjusting the Label Length 46 Attaching Labels...46 Printing from the Label Collection 47 Printing a label from the Label... Collection Stored in the Machine 47 USING THE FILE MEMORY 51 Storing a Label into Memory 51 Opening a Stored Label File 51 Printing a Stored Label File 52 Deleting a Stored Label File 52 MAINTAINING YOUR P-TOUCH LABELER 53 Resetting the P-touch Labeler 53 Resetting ...
...a Bar Code 40 LABEL PRINTING 41 Label Preview...41 Printing a Label ...41 Printing a Single Copy 42 Printing Multiple Copies 42 Auto-numbering Labels 43 Mirror Printing ...44 Setting Margin ...45 Adjusting the Label Length 46 Attaching Labels...46 Printing from the Label Collection 47 Printing a label from the Label... Collection Stored in the Machine 47 USING THE FILE MEMORY 51 Storing a Label into Memory 51 Opening a Stored Label File 51 Printing a Stored Label File 52 Deleting a Stored Label File 52 MAINTAINING YOUR P-TOUCH LABELER 53 Resetting the P-touch Labeler 53 Resetting ...

Users Manual - English
Page 10
... „ Create a label with the P-touch labeler 1 GETTING STARTED • Prepare the P-touch labeler. Create labels like these : „ Printing from the Label collection. INTRODUCTION How to use the P-touch labeler P. 22 • Entering Accented Characters. P. 41 • Setting Margin. ...P. 20 • Entering Symbols. P. 45 • Printing from the Label Collection Using the Label Collection function, labels can check the layout of formatting options. P. 10 2 CREATING A LABEL •...
... „ Create a label with the P-touch labeler 1 GETTING STARTED • Prepare the P-touch labeler. Create labels like these : „ Printing from the Label collection. INTRODUCTION How to use the P-touch labeler P. 22 • Entering Accented Characters. P. 41 • Setting Margin. ...P. 20 • Entering Symbols. P. 45 • Printing from the Label Collection Using the Label Collection function, labels can check the layout of formatting options. P. 10 2 CREATING A LABEL •...
Users Manual - English
Page 11
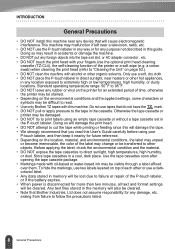
... could result in the packaging of 1 the printer, contact the retail outlet where the P-touch labeler was purchased or your printer. The print head becomes very hot during use and remains very hot immediately after use the P-touch labeler with your 2 local authorized service center. Plastic... shock, the risk of 3 suffocation, keep these guidelines to get wet in it directly with a foreign object in any metal parts near the print head. DO NOT disassemble the P-touch labeler. DO NOT touch any way. If water, metallic substance or any 8 foreign object enters the ...
... could result in the packaging of 1 the printer, contact the retail outlet where the P-touch labeler was purchased or your printer. The print head becomes very hot during use and remains very hot immediately after use the P-touch labeler with your 2 local authorized service center. Plastic... shock, the risk of 3 suffocation, keep these guidelines to get wet in it directly with a foreign object in any metal parts near the print head. DO NOT disassemble the P-touch labeler. DO NOT touch any way. If water, metallic substance or any 8 foreign object enters the ...
Users Manual - English
Page 14
...• DO NOT attempt to print labels using your fingers.Use the optional print head cleaning cassette (TZ-CL4), the self-cleaning function of the label may change or be cleared. Any text files stored in the memory will also be cleared. • Note that Brother Industries, Ltd does not assume ...or water-based ink may be damaged. • DO NOT try to cut the tape while printing or feeding since this will damage the tape. • We strongly recommend that you read . • Use only Brother TZ tapes with your P-touch labeler, and then keep it nearby for future reference. •...
...• DO NOT attempt to print labels using your fingers.Use the optional print head cleaning cassette (TZ-CL4), the self-cleaning function of the label may change or be cleared. Any text files stored in the memory will also be cleared. • Note that Brother Industries, Ltd does not assume ...or water-based ink may be damaged. • DO NOT try to cut the tape while printing or feeding since this will damage the tape. • We strongly recommend that you read . • Use only Brother TZ tapes with your P-touch labeler, and then keep it nearby for future reference. •...
Users Manual - English
Page 16
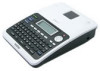
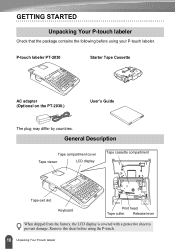
... Tape Cassette AC adapter (Optional on the PT-2030.) User's Guide The plug may differ by countries. General Description Tape compartment cover Tape viewer LCD display Tape cassette compartment Tape exit slot Keyboard Print head Tape cutter Release lever When shipped from the factory, the LCD display is covered with a protective sheet to...
... Tape Cassette AC adapter (Optional on the PT-2030.) User's Guide The plug may differ by countries. General Description Tape compartment cover Tape viewer LCD display Tape cassette compartment Tape exit slot Keyboard Print head Tape cutter Release lever When shipped from the factory, the LCD display is covered with a protective sheet to...
Users Manual - English
Page 18
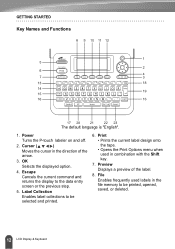
... the data entry screen or the previous step. 5. Escape Cancels the current command and returns the display to be selected and printed. 6. GETTING STARTED Key Names and Functions The default language is "English". 1. File Enables frequently used in the direction of ...the label. 8. Label Collection Enables label collections to be printed, opened, saved, or deleted. 12 LCD Display & Keyboard Preview Displays a preview of the arrow. 3. Power Turns the P-touch labeler on ...
... the data entry screen or the previous step. 5. Escape Cancels the current command and returns the display to be selected and printed. 6. GETTING STARTED Key Names and Functions The default language is "English". 1. File Enables frequently used in the direction of ...the label. 8. Label Collection Enables label collections to be printed, opened, saved, or deleted. 12 LCD Display & Keyboard Preview Displays a preview of the arrow. 3. Power Turns the P-touch labeler on ...
Users Manual - English
Page 23
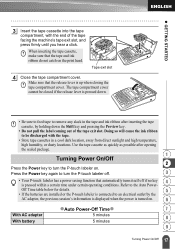
... labeler on. Doing so will cause the ink ribbon to the Auto Power- Refer to be closed if the release lever is turned on the print head.
... labeler on. Doing so will cause the ink ribbon to the Auto Power- Refer to be closed if the release lever is turned on the print head.
Users Manual - English
Page 24
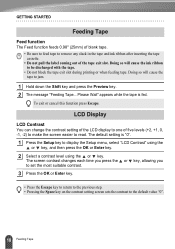
... Wait" appears while the tape is "0". 1 Press the Setup key to be discharged with the tape. • Do not block the tape exit slot during printing or when feeding tape. The screen contrast changes each time you press the or key, allowing you to set the most suitable contrast. 3 Press the...
... Wait" appears while the tape is "0". 1 Press the Setup key to be discharged with the tape. • Do not block the tape exit slot during printing or when feeding tape. The screen contrast changes each time you press the or key, allowing you to set the most suitable contrast. 3 Press the...

Users Manual - English
Page 28
.... 3 Press the OK or Enter key. The selected symbol is displayed. EDITING A LABEL Entering Symbols In addition to enter the symbol printed on the keyboard, there are various symbols (including international and extended ASCII characters) available with the symbol function. A list of text. • Press the Escape key to return to the...
.... 3 Press the OK or Enter key. The selected symbol is displayed. EDITING A LABEL Entering Symbols In addition to enter the symbol printed on the keyboard, there are various symbols (including international and extended ASCII characters) available with the symbol function. A list of text. • Press the Escape key to return to the...
Users Manual - English
Page 30
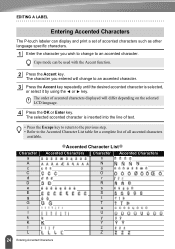
Caps mode can display and print a set of accented characters such as other language specific characters. 1 Enter the character you entered will differ depending on the selected LCD language. 4 Press the ...
Caps mode can display and print a set of accented characters such as other language specific characters. 1 Enter the character you entered will differ depending on the selected LCD language. 4 Press the ...

Users Manual - English
Page 32
EDITING A LABEL Attribute Font zSetting Optionsz Value Result HEL (Helsinki) BRU (Brussels) FLO (Florida) CAL (Calgary) Auto When Auto is selected, the text is automatically adjusted to print in the largest size available for each tape width. 42pt 36pt 24pt Size 18pt 12pt 9pt 6pt 26 Setting Character Attributes
EDITING A LABEL Attribute Font zSetting Optionsz Value Result HEL (Helsinki) BRU (Brussels) FLO (Florida) CAL (Calgary) Auto When Auto is selected, the text is automatically adjusted to print in the largest size available for each tape width. 42pt 36pt 24pt Size 18pt 12pt 9pt 6pt 26 Setting Character Attributes
Users Manual - English
Page 38
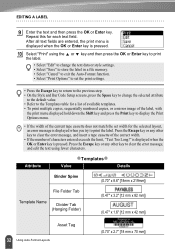
...text and then press the OK or Enter key. Press the Escape key or any other key to print the label. Press the Escape key or any other key to clear the error message, and edit... the text using the or key and then press the OK or Enter key to print the label. • Select "Edit" to change the text data or style settings. • Select "...label in a file memory. • Select "Cancel" to exit the Auto-Format function. • Select "Print Options" to set the print settings. • Press the Escape key to return to the previous step. • On the Style and...
...text and then press the OK or Enter key. Press the Escape key or any other key to print the label. Press the Escape key or any other key to clear the error message, and edit... the text using the or key and then press the OK or Enter key to print the label. • Select "Edit" to change the text data or style settings. • Select "...label in a file memory. • Select "Cancel" to exit the Auto-Format function. • Select "Print Options" to set the print settings. • Press the Escape key to return to the previous step. • On the Style and...
Users Manual - English
Page 40
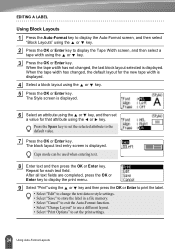
... label in a file memory. • Select "Cancel" to exit the Auto-Format function. • Select "Change Layout" to use a different layout. • Select "Print Options" to set the selected attribute to the default value. 7 Press the OK or Enter key. The Style screen is displayed. Caps mode can be.... When the tape width has not changed , the default layout for the new tape width is displayed. Press the Space key to display the print menu. 9 Select "Print" using the or key. 3 Press the OK or Enter key. When the tape width has changed , the last block layout selected is displayed. ...
... label in a file memory. • Select "Cancel" to exit the Auto-Format function. • Select "Change Layout" to use a different layout. • Select "Print Options" to set the selected attribute to the default value. 7 Press the OK or Enter key. The Style screen is displayed. Caps mode can be.... When the tape width has not changed , the default layout for the new tape width is displayed. Press the Space key to display the print menu. 9 Select "Print" using the or key. 3 Press the OK or Enter key. When the tape width has changed , the last block layout selected is displayed. ...
Users Manual - English
Page 41
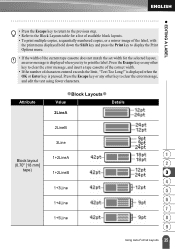
... set width for a list of available block layouts. • To print multiple copies, sequentially numbered copies, or a mirror image of the label, with the print menu displayed hold down the Shift key and press the Print key to display the Print Options menu. • If the width of characters entered exceeds the ... clear the error message, and edit the text using fewer characters. is displayed when the OK or Enter key is displayed when you try to print the label. z EDITING A LABEL • Press the Escape key to return to the previous step. • Refer to the Block Layouts table for the...
... set width for a list of available block layouts. • To print multiple copies, sequentially numbered copies, or a mirror image of the label, with the print menu displayed hold down the Shift key and press the Print key to display the Print Options menu. • If the width of characters entered exceeds the ... clear the error message, and edit the text using fewer characters. is displayed when the OK or Enter key is displayed when you try to print the label. z EDITING A LABEL • Press the Escape key to return to the previous step. • Refer to the Block Layouts table for the...
Users Manual - English
Page 43
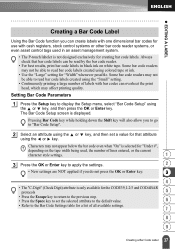
... code labels created using colored tape or ink. • Use the "Large" setting for "Width" whenever possible. Some bar code readers may affect printing quality. Always check that attribute using the or key, and then press the OK or Enter key. Some bar code readers may not appear below... one dimensional bar codes for use with bar codes can be able to read bar code labels created using the "Small" setting. • Continuously printing a large number of labels with cash registers, stock control systems or other bar code reader systems, or even asset control tags used , the number...
... code labels created using colored tape or ink. • Use the "Large" setting for "Width" whenever possible. Some bar code readers may affect printing quality. Always check that attribute using the or key, and then press the OK or Enter key. Some bar code readers may not appear below... one dimensional bar codes for use with bar codes can be able to read bar code labels created using the "Small" setting. • Continuously printing a large number of labels with cash registers, stock control systems or other bar code reader systems, or even asset control tags used , the number...
Users Manual - English
Page 44
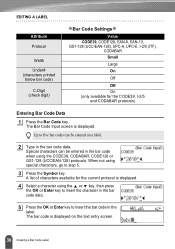
... the OK or Enter key to insert the bar code in the label. The bar code is displayed. EDITING A LABEL Attribute Protocol Width Under# (characters printed below bar code) C.Digit (check digit) zBar Code Settingsz Value CODE39, CODE128, EAN-8, EAN-13, GS1-128 (UCC/EAN-128), UPC-A, UPC-E, I -2/5 and CODABAR protocols...
... the OK or Enter key to insert the bar code in the label. The bar code is displayed. EDITING A LABEL Attribute Protocol Width Under# (characters printed below bar code) C.Digit (check digit) zBar Code Settingsz Value CODE39, CODE128, EAN-8, EAN-13, GS1-128 (UCC/EAN-128), UPC-A, UPC-E, I -2/5 and CODABAR protocols...
Users Manual - English
Page 47
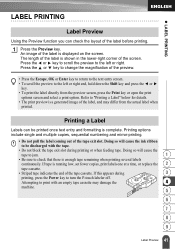
... Preview Using the Preview function you can be discharged with an empty tape cassette may differ from the preview screen, press the Print key or open the print options screen and select a print option. Refer to the left or right end, hold down the Shift key and press the or key. • To... one at a time, or replace the 2 tape cassette. • Striped tape indicates the end of the label is a generated image of the label before printing. 1 Press the Preview key. Doing so will cause the tape to jam. 1 • Be sure to turn the P-touch labeler off. An image of the ...
... Preview Using the Preview function you can be discharged with an empty tape cassette may differ from the preview screen, press the Print key or open the print options screen and select a print option. Refer to the left or right end, hold down the Shift key and press the or key. • To... one at a time, or replace the 2 tape cassette. • Striped tape indicates the end of the label is a generated image of the label before printing. 1 Press the Preview key. Doing so will cause the tape to jam. 1 • Be sure to turn the P-touch labeler off. An image of the ...
Users Manual - English
Page 48
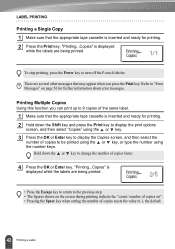
... the "count / number of copies set". • Pressing the Space key when setting the number of copies resets the value to be printed using the or key, or type the number using the or key. 3 Press the OK or Enter key to display the Copies screen, and then ... Copies Using this function you press the Print key. Hold down the Shift key and press the Print key to display the print options screen, and then select "Copies" using the number keys. "Printing...Copies" is inserted and ready for printing. 2 Press the Print key. To stop printing, press the Power key to change the number of...
... the "count / number of copies set". • Pressing the Space key when setting the number of copies resets the value to be printed using the or key, or type the number using the or key. 3 Press the OK or Enter key to display the Copies screen, and then ... Copies Using this function you press the Print key. Hold down the Shift key and press the Print key to display the print options screen, and then select "Copies" using the number keys. "Printing...Copies" is inserted and ready for printing. 2 Press the Print key. To stop printing, press the Power key to change the number of...
Users Manual - English
Page 49
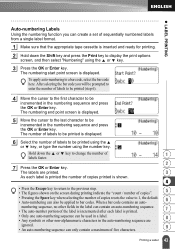
...key. The labels are ignored. 9 • An auto-numbering sequence can only contain a maximum of labels to be printed (step 6). 4 Move the cursor to the first character to be printed using the or key, or type the number using the or key. 3 Press the OK or Enter key. After... set of sequentially numbered labels from a single label format. 1 Make sure that the appropriate tape cassette is inserted and ready for printing. 2 Hold down the or key to display the print options screen, and then select "Numbering" using the number key. When a bar code contains an auto- 6 numbering sequence, no...
...key. The labels are ignored. 9 • An auto-numbering sequence can only contain a maximum of labels to be printed (step 6). 4 Move the cursor to the first character to be printed using the or key, or type the number using the or key. 3 Press the OK or Enter key. After... set of sequentially numbered labels from a single label format. 1 Make sure that the appropriate tape cassette is inserted and ready for printing. 2 Hold down the or key to display the print options screen, and then select "Numbering" using the number key. When a bar code contains an auto- 6 numbering sequence, no...


