Users Manual - English
Page 2
... the P-touch labeler PT-2030. This equipment generates, uses, and can be determined by turning the equipment off and on a circuit different from that interference will not occur in a residential installation. This manual contains various precautions and basic procedures for help. could void the user's authority to correct the interference by Brother Industries, Ltd. These limits are different. Important Changes or modifications...
... the P-touch labeler PT-2030. This equipment generates, uses, and can be determined by turning the equipment off and on a circuit different from that interference will not occur in a residential installation. This manual contains various precautions and basic procedures for help. could void the user's authority to correct the interference by Brother Industries, Ltd. These limits are different. Important Changes or modifications...
Users Manual - English
Page 4
... the problem to Brother or an Authorized Service Center within five (5) business days; (ii) the problems with your original Product are not followed and has caused damage to the product; Brother reserves the right to supply a refurbished or remanufactured replacement Machine and/or accompanying Consumable and Accessory Items and use refurbished parts provided such replacement products conform to the manufacturer's specifications for...
... the problem to Brother or an Authorized Service Center within five (5) business days; (ii) the problems with your original Product are not followed and has caused damage to the product; Brother reserves the right to supply a refurbished or remanufactured replacement Machine and/or accompanying Consumable and Accessory Items and use refurbished parts provided such replacement products conform to the manufacturer's specifications for...
Users Manual - English
Page 8
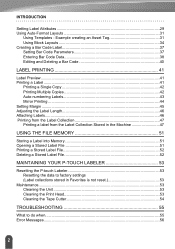
... the Label Collection Stored in the Machine 47 USING THE FILE MEMORY 51 Storing a Label into Memory 51 Opening a Stored Label File 51 Printing a Stored Label File 52 Deleting a Stored Label File 52 MAINTAINING YOUR P-TOUCH LABELER 53 Resetting the P-touch Labeler 53 Resetting the data to factory settings (Label collections stored in Favorites is not reset 53 Maintenance...53 Cleaning the Unit 53 Cleaning the Print Head 53 Cleaning the Tape Cutter 54 TROUBLESHOOTING 55 What to do when...55 Error Messages...
... the Label Collection Stored in the Machine 47 USING THE FILE MEMORY 51 Storing a Label into Memory 51 Opening a Stored Label File 51 Printing a Stored Label File 52 Deleting a Stored Label File 52 MAINTAINING YOUR P-TOUCH LABELER 53 Resetting the P-touch Labeler 53 Resetting the data to factory settings (Label collections stored in Favorites is not reset 53 Maintenance...53 Cleaning the Unit 53 Cleaning the Print Head 53 Cleaning the Tape Cutter 54 TROUBLESHOOTING 55 What to do when...55 Error Messages...

Users Manual - English
Page 10
...; Setting Margin. P. 47 Before printing, you can be created easily by selecting and then printing designs already built into the machine. 4 How to use the P-touch labeler „ Create a label with the P-touch labeler 1 GETTING STARTED • Prepare the P-touch labeler. P. 10 2 CREATING A LABEL • Entering and Editing text. P. 45 • Printing from the Label Collection Using the Label Collection function, labels can check the layout of formatting options. INTRODUCTION How to entering text, the P-touch labeler has a large...
...; Setting Margin. P. 47 Before printing, you can be created easily by selecting and then printing designs already built into the machine. 4 How to use the P-touch labeler „ Create a label with the P-touch labeler 1 GETTING STARTED • Prepare the P-touch labeler. P. 10 2 CREATING A LABEL • Entering and Editing text. P. 45 • Printing from the Label Collection Using the Label Collection function, labels can check the layout of formatting options. INTRODUCTION How to entering text, the P-touch labeler has a large...
Users Manual - English
Page 14
... tape cassette or printer may be damaged. • DO NOT try to read this machine. Any text files stored in the P-touch labeler. Doing so will damage the print head. • DO NOT attempt to extremely high or low temperatures, high humidity, or dusty locations. To hide the markings, use a darkcolored label. • Any data stored in this guide. INTRODUCTION General Precautions • DO NOT install this machine...
... tape cassette or printer may be damaged. • DO NOT try to read this machine. Any text files stored in the P-touch labeler. Doing so will damage the print head. • DO NOT attempt to extremely high or low temperatures, high humidity, or dusty locations. To hide the markings, use a darkcolored label. • Any data stored in this guide. INTRODUCTION General Precautions • DO NOT install this machine...
Users Manual - English
Page 18
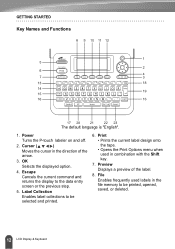
... Displays a preview of the arrow. 3. File Enables frequently used in combination with the Shift key. 7. OK Selects the displayed option. 4. Power Turns the P-touch labeler on and off. 2. Print • Prints the current label design onto the tape. • Opens the Print Options menu when used labels in the direction of the label. 8. Cursor ( ) Moves the cursor in the file memory to be selected and printed. 6. Label Collection Enables label collections to the data...
... Displays a preview of the arrow. 3. File Enables frequently used in combination with the Shift key. 7. OK Selects the displayed option. 4. Power Turns the P-touch labeler on and off. 2. Print • Prints the current label design onto the tape. • Opens the Print Options menu when used labels in the direction of the label. 8. Cursor ( ) Moves the cursor in the file memory to be selected and printed. 6. Label Collection Enables label collections to the data...
Users Manual - English
Page 19
Text 16. letter and number keys to type • Character attributes can • Returns a setting to type letters or 21. menu is opened in combination with the Shift key. Setup cursor. Letter 20. Caps Turns Caps mode on the number keys. Label 17. Symbol Use this to select and enter an accented character. 2 3 4 5 6 7 8 9 13 LCD Display & Keyboard Enables operating preferences (Bar Code, LCD Contrast, etc.) for the Use this to select and enter...
Text 16. letter and number keys to type • Character attributes can • Returns a setting to type letters or 21. menu is opened in combination with the Shift key. Setup cursor. Letter 20. Caps Turns Caps mode on the number keys. Label 17. Symbol Use this to select and enter an accented character. 2 3 4 5 6 7 8 9 13 LCD Display & Keyboard Enables operating preferences (Bar Code, LCD Contrast, etc.) for the Use this to select and enter...
Users Manual - English
Page 23
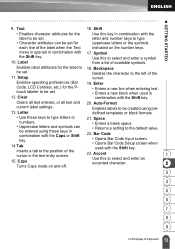
... certain operating conditions. Press the Power key again to turn the P-touch labeler on. Refer to the Auto Power- Make sure that the release lever is turned on. 6 zAuto Power-Off Timez 7 With AC adapter 5 minutes 8 With battery 5 minutes 9 17 Turning Power On/Off Tape exit slot 4 Close the tape compartment cover. z GETTING STARTED 3 Insert the tape cassette into the tape compartment, with the tape. • Store tape cassettes in the tape and ink ribbon...
... certain operating conditions. Press the Power key again to turn the P-touch labeler on. Refer to the Auto Power- Make sure that the release lever is turned on. 6 zAuto Power-Off Timez 7 With AC adapter 5 minutes 8 With battery 5 minutes 9 17 Turning Power On/Off Tape exit slot 4 Close the tape compartment cover. z GETTING STARTED 3 Insert the tape cassette into the tape compartment, with the tape. • Store tape cassettes in the tape and ink ribbon...
Users Manual - English
Page 30
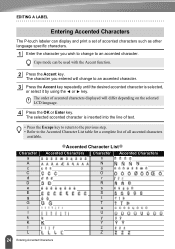
... Characters Caps mode can display and print a set of accented characters such as other language specific characters. 1 Enter the character you entered will differ depending on the selected LCD language. 4 Press the OK or Enter key. The selected accented character is selected, or select it by using the or key. The character you wish to change to an accented character. 3 Press the Accent key repeatedly until the desired accented character is inserted...
... Characters Caps mode can display and print a set of accented characters such as other language specific characters. 1 Enter the character you entered will differ depending on the selected LCD language. 4 Press the OK or Enter key. The selected accented character is selected, or select it by using the or key. The character you wish to change to an accented character. 3 Press the Accent key repeatedly until the desired accented character is inserted...
Users Manual - English
Page 31
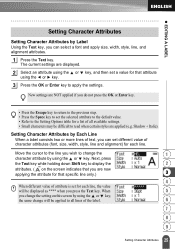
... using the or key. New settings are now applying the attribute for that specific line only.) 3 4 When different value of attribute is set the selected attribute to the default value. • Refer to read when certain styles are displayed. 2 Select an attribute using the or key, and then set different value of character attributes (font, size, width, style, line and alignment) for each line. Next, press the Text...
... using the or key. New settings are now applying the attribute for that specific line only.) 3 4 When different value of attribute is set the selected attribute to the default value. • Refer to read when certain styles are displayed. 2 Select an attribute using the or key, and then set different value of character attributes (font, size, width, style, line and alignment) for each line. Next, press the Text...
Users Manual - English
Page 34
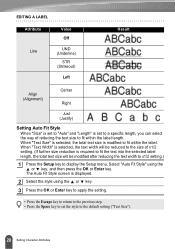
... to the previous step. • Press the Space key to set to a specific length, you can select the way of x1/2 setting. (If further size reduction is required to fit the text into the selected label length, the total text size will be modified after reducing the text width to x1/2 setting.) 1 Press the Setup key to display the Setup menu, Select "Auto Fit Style" using the or key, and then press the...
... to the previous step. • Press the Space key to set to a specific length, you can select the way of x1/2 setting. (If further size reduction is required to fit the text into the selected label length, the total text size will be modified after reducing the text width to x1/2 setting.) 1 Press the Setup key to display the Setup menu, Select "Auto Fit Style" using the or key, and then press the...
Users Manual - English
Page 38
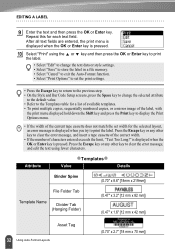
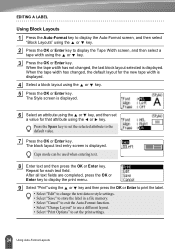
... label. • Select "Edit" to change the text data or style settings. • Select "Save" to store the label in a file memory. • Select "Cancel" to exit the Auto-Format function. • Select "Print Options" to set the print settings. • Press the Escape key to return to the previous step. • On the Style and Bar Code Setup screens, press the Space key to change the selected attribute to the default...
... label. • Select "Edit" to change the text data or style settings. • Select "Save" to store the label in a file memory. • Select "Cancel" to exit the Auto-Format function. • Select "Print Options" to set the print settings. • Press the Escape key to return to the previous step. • On the Style and Bar Code Setup screens, press the Space key to change the selected attribute to the default...
Users Manual - English
Page 40
... to display the print menu. 9 Select "Print" using the or key and then press the OK or Enter to print the label. • Select "Edit" to change the text data or style settings. • Select "Save" to store the label in a file memory. • Select "Cancel" to exit the Auto-Format function. • Select "Change Layout" to use a different layout. • Select "Print Options" to display the Tape Width screen, and then select a tape width using the...
... to display the print menu. 9 Select "Print" using the or key and then press the OK or Enter to print the label. • Select "Edit" to change the text data or style settings. • Select "Save" to store the label in a file memory. • Select "Cancel" to exit the Auto-Format function. • Select "Change Layout" to use a different layout. • Select "Print Options" to display the Tape Width screen, and then select a tape width using the...
Users Manual - English
Page 47
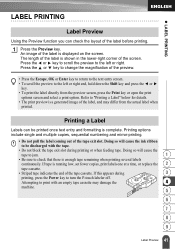
... to change the magnification of the tape cassette. Printing options include single and multiple copies, sequential numbering and mirror-printing. • Do not pull the label coming out of the label, and may damage the 4 machine. 5 6 7 8 9 41 Label Preview Attempting to print with the tape. • Do not block the tape exit slot during 3 printing, press the Power key to the left or right. The length of the label...
... to change the magnification of the tape cassette. Printing options include single and multiple copies, sequential numbering and mirror-printing. • Do not pull the label coming out of the label, and may damage the 4 machine. 5 6 7 8 9 41 Label Preview Attempting to print with the tape. • Do not block the tape exit slot during 3 printing, press the Power key to the left or right. The length of the label...
Users Manual - English
Page 48
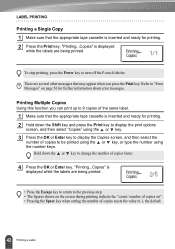
... screen, and then select the number of copies to be printed using the or key, or type the number using the number keys. To stop printing, press the Power key to change the number of copies resets the value to 1, the default. 42 Printing a Label Printing Multiple Copies Using this function you press the Print key. LABEL PRINTING Printing a Single Copy 1 Make sure that the appropriate tape cassette is displayed while the labels are being printed. • Press the...
... screen, and then select the number of copies to be printed using the or key, or type the number using the number keys. To stop printing, press the Power key to change the number of copies resets the value to 1, the default. 42 Printing a Label Printing Multiple Copies Using this function you press the Print key. LABEL PRINTING Printing a Single Copy 1 Make sure that the appropriate tape cassette is displayed while the labels are being printed. • Press the...
Users Manual - English
Page 52
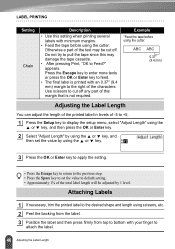
... tape cassette. • After pressing Print, "OK to default setting. • Approximately 1% of the text may be adjusted by 1 level. Use scissors to cut off any part of this margin that is printed with an 0.37" (9.4 mm) margin to the right of the characters. Press the Escape key to enter more texts or press the OK or Enter key to attach the label. 46 Adjusting the Label Length Attaching Labels...
... tape cassette. • After pressing Print, "OK to default setting. • Approximately 1% of the text may be adjusted by 1 level. Use scissors to cut off any part of this margin that is printed with an 0.37" (9.4 mm) margin to the right of the characters. Press the Escape key to enter more texts or press the OK or Enter key to attach the label. 46 Adjusting the Label Length Attaching Labels...
Users Manual - English
Page 59
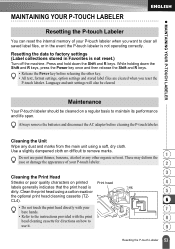
... and marks from the main unit using a cotton swab or 5 the optional print head cleaning cassette (TZ- z MAINTAINING YOUR P-TOUCH LABELER MAINTAINING YOUR P-TOUCH LABELER Resetting the P-touch Labeler You can reset the internal memory of your 7 bare hands. • Refer to the instructions provided with the print 8 head cleaning cassette for directions on difficult to clear all saved label files, or in Favorites is not reset.) Turn off the machine. While holding down the Shift...
... and marks from the main unit using a cotton swab or 5 the optional print head cleaning cassette (TZ- z MAINTAINING YOUR P-TOUCH LABELER MAINTAINING YOUR P-TOUCH LABELER Resetting the P-touch Labeler You can reset the internal memory of your 7 bare hands. • Refer to the instructions provided with the print 8 head cleaning cassette for directions on difficult to clear all saved label files, or in Favorites is not reset.) Turn off the machine. While holding down the Shift...
Users Manual - English
Page 61
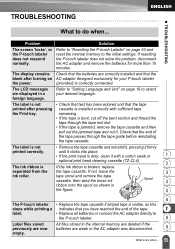
... the print head is dirty, clean it with sufficient tape remaining. • If the tape is bent, cut it firmly printed correctly. TROUBLESHOOTING z TROUBLESHOOTING What to do when... Refer to "Resetting the P-touch Labeler" on page 19 to the initial settings. Refer to "Setting Language and Unit" on page 53 and reset the internal memory to select your P-touch labeler the power. (provided) is jammed, remove the tape cassette and then pull out the jammed tape and cut...
... the print head is dirty, clean it with sufficient tape remaining. • If the tape is bent, cut it firmly printed correctly. TROUBLESHOOTING z TROUBLESHOOTING What to do when... Refer to "Resetting the P-touch Labeler" on page 19 to the initial settings. Refer to "Setting Language and Unit" on page 53 and reset the internal memory to select your P-touch labeler the power. (provided) is jammed, remove the tape cassette and then pull out the jammed tape and cut...
Users Manual - English
Page 62
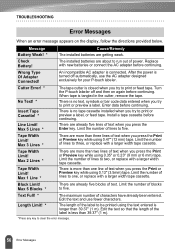
... or bar code data entered when you try to print or feed tape. Install a tape cassette before continuing. Edit the text so that the length of the label is no tape cassette installed when you press the Print or Preview key while using the text entered is tangled in the cutter, remove the tape. No Text! * There is less than three lines of power. Turn the P-touch labeler off automatically, use fewer characters. Message Cause/Remedy Battery Weak! * The installed batteries are about...
... or bar code data entered when you try to print or feed tape. Install a tape cassette before continuing. Edit the text so that the length of the label is no tape cassette installed when you press the Print or Preview key while using the text entered is tangled in the cutter, remove the tape. No Text! * There is less than three lines of power. Turn the P-touch labeler off automatically, use fewer characters. Message Cause/Remedy Battery Weak! * The installed batteries are about...
Users Manual - English
Page 64
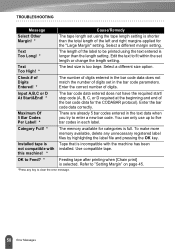
... any unnecessary registered label files by highlighting the label file and pressing the OK key. Category Full! * The memory available for the CODABAR protocol). Use compatible tape. Text Too Long! * The length of the bar code data for categories is selected. To make more memory available, delete any key to Feed? * Feeding tape after printing when [Chain print] is full. Select a different size option. this machine! * OK to clear the error message. 58 Error Messages
... any unnecessary registered label files by highlighting the label file and pressing the OK key. Category Full! * The memory available for the CODABAR protocol). Use compatible tape. Text Too Long! * The length of the bar code data for categories is selected. To make more memory available, delete any key to Feed? * Feeding tape after printing when [Chain print] is full. Select a different size option. this machine! * OK to clear the error message. 58 Error Messages


