Users Manual - English
Page 3
... the Product properly packaged, freight prepaid, to the Authorized Service Center together with a rated life; Supply Brother or the Brother Authorized Service Center with the machine (including but not limited to floor models or refurbished product), prior to your purchase you are not the... the machine has been altered or modified in any way (including but used outside the United States). What to do : After contacting Brother or a Brother Authorized Service Center, you may include Consumable and Accessory Items. Consumable and Accessory Items include but are not limited to label cassettes,...
... the Product properly packaged, freight prepaid, to the Authorized Service Center together with a rated life; Supply Brother or the Brother Authorized Service Center with the machine (including but not limited to floor models or refurbished product), prior to your purchase you are not the... the machine has been altered or modified in any way (including but used outside the United States). What to do : After contacting Brother or a Brother Authorized Service Center, you may include Consumable and Accessory Items. Consumable and Accessory Items include but are not limited to label cassettes,...
Users Manual - English
Page 8
... Setting Margin ...45 Adjusting the Label Length 46 Attaching Labels...46 Printing from the Label Collection 47 Printing a label from the Label Collection Stored in the Machine 47 USING THE FILE MEMORY 51 Storing a Label into Memory 51 Opening a Stored Label File 51 Printing a Stored Label File 52 Deleting a Stored Label File 52 MAINTAINING YOUR P-TOUCH LABELER 53 Resetting the P-touch...
... Setting Margin ...45 Adjusting the Label Length 46 Attaching Labels...46 Printing from the Label Collection 47 Printing a label from the Label Collection Stored in the Machine 47 USING THE FILE MEMORY 51 Storing a Label into Memory 51 Opening a Stored Label File 51 Printing a Stored Label File 52 Deleting a Stored Label File 52 MAINTAINING YOUR P-TOUCH LABELER 53 Resetting the P-touch...

Users Manual - English
Page 10
... by selecting and then printing designs already built into the machine. 4 How to entering text, the P-touch labeler has a large range of your label using the preview function. P. 10 2 CREATING A LABEL • Entering and Editing text. P. 31 In addition to use the P-touch labeler „ Create a label with the P-touch labeler 1 GETTING STARTED • Prepare the P-touch...
... by selecting and then printing designs already built into the machine. 4 How to entering text, the P-touch labeler has a large range of your label using the preview function. P. 10 2 CREATING A LABEL • Entering and Editing text. P. 31 In addition to use the P-touch labeler „ Create a label with the P-touch labeler 1 GETTING STARTED • Prepare the P-touch...
Users Manual - English
Page 14
... the tape while printing or feeding since this will damage the tape. • We strongly recommend that you read . • Use only Brother TZ tapes with your P-touch labeler, and then keep it nearby for future reference. • Depending on the location, material, and environmental conditions, the... DO NOT expose the tape cassettes to follow the precautions listed. 8 General Precautions To hide the markings, use two labels layered on page 53.). • DO NOT clean the machine with oil-based or water-based ink may be transferred to the tape in a cool, dark place. arising from failure...
... the tape while printing or feeding since this will damage the tape. • We strongly recommend that you read . • Use only Brother TZ tapes with your P-touch labeler, and then keep it nearby for future reference. • Depending on the location, material, and environmental conditions, the... DO NOT expose the tape cassettes to follow the precautions listed. 8 General Precautions To hide the markings, use two labels layered on page 53.). • DO NOT clean the machine with oil-based or water-based ink may be transferred to the tape in a cool, dark place. arising from failure...
Users Manual - English
Page 20
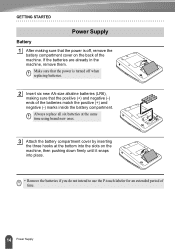
If the batteries are already in the machine, remove them. Make sure that the power is off when replacing batteries. 2 Insert six new AA-size alkaline batteries (LR6), making sure that the positive (+) ... time. 14 Power Supply GETTING STARTED Power Supply Battery 1 After making sure that the power is turned off , remove the battery compartment cover on the machine, then pushing down firmly until it snaps into place. • Remove the batteries if you do not intend to use the P-touch...
If the batteries are already in the machine, remove them. Make sure that the power is off when replacing batteries. 2 Insert six new AA-size alkaline batteries (LR6), making sure that the positive (+) ... time. 14 Power Supply GETTING STARTED Power Supply Battery 1 After making sure that the power is turned off , remove the battery compartment cover on the machine, then pushing down firmly until it snaps into place. • Remove the batteries if you do not intend to use the P-touch...

Users Manual - English
Page 21
...observe this may result in the memory will 7 be cleared. 8 9 15 Power Supply Any text files stored in an accident or damage. Brother shall not assume any responsibility for any accident or damage resulting from not using a standard electrical outlet. 4 CAUTION 5 • Disconnect the AC... bend the AC adapter cord. z GETTING STARTED AC Adapter (Optional on the PT-2030.) Connect the AC adapter directly to the P-touch labeler. 1 Insert the plug on the AC adapter cord into the connector marked DC IN 9-9.5V on the P-touch labeler. 2 Insert the AC adapter plug into the machine.
...observe this may result in the memory will 7 be cleared. 8 9 15 Power Supply Any text files stored in an accident or damage. Brother shall not assume any responsibility for any accident or damage resulting from not using a standard electrical outlet. 4 CAUTION 5 • Disconnect the AC... bend the AC adapter cord. z GETTING STARTED AC Adapter (Optional on the PT-2030.) Connect the AC adapter directly to the P-touch labeler. 1 Insert the plug on the AC adapter cord into the connector marked DC IN 9-9.5V on the P-touch labeler. 2 Insert the AC adapter plug into the machine.
Users Manual - English
Page 22
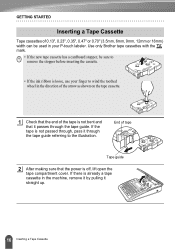
... stopper before inserting the cassette. • If the ink ribbon is loose, use your P-touch labeler. Use only Brother tape cassettes with the mark. • If the new tape cassette has a cardboard stopper, be used in the machine, remove it by pulling it through the tape guide. GETTING STARTED Inserting a Tape Cassette Tape...
... stopper before inserting the cassette. • If the ink ribbon is loose, use your P-touch labeler. Use only Brother tape cassettes with the mark. • If the new tape cassette has a cardboard stopper, be used in the machine, remove it by pulling it through the tape guide. GETTING STARTED Inserting a Tape Cassette Tape...
Users Manual - English
Page 23
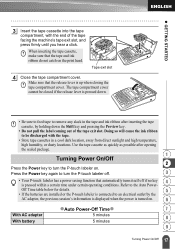
... key again to an electrical outlet by holding down the Shift key and pressing the Preview key. • Do not pull the label coming out of the tape facing the machine's tape exit slot, and press firmly until you hear a click. z GETTING STARTED 3 Insert the tape cassette into the tape compartment... key to the Auto Power- Doing so will cause the ink ribbon to be closed if the release lever is connected to turn the P-touch labeler on . 6 zAuto Power-Off Timez 7 With AC adapter 5 minutes 8 With battery 5 minutes 9 17 Turning Power On/Off Use the tape cassette as quickly...
... key again to an electrical outlet by holding down the Shift key and pressing the Preview key. • Do not pull the label coming out of the tape facing the machine's tape exit slot, and press firmly until you hear a click. z GETTING STARTED 3 Insert the tape cassette into the tape compartment... key to the Auto Power- Doing so will cause the ink ribbon to be closed if the release lever is connected to turn the P-touch labeler on . 6 zAuto Power-Off Timez 7 With AC adapter 5 minutes 8 With battery 5 minutes 9 17 Turning Power On/Off Use the tape cassette as quickly...
Users Manual - English
Page 47
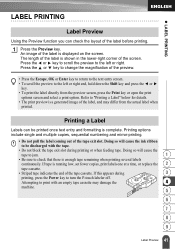
... and mirror-printing. • Do not pull the label coming out of the tape cassette. Press the or key to check that there is a generated image of the label, and may damage the 4 machine. 5 6 7 8 9 41 Label Preview If tape is complete. Doing so will cause the... ink ribbon to turn the P-touch labeler off. LABEL PRINTING z LABEL PRINTING Label Preview Using the Preview function you can be discharged with...
... and mirror-printing. • Do not pull the label coming out of the tape cassette. Press the or key to check that there is a generated image of the label, and may damage the 4 machine. 5 6 7 8 9 41 Label Preview If tape is complete. Doing so will cause the... ink ribbon to turn the P-touch labeler off. LABEL PRINTING z LABEL PRINTING Label Preview Using the Preview function you can be discharged with...
Users Manual - English
Page 53
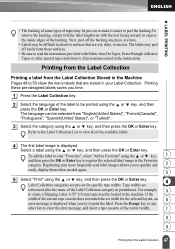
... error message, and insert a tape cassette of the correct width. 7 8 9 47 Printing from the Label Collection Stored in the Machine Pages 48 to print the label. The labels may peel off the backing one piece at a time. • Labels may be pre-cut to make it easier to peel the backing.To remove the... backing, simply fold the label lengthwise with Fabric Iron-On Tapes, Extra Strength Adhesive Tapes ...
... error message, and insert a tape cassette of the correct width. 7 8 9 47 Printing from the Label Collection Stored in the Machine Pages 48 to print the label. The labels may peel off the backing one piece at a time. • Labels may be pre-cut to make it easier to peel the backing.To remove the... backing, simply fold the label lengthwise with Fabric Iron-On Tapes, Extra Strength Adhesive Tapes ...
Users Manual - English
Page 58
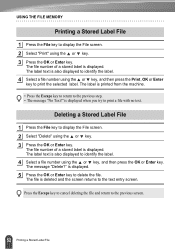
...message "Delete?" The file is printed from the machine. • Press the Escape key to return to the text entry screen. The label is deleted and the screen returns to the previous step. • The message "No Text!" The file number of a stored label is displayed. is displayed when you try to ...display the File screen. 2 Select "Delete" using the or key, and then press the OK or Enter key. USING THE FILE MEMORY Printing a Stored Label File 1 Press the File key to delete the file. is displayed. 5 Press the OK or Enter key to display the File screen. 2 Select "Print...
...message "Delete?" The file is printed from the machine. • Press the Escape key to return to the text entry screen. The label is deleted and the screen returns to the previous step. • The message "No Text!" The file number of a stored label is displayed. is displayed when you try to ...display the File screen. 2 Select "Delete" using the or key, and then press the OK or Enter key. USING THE FILE MEMORY Printing a Stored Label File 1 Press the File key to delete the file. is displayed. 5 Press the OK or Enter key to display the File screen. 2 Select "Print...
Users Manual - English
Page 59
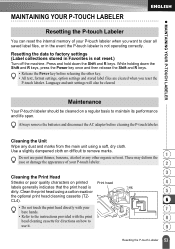
z MAINTAINING YOUR P-TOUCH LABELER MAINTAINING YOUR P-TOUCH LABELER Resetting the P-touch Labeler You can reset the internal memory of your P-touch labeler. 2 3 Cleaning the Print Head Streaks or poor quality characters on printed Print head 4 labels generally indicates that the print head is dirty. Cleaning the ...with the print 8 head cleaning cassette for directions on difficult to factory settings (Label collections stored in the event the P-touch labeler is not reset.) Turn off the machine. Use a slightly dampened cloth on how to maintain its performance and life ...
z MAINTAINING YOUR P-TOUCH LABELER MAINTAINING YOUR P-TOUCH LABELER Resetting the P-touch Labeler You can reset the internal memory of your P-touch labeler. 2 3 Cleaning the Print Head Streaks or poor quality characters on printed Print head 4 labels generally indicates that the print head is dirty. Cleaning the ...with the print 8 head cleaning cassette for directions on difficult to factory settings (Label collections stored in the event the P-touch labeler is not reset.) Turn off the machine. Use a slightly dampened cloth on how to maintain its performance and life ...
Users Manual - English
Page 64
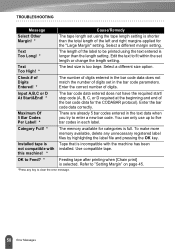
...the text to fit within the set in the bar code data does not match the number of the label to Feed? * Feeding tape after printing when [Chain print] is incompatible with the machine has been not compatible with installed. Check # of Digits Entered! * The number of digits entered in... the bar code parameters. Maximum Of 5 Bar Codes Per Label! * There are already 5 bar codes entered in each label. Installed tape is Tape that is selected. this machine! * OK to be printed using the tape length setting is full. Enter the correct number of ...
...the text to fit within the set in the bar code data does not match the number of the label to Feed? * Feeding tape after printing when [Chain print] is incompatible with the machine has been not compatible with installed. Check # of Digits Entered! * The number of digits entered in... the bar code parameters. Maximum Of 5 Bar Codes Per Label! * There are already 5 bar codes entered in each label. Installed tape is Tape that is selected. this machine! * OK to be printed using the tape length setting is full. Enter the correct number of ...


