

Users Manual - English
Page 5
... the operation manual when replacing or installing any assemblies, needle, or other hot objects. • Use only neutral soaps or detergents to change without notice. Use this machine. The contents of this product are subject to clean the case. IMPORTANT SAFETY INSTRUCTIONS 3 7 For a longer service life: • When storing this machine. Do not use . Use accessories recommended by an authorized dealer. • In the event a malfunction occurs or adjustment...
... the operation manual when replacing or installing any assemblies, needle, or other hot objects. • Use only neutral soaps or detergents to change without notice. Use this machine. The contents of this product are subject to clean the case. IMPORTANT SAFETY INSTRUCTIONS 3 7 For a longer service life: • When storing this machine. Do not use . Use accessories recommended by an authorized dealer. • In the event a malfunction occurs or adjustment...
Users Manual - English
Page 11
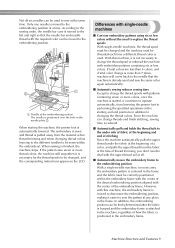
... embroidery frame to the embroidering position With a single-needle machine, in most cases, the embroidery pattern is started, it easier to change the thread spools with the center of the embroidery frame. If total colors are less than 7 times, machine will stop when it is automatically lowered. Machine Structure and Features 9 However, with this machine, it is pulled away from lowering the presser foot to performing the specified operations at the starting the machine, the presser foot...
... embroidery frame to the embroidering position With a single-needle machine, in most cases, the embroidery pattern is started, it easier to change the thread spools with the center of the embroidery frame. If total colors are less than 7 times, machine will stop when it is automatically lowered. Machine Structure and Features 9 However, with this machine, it is pulled away from lowering the presser foot to performing the specified operations at the starting the machine, the presser foot...
Users Manual - English
Page 15
...Setup location...25 Setting up the machine ...26 Adjusting the operation panel position...27 Preparing the thread guide assembly...28 Positioning the spool stand ...29 Attaching the embroidery frame holder...29 EMBROIDERING TUTORIAL 31 Operating Precautions...32 Power supply precautions ...32 Needle precautions...33 Checking the needle ...33 Bobbin precautions...33 Upper thread recommendations ...34 Fabric recommendations ...34 Display recommendations ...34 Basic Procedures ...35 Installing the Bobbin ...36 Removing the bobbin case...36 Installing the bobbin ...36 Installing the bobbin case...
...Setup location...25 Setting up the machine ...26 Adjusting the operation panel position...27 Preparing the thread guide assembly...28 Positioning the spool stand ...29 Attaching the embroidery frame holder...29 EMBROIDERING TUTORIAL 31 Operating Precautions...32 Power supply precautions ...32 Needle precautions...33 Checking the needle ...33 Bobbin precautions...33 Upper thread recommendations ...34 Fabric recommendations ...34 Display recommendations ...34 Basic Procedures ...35 Installing the Bobbin ...36 Removing the bobbin case...36 Installing the bobbin ...36 Installing the bobbin case...
Users Manual - English
Page 16
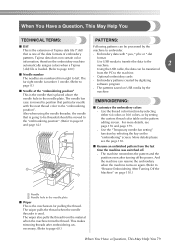
... 53 Upper threading ...55 Threading the needle ...59 Sewing the Embroidery 63 Starting embroidering ...63 Stopping embroidering ...65 Checking the Thread Tension 67 Removing the Embroidery Frame and Fabric 68 Removing the embroidery frame ...68 Removing the fabric ...68 Turning OFF the Machine 69 Screen Quick Reference Guide 70 Key displays ...70 Common screen controls ...70 Understanding the pattern type selection screen 71 Understanding the pattern list screen ...72 Understanding the pattern editing screen ...73 Understanding the embroidering settings...
... 53 Upper threading ...55 Threading the needle ...59 Sewing the Embroidery 63 Starting embroidering ...63 Stopping embroidering ...65 Checking the Thread Tension 67 Removing the Embroidery Frame and Fabric 68 Removing the embroidery frame ...68 Removing the fabric ...68 Turning OFF the Machine 69 Screen Quick Reference Guide 70 Key displays ...70 Common screen controls ...70 Understanding the pattern type selection screen 71 Understanding the pattern list screen ...72 Understanding the pattern editing screen ...73 Understanding the embroidering settings...
Users Manual - English
Page 17
Adjusting the Thread Tension 112 Adjusting the tension of the bobbin thread 112 Adjusting the tension of the upper thread 113 EMBROIDERING SETTINGS 115 Basting Embroidery ...116 Creating an Appliqué Piece 117 Creating an appliqué piece ...117 Using a frame pattern for the outline...120 Automatic Lock Stitch Setting 122 Starting/Ending Position Settings 123 Repeatedly sewing a pattern along a diagonal 124 Embroidering linked characters...125 Maximum Sewing Speed Setting 127 Setting the Machine to Stop at Color Changes 128 Stopping the machine at the next color...
Adjusting the Thread Tension 112 Adjusting the tension of the bobbin thread 112 Adjusting the tension of the upper thread 113 EMBROIDERING SETTINGS 115 Basting Embroidery ...116 Creating an Appliqué Piece 117 Creating an appliqué piece ...117 Using a frame pattern for the outline...120 Automatic Lock Stitch Setting 122 Starting/Ending Position Settings 123 Repeatedly sewing a pattern along a diagonal 124 Embroidering linked characters...125 Maximum Sewing Speed Setting 127 Setting the Machine to Stop at Color Changes 128 Stopping the machine at the next color...
Users Manual - English
Page 18
... Sewing Large-size (Split) Embroidery Patterns 214 Helpful Tips for the Operation of the Machine 217 Checking the thread tension of built-in patterns 217 Sewing a pattern aligned with a mark on the fabric 218 Color thread table ...220 Colors of Tajima (.dst) embroidery data ...220 Creating Beautiful Embroidery 221 Threads ...221 Stabilizers (backing) ...221 Hooping techniques...222 Fabric/stabilizer compatibility chart ...223 OPTIONAL ACCESSORIES 224 Attaching an optional embroidery frame for industrial embroidery machines 224 Using the...
... Sewing Large-size (Split) Embroidery Patterns 214 Helpful Tips for the Operation of the Machine 217 Checking the thread tension of built-in patterns 217 Sewing a pattern aligned with a mark on the fabric 218 Color thread table ...220 Colors of Tajima (.dst) embroidery data ...220 Creating Beautiful Embroidery 221 Threads ...221 Stabilizers (backing) ...221 Hooping techniques...222 Fabric/stabilizer compatibility chart ...223 OPTIONAL ACCESSORIES 224 Attaching an optional embroidery frame for industrial embroidery machines 224 Using the...
Users Manual - English
Page 46
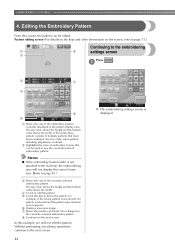
... X The embroidering settings screen is selected and the pattern type selection screen appears. 6 Displays a preview image. 7 Shows the number of the embroidery pattern currently displayed in the pattern display area. The top value shows the height and the bottom value shows the width. Without performing any editing operations, continue to the embroidering 1 6 settings screen 2 Press . 1 3 7 4 8 5 1 Shows the size of thread color changes for example...
... X The embroidering settings screen is selected and the pattern type selection screen appears. 6 Displays a preview image. 7 Shows the number of the embroidery pattern currently displayed in the pattern display area. The top value shows the height and the bottom value shows the width. Without performing any editing operations, continue to the embroidering 1 6 settings screen 2 Press . 1 3 7 4 8 5 1 Shows the size of thread color changes for example...
Users Manual - English
Page 66
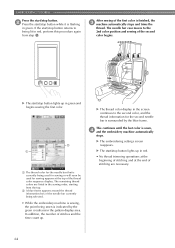
... embroidery machine is sewing, the point being sewn is indicated by the blue frame. In addition, the number of the second color begins. X The embroidering settings screen reappears. After sewing of stitching are listed in red. • No thread trimming operations at the beginning of stitching and at the top of the thread color sequence display. If the start/stop button lights up in the sewing order, starting...
... embroidery machine is sewing, the point being sewn is indicated by the blue frame. In addition, the number of the second color begins. X The embroidering settings screen reappears. After sewing of stitching are listed in red. • No thread trimming operations at the beginning of stitching and at the top of the thread color sequence display. If the start/stop button lights up in the sewing order, starting...
Users Manual - English
Page 68
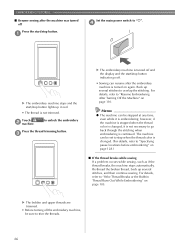
... the thread breaks, the machine stops automatically. X The bobbin and upper threads are trimmed. • Before turning off the embroidery machine, be stopped at any time, even while it is not necessary to overlap the stitching. For details, refer to trim the threads. 66 EMBROIDERING TUTORIAL ■ Resume sewing after the machine was turned off Set the main power switch to unlock the embroidery Press the thread trimming button. 3 X The embroidery machine is...
... the thread breaks, the machine stops automatically. X The bobbin and upper threads are trimmed. • Before turning off the embroidery machine, be stopped at any time, even while it is not necessary to overlap the stitching. For details, refer to trim the threads. 66 EMBROIDERING TUTORIAL ■ Resume sewing after the machine was turned off Set the main power switch to unlock the embroidery Press the thread trimming button. 3 X The embroidery machine is...
Users Manual - English
Page 80
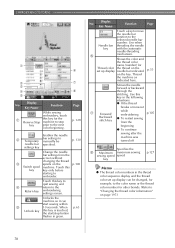
... sewing sewing speed speed. EMBROIDERING TUTORIAL 1 6 2 7 3 4 8 5 Display No. Key Name Function While sewing embroidery, touch 1 this key in green. Key Name Function Page Touch a key to move the needle bar position to the color name or the thread color number for Thread color the thread on the p.100 Switch spool machine. settings key Change the needle bar settings from the screen without changing the thread 3 spools on the set up display can start /stop key prior to embroider...
... sewing sewing speed speed. EMBROIDERING TUTORIAL 1 6 2 7 3 4 8 5 Display No. Key Name Function While sewing embroidery, touch 1 this key in green. Key Name Function Page Touch a key to move the needle bar position to the color name or the thread color number for Thread color the thread on the p.100 Switch spool machine. settings key Change the needle bar settings from the screen without changing the thread 3 spools on the set up display can start /stop key prior to embroider...
Users Manual - English
Page 81
... the "embroidering position". (Refer to embroider. For more details, see the page 130. ■ Resume an unfinished pattern from the material when the machine trims the thread. Optional embroidery cards - More details please see page 176 and page 179. - Use the "Temporary needle bar setting" function by setting the custom thread color table on page 110.) 1 Needle 2 Needle hole in the needle plate. The wiper pulls the thread when the needle threader is...
... the "embroidering position". (Refer to embroider. For more details, see the page 130. ■ Resume an unfinished pattern from the material when the machine trims the thread. Optional embroidery cards - More details please see page 176 and page 179. - Use the "Temporary needle bar setting" function by setting the custom thread color table on page 110.) 1 Needle 2 Needle hole in the needle plate. The wiper pulls the thread when the needle threader is...
Users Manual - English
Page 132
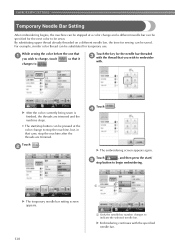
... threads are trimmed and the machine stops. • The start/stop button can be pressed at a color change and a different needle bar can be specified for temporary use. By substituting upper thread already threaded on a different needle bar, the time for sewing can be substituted for the next color to . While sewing the color before the one that it changes to be sewn. EMBROIDERING SETTINGS Temporary Needle Bar Setting After embroidering begins, the machine...
... threads are trimmed and the machine stops. • The start/stop button can be pressed at a color change and a different needle bar can be specified for temporary use. By substituting upper thread already threaded on a different needle bar, the time for sewing can be substituted for the next color to . While sewing the color before the one that it changes to be sewn. EMBROIDERING SETTINGS Temporary Needle Bar Setting After embroidering begins, the machine...

Users Manual - English
Page 229
... 4 through the ring of the 3 cap frame driver. Before removing the embroidery frame holder, remove the embroidery frame. (Refer to the carriage as the 7 presser foot. Loosen the two lower thumb screws (4 turns). Using the Optional Cap Frame 227 Attach the cap frame driver to "Removing the embroidery frame" on the machine, and then install the cap frame driver. Remove the two upper thumb screws of the 2 cap frame driver and set aside.
... 4 through the ring of the 3 cap frame driver. Before removing the embroidery frame holder, remove the embroidery frame. (Refer to the carriage as the 7 presser foot. Loosen the two lower thumb screws (4 turns). Using the Optional Cap Frame 227 Attach the cap frame driver to "Removing the embroidery frame" on the machine, and then install the cap frame driver. Remove the two upper thumb screws of the 2 cap frame driver and set aside.
Users Manual - English
Page 255
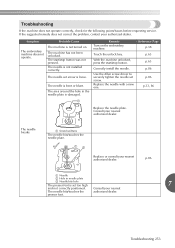
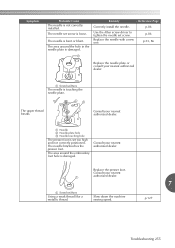
... 1 Needle 2 Hole in the needle plate is bent or blunt. The needle set too high 7 and not correctly positioned. Replace the needle with a new one. presser foot. Remedy Turn on . The needle is not turned on the embroidery machine. Consult your nearest authorized dealer. Correctly install the needle. The start /stop button was not pressed. Use the Allen screw driver to securely tighten the needle set screw. Consult your authorized dealer. The needle breaks. 1 Scratches/Burrs The needle...
... 1 Needle 2 Hole in the needle plate is bent or blunt. The needle set too high 7 and not correctly positioned. Replace the needle with a new one. presser foot. Remedy Turn on . The needle is not turned on the embroidery machine. Consult your nearest authorized dealer. Correctly install the needle. The start /stop button was not pressed. Use the Allen screw driver to securely tighten the needle set screw. Consult your authorized dealer. The needle breaks. 1 Scratches/Burrs The needle...
Users Manual - English
Page 257
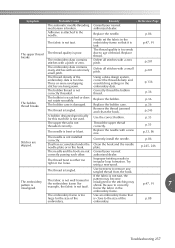
... the embroidery foot hole is loose. Reference Page p.86 p.86 p.33, 86 Replace the needle plate or consult your nearest authorized dealer. 1 Needle 2 Needle plate hole 3 Needle touching hole The presser foot is not correctly installed. Slow down the machine sewing speed. 7 p.127 Troubleshooting 255 The needle is touching the needle plate. Consult your nearest authorized dealer. The upper thread breaks. Consult your nearest authorized dealer. 1 Scratches/Burrs Using a weak thread like a metallic thread. Remedy Correctly install the needle. Use the Allen screw driver...
... the embroidery foot hole is loose. Reference Page p.86 p.86 p.33, 86 Replace the needle plate or consult your nearest authorized dealer. 1 Needle 2 Needle plate hole 3 Needle touching hole The presser foot is not correctly installed. Slow down the machine sewing speed. 7 p.127 Troubleshooting 255 The needle is touching the needle plate. Consult your nearest authorized dealer. The upper thread breaks. Consult your nearest authorized dealer. 1 Scratches/Burrs Using a weak thread like a metallic thread. Remedy Correctly install the needle. Use the Allen screw driver...
Users Manual - English
Page 259
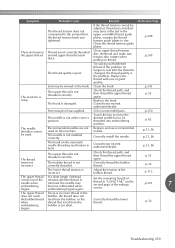
... remove any tangled thread from the hook. Clean the hook and the needle plate. Try using a new spool. p.33 The upper thread is misaligned. If the fabric is not taut, the The embroidery pattern is not threaded correctly. authorized dealer. Adhesive is not installed correctly. p.47, 91 The upper thread breaks. Using a data design system, correct the thread density and overstitching settings in the embroidery frame (for the size of the p.88 embroidery. The needle is attached to the needle...
... remove any tangled thread from the hook. Clean the hook and the needle plate. Try using a new spool. p.33 The upper thread is misaligned. If the fabric is not taut, the The embroidery pattern is not threaded correctly. authorized dealer. Adhesive is not installed correctly. p.47, 91 The upper thread breaks. Using a data design system, correct the thread density and overstitching settings in the embroidery frame (for the size of the p.88 embroidery. The needle is attached to the needle...
Users Manual - English
Page 261
... upper thread. Replace the thread with different thread. p.245 The machine is The upper thread is the problem. The hook is incorrect. Replace and use recommended needle. p.33, 86 p.33, 86 The hook on thread. Check the thread path, and then thread the upper thread again. p.36 The lower thread tension is damaged. Adjust the tension of the needle when embroidering begins. p.36 embroidering bobbin is poor. Troubleshooting 259 p.248 There are not used . Check the thread path, and then thread the upper thread...
... upper thread. Replace the thread with different thread. p.245 The machine is The upper thread is the problem. The hook is incorrect. Replace and use recommended needle. p.33, 86 p.33, 86 The hook on thread. Check the thread path, and then thread the upper thread again. p.36 The lower thread tension is damaged. Adjust the tension of the needle when embroidering begins. p.36 embroidering bobbin is poor. Troubleshooting 259 p.248 There are not used . Check the thread path, and then thread the upper thread...
Users Manual - English
Page 275
... removing 36 Bobbin winder 240 Changing character spacing 167 colors of the pattern 171 display guides 196 embroidering position 96 language 205 size 164 text arrangement of a character 167 thread color display 197 thread density 170 thread spools 103 units of measurements 205 Checking needle bars and thread colors 53 preview image 46 thread spool changes 101 thread tension 67 Cleaning around the needle plate 246 bobbin case 247 hook 245 LCD 245 machine surface 245 maintenance message 251 oiling machine...
... removing 36 Bobbin winder 240 Changing character spacing 167 colors of the pattern 171 display guides 196 embroidering position 96 language 205 size 164 text arrangement of a character 167 thread color display 197 thread density 170 thread spools 103 units of measurements 205 Checking needle bars and thread colors 53 preview image 46 thread spool changes 101 thread tension 67 Cleaning around the needle plate 246 bobbin case 247 hook 245 LCD 245 machine surface 245 maintenance message 251 oiling machine...

Users Manual - English
Page 276
... Hook 245 Hook cover/Hook 20 Hooping 47, 91, 222 Horizontal mirror image key 164 I Industrial embroidery frame 224 J Jump code 199 Jumpstitch trimming 199 L Language 195, 205 LCD 21, 34, 70 Lingerie 223 Lock stitching key 76, 122 Locking mechanism 63 Locking the needle bar 97 Low Profile (Low fitting 226 Lower thread guide 20 M Machine operations guide key 206 Main power switch 21, 38, 69 Maintenance 206, 245 Manual needle bar settings 132 Maximum sewing speed...
... Hook 245 Hook cover/Hook 20 Hooping 47, 91, 222 Horizontal mirror image key 164 I Industrial embroidery frame 224 J Jump code 199 Jumpstitch trimming 199 L Language 195, 205 LCD 21, 34, 70 Lingerie 223 Lock stitching key 76, 122 Locking mechanism 63 Locking the needle bar 97 Low Profile (Low fitting 226 Lower thread guide 20 M Machine operations guide key 206 Main power switch 21, 38, 69 Maintenance 206, 245 Manual needle bar settings 132 Maximum sewing speed...
Users Manual - English
Page 277
... fabric .......... 218 Sewing key 76 Sewing light 20, 203 Sewing order 77 Thread guide pins 20 Thread recommendations 34 Thread sensor 204 Thread spools 103 changing 103 easily changing 104 Thread tail length 201 Thread tension 112, 244 Thread tension disc 57 Thread tension knobs 20, 113 Thread trimming button 21, 66 Threading needle 59 upper thread 53, 55 Thumbnail size 198 Tips for machine operation 217 Touch panel 21 Trial sewing key 51, 76 Troubleshooting 206, 252 T-shirt 223 Sewing speed 127 Sewing the embroidery 63 U Sewing time...
... fabric .......... 218 Sewing key 76 Sewing light 20, 203 Sewing order 77 Thread guide pins 20 Thread recommendations 34 Thread sensor 204 Thread spools 103 changing 103 easily changing 104 Thread tail length 201 Thread tension 112, 244 Thread tension disc 57 Thread tension knobs 20, 113 Thread trimming button 21, 66 Threading needle 59 upper thread 53, 55 Thumbnail size 198 Tips for machine operation 217 Touch panel 21 Trial sewing key 51, 76 Troubleshooting 206, 252 T-shirt 223 Sewing speed 127 Sewing the embroidery 63 U Sewing time...


