
Users Manual - English
Page 23
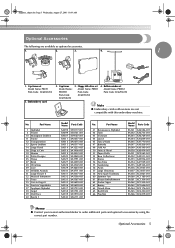
...-001 XC1168-001 XC1304-001 XC1502-001 XC1646-001 XC2176-001 XC4220-001 XC4819-001 Memo ● Contact your nearest authorized dealer to order additional parts and optional accessories by using the correct part number. Embroidery card 2. Cap frame set Model Name: PRFD1 Parts Code: XC6289-052 4. Cap frame Model Name: PRCFH1 Parts Code: XC6958-052 3.
...-001 XC1168-001 XC1304-001 XC1502-001 XC1646-001 XC2176-001 XC4220-001 XC4819-001 Memo ● Contact your nearest authorized dealer to order additional parts and optional accessories by using the correct part number. Embroidery card 2. Cap frame set Model Name: PRFD1 Parts Code: XC6289-052 4. Cap frame Model Name: PRCFH1 Parts Code: XC6958-052 3.

Users Manual - English
Page 184
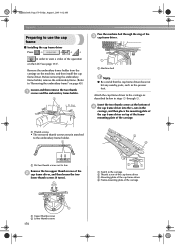
... tubular fabric or pre-assembled garments to be placed around the finished design when the frame is necessary to hold caps for use on a tubular machine). Cap frames: These are specialized embroidery frames (hoops) designed to make the fabric flat and smooth. If there are available in a variety of it... frame may cause puckers around the hook assembly. Pull no more than is removed. It allows embroidering of the front of a garment without stitching through the back of styles for various machines, with two basic styles: one that must be removed, be generated between design parts....
... tubular fabric or pre-assembled garments to be placed around the finished design when the frame is necessary to hold caps for use on a tubular machine). Cap frames: These are specialized embroidery frames (hoops) designed to make the fabric flat and smooth. If there are available in a variety of it... frame may cause puckers around the hook assembly. Pull no more than is removed. It allows embroidering of the front of a garment without stitching through the back of styles for various machines, with two basic styles: one that must be removed, be generated between design parts....
Users Manual - English
Page 188
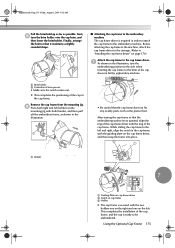
... the embroidery frame holder, remove the embroidery frame. (Refer to "Removing the embroidery frame" on page 45.) Loosen and then remove the two thumb 1 screws and the embroidery frame holder. 1 1 1 Machine bed Note ● Be careful that the cap frame driver does not hit any nearby parts, such as... described below in steps 4 through the ring of the operation on the machine, and then install the cap frame driver. Remove the embroidery frame holder from the carriage on the LCD (see page...
... the embroidery frame holder, remove the embroidery frame. (Refer to "Removing the embroidery frame" on page 45.) Loosen and then remove the two thumb 1 screws and the embroidery frame holder. 1 1 1 Machine bed Note ● Be careful that the cap frame driver does not hit any nearby parts, such as... described below in steps 4 through the ring of the operation on the machine, and then install the cap frame driver. Remove the embroidery frame holder from the carriage on the LCD (see page...
Users Manual - English
Page 193
... the cap frame to the machine, attach the cap frame driver to the carriage. (Refer to "Installing the cap frame driver" on cap frame 3 Holder X The cap frame is ready to the cap frame driver. 1 As shown in the illustration. 1 • Be careful that the cap frame does not hit any nearby parts, such as possible. While sliding the cap frame to the embroidery machine The cap frame driver...
... the cap frame to the machine, attach the cap frame driver to the carriage. (Refer to "Installing the cap frame driver" on cap frame 3 Holder X The cap frame is ready to the cap frame driver. 1 As shown in the illustration. 1 • Be careful that the cap frame does not hit any nearby parts, such as possible. While sliding the cap frame to the embroidery machine The cap frame driver...
Users Manual - English
Page 194
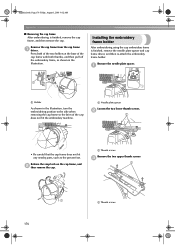
...when removing the cap frame so the brim of the cap frame with both of the two holders at the base of the cap does not hit the embroidery machine. 1 Needle plate spacer Loosen the two lower thumb screws. 2 • Be careful that the cap frame does not hit any nearby parts, such as ...shown in the illustration. Press both thumbs, and then pull off the embroidery frame, as the presser foot. Release the snap lock on the cap frame, and 2 then remove the cap. 1 Thumb screws Remove the two upper ...
...when removing the cap frame so the brim of the cap frame with both of the two holders at the base of the cap does not hit the embroidery machine. 1 Needle plate spacer Loosen the two lower thumb screws. 2 • Be careful that the cap frame does not hit any nearby parts, such as ...shown in the illustration. Press both thumbs, and then pull off the embroidery frame, as the presser foot. Release the snap lock on the cap frame, and 2 then remove the cap. 1 Thumb screws Remove the two upper ...

Users Manual - English
Page 195
... the two 7 thumb screws. 1 2 1 Hole on the sweat guard holder 2 Centerline of the carriage. 1 2 Note ● Be careful that the cap frame driver does not hit any nearby parts, such as the presser foot. With the hole on the sweat guard holder 5 aligned with the centerline of the guiding plate, insert the... two thumb screws removed in step 3 into the holes where the cap frame driver that was originally installed (holes that the thumb...
... the two 7 thumb screws. 1 2 1 Hole on the sweat guard holder 2 Centerline of the carriage. 1 2 Note ● Be careful that the cap frame driver does not hit any nearby parts, such as the presser foot. With the hole on the sweat guard holder 5 aligned with the centerline of the guiding plate, insert the... two thumb screws removed in step 3 into the holes where the cap frame driver that was originally installed (holes that the thumb...

Users Manual - English
Page 23
... your nearest authorized dealer to order additional parts and optional accessories by using the correct part number. Embroidery card 2. Cap frame set Model Name: PRFD1 Parts Code: XC6289-052 4. Bobbin winder set Model Name: PRBW1 Parts Code: XC6290-052 Note ● Embroidery... accessories. 1. 2. 3. 4. 1 1. Optional Accessories 5 Cap frame Model Name: PRCFH1 Parts Code: XC6958-052 3. Floppy disk drive set Model Name: PRCF1 Parts Code: XC6288-052 5. Part Name 1 Alphabet 2 Flower 10 Monogram Emblem 11 Frame 12 Transportation 13 Sports Emblem 14 Large Floral 16 Dogs &...
... your nearest authorized dealer to order additional parts and optional accessories by using the correct part number. Embroidery card 2. Cap frame set Model Name: PRFD1 Parts Code: XC6289-052 4. Bobbin winder set Model Name: PRBW1 Parts Code: XC6290-052 Note ● Embroidery... accessories. 1. 2. 3. 4. 1 1. Optional Accessories 5 Cap frame Model Name: PRCFH1 Parts Code: XC6958-052 3. Floppy disk drive set Model Name: PRCF1 Parts Code: XC6288-052 5. Part Name 1 Alphabet 2 Flower 10 Monogram Emblem 11 Frame 12 Transportation 13 Sports Emblem 14 Large Floral 16 Dogs &...

Users Manual - English
Page 184
... embroidery frames (hoops) designed to hold caps for the right job" is necessary to be placed around the finished design when the frame is... screw only if the inner frame feels loose. Gaps may also be sure that allows sewing the cap in the embroidery industry. The.... 166 Cap frames: These are bubbles or wrinkles that allows sewing a flattened cap (for its natural curved shape (for use on the back side. Inner/outer frame positioning: ...outer frame on a tubular machine). You can take a perfectly created design and ruin the final results by simply not using the correct frame size...
... embroidery frames (hoops) designed to hold caps for the right job" is necessary to be placed around the finished design when the frame is... screw only if the inner frame feels loose. Gaps may also be sure that allows sewing the cap in the embroidery industry. The.... 166 Cap frames: These are bubbles or wrinkles that allows sewing a flattened cap (for its natural curved shape (for use on the back side. Inner/outer frame positioning: ...outer frame on a tubular machine). You can take a perfectly created design and ruin the final results by simply not using the correct frame size...

Users Manual - English
Page 188
... ● Be careful that the cap frame driver does not hit any nearby parts, such as described below in the carriage 2 Thumb screw of the cap frame driver 3 Mounting plate of the cap frame driver 4 Frame-mounting plate of the operation on the machine, and then install the cap frame driver. Remove the embroidery frame holder from the carriage on the...
... ● Be careful that the cap frame driver does not hit any nearby parts, such as described below in the carriage 2 Thumb screw of the cap frame driver 3 Mounting plate of the cap frame driver 4 Frame-mounting plate of the operation on the machine, and then install the cap frame driver. Remove the embroidery frame holder from the carriage on the...

Users Manual - English
Page 193
... on the right and one on page 170.) Attach the cap frame to the cap frame driver. 1 As shown in order to attach the cap frame to be embroidered. X This completes the positioning of the cap frame. After turning the cap frame so that the cap frame does not hit any nearby parts, such as possible. This completes the installation of brim presser...
... on the right and one on page 170.) Attach the cap frame to the cap frame driver. 1 As shown in order to attach the cap frame to be embroidered. X This completes the positioning of the cap frame. After turning the cap frame so that the cap frame does not hit any nearby parts, such as possible. This completes the installation of brim presser...

Users Manual - English
Page 194
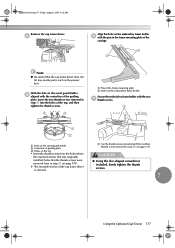
... position to the side when removing the cap frame so the brim of the cap does not hit the embroidery machine. 1 Needle plate spacer Loosen the two lower thumb screws. 2 • Be careful that the cap frame does not hit any nearby parts, such as the presser foot. Remove the... needle plate spacer. 1 1 1 Holder As shown in the illustration. Release the snap lock on the cap frame, and 2 then remove the cap. 1 Thumb screws Remove the two upper thumb screws 3 ...
... position to the side when removing the cap frame so the brim of the cap does not hit the embroidery machine. 1 Needle plate spacer Loosen the two lower thumb screws. 2 • Be careful that the cap frame does not hit any nearby parts, such as the presser foot. Remove the... needle plate spacer. 1 1 1 Holder As shown in the illustration. Release the snap lock on the cap frame, and 2 then remove the cap. 1 Thumb screws Remove the two upper thumb screws 3 ...
Users Manual - English
Page 195
...thumb screws were removed from in the frame-mounting plate of guiding plate 3 Holes on the top • Insert the thumb screws into the holes where the cap frame driver that was originally installed (holes that the cap frame driver does not hit any nearby parts, such as the presser foot. ...Sapphire.book Page 177 Friday, August 1, 2003 9:12 AM Remove the cap frame driver. 4 Align the holes on page 170). ...
...thumb screws were removed from in the frame-mounting plate of guiding plate 3 Holes on the top • Insert the thumb screws into the holes where the cap frame driver that was originally installed (holes that the cap frame driver does not hit any nearby parts, such as the presser foot. ...Sapphire.book Page 177 Friday, August 1, 2003 9:12 AM Remove the cap frame driver. 4 Align the holes on page 170). ...


