
Accessory Catalog
Page 2
... ZZ3-B894 QuattroTM 6000D Chain-stitch sewing machine for the production of straw hats Contents 02 FZ2-B1 Brother Sewing Machine Lineup 03-04 Brother General Sewing Accessories 05-16 Brother Embellishment Feet 17-24 Brother Quilting Feet 25-28 Brother Embroidery Accessories 29-66 Brother Sewing Machine Attachments for PQ Series 0637-0740 Brother Serger/Overlock Feet 71-74 Brother Cover Stitch Feet 75-78...
... ZZ3-B894 QuattroTM 6000D Chain-stitch sewing machine for the production of straw hats Contents 02 FZ2-B1 Brother Sewing Machine Lineup 03-04 Brother General Sewing Accessories 05-16 Brother Embellishment Feet 17-24 Brother Quilting Feet 25-28 Brother Embroidery Accessories 29-66 Brother Sewing Machine Attachments for PQ Series 0637-0740 Brother Serger/Overlock Feet 71-74 Brother Cover Stitch Feet 75-78...

Accessory Catalog
Page 3
... Sewing & Embroidery Combination Machines Everyday sewing features and 7" x 5" embroidery for everyone to ensure the accurate selection (i.e. Advanced Sewing & Embroidery Combination Machines The ultimate in sewing, quilting, embroidery and even crafting capability! Innov-is 4000D, 2500D, 1500D State of the Art machine with a compact yet powerful sewing and quilting machine. These embroidery only machines create beautiful embroidered results using designs from a variety of the corresponding illustration. Brother Sewing Machine...
... Sewing & Embroidery Combination Machines Everyday sewing features and 7" x 5" embroidery for everyone to ensure the accurate selection (i.e. Advanced Sewing & Embroidery Combination Machines The ultimate in sewing, quilting, embroidery and even crafting capability! Innov-is 4000D, 2500D, 1500D State of the Art machine with a compact yet powerful sewing and quilting machine. These embroidery only machines create beautiful embroidered results using designs from a variety of the corresponding illustration. Brother Sewing Machine...

Accessory Catalog
Page 17
... to allow you to easily slide your new machine you to your embroidery designs with the Brother Innov-is Project Book (See page 18 for perfect echo quilting - Accepts USB mouse* to embroider 150 decorative sewing stitches within the frame. - Includes three new... foot "O" for greater visibility Echo quilting foot "E" for details.) www.brother.com Sewing Decorative Stitches as border designs. Use the Border Frame to navigate LCD screen. - SAVR4500D Duetta™ 4500D/Innov-is4000D Nightie Innov-is 4000D sewing and embroidery machine. * Requires additional purchases.
... to allow you to easily slide your new machine you to your embroidery designs with the Brother Innov-is Project Book (See page 18 for perfect echo quilting - Accepts USB mouse* to embroider 150 decorative sewing stitches within the frame. - Includes three new... foot "O" for greater visibility Echo quilting foot "E" for details.) www.brother.com Sewing Decorative Stitches as border designs. Use the Border Frame to navigate LCD screen. - SAVR4500D Duetta™ 4500D/Innov-is4000D Nightie Innov-is 4000D sewing and embroidery machine. * Requires additional purchases.

Accessory Catalog
Page 33
...selected dealer or check on creating. Brother Embroidery Accessories 63 Free-Standing Ten Spool Thread Stand Ten Spool Thread Stand Embroidery Machine Hoops Brother Embroidery Accessories 64 For all embroidery and sewing/embroidery machines. Ask your next embroidery, quilting or sewing project. For Quattro™ 6000D: ... 260 x 160 mm (approx. 10-1/4 x 6-1/4 inches) SA428 • Medium Plus: 180 x 130 mm (approx. 7 x 5 inches) SA429 For PC-6500, 8200, 8500, 8500D series: • Extra-large: 300 x 130 mm (approx. 12 x 5 inches) • Small: 20 x 60 mm (approx. 1 ...
...selected dealer or check on creating. Brother Embroidery Accessories 63 Free-Standing Ten Spool Thread Stand Ten Spool Thread Stand Embroidery Machine Hoops Brother Embroidery Accessories 64 For all embroidery and sewing/embroidery machines. Ask your next embroidery, quilting or sewing project. For Quattro™ 6000D: ... 260 x 160 mm (approx. 10-1/4 x 6-1/4 inches) SA428 • Medium Plus: 180 x 130 mm (approx. 7 x 5 inches) SA429 For PC-6500, 8200, 8500, 8500D series: • Extra-large: 300 x 130 mm (approx. 12 x 5 inches) • Small: 20 x 60 mm (approx. 1 ...

Accessory Catalog
Page 34
...hoop your fabric properly with Wooden Rack) Our high sheen 100% polyester mini king embroidery thread (1100 yds) is also recommended for Brother Embroidery machines, but compatible with other sewing and embroidery machine brands. Handles a variety of thread per spool. SA520 Water Soluble Stabilizer 11" ..., 1500D, 1200 series, PC and ULT series machines and the PE-400D and Innov-is ideal for each design. Stabilizers and Water Soluble Stabilizers When doing machine embroidery, the use the Brother Bobbin Thread designed specifically for your sewing counter or can illustrate more...
...hoop your fabric properly with Wooden Rack) Our high sheen 100% polyester mini king embroidery thread (1100 yds) is also recommended for Brother Embroidery machines, but compatible with other sewing and embroidery machine brands. Handles a variety of thread per spool. SA520 Water Soluble Stabilizer 11" ..., 1500D, 1200 series, PC and ULT series machines and the PE-400D and Innov-is ideal for each design. Stabilizers and Water Soluble Stabilizers When doing machine embroidery, the use the Brother Bobbin Thread designed specifically for your sewing counter or can illustrate more...

Users Manual - English
Page 6
... position 105 Changing the pattern direction 106 Mirror imaging patterns 106 Embroidering from a specific starting point..107 Checking the embroidery area 107 Changing the size of patterns 108 Changing the thread density 109 MEMORY 110 Saving character combinations in the ...MESSAGES 125 Warning messages 125 Operation messages 128 Troubleshooting 129 Thread and stitch problems 130 Mechanical problems 131 SEWING CHART 132 PATTERNS (PROGRAMMED IN MACHINE) 135 Utility stitches 135 Character embroidering 135 Frame pattern embroidering 136 Floral alphabet 136 One-point pattern ...
... position 105 Changing the pattern direction 106 Mirror imaging patterns 106 Embroidering from a specific starting point..107 Checking the embroidery area 107 Changing the size of patterns 108 Changing the thread density 109 MEMORY 110 Saving character combinations in the ...MESSAGES 125 Warning messages 125 Operation messages 128 Troubleshooting 129 Thread and stitch problems 130 Mechanical problems 131 SEWING CHART 132 PATTERNS (PROGRAMMED IN MACHINE) 135 Utility stitches 135 Character embroidering 135 Frame pattern embroidering 136 Floral alphabet 136 One-point pattern ...

Users Manual - English
Page 8
... is easier. No. MY CUSTOM STITCHTM (CREATE YOUR OWN STITCH DESIGNS) EMBROIDERING MAINTENANCE ERROR MESSAGES SEWING CHART PATTERNS (PROGRAMMED IN MACHINE) 5 II Each presser foot is marked with a letter. 1 Presser foot code III Compartment accessories... accessories. Part Name 1 Buttonhole foot A 2 Embroidery foot Q 3 Overcasting foot G 4 Monogramming foot N 5 Zipper foot I To open the accessory compartment, tilt its lid toward you. To remove the flat-bed attachment, pull it straight out to the left of the sewing machine. 1 Flat-bed attachment 1 Accessory compartment I ...
... is easier. No. MY CUSTOM STITCHTM (CREATE YOUR OWN STITCH DESIGNS) EMBROIDERING MAINTENANCE ERROR MESSAGES SEWING CHART PATTERNS (PROGRAMMED IN MACHINE) 5 II Each presser foot is marked with a letter. 1 Presser foot code III Compartment accessories... accessories. Part Name 1 Buttonhole foot A 2 Embroidery foot Q 3 Overcasting foot G 4 Monogramming foot N 5 Zipper foot I To open the accessory compartment, tilt its lid toward you. To remove the flat-bed attachment, pull it straight out to the left of the sewing machine. 1 Flat-bed attachment 1 Accessory compartment I ...

Users Manual - English
Page 9
...machine model PC6500. Part Name 1 Presser foot adapter 2 Seam ripper 3 Screwa (for securing presser foot) 4 Scissors 5 Chalk pen 6 Cleaning brush 7 Eyelet punch 8 Screwdriver (large) 9 Screwdriver (small) 0 Spool cap (small) A Spool cap (large) B Extra spool pinb C Spool felt D Disc-shaped screwdriver E Spool netd F Embroidery...spool before sewing. CONTENTS SETTING UP SEWING UTILITY STITCHES MY CUSTOM STITCHTM (CREATE YOUR OWN STITCH DESIGNS) ADDITIONAL ACCESSORIES 1 2 3 4 5 6 7 8 9 : A B C D E F G H I Grid sheet J Hard case K Bobbin thread L Embroidery cards M...
...machine model PC6500. Part Name 1 Presser foot adapter 2 Seam ripper 3 Screwa (for securing presser foot) 4 Scissors 5 Chalk pen 6 Cleaning brush 7 Eyelet punch 8 Screwdriver (large) 9 Screwdriver (small) 0 Spool cap (small) A Spool cap (large) B Extra spool pinb C Spool felt D Disc-shaped screwdriver E Spool netd F Embroidery...spool before sewing. CONTENTS SETTING UP SEWING UTILITY STITCHES MY CUSTOM STITCHTM (CREATE YOUR OWN STITCH DESIGNS) ADDITIONAL ACCESSORIES 1 2 3 4 5 6 7 8 9 : A B C D E F G H I Grid sheet J Hard case K Bobbin thread L Embroidery cards M...

Users Manual - English
Page 10
...walking foot, refer to page 15. 7 PATTERNS (PROGRAMMED IN MACHINE) SEWING CHART ERROR MESSAGES MAINTENANCE EMBROIDERING MY CUSTOM STITCHTM (CREATE YOUR OWN STITCH DESIGNS) UTILITY STITCHES SEWING SETTING UP CONTENTS WARNING Embroidery cards purchased in other countries may not be used together with... your machine. Part Name 2 No. 25 Equestrian No. 27 Birds No. 28 Christmas...
...walking foot, refer to page 15. 7 PATTERNS (PROGRAMMED IN MACHINE) SEWING CHART ERROR MESSAGES MAINTENANCE EMBROIDERING MY CUSTOM STITCHTM (CREATE YOUR OWN STITCH DESIGNS) UTILITY STITCHES SEWING SETTING UP CONTENTS WARNING Embroidery cards purchased in other countries may not be used together with... your machine. Part Name 2 No. 25 Equestrian No. 27 Birds No. 28 Christmas...
Users Manual - English
Page 12
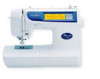
...Reverse stitches (straight stitches only) are made by sewing three stitches on how to use machine functions such as upper threading, bobbin winding and bobbin thread setting. (Refer to page 35 for details.) 5 OPERATION GUIDE key When the embroidery unit is not installed, press this key to... see information on top of the stitching by stitching in order to wind the bobbin thread onto the bobbin. 9 PATTERNS (PROGRAMMED IN MACHINE) SEWING CHART ERROR MESSAGES MAINTENANCE EMBROIDERING MY CUSTOM ...
...Reverse stitches (straight stitches only) are made by sewing three stitches on how to use machine functions such as upper threading, bobbin winding and bobbin thread setting. (Refer to page 35 for details.) 5 OPERATION GUIDE key When the embroidery unit is not installed, press this key to... see information on top of the stitching by stitching in order to wind the bobbin thread onto the bobbin. 9 PATTERNS (PROGRAMMED IN MACHINE) SEWING CHART ERROR MESSAGES MAINTENANCE EMBROIDERING MY CUSTOM ...
Users Manual - English
Page 21
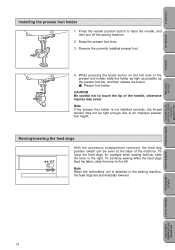
...dogs With the accessory compartment removed, the feed dog position switch can be tight enough due to touch the tip of the machine. CONTENTS SETTING UP SEWING UTILITY STITCHES Installing the presser foot holder 5 1. Remove the currently installed presser foot. 5 4. To lower the feed dogs, ...foot holder CAUTION Be careful not to an improper presser foot height. While pressing the black button on the left . Note When the embroidery unit is not installed correctly, the thread tension may not be seen at the base of the needle, otherwise injuries may occur. Press...
...dogs With the accessory compartment removed, the feed dog position switch can be tight enough due to touch the tip of the machine. CONTENTS SETTING UP SEWING UTILITY STITCHES Installing the presser foot holder 5 1. Remove the currently installed presser foot. 5 4. To lower the feed dogs, ...foot holder CAUTION Be careful not to an improper presser foot height. While pressing the black button on the left . Note When the embroidery unit is not installed correctly, the thread tension may not be seen at the base of the needle, otherwise injuries may occur. Press...

Users Manual - English
Page 77
... decorate hems. For a more ornamental stitch, use contrasting thread colors or decorative embroidery thread. Fold under the edge of the fabric. 1 Right side of the fabric, and then sew the shell tucks. 4. Make sure that the needle drops slightly off the edge... of fabric Note Use a thin fabric. 3. Attach presser foot J, press tension. SEWING UTILITY STITCHES MY CUSTOM STITCHTM (CREATE YOUR OWN STITCH DESIGNS) EMBROIDERING MAINTENANCE ERROR MESSAGES Shell tuck stitching 1. CONTENTS SETTING UP DECORATIVE STITCHING 1 ...
... decorate hems. For a more ornamental stitch, use contrasting thread colors or decorative embroidery thread. Fold under the edge of the fabric. 1 Right side of the fabric, and then sew the shell tucks. 4. Make sure that the needle drops slightly off the edge... of fabric Note Use a thin fabric. 3. Attach presser foot J, press tension. SEWING UTILITY STITCHES MY CUSTOM STITCHTM (CREATE YOUR OWN STITCH DESIGNS) EMBROIDERING MAINTENANCE ERROR MESSAGES Shell tuck stitching 1. CONTENTS SETTING UP DECORATIVE STITCHING 1 ...

Users Manual - English
Page 82
... for more details.) 5 Press this key to finish creating the stitch and display the screen that it appears as ; MAINTENANCE ERROR MESSAGES SEWING CHART PATTERNS (PROGRAMMED IN MACHINE) 7. Once you have drawn on the grid sheet until the stitch design is being created. 2 The number beside indicates the y coordinate ...as a continuous line. Use the arrow keys to move to erase the last point set point. (Refer to page 81 for each point that the embroidery unit is not attached. 1 1. Note If you to see the entered stitch. (Refer to page 80.) 3. Press the MY CUSTOM STITCH key...
... for more details.) 5 Press this key to finish creating the stitch and display the screen that it appears as ; MAINTENANCE ERROR MESSAGES SEWING CHART PATTERNS (PROGRAMMED IN MACHINE) 7. Once you have drawn on the grid sheet until the stitch design is being created. 2 The number beside indicates the y coordinate ...as a continuous line. Use the arrow keys to move to erase the last point set point. (Refer to page 81 for each point that the embroidery unit is not attached. 1 1. Note If you to see the entered stitch. (Refer to page 80.) 3. Press the MY CUSTOM STITCH key...

Users Manual - English
Page 89
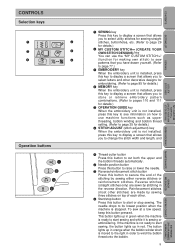
... tightly attached to the presser foot bar. - Press the needle position button to raise the needle, and then turn off the sewing machine. 2. With the enclosed screwdriver or disc-shaped screwdriver, loosen the screw on embroidery foot Q up onto the presser foot bar, and then fasten it . 1 Presser foot holder 5 4. CONTENTS SETTING UP...
... tightly attached to the presser foot bar. - Press the needle position button to raise the needle, and then turn off the sewing machine. 2. With the enclosed screwdriver or disc-shaped screwdriver, loosen the screw on embroidery foot Q up onto the presser foot bar, and then fasten it . 1 Presser foot holder 5 4. CONTENTS SETTING UP...

Users Manual - English
Page 90
... are lowered or if the bobbin winding shaft is not being used , keep the connecting slot cover closed. 3. Do not touch the connector on the sewing machine. CONTENTS SETTING UP SEWING Installing the embroidery unit CAUTION - Open the connecting slot by sliding the cover in its initial CAUTION - Do not place your...
... are lowered or if the bobbin winding shaft is not being used , keep the connecting slot cover closed. 3. Do not touch the connector on the sewing machine. CONTENTS SETTING UP SEWING Installing the embroidery unit CAUTION - Open the connecting slot by sliding the cover in its initial CAUTION - Do not place your...

Users Manual - English
Page 91
... press . CAUTION If the above step is turned off the sewing machine, hold the left side of the embroidery unit, and while pressing the release button, gently slide the embroidery unit away from the installed embroidery card. 5 Press this key to select a pattern from the machine. 1 Release button CAUTION Make sure that the power is not...
... press . CAUTION If the above step is turned off the sewing machine, hold the left side of the embroidery unit, and while pressing the release button, gently slide the embroidery unit away from the installed embroidery card. 5 Press this key to select a pattern from the machine. 1 Release button CAUTION Make sure that the power is not...

Users Manual - English
Page 92
...placed on page 19 when selecting the appropriate fabric, thread and needle for creating attractive embroidery. Pattern slippage may be torn from around the design 2 when sewing is finished. FABRIC Note It is recommended that cannot be ironed, or in places where...fabric. CONTENTS SETTING UP SEWING Creating beautiful embroidery Refer to the table below and the FABRIC/THREAD/NEEDLE COMBINATIONS table on the right side of the fabric. 1 Embroidery frame 2 Fabric 3 Non-woven stabilizer material ERROR MESSAGES SEWING CHART PATTERNS (PROGRAMMED IN MACHINE) 89 Use stabilizer material ...
...placed on page 19 when selecting the appropriate fabric, thread and needle for creating attractive embroidery. Pattern slippage may be torn from around the design 2 when sewing is finished. FABRIC Note It is recommended that cannot be ironed, or in places where...fabric. CONTENTS SETTING UP SEWING Creating beautiful embroidery Refer to the table below and the FABRIC/THREAD/NEEDLE COMBINATIONS table on the right side of the fabric. 1 Embroidery frame 2 Fabric 3 Non-woven stabilizer material ERROR MESSAGES SEWING CHART PATTERNS (PROGRAMMED IN MACHINE) 89 Use stabilizer material ...

Users Manual - English
Page 93
...screw on the outer frame). 3. Depending on the fabric. Use a chalk pen to help reduce pattern distortions while embroidering. 4. ERROR MESSAGES SEWING CHART PATTERNS (PROGRAMMED IN MACHINE) Embroidery area of extra-large frame: 11-53/64" (30 cm) (H) × 5-3/64" (13 cm... results, lay the outer frame on a flat surface and lay the fabric on top of the pattern to use any embroidery frames other than those shown here, otherwise injuries could occur. 1. SEWING UTILITY STITCHES MY CUSTOM STITCHTM (CREATE YOUR OWN STITCH DESIGNS) EMBROIDERING MAINTENANCE 1 2 1 90 4 3 1 2. Place...
...screw on the outer frame). 3. Depending on the fabric. Use a chalk pen to help reduce pattern distortions while embroidering. 4. ERROR MESSAGES SEWING CHART PATTERNS (PROGRAMMED IN MACHINE) Embroidery area of extra-large frame: 11-53/64" (30 cm) (H) × 5-3/64" (13 cm... results, lay the outer frame on a flat surface and lay the fabric on top of the pattern to use any embroidery frames other than those shown here, otherwise injuries could occur. 1. SEWING UTILITY STITCHES MY CUSTOM STITCHTM (CREATE YOUR OWN STITCH DESIGNS) EMBROIDERING MAINTENANCE 1 2 1 90 4 3 1 2. Place...

Users Manual - English
Page 94
..., do not use a screwdriver to embroider. 1 Fingerhole for removing embroidery sheet UTILITY STITCHES MY CUSTOM STITCHTM (CREATE YOUR OWN STITCH DESIGNS) EMBROIDERING MAINTENANCE ERROR MESSAGES SEWING CHART PATTERNS (PROGRAMMED IN MACHINE) 91 Insert the fabric and inner frame back into the outer frame... without allowing the embroidery sheet or the fabric to move out of place. 1 Outer ...
..., do not use a screwdriver to embroider. 1 Fingerhole for removing embroidery sheet UTILITY STITCHES MY CUSTOM STITCHTM (CREATE YOUR OWN STITCH DESIGNS) EMBROIDERING MAINTENANCE ERROR MESSAGES SEWING CHART PATTERNS (PROGRAMMED IN MACHINE) 91 Insert the fabric and inner frame back into the outer frame... without allowing the embroidery sheet or the fabric to move out of place. 1 Outer ...

Users Manual - English
Page 95
... MY CUSTOM STITCHTM (CREATE YOUR OWN STITCH DESIGNS) EMBROIDERING MAINTENANCE ERROR MESSAGES SEWING CHART PATTERNS (PROGRAMMED IN MACHINE) 92 Removing the embroidery frame from the embroidery arm While pushing the release lever on the embroidery frame is 1 attached to remove it is facing up to both knobs.... to page 87.) 1. CONTENTS SETTING UP SEWING UTILITY STITCHES Attaching the embroidery frame to the embroidery arm CAUTION Be sure to wait until the embroidery unit has finished initializing before trying to attach the embroidery frame. (Refer to only one knob, ...
... MY CUSTOM STITCHTM (CREATE YOUR OWN STITCH DESIGNS) EMBROIDERING MAINTENANCE ERROR MESSAGES SEWING CHART PATTERNS (PROGRAMMED IN MACHINE) 92 Removing the embroidery frame from the embroidery arm While pushing the release lever on the embroidery frame is 1 attached to remove it is facing up to both knobs.... to page 87.) 1. CONTENTS SETTING UP SEWING UTILITY STITCHES Attaching the embroidery frame to the embroidery arm CAUTION Be sure to wait until the embroidery unit has finished initializing before trying to attach the embroidery frame. (Refer to only one knob, ...


