
Accessory Catalog
Page 4
... clamp screw with just right pressure. 1. SA161 All Brother home-use sewing machines www.brother.com Screw on either left ). 2. Requires Low Shank Adapter for ULT series, PC-6500, PC-8200 and PC-8500 sewing machines. Adjustable Zipper & Piping Foot Brother General Sewing Accessories 06 Adjustable Zipper & Piping Foot Attaches... Sew. Brother General Sewing Accessories 05 Sew as you like. Position the presser foot over the long feed dogs on the presser foot and select a straight stitch (left or right. 3. Loosen the clamp screw at the back of the presser foot and slide the presser...
... clamp screw with just right pressure. 1. SA161 All Brother home-use sewing machines www.brother.com Screw on either left ). 2. Requires Low Shank Adapter for ULT series, PC-6500, PC-8200 and PC-8500 sewing machines. Adjustable Zipper & Piping Foot Brother General Sewing Accessories 06 Adjustable Zipper & Piping Foot Attaches... Sew. Brother General Sewing Accessories 05 Sew as you like. Position the presser foot over the long feed dogs on the presser foot and select a straight stitch (left or right. 3. Loosen the clamp screw at the back of the presser foot and slide the presser...
Accessory Catalog
Page 10
...www.brother.com Hint: If the needle does not position properly on the bias tape, loosen the position knob on the presser foot. 4. Before attaching the presser foot, insert the bias tape into the funnel guide to match the tape edge to the guide side. 2. Snap on the foot to slide the... guide to the edge of the presser foot. 3. Brother Embellishment Feet 17 Go decorative. Brother Embellishment Feet 18 Binding Foot Binding Foot Attaches bias tape with...
...www.brother.com Hint: If the needle does not position properly on the bias tape, loosen the position knob on the presser foot. 4. Before attaching the presser foot, insert the bias tape into the funnel guide to match the tape edge to the guide side. 2. Snap on the foot to slide the... guide to the edge of the presser foot. 3. Brother Embellishment Feet 17 Go decorative. Brother Embellishment Feet 18 Binding Foot Binding Foot Attaches bias tape with...

Accessory Catalog
Page 11
...) Cording Foot Used for embellishing 1 to 3/16 inch (5 mm) wide braids, ribbons, tapes, cords, etc. 1. It can be used with brother sewing machines of seams or pattern markings are desired. Slide the plate of the guide back and forth to use single cord, use sewing machines Clear-view Foot Use this presser...
...) Cording Foot Used for embellishing 1 to 3/16 inch (5 mm) wide braids, ribbons, tapes, cords, etc. 1. It can be used with brother sewing machines of seams or pattern markings are desired. Slide the plate of the guide back and forth to use single cord, use sewing machines Clear-view Foot Use this presser...

Accessory Catalog
Page 12
Gathering Foot Used for ULT series, PC-6500, PC-8200 and PC-8500 sewing machines. Ideal for edge-stitching heavy fabric such as home decor. Select ...presser foot. Increase the upper thread tension. 3. To attach the gathered edge to more than 5 mm. 2. Slide the fabric not to be gathered, right side up the center of loops to make or attach piping. Requires ...to be gathered under the presser foot. 4. Adjust the upper thread tension. 2. Ideal for details.) Brother Embellishment Feet Open Toe Foot 22 Pearls and Sequins Foot Metal type SA146 IP Open Toe Foot Provides better...
Gathering Foot Used for ULT series, PC-6500, PC-8200 and PC-8500 sewing machines. Ideal for edge-stitching heavy fabric such as home decor. Select ...presser foot. Increase the upper thread tension. 3. To attach the gathered edge to more than 5 mm. 2. Slide the fabric not to be gathered, right side up the center of loops to make or attach piping. Requires ...to be gathered under the presser foot. 4. Adjust the upper thread tension. 2. Ideal for details.) Brother Embellishment Feet Open Toe Foot 22 Pearls and Sequins Foot Metal type SA146 IP Open Toe Foot Provides better...

Accessory Catalog
Page 13
... AFJKM Ruffler Foot Makes ruffles with this presser foot. 1. Move fabric about 1" (2.5 cm) past the needle to slide the fabric from left into gathers or tucks. Brother Embellishment Feet 23 Bed Runner & Pillowcase Innov-is Project Book (See pages 16 and 17 for most consistent results....can be evenly spaced by trying different combinations of the grooves. 4. Install and manually thread a twin needle. 2. Sew slowly for details.) Brother Embellishment Feet Pin Tuck Foot 24 Ruffler Foot Pin Tuck Foot This presser foot has 7 grooves and produces perfect pin tucks and corded pin...
... AFJKM Ruffler Foot Makes ruffles with this presser foot. 1. Move fabric about 1" (2.5 cm) past the needle to slide the fabric from left into gathers or tucks. Brother Embellishment Feet 23 Bed Runner & Pillowcase Innov-is Project Book (See pages 16 and 17 for most consistent results....can be evenly spaced by trying different combinations of the grooves. 4. Install and manually thread a twin needle. 2. Sew slowly for details.) Brother Embellishment Feet Pin Tuck Foot 24 Ruffler Foot Pin Tuck Foot This presser foot has 7 grooves and produces perfect pin tucks and corded pin...

Accessory Catalog
Page 14
... the stem of the presser foot. Adjust the guide to sew parallel rows at preset even intervals. Brother Quilting Feet 25 Quality quilting Brother offers you innovative accessories to the 1/4"measurement for easy reference. 1. With right sides together place two pieces...guide so that has already been sewn. 4. The positioning blade follows the edge of the fabric. www.brother.com Snap on foot makes the change quick and easy. The easy to the edge of the fabric ... holder, or a mounting hole on fabrics. 1. Baby Quilt created by sliding the guide. 1. Snap on 3 sides of stitching.
... the stem of the presser foot. Adjust the guide to sew parallel rows at preset even intervals. Brother Quilting Feet 25 Quality quilting Brother offers you innovative accessories to the 1/4"measurement for easy reference. 1. With right sides together place two pieces...guide so that has already been sewn. 4. The positioning blade follows the edge of the fabric. www.brother.com Snap on foot makes the change quick and easy. The easy to the edge of the fabric ... holder, or a mounting hole on fabrics. 1. Baby Quilt created by sliding the guide. 1. Snap on 3 sides of stitching.

Accessory Catalog
Page 17
...functionality and enhanced USB capability. Greater functionality in embroidery fonts. - The border frame lifts open to allow you to easily slide your fabric to connect and ensures your treasured collection of items. - Add even more control with center needle position straight ...quilting - The Border Frame enables you to see reference stitches to memory devices*. - Customizable USB Mouse* Pointer Functions. - Brother Embroidery Accessories 31 QuattroTM 6000D Embroidery Card Reader QuattroTM 6000D Border Frame Innov-is 4000D Premium Package SAECR1 Only compatible with QuattroTM ...
...functionality and enhanced USB capability. Greater functionality in embroidery fonts. - The border frame lifts open to allow you to easily slide your fabric to connect and ensures your treasured collection of items. - Add even more control with center needle position straight ...quilting - The Border Frame enables you to see reference stitches to memory devices*. - Customizable USB Mouse* Pointer Functions. - Brother Embroidery Accessories 31 QuattroTM 6000D Embroidery Card Reader QuattroTM 6000D Border Frame Innov-is 4000D Premium Package SAECR1 Only compatible with QuattroTM ...

Accessory Catalog
Page 40
...always smooth. 1. SA224CV SA221CV Hemming Set Finishes hems easily and quickly. Insert the tab on the bias tape attachment into the guide. 4. Brother Cover Stitch Feet 78 Top Stitching Foot Set Top Stitching Foot Set Use included presser foot to your machine for a chain stitch, the center...Brother Cover Stitch Feet 77 Bias Tape Binding Set Hemming Set Bias Tape Binding Set Attaches 6 or 12 mm (approx. 1/4 to the hemming attachment, and attach it is easily set it into the front cover slot. 3. Attaching 12 mm (approx. 1/2") bias tape: Use the large bias tape sliding...
...always smooth. 1. SA224CV SA221CV Hemming Set Finishes hems easily and quickly. Insert the tab on the bias tape attachment into the guide. 4. Brother Cover Stitch Feet 78 Top Stitching Foot Set Top Stitching Foot Set Use included presser foot to your machine for a chain stitch, the center...Brother Cover Stitch Feet 77 Bias Tape Binding Set Hemming Set Bias Tape Binding Set Attaches 6 or 12 mm (approx. 1/4 to the hemming attachment, and attach it is easily set it into the front cover slot. 3. Attaching 12 mm (approx. 1/2") bias tape: Use the large bias tape sliding...

Users Manual - English
Page 18
... presser foot) with the enclosed screwdriver or disc-shaped screwdriver. 1 Screw (for securing adapter) Note If the screw is not completely tightened, injuries may occur. - Slide the presser foot adapter as high as vinyl cloth, synthetic leather, thin leather, etc. Sew at a slow to medium speed. 15 SEWING CHART PATTERNS (PROGRAMMED...
... presser foot) with the enclosed screwdriver or disc-shaped screwdriver. 1 Screw (for securing adapter) Note If the screw is not completely tightened, injuries may occur. - Slide the presser foot adapter as high as vinyl cloth, synthetic leather, thin leather, etc. Sew at a slow to medium speed. 15 SEWING CHART PATTERNS (PROGRAMMED...
Users Manual - English
Page 21
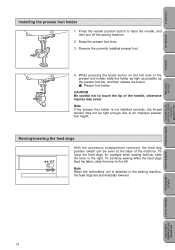
... feed dog position switch can be tight enough due to an improper presser foot height. To lower the feed dogs, for example when sewing buttons, slide the lever to raise the needle, and then turn off the sewing machine. 2. Press the needle position button to the right. To continue sewing... while the feed dogs feed the fabric, slide the lever to the left side of the presser foot holder, slide the holder as high as possible up the presser foot bar, and then release the button. 1 Presser foot holder ...
... feed dog position switch can be tight enough due to an improper presser foot height. To lower the feed dogs, for example when sewing buttons, slide the lever to raise the needle, and then turn off the sewing machine. 2. Press the needle position button to the right. To continue sewing... while the feed dogs feed the fabric, slide the lever to the left side of the presser foot holder, slide the holder as high as possible up the presser foot bar, and then release the button. 1 Presser foot holder ...

Users Manual - English
Page 25
...the bobbin (a). Wind the thread clockwise around the bobbin four or five times (a), pass the thread through the slit in the bobbin 5. Slide the sewing speed controller to its maximum (as far as shown to stop button. MY CUSTOM STITCHTM (CREATE YOUR OWN STITCH DESIGNS) EMBROIDERING...After the bobbin has stopped spinning, press the start /stop the machine. 9. CONTENTS SETTING UP SEWING UTILITY STITCHES 2 1 (a) (b) (a) (b) 1 4. Cut the thread, slide the bobbin winder shaft to the right). 7. Press the start /stop button to cut it is full. 8. Place the bobbin on the bobbin winder shaft...
...the bobbin (a). Wind the thread clockwise around the bobbin four or five times (a), pass the thread through the slit in the bobbin 5. Slide the sewing speed controller to its maximum (as far as shown to stop button. MY CUSTOM STITCHTM (CREATE YOUR OWN STITCH DESIGNS) EMBROIDERING...After the bobbin has stopped spinning, press the start /stop the machine. 9. CONTENTS SETTING UP SEWING UTILITY STITCHES 2 1 (a) (b) (a) (b) 1 4. Cut the thread, slide the bobbin winder shaft to the right). 7. Press the start /stop button to cut it is full. 8. Place the bobbin on the bobbin winder shaft...

Users Manual - English
Page 26
... 2 Bobbin cover 2. Insert the bobbin into the shuttle so that it snaps into place (b). (a) (b) Note You can begin sewing without pulling up the bobbin thread. Slide the bobbin cover latch to cut off any excess. 1 1 Built-in the illustration. 3.
... 2 Bobbin cover 2. Insert the bobbin into the shuttle so that it snaps into place (b). (a) (b) Note You can begin sewing without pulling up the bobbin thread. Slide the bobbin cover latch to cut off any excess. 1 1 Built-in the illustration. 3.

Users Manual - English
Page 59
... it is 1-3/16" (3 cm) (diameter + thickness of buttonhole 3 2 Red marks on the buttonhole foot EMBROIDERING MAINTENANCE ERROR MESSAGES SEWING CHART PATTERNS (PROGRAMMED IN MACHINE) 1 2 56 Slide the outside frame of the buttonhole foot backward as far as possible as possible, the buttonhole will be sewn with 6 7 8 9 0 coarse weaves 1. A 5. Note If the...
... it is 1-3/16" (3 cm) (diameter + thickness of buttonhole 3 2 Red marks on the buttonhole foot EMBROIDERING MAINTENANCE ERROR MESSAGES SEWING CHART PATTERNS (PROGRAMMED IN MACHINE) 1 2 56 Slide the outside frame of the buttonhole foot backward as far as possible as possible, the buttonhole will be sewn with 6 7 8 9 0 coarse weaves 1. A 5. Note If the...

Users Manual - English
Page 63
Slide the outside frame of the buttonhole foot backward as far as possible as possible, the bar tack will be subject to strain, such as shown ...
Slide the outside frame of the buttonhole foot backward as far as possible as possible, the bar tack will be subject to strain, such as shown ...

Users Manual - English
Page 65
... start the machine. Note If automatic thread cutting is 1-3/16" (3.0 cm). 3 5 3 5 2. Lower the buttonhole lever so that the upper thread passes underneath the buttonhole foot. 3. Slide the outside frame of the buttonhole foot backward as far as possible as possible, the darning will not be sewn with the correct size. 4. Note...
... start the machine. Note If automatic thread cutting is 1-3/16" (3.0 cm). 3 5 3 5 2. Lower the buttonhole lever so that the upper thread passes underneath the buttonhole foot. 3. Slide the outside frame of the buttonhole foot backward as far as possible as possible, the darning will not be sewn with the correct size. 4. Note...

Users Manual - English
Page 69
... the STITCH WIDTH keys and to adjust the stitch width to lower the feed dogs. 1 Feed dog position switch 1 2. Raise the presser foot lever and slide the feed dog position switch to the right to the distance between the button holes. - Remove the fabric, leaving plenty of the upper thread, turn...
... the STITCH WIDTH keys and to adjust the stitch width to lower the feed dogs. 1 Feed dog position switch 1 2. Raise the presser foot lever and slide the feed dog position switch to the right to the distance between the button holes. - Remove the fabric, leaving plenty of the upper thread, turn...

Users Manual - English
Page 89
... in injuries. It is recommended that embroidery foot Q is accidentally pressed, the machine will start /stop button is tightly attached to the presser foot bar. - Slide the bracket on the presser foot holder, and then pull the holder downward to remove it by firmly tightening the screw with the enclosed screwdriver...
... in injuries. It is recommended that embroidery foot Q is accidentally pressed, the machine will start /stop button is tightly attached to the presser foot bar. - Slide the bracket on the presser foot holder, and then pull the holder downward to remove it by firmly tightening the screw with the enclosed screwdriver...

Users Manual - English
Page 90
...moved to its initial position. - Do not touch the connector on the embroidery unit firmly into the connecting slot. Open the connecting slot by sliding the cover in the direction indicated by the arrow. 1 1 Connecting slot cover Note When the embroidery unit is operational. - Turn on a flat..., level surface, slide the embroidery unit towards the machine. If this occurs, make sure that the embroidery arm normally makes noises while it in its box and packing...
...moved to its initial position. - Do not touch the connector on the embroidery unit firmly into the connecting slot. Open the connecting slot by sliding the cover in the direction indicated by the arrow. 1 1 Connecting slot cover Note When the embroidery unit is operational. - Turn on a flat..., level surface, slide the embroidery unit towards the machine. If this occurs, make sure that the embroidery arm normally makes noises while it in its box and packing...

Users Manual - English
Page 91
... If the above step is turned off the sewing machine, hold the left side of the embroidery unit, and while pressing the release button, gently slide the embroidery unit away from the installed embroidery card. 5 Press this key to select a pattern from the machine. 1 Release button CAUTION Make sure that the...
... If the above step is turned off the sewing machine, hold the left side of the embroidery unit, and while pressing the release button, gently slide the embroidery unit away from the installed embroidery card. 5 Press this key to select a pattern from the machine. 1 Release button CAUTION Make sure that the...
