

Users Manual - English
Page 3
... a stitch from those that appear in the accessory compartment of the upper thread. A Thread cutter Pass the threads through the thread cutter to start the sewing machine and raise and lower the needle. (page Cover D) 0 Flat bed attachment with accessory compartment Store presser feet and bobbins in the operation panel. (page Cover...
... a stitch from those that appear in the accessory compartment of the upper thread. A Thread cutter Pass the threads through the thread cutter to start the sewing machine and raise and lower the needle. (page Cover D) 0 Flat bed attachment with accessory compartment Store presser feet and bobbins in the operation panel. (page Cover...

Users Manual - English
Page 4
... for the selected stitching. 8 Presser foot holder The presser foot is being used. 5 Main power switch Use the main power switch to turn the sewing machine on and off. 6 Foot controller jack Insert the plug on the end of the foot controller cable into the power supply jack. 8 Feed dog ... stitch. 4 Air vent The air vent allows the air surrounding the motor to use your machine. APPENDIX INDEX Cover C Do not cover the air vent while the sewing machine is installed onto the presser foot holder. 5 6 8 7 1 Presser foot dial Use the presser foot dial to adjust the amount of pressure that ...
... for the selected stitching. 8 Presser foot holder The presser foot is being used. 5 Main power switch Use the main power switch to turn the sewing machine on and off. 6 Foot controller jack Insert the plug on the end of the foot controller cable into the power supply jack. 8 Feed dog ... stitch. 4 Air vent The air vent allows the air surrounding the motor to use your machine. APPENDIX INDEX Cover C Do not cover the air vent while the sewing machine is installed onto the presser foot holder. 5 6 8 7 1 Presser foot dial Use the presser foot dial to adjust the amount of pressure that ...

Users Manual - English
Page 5
... lower the presser foot. Reinforcement stitches are sewn by sewing 3 to 5 stitches on how the sewing machine is depressed. Pressing the button twice sews one stitch. 4 Sewing speed controller Slide the sewing speed controller to adjust the sewing speed. 5 Presser foot lever Raise and lower the ...buttons The operation buttons help you to easily perform various basic sewing machine operations. 2 3 4 1 5 1 Start/stop button Press the start/stop sewing. The button lights up in the opposite direction. The machine sews at a slow speed at the beginning of each other. Reverse...
... lower the presser foot. Reinforcement stitches are sewn by sewing 3 to 5 stitches on how the sewing machine is depressed. Pressing the button twice sews one stitch. 4 Sewing speed controller Slide the sewing speed controller to adjust the sewing speed. 5 Presser foot lever Raise and lower the ...buttons The operation buttons help you to easily perform various basic sewing machine operations. 2 3 4 1 5 1 Start/stop button Press the start/stop sewing. The button lights up in the opposite direction. The machine sews at a slow speed at the beginning of each other. Reverse...

Users Manual - English
Page 6
... slider to adjust the stitch length. 5 Automatic reverse/reinforcement stitch key Press the automatic reverse/reinforcement stitch key to automatically sew reverse or reinforcement stitches at the right of the sewing machine, consists of various buttons and sliders for the stitch that should be sewn. 1 2 3 8 4 5 7 6...end of stitching. 6 Needle stop position key This is used to change the position of the needle when the sewing machine is not lit, the sewing machine will stop with the needle raised. 7 Stitch selection key / 8Stitch indicator Press the stitch selection key, and...
... slider to adjust the stitch length. 5 Automatic reverse/reinforcement stitch key Press the automatic reverse/reinforcement stitch key to automatically sew reverse or reinforcement stitches at the right of the sewing machine, consists of various buttons and sliders for the stitch that should be sewn. 1 2 3 8 4 5 7 6...end of stitching. 6 Needle stop position key This is used to change the position of the needle when the sewing machine is not lit, the sewing machine will stop with the needle raised. 7 Stitch selection key / 8Stitch indicator Press the stitch selection key, and...

Users Manual - English
Page 8
.... (page 12) 4 Built-in stitches available, including utility stitches and decorative stitches.(page 54) APPENDIX INDEX 2 Before using this sewing machine, carefully read the "Important Safety Instructions" (page 6), and then study this manual, store it where it can quickly be accessed for... future reference. In addition, after you for purchasing this sewing machine. CONTENTS GETTING READY SEWING BASICS UTILITY STITCHES Introduction Thank you have finished reading this manual for the correct operation of the sewing machine, the upper thread can select from the built-in stitches ...
.... (page 12) 4 Built-in stitches available, including utility stitches and decorative stitches.(page 54) APPENDIX INDEX 2 Before using this sewing machine, carefully read the "Important Safety Instructions" (page 6), and then study this manual, store it where it can quickly be accessed for... future reference. In addition, after you for purchasing this sewing machine. CONTENTS GETTING READY SEWING BASICS UTILITY STITCHES Introduction Thank you have finished reading this manual for the correct operation of the sewing machine, the upper thread can select from the built-in stitches ...

Users Manual - English
Page 9
...-side/rear view ...Cover C Operation buttons ...Cover D Operation panel ...Cover E Optional Accessories ...1 Introduction ...2 Sewing Machine Features ...2 Contents ...3 Important Safety Instructions 6 GETTING READY 9 Turning the Machine On/Off 10 Power supply precautions ...10 Turning on the machine ...11 Turning off the machine ...11 Winding/Installing the Bobbin 12 Bobbin precautions ...12 Winding the bobbin ...12 Installing...
...-side/rear view ...Cover C Operation buttons ...Cover D Operation panel ...Cover E Optional Accessories ...1 Introduction ...2 Sewing Machine Features ...2 Contents ...3 Important Safety Instructions 6 GETTING READY 9 Turning the Machine On/Off 10 Power supply precautions ...10 Turning on the machine ...11 Turning off the machine ...11 Winding/Installing the Bobbin 12 Bobbin precautions ...12 Winding the bobbin ...12 Installing...
Users Manual - English
Page 12
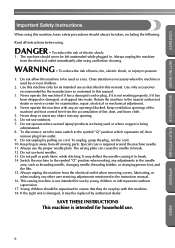
... all instructions before using and before cleaning. Special care is not working properly, if it is required around the machine needle. 11. This sewing machine is intended for examination, repair, electrical or mechanical adjustment. 4. To reduce the risk of electric shock: 1. ...in . Young children should never be left unattended while plugged in this manual. 3. CONTENTS GETTING READY SEWING BASICS UTILITY STITCHES Important Safety Instructions When using this machine, basic safety precautions should always be taken, including the following: Read all moving parts. To reduce ...
... all instructions before using and before cleaning. Special care is not working properly, if it is required around the machine needle. 11. This sewing machine is intended for examination, repair, electrical or mechanical adjustment. 4. To reduce the risk of electric shock: 1. ...in . Young children should never be left unattended while plugged in this manual. 3. CONTENTS GETTING READY SEWING BASICS UTILITY STITCHES Important Safety Instructions When using this machine, basic safety precautions should always be taken, including the following: Read all moving parts. To reduce ...
Users Manual - English
Page 14
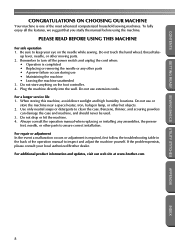
..., and scouring powders can damage the case and machine, and should never be used. 3. CONTENTS GETTING READY SEWING BASICS UTILITY STITCHES CONGRATULATIONS ON CHOOSING OUR MACHINE Your machine is one of the operation manual to keep your local authorized Brother dealer. Do not use or store the machine near a space heater, iron, halogen lamp, or other...
..., and scouring powders can damage the case and machine, and should never be used. 3. CONTENTS GETTING READY SEWING BASICS UTILITY STITCHES CONGRATULATIONS ON CHOOSING OUR MACHINE Your machine is one of the operation manual to keep your local authorized Brother dealer. Do not use or store the machine near a space heater, iron, halogen lamp, or other...

Users Manual - English
Page 16
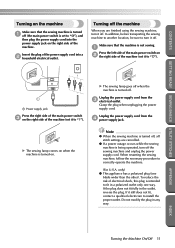
... other appliances plugged in the following precautions concerning the power supply. Electric shock may result in fire, electric shock, or damage to the machine. ● Turn off the main power and remove the plug in to heat. Do not subject the cord to them. If the ... plug with many other power sources may result. ● When unplugging the machine, always turn the sewing machine on and off. Pulling on the cord. CONTENTS GETTING READY SEWING BASICS UTILITY STITCHES GETTING READY Turning the Machine On/Off This section explains how to turn off the main power first....
... other appliances plugged in the following precautions concerning the power supply. Electric shock may result in fire, electric shock, or damage to the machine. ● Turn off the main power and remove the plug in to heat. Do not subject the cord to them. If the ... plug with many other power sources may result. ● When unplugging the machine, always turn the sewing machine on and off. Pulling on the cord. CONTENTS GETTING READY SEWING BASICS UTILITY STITCHES GETTING READY Turning the Machine On/Off This section explains how to turn off the main power first....
Users Manual - English
Page 17
...from the 4 power supply jack. Unplug the power supply cord from the 3 electrical outlet. Note ● When the sewing machine is turned off, all stitch settings are finished using the sewing machine, turn it off . To reduce the risk of electrical shock, this plug is intended to fit in a polarized ...supply cord into the power supply jack on the right side of the machine. Turning off the machine When you are cancelled. ● If a power outage occurs while the sewing machine is being operated, turn it off the sewing machine and unplug the power supply cord. If the plug does not fit ...
...from the 4 power supply jack. Unplug the power supply cord from the 3 electrical outlet. Note ● When the sewing machine is turned off, all stitch settings are finished using the sewing machine, turn it off . To reduce the risk of electrical shock, this plug is intended to fit in a polarized ...supply cord into the power supply jack on the right side of the machine. Turning off the machine When you are cancelled. ● If a power outage occurs while the sewing machine is being operated, turn it off the sewing machine and unplug the power supply cord. If the plug does not fit ...
Users Manual - English
Page 18
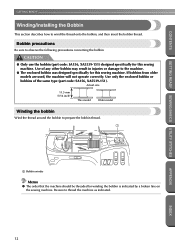
... sure to observe the following precautions concerning the bobbin. CAUTION ● Only use the bobbin (part code: SA156, XA5539-151) designed specifically for this sewing machine. Use only the enclosed bobbin or bobbins of any other bobbin may result in injuries or damage to the... machine. ● The enclosed bobbin was designed specifically for this sewing machine. INDEX 12 Actual size 11.5 mm (7/16 inch) This model Older model Winding the bobbin Wind the thread around the bobbin ...
... sure to observe the following precautions concerning the bobbin. CAUTION ● Only use the bobbin (part code: SA156, XA5539-151) designed specifically for this sewing machine. Use only the enclosed bobbin or bobbins of any other bobbin may result in injuries or damage to the... machine. ● The enclosed bobbin was designed specifically for this sewing machine. INDEX 12 Actual size 11.5 mm (7/16 inch) This model Older model Winding the bobbin Wind the thread around the bobbin ...

Users Manual - English
Page 19
...spool onto the pin so that the spool is slightly larger than the diameter of the spool. CONTENTS GETTING READY SEWING BASICS UTILITY STITCHES Turn on the spool pin when the sewing machine is purchased. 1 2 APPENDIX Remove the spool cap that is not positioned so that the thread unrolls correctly, the... of the spool touches the right end of thread for the bobbin onto 6 the spool pin. The medium-sized spool cap is already on the sewing machine. 1 Place the spool of the spool pin. 1 Notch 2 Bobbin winder shaft spring Slide the bobbin winder shaft to the right. 4 • Three ...
...spool onto the pin so that the spool is slightly larger than the diameter of the spool. CONTENTS GETTING READY SEWING BASICS UTILITY STITCHES Turn on the spool pin when the sewing machine is purchased. 1 2 APPENDIX Remove the spool cap that is not positioned so that the thread unrolls correctly, the... of the spool touches the right end of thread for the bobbin onto 6 the spool pin. The medium-sized spool cap is already on the sewing machine. 1 Place the spool of the spool pin. 1 Notch 2 Bobbin winder shaft spring Slide the bobbin winder shaft to the right. 4 • Three ...

Users Manual - English
Page 21
... left. CAUTION ● Use a bobbin thread that the speed will be fast). X The bobbin stops spinning when it is wound around the bobbin. X The sewing machine stops. h 1 1 Sewing speed controller Press d (start /stop button X The bobbin starts spinning and the thread is full. this is wound without cutting the thread using the cutter... the needle may bend or break when the bobbin thread starts to cut the thread as described on the previous page. Memo ● When the sewing machine is started or the balance wheel is turned after winding the thread around the bobbin, the...
... left. CAUTION ● Use a bobbin thread that the speed will be fast). X The bobbin stops spinning when it is wound around the bobbin. X The sewing machine stops. h 1 1 Sewing speed controller Press d (start /stop button X The bobbin starts spinning and the thread is full. this is wound without cutting the thread using the cutter... the needle may bend or break when the bobbin thread starts to cut the thread as described on the previous page. Memo ● When the sewing machine is started or the balance wheel is turned after winding the thread around the bobbin, the...

Users Manual - English
Page 22
...the front. Be sure to the right. 1 1 2 Pass the thread through the shuttle is indicated by marks around the shuttle. GETTING READY SEWING BASICS UTILITY STITCHES GETTING READY CONTENTS Installing the bobbin Install the bobbin wound with your left . • Be careful not to insert the bobbin... correctly. If bobbins from older models are used, the machine will be passed through the slot as indicated. Insert the bobbin into the shuttle so that the bobbin thread should be incorrect. ● ...
...the front. Be sure to the right. 1 1 2 Pass the thread through the shuttle is indicated by marks around the shuttle. GETTING READY SEWING BASICS UTILITY STITCHES GETTING READY CONTENTS Installing the bobbin Install the bobbin wound with your left . • Be careful not to insert the bobbin... correctly. If bobbins from older models are used, the machine will be passed through the slot as indicated. Insert the bobbin into the shuttle so that the bobbin thread should be incorrect. ● ...
Users Manual - English
Page 24
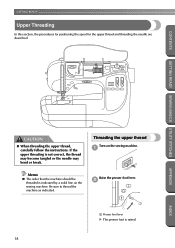
...threading is indicated by a solid line on the sewing machine. 1 Memo ● The order that the machine should be threaded is not correct, the thread may become tangled or the needle may bend or break. Be sure to thread the machine as indicated. GETTING READY Upper Threading In this ...section, the procedures for positioning the spool for the upper thread and threading the needle are described. CONTENTS GETTING READY SEWING BASICS UTILITY STITCHES APPENDIX CAUTION ● When threading...
...threading is indicated by a solid line on the sewing machine. 1 Memo ● The order that the machine should be threaded is not correct, the thread may become tangled or the needle may bend or break. Be sure to thread the machine as indicated. GETTING READY Upper Threading In this ...section, the procedures for positioning the spool for the upper thread and threading the needle are described. CONTENTS GETTING READY SEWING BASICS UTILITY STITCHES APPENDIX CAUTION ● When threading...
Users Manual - English
Page 25
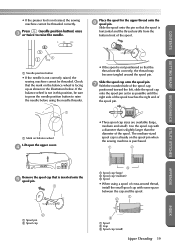
... UTILITY STITCHES 1 1 Needle position button • If the needle is not correctly raised, the sewing machine cannot be sure to press the needle position button to raise the needle. Use the spool cap with some space between the cap and the ...spool. 1 2 3 1 Spool 2 Gap 3 Spool cap (small) Upper Threading 19 APPENDIX INDEX The medium-sized spool cap is already on the spool pin when the sewing machine is purchased. 1 2 Remove the spool cap that is slightly larger than the diameter of cross-wound thread, install the small spool cap with a diameter that...
... UTILITY STITCHES 1 1 Needle position button • If the needle is not correctly raised, the sewing machine cannot be sure to press the needle position button to raise the needle. Use the spool cap with some space between the cap and the ...spool. 1 2 3 1 Spool 2 Gap 3 Spool cap (small) Upper Threading 19 APPENDIX INDEX The medium-sized spool cap is already on the spool pin when the sewing machine is purchased. 1 2 Remove the spool cap that is slightly larger than the diameter of cross-wound thread, install the small spool cap with a diameter that...

Users Manual - English
Page 28
...to use bent needles. GETTING READY SEWING BASICS UTILITY STITCHES Note ● If the needle is finished. GETTING READY CONTENTS Raise the presser foot lever, pass the thread 7 through the presser foot, and then pull out about 5 cm (2 inch) of thread toward the rear of the machine. 1 1 5 cm (2 inch...raise the needle before using the needle threader. ● If the twin needle is used with the twin needle, the sewing machine may bend the needle or damage the machine. ● Never use the twin needle, the extra spool pin and the spool cap. Both upper threads should have ...
...to use bent needles. GETTING READY SEWING BASICS UTILITY STITCHES Note ● If the needle is finished. GETTING READY CONTENTS Raise the presser foot lever, pass the thread 7 through the presser foot, and then pull out about 5 cm (2 inch) of thread toward the rear of the machine. 1 1 5 cm (2 inch...raise the needle before using the needle threader. ● If the twin needle is used with the twin needle, the sewing machine may bend the needle or damage the machine. ● Never use the twin needle, the extra spool pin and the spool cap. Both upper threads should have ...

Users Manual - English
Page 29
... the upper thread for the left side was threaded. 1 1 Bobbin winder shaft Swing down the spool pin so that it with the twin needle, the sewing machine may be sure to "Replacing the presser foot" (page 29). CAUTION ● When using the twin needle, be damaged. If the needle threader is ... thread the right needle. Without passing the thread through 0 of "Threading the upper thread" (page 20). Attach zigzag foot "J". 9 • For details on the sewing machine. 0 APPENDIX INDEX Upper Threading 23 Insert the extra spool pin so that it is used with the twin needle.
... the upper thread for the left side was threaded. 1 1 Bobbin winder shaft Swing down the spool pin so that it with the twin needle, the sewing machine may be sure to "Replacing the presser foot" (page 29). CAUTION ● When using the twin needle, be damaged. If the needle threader is ... thread the right needle. Without passing the thread through 0 of "Threading the upper thread" (page 20). Attach zigzag foot "J". 9 • For details on the sewing machine. 0 APPENDIX INDEX Upper Threading 23 Insert the extra spool pin so that it is used with the twin needle.

Users Manual - English
Page 32
...(golden colored) 75/11-90/14 65/9-90/14 90/14-100/16 APPENDIX INDEX 26 Needle types and their uses The sewing machine needle that you wish to read and carefully follow the instructions below. Fabric Type/Application Medium weight fabrics Thin fabrics Thick fabrics ...dispersed. Failure to observe the following table when choosing the thread and needle appropriate for the fabric that should be used depends on sewing machine needles. Bent needles can easily break, possibly resulting in injuries. Refer to the following precautions concerning the handling of the needle. ...
...(golden colored) 75/11-90/14 65/9-90/14 90/14-100/16 APPENDIX INDEX 26 Needle types and their uses The sewing machine needle that you wish to read and carefully follow the instructions below. Fabric Type/Application Medium weight fabrics Thin fabrics Thick fabrics ...dispersed. Failure to observe the following table when choosing the thread and needle appropriate for the fabric that should be used depends on sewing machine needles. Bent needles can easily break, possibly resulting in injuries. Refer to the following precautions concerning the handling of the needle. ...

Users Manual - English
Page 33
... is bent. In addition, the stitching may be uneven or puckered or there may break while the machine is being sewn. ● A 75/11 needle is already installed when the sewing machine is extremely dangerous since the needle may be skipped stitches. If the combination of the fabric, thread ...and needle is not correct, particularly when sewing thick fabrics (such as denim) with thin needles (such as 65/9 ...
... is bent. In addition, the stitching may be uneven or puckered or there may break while the machine is being sewn. ● A 75/11 needle is already installed when the sewing machine is extremely dangerous since the needle may be skipped stitches. If the combination of the fabric, thread ...and needle is not correct, particularly when sewing thick fabrics (such as denim) with thin needles (such as 65/9 ...


