

Accessory Catalog
Page 13
...ABCDEJ For five grooves: SA162 IP This presser foot does not include the bobbin cover. Use a stiff card to get started. Install and manually thread a twin needle. 2. The ruffling blade on lightweight fabric. Further rows can be evenly spaced by trying different combinations of the presser... foot is moved forward, its teeth catch a fabric and force it forward into the slot, and stitch slowly. 3. Brother Embellishment Feet 23 Bed Runner & Pillowcase Innov-is Project Book (See pages 16 and 17 for most consistent results. A specially designed bobbin cover...
...ABCDEJ For five grooves: SA162 IP This presser foot does not include the bobbin cover. Use a stiff card to get started. Install and manually thread a twin needle. 2. The ruffling blade on lightweight fabric. Further rows can be evenly spaced by trying different combinations of the presser... foot is moved forward, its teeth catch a fabric and force it forward into the slot, and stitch slowly. 3. Brother Embellishment Feet 23 Bed Runner & Pillowcase Innov-is Project Book (See pages 16 and 17 for most consistent results. A specially designed bobbin cover...

Accessory Catalog
Page 34
... For best results, use of needle and stabilizer types. Stabilizers and Water Soluble Stabilizers When doing machine embroidery, the use the Brother Bobbin Thread designed specifically for our embroidery only machines, PE750D and PE700II. Pacesetter embroidery thread is 500D. Designed for high speed ...such as a useful and decorative wooden thread rack that no stabilizer remains after the embroidery is designed to hoop your instruction manual for advice on how to create machine embroidery as well as preventing fabric slippage and puckering. SA519 Iron-on your sewing ...
... For best results, use of needle and stabilizer types. Stabilizers and Water Soluble Stabilizers When doing machine embroidery, the use the Brother Bobbin Thread designed specifically for our embroidery only machines, PE750D and PE700II. Pacesetter embroidery thread is 500D. Designed for high speed ...such as a useful and decorative wooden thread rack that no stabilizer remains after the embroidery is designed to hoop your instruction manual for advice on how to create machine embroidery as well as preventing fabric slippage and puckering. SA519 Iron-on your sewing ...
Users Manual - English
Page 1
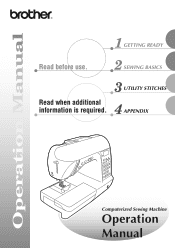
GETTING READY Read before use. SEWING BASICS Read when additional information is required. UTILITY STITCHES APPENDIX Computerized Sewing Machine Operation Manual
GETTING READY Read before use. SEWING BASICS Read when additional information is required. UTILITY STITCHES APPENDIX Computerized Sewing Machine Operation Manual

Users Manual - English
Page 2
... immediately after using the machine and immediately unplug the power cord. 4 Always keep your machine if the power is cut. 3 Never operate this manual, or if you notice anything unusual, such an odor, heat, discoloration or deformation, stop using , when cleaning, when making any adjustments mentioned... in the instruction manual: • To unplug the machine, switch the machine to the symbol "O" position to turn it off, then grasp the plug and pull ...
... immediately after using the machine and immediately unplug the power cord. 4 Always keep your machine if the power is cut. 3 Never operate this manual, or if you notice anything unusual, such an odor, heat, discoloration or deformation, stop using , when cleaning, when making any adjustments mentioned... in the instruction manual: • To unplug the machine, switch the machine to the symbol "O" position to turn it off, then grasp the plug and pull ...

Users Manual - English
Page 3
...toy: • Your close attention to the needle. If the problem persists, please consult your local authorized Brother dealer. The contents of this manual and specifications of the operation manual to inspect and adjust the machine yourself. Use accessories recommended by authorized dealer. • In the event...this machine only for its intended use outdoors. 7 For a longer service life: • When storing this manual. For additional product information, visit our web site at www.brother.com 2 Do not use a damaged or incorrect needle plate, as it could cause the needle to break....
...toy: • Your close attention to the needle. If the problem persists, please consult your local authorized Brother dealer. The contents of this manual and specifications of the operation manual to inspect and adjust the machine yourself. Use accessories recommended by authorized dealer. • In the event...this machine only for its intended use outdoors. 7 For a longer service life: • When storing this manual. For additional product information, visit our web site at www.brother.com 2 Do not use a damaged or incorrect needle plate, as it could cause the needle to break....

Users Manual - English
Page 5
... precautions ...22 Winding the bobbin ...22 Installing the bobbin ...26 Upper Threading ...28 Threading the upper thread ...28 Threading the needle ...31 Threading the needle manually (without using the needle threader 33 Using the twin needle ...33 Pulling up the bobbin thread...36 Replacing the Needle ...37 Needle precautions ...37 Needle...
... precautions ...22 Winding the bobbin ...22 Installing the bobbin ...26 Upper Threading ...28 Threading the upper thread ...28 Threading the needle ...31 Threading the needle manually (without using the needle threader 33 Using the twin needle ...33 Pulling up the bobbin thread...36 Replacing the Needle ...37 Needle precautions ...37 Needle...

Users Manual - English
Page 8
...easily be set to handle the fabric (page 65). Before using this sewing machine, carefully read the "Important Safety Instructions" (page 1), and then study this manual for future reference. c Automatic thread-cutting The sewing machine can be wound with a simple operation (page 28). d One-touch lower threading You can select from... the built-in stitches available, including utility stitches, character stitches and decorative stitches. Introduction Thank you have finished reading this manual, store it where it can quickly be threaded with thread (page 22).
...easily be set to handle the fabric (page 65). Before using this sewing machine, carefully read the "Important Safety Instructions" (page 1), and then study this manual for future reference. c Automatic thread-cutting The sewing machine can be wound with a simple operation (page 28). d One-touch lower threading You can select from... the built-in stitches available, including utility stitches, character stitches and decorative stitches. Introduction Thank you have finished reading this manual, store it where it can quickly be threaded with thread (page 22).
Users Manual - English
Page 10
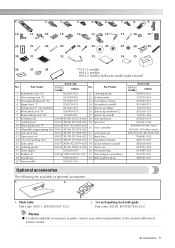
...) 31 Grid sheet set 13 Open toe foot SA147 F027N (XC1964-002) 32 Knee lifter 14 1/4 inch quilting foot SA125 F001N (XC1944-052) 33 Operation manual 15 Side cutter SA177 F054 (XC3879-002) 34 Quick reference guide 16 Quilting guide SA132 F016N (XC2215-002) 35 Hard case 17 Seam ripper X54243...
...) 31 Grid sheet set 13 Open toe foot SA147 F027N (XC1964-002) 32 Knee lifter 14 1/4 inch quilting foot SA125 F001N (XC1944-052) 33 Operation manual 15 Side cutter SA177 F054 (XC3879-002) 34 Quick reference guide 16 Quilting guide SA132 F016N (XC2215-002) 35 Hard case 17 Seam ripper X54243...
Users Manual - English
Page 14
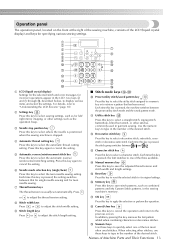
... select the utility stitch assigned to a numeric key or to save stitch patterns, such as combined patterns and My Custom Stitch patterns, in garment sewing. n Manual memory key Press this key to retrieve a pattern that for single needle sewing and for left/ right mirror imaging, or other stitches, use these keys...
... select the utility stitch assigned to a numeric key or to save stitch patterns, such as combined patterns and My Custom Stitch patterns, in garment sewing. n Manual memory key Press this key to retrieve a pattern that for single needle sewing and for left/ right mirror imaging, or other stitches, use these keys...
Users Manual - English
Page 16
... precautions 22 Winding the bobbin 22 Installing the bobbin 26 Upper Threading ...28 Threading the upper thread 28 Threading the needle 31 Threading the needle manually (without using the needle threader 33 Using the twin needle 33 Pulling up the bobbin thread 36 Replacing the Needle 37 Needle precautions 37 Needle...
... precautions 22 Winding the bobbin 22 Installing the bobbin 26 Upper Threading ...28 Threading the upper thread 28 Threading the needle 31 Threading the needle manually (without using the needle threader 33 Using the twin needle 33 Pulling up the bobbin thread 36 Replacing the Needle 37 Needle precautions 37 Needle...

Users Manual - English
Page 32
..., instead of using the needle threader)" (page 33). a Thread guide disk 1 a 80 mm (3 inches) or more Lower the presser foot lever to "Threading the needle manually (without using the thread cutter, pull out about 80 mm (approx. 3 inches) of 130/20 or thicker cannot be used with sewing machine needles 75...
..., instead of using the needle threader)" (page 33). a Thread guide disk 1 a 80 mm (3 inches) or more Lower the presser foot lever to "Threading the needle manually (without using the thread cutter, pull out about 80 mm (approx. 3 inches) of 130/20 or thicker cannot be used with sewing machine needles 75...

Users Manual - English
Page 34
...that can easily break, possibly resulting in injuries. Be sure to use the twin needle, the extra which cannot be sewn with the upper c thread. Manually thread the left needle b eye. • For details, refer to steps a through the eye of the needle from front to the needle bar ...thread a guide. Threading the needle manually Using the twin needle (without using the needle threader) With the twin needle, you can sew two parallel lines When using special thread, thread with...
...that can easily break, possibly resulting in injuries. Be sure to use the twin needle, the extra which cannot be sewn with the upper c thread. Manually thread the left needle b eye. • For details, refer to steps a through the eye of the needle from front to the needle bar ...thread a guide. Threading the needle manually Using the twin needle (without using the needle threader) With the twin needle, you can sew two parallel lines When using special thread, thread with...

Users Manual - English
Page 35
... machine may be damaged. GETTING READY Insert the extra spool pin onto the bobbin d winder shaft. Pass the thread through the needle h bar thread guide, manually thread the right needle. Turn on . 34 Place the upper thread spool for the left side was threaded. 1 a Bobbin winder shaft Swing down the spool...
... machine may be damaged. GETTING READY Insert the extra spool pin onto the bobbin d winder shaft. Pass the thread through the needle h bar thread guide, manually thread the right needle. Turn on . 34 Place the upper thread spool for the left side was threaded. 1 a Bobbin winder shaft Swing down the spool...
Users Manual - English
Page 57
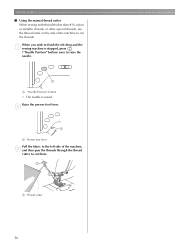
Raise the presser foot lever. b a a Presser foot lever Pull the fabric to the left side of the machine to cut them. 1 a Thread cutter 56 When you wish to finish the stitching and the a sewing machine is stopped, press ("Needle Position" button) once to raise the needle. 1 a "Needle Position" button X The needle is raised. SEWING BASICS Using the manual thread cutter When sewing with thread thicker than #30, nylon or metallic threads, or other special threads, use the thread cutter on the side of the machine, c and then pass the threads through the thread cutter to cut the threads.
Raise the presser foot lever. b a a Presser foot lever Pull the fabric to the left side of the machine to cut them. 1 a Thread cutter 56 When you wish to finish the stitching and the a sewing machine is stopped, press ("Needle Position" button) once to raise the needle. 1 a "Needle Position" button X The needle is raised. SEWING BASICS Using the manual thread cutter When sewing with thread thicker than #30, nylon or metallic threads, or other special threads, use the thread cutter on the side of the machine, c and then pass the threads through the thread cutter to cut the threads.

Users Manual - English
Page 65
... key). The various settings can be saved so that the stitch is selected, press (Manual memory key) to save the settings. 1 3 2 a Thread tension keys b Stitch width keys c Stitch length keys 1 23 a Upper thread tension b Stitch width (mm) c Stitch length (mm) &#...
... key). The various settings can be saved so that the stitch is selected, press (Manual memory key) to save the settings. 1 3 2 a Thread tension keys b Stitch width keys c Stitch length keys 1 23 a Upper thread tension b Stitch width (mm) c Stitch length (mm) &#...

Users Manual - English
Page 77
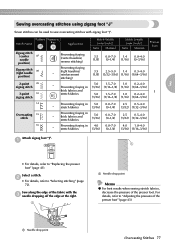
... stitch width, slowly turn the handwheel toward you (counterclockwise) and check that fray easily Stitch Width [mm (inch)] Auto Manual 3.5 2.5-5.0 (1/8) (3/32-3/16) 5.0 2.5-5.0 (3/16) (3/32-3/16) 5.0 3.5-5.0 (3/16) (1/8-3/16) Stitch Length [mm (inch)] Auto Manual 2.0 1.0-4.0 (1/16) (1/16-3/16) 2.5 1.0-4.0 (3/32) (1/16-3/16) 2.5 1.0-4.0 (3/32) (1/16-3/16) Presser Foot G Attach overcasting foot "G". UTILITY STITCHES Overcasting Stitches Sew...
... stitch width, slowly turn the handwheel toward you (counterclockwise) and check that fray easily Stitch Width [mm (inch)] Auto Manual 3.5 2.5-5.0 (1/8) (3/32-3/16) 5.0 2.5-5.0 (3/16) (3/32-3/16) 5.0 3.5-5.0 (3/16) (1/8-3/16) Stitch Length [mm (inch)] Auto Manual 2.0 1.0-4.0 (1/16) (1/16-3/16) 2.5 1.0-4.0 (3/32) (1/16-3/16) 2.5 1.0-4.0 (3/32) (1/16-3/16) Presser Foot G Attach overcasting foot "G". UTILITY STITCHES Overcasting Stitches Sew...
Users Manual - English
Page 78
...) (1/32-3/16) - Sew along the edge of the fabric with zigzag foot "J". Pattern Numeric Stitch Name Key Application Stitch Width [mm (inch)] Auto Manual Stitch Length [mm (inch)] Auto Manual Presser Foot Zigzag stitch (center 07 needle position) Preventing fraying (center baseline/ reverse stitching) 3.5 0.0-7.0 1.4 0.0-4.0 (1/8) (0-1/4) (1/16) (0-3/16) Zigzag stitch 08 (right needle position...
...) (1/32-3/16) - Sew along the edge of the fabric with zigzag foot "J". Pattern Numeric Stitch Name Key Application Stitch Width [mm (inch)] Auto Manual Stitch Length [mm (inch)] Auto Manual Presser Foot Zigzag stitch (center 07 needle position) Preventing fraying (center baseline/ reverse stitching) 3.5 0.0-7.0 1.4 0.0-4.0 (1/8) (0-1/4) (1/16) (0-3/16) Zigzag stitch 08 (right needle position...
Users Manual - English
Page 79
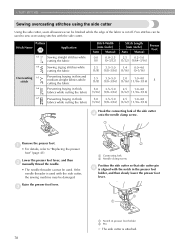
... threader is cut off. Raise the presser foot lever. b a a Notch in thick fabrics while cutting the fabric Stitch Width [mm (inch)] Auto Manual 0.0 0.0-2.5 (0) (0-3/32) Stitch Length [mm (inch)] Auto Manual Presser Foot 2.5 0.2-5.0 (3/32) (1/64-3/16) 3.5 3.5-5.0 1.4 0.0-4.0 (1/8) (1/8-3/16) (1/16) (0-3/16) 3.5 3.5-5.0 2.0 1.0-4.0 (1/8) (1/8-3/16) (1/16) ( 1/16-3/16) S 5.0 3.5-5.0 ...(page 41). a Remove the presser foot. Lower the presser foot lever, and then b manually thread the needle. • The needle threader cannot be damaged. UTILITY STITCHES Sewing overcasting stitches...
... threader is cut off. Raise the presser foot lever. b a a Notch in thick fabrics while cutting the fabric Stitch Width [mm (inch)] Auto Manual 0.0 0.0-2.5 (0) (0-3/32) Stitch Length [mm (inch)] Auto Manual Presser Foot 2.5 0.2-5.0 (3/32) (1/64-3/16) 3.5 3.5-5.0 1.4 0.0-4.0 (1/8) (1/8-3/16) (1/16) (0-3/16) 3.5 3.5-5.0 2.0 1.0-4.0 (1/8) (1/8-3/16) (1/16) ( 1/16-3/16) S 5.0 3.5-5.0 ...(page 41). a Remove the presser foot. Lower the presser foot lever, and then b manually thread the needle. • The needle threader cannot be damaged. UTILITY STITCHES Sewing overcasting stitches...
Users Manual - English
Page 81
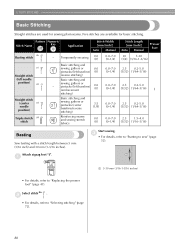
...Basic stitching and sewing gathers or pintucks (center baseline/reverse stitching) 3.5 0.0-7.0 (1/8) (0-1/4) Reinforcing seams and sewing stretch fabrics 0.0 0.0-7.0 (0) (0-1/4) Stitch Length [mm (inch)] Auto Manual Presser Foot 20 5-30 (3/4) (3/16-1-3/16) 2.5 0.2-5.0 (3/32) (1/64-3/16) 2.5 0.2-5.0 (3/32) (1/64-3/16) J 2.5 0.2-5.0 (3/32) (1/64-3/16) 2.5 .... Five stitches are available for basic stitching. Pattern Numeric Stitch Name Key Application Stitch Width [mm (inch)] Auto Manual 06 Basting stitch - c • For details, refer to "Starting to sew" (page 52). 1 a ...
...Basic stitching and sewing gathers or pintucks (center baseline/reverse stitching) 3.5 0.0-7.0 (1/8) (0-1/4) Reinforcing seams and sewing stretch fabrics 0.0 0.0-7.0 (0) (0-1/4) Stitch Length [mm (inch)] Auto Manual Presser Foot 20 5-30 (3/4) (3/16-1-3/16) 2.5 0.2-5.0 (3/32) (1/64-3/16) 2.5 0.2-5.0 (3/32) (1/64-3/16) J 2.5 0.2-5.0 (3/32) (1/64-3/16) 2.5 .... Five stitches are available for basic stitching. Pattern Numeric Stitch Name Key Application Stitch Width [mm (inch)] Auto Manual 06 Basting stitch - c • For details, refer to "Starting to sew" (page 52). 1 a ...
Users Manual - English
Page 83
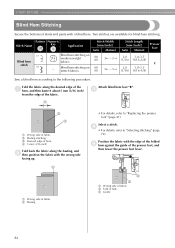
... Name Blind hem stitch Pattern Numeric Key Application 17 Blind hem stitching on stretch fabrics Stitch Width [mm (inch)] Auto Manual 00 (0) 3← - 3→ 00 (0) 3← - 3→ Stitch Length [mm (inch)] Auto Manual 2.0 1.0-3.5 (1/16) (1/16-1/8) 2.0 1.0-3.5 (1/16) (1/16-1/8) Presser Foot R Sew a blind hem according to "Selecting stitching" (page 72). Two stitches are available...
... Name Blind hem stitch Pattern Numeric Key Application 17 Blind hem stitching on stretch fabrics Stitch Width [mm (inch)] Auto Manual 00 (0) 3← - 3→ 00 (0) 3← - 3→ Stitch Length [mm (inch)] Auto Manual 2.0 1.0-3.5 (1/16) (1/16-1/8) 2.0 1.0-3.5 (1/16) (1/16-1/8) Presser Foot R Sew a blind hem according to "Selecting stitching" (page 72). Two stitches are available...


