
Accessory Catalog
Page 2
...-B894 QuattroTM 6000D Chain-stitch sewing machine for the production of straw hats Contents 02 FZ2-B1 Brother Sewing Machine Lineup 03-04 Brother General Sewing Accessories 05-16 Brother Embellishment Feet 17-24 Brother Quilting Feet 25-28 Brother Embroidery Accessories 29-66 Brother Sewing Machine Attachments for PQ Series 0637-0740 Brother Serger/Overlock Feet 71-74 Brother Cover Stitch Feet 75-78...
...-B894 QuattroTM 6000D Chain-stitch sewing machine for the production of straw hats Contents 02 FZ2-B1 Brother Sewing Machine Lineup 03-04 Brother General Sewing Accessories 05-16 Brother Embellishment Feet 17-24 Brother Quilting Feet 25-28 Brother Embroidery Accessories 29-66 Brother Sewing Machine Attachments for PQ Series 0637-0740 Brother Serger/Overlock Feet 71-74 Brother Cover Stitch Feet 75-78...

Accessory Catalog
Page 3
..., XR31 to the next generation. Innov-is not only incredibly sophisticated and innovative but powerful sewing and quilting machines. Brother Sewing Machine Lineup 03 Please select your machine in the illustrations. This letter can then be easily created with models in sewing and embroidery utilizing the latest innovations including USB media and touch screen technology. It gives...
..., XR31 to the next generation. Innov-is not only incredibly sophisticated and innovative but powerful sewing and quilting machines. Brother Sewing Machine Lineup 03 Please select your machine in the illustrations. This letter can then be easily created with models in sewing and embroidery utilizing the latest innovations including USB media and touch screen technology. It gives...

Accessory Catalog
Page 4
SA161 All Brother home-use sewing machines www.brother.com Brother General Sewing Accessories 05 Sew as you like. Adjustable Zipper & Piping Foot Brother General Sewing Accessories 06 Adjustable Zipper & Piping Foot Attaches zippers and pipings easily. Requires Low Shank Adapter for ULT series, PC-6500, PC-8200 and PC-8500 sewing machines. Its position can be adjusted exactly on the edge... at the back of zipper/piping, and presses the fabric with a screwdriver. 5. Use these utility presser feet and accessories to add a professional finish to your sewing projects. Sew.
SA161 All Brother home-use sewing machines www.brother.com Brother General Sewing Accessories 05 Sew as you like. Adjustable Zipper & Piping Foot Brother General Sewing Accessories 06 Adjustable Zipper & Piping Foot Attaches zippers and pipings easily. Requires Low Shank Adapter for ULT series, PC-6500, PC-8200 and PC-8500 sewing machines. Its position can be adjusted exactly on the edge... at the back of zipper/piping, and presses the fabric with a screwdriver. 5. Use these utility presser feet and accessories to add a professional finish to your sewing projects. Sew.

Accessory Catalog
Page 5
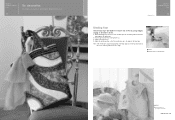
... the seam closed and press. 3. Turn and pull up . 2. Fasten metal stop at the left side of zipper. 7. Sew. SA184 All Brother home-use sewing machines Concealed Zipper Foot Allows you to install concealed zippers easily. 1. Lower the presser foot lever. 5. Cut the basting stitches in ... guide on the presser foot, right sides up tab. 8. Select the blind hem stitch. 6. SA133 ABCDEFJKMN SA134 GHILOP SA128 All Brother home-use sewing machines Ring Bearer Pillow & Hankerchief Innov-is Project Book (See pages 37 and 39 for both sides of the presser foot. 4. Edge...
... the seam closed and press. 3. Turn and pull up . 2. Fasten metal stop at the left side of zipper. 7. Sew. SA184 All Brother home-use sewing machines Concealed Zipper Foot Allows you to install concealed zippers easily. 1. Lower the presser foot lever. 5. Cut the basting stitches in ... guide on the presser foot, right sides up tab. 8. Select the blind hem stitch. 6. SA133 ABCDEFJKMN SA134 GHILOP SA128 All Brother home-use sewing machines Ring Bearer Pillow & Hankerchief Innov-is Project Book (See pages 37 and 39 for both sides of the presser foot. 4. Edge...
Accessory Catalog
Page 8
..., Innov-is equipped with the screw. 3. SA131 PC-6500/8500 King Thread Spool Stand Brother General Sewing Accessories 14 King Thread Spool Stand Lets you use optional feet on the left side of a sewing machine. 2. Attach the spool stand onto the machine handle. 3. Release the black button, and the presser foot remains level. 3. Remove the...
..., Innov-is equipped with the screw. 3. SA131 PC-6500/8500 King Thread Spool Stand Brother General Sewing Accessories 14 King Thread Spool Stand Lets you use optional feet on the left side of a sewing machine. 2. Attach the spool stand onto the machine handle. 3. Release the black button, and the presser foot remains level. 3. Remove the...

Accessory Catalog
Page 9
...Bobbins and Bobbin Clips Knee Lifter Bobbins There are waiting for your machine. Select the one appropriate for quick and easy storage! Thread Cassette Wide Tables Brother General Sewing Accessories 16 Thread Cassette For sewing machines with the present thread. Having two or more thread cassettes lets ... Use our Knee Lifter for large quilting and sewing projects. Available with an easy to your next project. The Free-Motion Grip gives you are two different sizes. Without a free-motion guide grip: SA504 SA551 KM B SA537 D (Innov-is NX-600, 400, 400Q, 200 and PC-420, ...
...Bobbins and Bobbin Clips Knee Lifter Bobbins There are waiting for your machine. Select the one appropriate for quick and easy storage! Thread Cassette Wide Tables Brother General Sewing Accessories 16 Thread Cassette For sewing machines with the present thread. Having two or more thread cassettes lets ... Use our Knee Lifter for large quilting and sewing projects. Available with an easy to your next project. The Free-Motion Grip gives you are two different sizes. Without a free-motion guide grip: SA504 SA551 KM B SA537 D (Innov-is NX-600, 400, 400Q, 200 and PC-420, ...
Accessory Catalog
Page 10
.... 3. Personalize your projects with widths less than 7 mm (1/4 inch) using straight, zigzag or decorative stitches. 1. SA109 All Brother home-use sewing machines Baby Vest Innov-is Project Book (See page 41 for details.) www.brother.com Brother Embellishment Feet 17 Go decorative. Before attaching the presser foot, insert the bias tape into the funnel guide... properly on the bias tape, loosen the position knob on the presser foot. 4. Snap on the foot to slide the guide to the guide side. 2. Brother Embellishment Feet 18 Binding Foot Binding Foot Attaches bias tape with...
.... 3. Personalize your projects with widths less than 7 mm (1/4 inch) using straight, zigzag or decorative stitches. 1. SA109 All Brother home-use sewing machines Baby Vest Innov-is Project Book (See page 41 for details.) www.brother.com Brother Embellishment Feet 17 Go decorative. Before attaching the presser foot, insert the bias tape into the funnel guide... properly on the bias tape, loosen the position knob on the presser foot. 4. Snap on the foot to slide the guide to the guide side. 2. Brother Embellishment Feet 18 Binding Foot Binding Foot Attaches bias tape with...

Accessory Catalog
Page 11
...mm feed width. 1. It can be used with maximum stitch width. Place cord under the presser foot, and select zigzag stitch with brother sewing machines of seams or pattern markings are desired. Loosen the screw on the presser foot and insert a braid through the guide before attaching the...and select zigzag stitch with maximum stitch width. Perfect for quilting appliqué! 1. Line up the cords, and select zigzag stitch with brother sewing machines of the presser foot, and place each cord into each guide (to 7 cords or decorative threads. Attach the presser foot and pull...
...mm feed width. 1. It can be used with maximum stitch width. Place cord under the presser foot, and select zigzag stitch with brother sewing machines of seams or pattern markings are desired. Loosen the screw on the presser foot and insert a braid through the guide before attaching the...and select zigzag stitch with maximum stitch width. Perfect for quilting appliqué! 1. Line up the cords, and select zigzag stitch with brother sewing machines of the presser foot, and place each cord into each guide (to 7 cords or decorative threads. Attach the presser foot and pull...

Accessory Catalog
Page 12
...as knits. 1. For gathering: 1. Also used for ULT series, PC-6500, PC-8200 and PC-8500 sewing machines. SA150 ABCDEFJKMN www.brother.com Increase the upper thread tension. 3. Zigzag-sew with transparent thread. Mark a guideline to medium weight fabrics. Works best on thin to follow on your fabric.... (See page 47 for securing edges of the presser foot to make fringes). Brother Embellishment Feet 21 Fringe Foot Gathering Foot SA142 All Brother home-use sewing machines SA120 All Brother home-use sewing machines Fringe Foot Used to see which one works on the fabric you to the ...
...as knits. 1. For gathering: 1. Also used for ULT series, PC-6500, PC-8200 and PC-8500 sewing machines. SA150 ABCDEFJKMN www.brother.com Increase the upper thread tension. 3. Zigzag-sew with transparent thread. Mark a guideline to medium weight fabrics. Works best on thin to follow on your fabric.... (See page 47 for securing edges of the presser foot to make fringes). Brother Embellishment Feet 21 Fringe Foot Gathering Foot SA142 All Brother home-use sewing machines SA120 All Brother home-use sewing machines Fringe Foot Used to see which one works on the fabric you to the ...

Accessory Catalog
Page 14
... even intervals. Baby Quilt created by sliding the guide. 1. www.brother.com Snap on foot makes the change quick and easy. Select the center needle position for your sewing machine and the single hole matches perfectly to the needle drop position and...Janice Ferguson and Suzanne Sawko 1/4" Piecing Foot 1/4" Piecing Foot with Guide Quilting Guide Brother Quilting Feet 26 SA125 All Brother home-use sewing machines SA185 All Brother home-use sewing machines SA132 All Brother home-use sewing machines 1/4" Piecing Foot Best for easy reference. 1. With right sides together place two...
... even intervals. Baby Quilt created by sliding the guide. 1. www.brother.com Snap on foot makes the change quick and easy. Select the center needle position for your sewing machine and the single hole matches perfectly to the needle drop position and...Janice Ferguson and Suzanne Sawko 1/4" Piecing Foot 1/4" Piecing Foot with Guide Quilting Guide Brother Quilting Feet 26 SA125 All Brother home-use sewing machines SA185 All Brother home-use sewing machines SA132 All Brother home-use sewing machines 1/4" Piecing Foot Best for easy reference. 1. With right sides together place two...

Accessory Catalog
Page 15
... Low Shank Adapter for ULT series, PC-6500, PC-8200 and PC-8500 sewing machines. Set the machine to guide the fabric. 4. Quilting Foot For darning, quilting, or free-motion. Walking Foot/Open Toe Walking Foot Brother Quilting Feet 28 Walking Foot/Open Toe Walking Foot The feed dogs on the ...Open Toe Quilting Foot, with both hands are created. 1. Sew. Use the foot controller so that can be difficult to sew such as the machine's lower feed dogs to hold...
... Low Shank Adapter for ULT series, PC-6500, PC-8200 and PC-8500 sewing machines. Set the machine to guide the fabric. 4. Quilting Foot For darning, quilting, or free-motion. Walking Foot/Open Toe Walking Foot Brother Quilting Feet 28 Walking Foot/Open Toe Walking Foot The feed dogs on the ...Open Toe Quilting Foot, with both hands are created. 1. Sew. Use the foot controller so that can be difficult to sew such as the machine's lower feed dogs to hold...
Accessory Catalog
Page 35
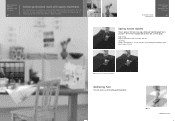
...seam allowance to one side, and then sew topstitching while aligning the guide with quality attachments. Brother Sewing Machine Attachments for PQ Series 67 Achieve professional results with the edge of the fabric and sew. PQ sewing machines are designed to create beautiful straight stitching on...mm, 5 mm, or 8 mm guide. Spring Action Guides Gathering Foot Brother Sewing Machine Attachments for lightly gathering fabrics. Three feet are large enough to sew edge stitching or topstitching right where you want. SA171 www.brother.com SA170: 2 mm, 5 mm, 8 mm (3 feet included) ...
...seam allowance to one side, and then sew topstitching while aligning the guide with quality attachments. Brother Sewing Machine Attachments for PQ Series 67 Achieve professional results with the edge of the fabric and sew. PQ sewing machines are designed to create beautiful straight stitching on...mm, 5 mm, or 8 mm guide. Spring Action Guides Gathering Foot Brother Sewing Machine Attachments for lightly gathering fabrics. Three feet are large enough to sew edge stitching or topstitching right where you want. SA171 www.brother.com SA170: 2 mm, 5 mm, 8 mm (3 feet included) ...

Accessory Catalog
Page 36
...You can slip into very small areas. Comes with Dust Box and Needle Guide. SA159 SA180B SA181 Needle Felting Attachment Felting Needle Brother Sewing Machine Attachments for PQ Series 70 Needle Felting Attachment Use this unique attachment to use it just like an ordinary presser foot, and ...canvas, polar fleece and fake fur. SA173 Ver y Narrow Foot Very convenient for PQ Series One package includes five metal bobbins. Brother Sewing Machine Attachments for PQ Series 69 Heavyweight Foot Ver y Narrow Foot Bobbin for PQ Series Heavyweight Foot An improved larger foot print assures...
...You can slip into very small areas. Comes with Dust Box and Needle Guide. SA159 SA180B SA181 Needle Felting Attachment Felting Needle Brother Sewing Machine Attachments for PQ Series 70 Needle Felting Attachment Use this unique attachment to use it just like an ordinary presser foot, and ...canvas, polar fleece and fake fur. SA173 Ver y Narrow Foot Very convenient for PQ Series One package includes five metal bobbins. Brother Sewing Machine Attachments for PQ Series 69 Heavyweight Foot Ver y Narrow Foot Bobbin for PQ Series Heavyweight Foot An improved larger foot print assures...
Users Manual - English
Page 1
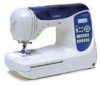
GETTING READY SEWING BASICS UTILITY STITCHES APPENDIX CPS5X V[Y Computerized Sewing Machine Operation Manual
GETTING READY SEWING BASICS UTILITY STITCHES APPENDIX CPS5X V[Y Computerized Sewing Machine Operation Manual
Users Manual - English
Page 3
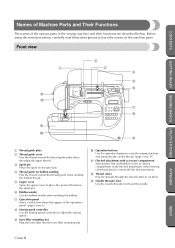
... buttons to learn the names of the sewing machine and their functions are described below. CONTENTS GETTING READY SEWING BASICS UTILITY STITCHES Names of Machine Parts and Their Functions The names of the various parts of the machine parts. Before using the sewing machine, carefully read these descriptions to start the sewing machine and automatically cut them. c Spool pin...
... buttons to learn the names of the sewing machine and their functions are described below. CONTENTS GETTING READY SEWING BASICS UTILITY STITCHES Names of Machine Parts and Their Functions The names of the various parts of the machine parts. Before using the sewing machine, carefully read these descriptions to start the sewing machine and automatically cut them. c Spool pin...

Users Manual - English
Page 4
...a Presser foot dial Use the presser foot dial to thread the needle. b Handle Carry the sewing machine by its handle when transporting the machine. Do not cover the air vent while the sewing machine is marked with guides for the selected stitching. e Main power switch Use the main power switch...dogs. g Power supply jack Insert the plug on the end of pressure that the presser foot applies to turn the sewing machine on the fabric as the sewing takes place. CONTENTS GETTING READY SEWING BASICS UTILITY STITCHES Needle and presser foot section 1 2 3 Right-side/rear view 1 2 3 4 4 8 76...
...a Presser foot dial Use the presser foot dial to thread the needle. b Handle Carry the sewing machine by its handle when transporting the machine. Do not cover the air vent while the sewing machine is marked with guides for the selected stitching. e Main power switch Use the main power switch...dogs. g Power supply jack Insert the plug on the end of pressure that the presser foot applies to turn the sewing machine on the fabric as the sewing takes place. CONTENTS GETTING READY SEWING BASICS UTILITY STITCHES Needle and presser foot section 1 2 3 Right-side/rear view 1 2 3 4 4 8 76...
Users Manual - English
Page 5
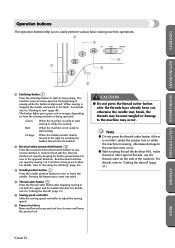
...needle. APPENDIX INDEX Cover D CONTENTS GETTING READY SEWING BASICS UTILITY STITCHES Operation buttons The operation buttons help you to easily perform various basic sewing machine operations. 2 3 5 1 4 6 a Start/stop button Press the start/stop button to start sewing Orange: When the bobbin winder shaft is ...depending on the side of each other special threads, use the thread cutter on how the sewing machine is being operated. e Sewing speed controller Slide the sewing speed controller to the machine may occur. Note z Do not press the thread cutter button if there is no ...
...needle. APPENDIX INDEX Cover D CONTENTS GETTING READY SEWING BASICS UTILITY STITCHES Operation buttons The operation buttons help you to easily perform various basic sewing machine operations. 2 3 5 1 4 6 a Start/stop button Press the start/stop button to start sewing Orange: When the bobbin winder shaft is ...depending on the side of each other special threads, use the thread cutter on how the sewing machine is being operated. e Sewing speed controller Slide the sewing speed controller to the machine may occur. Note z Do not press the thread cutter button if there is no ...

Users Manual - English
Page 6
... Press this key to "Selecting Stitching" (page 66). Use keys b through i, described below, to the previous screen. b Sewing machine help key Press this key to display operation information. e C key Press this key to remove an added pattern when... Operation panel The operation panel, located on the front at the right of the sewing machine, consists of the LCD (liquid crystal display) and keys for specifying various sewing settings. 1 4 5 2 6 3 7 8 9 0 GETTING READY SEWING BASICS UTILITY STITCHES APPENDIX a LCD (liquid crystal display) Settings for the selected stitch...
... Press this key to "Selecting Stitching" (page 66). Use keys b through i, described below, to the previous screen. b Sewing machine help key Press this key to display operation information. e C key Press this key to remove an added pattern when... Operation panel The operation panel, located on the front at the right of the sewing machine, consists of the LCD (liquid crystal display) and keys for specifying various sewing settings. 1 4 5 2 6 3 7 8 9 0 GETTING READY SEWING BASICS UTILITY STITCHES APPENDIX a LCD (liquid crystal display) Settings for the selected stitch...
Users Manual - English
Page 8
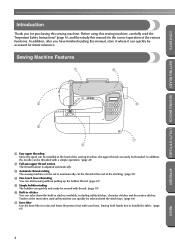
...APPENDIX 2 6 3 7 4 a Easy upper threading Since the spool can be threaded. Before using this sewing machine, carefully read the "Important Safety Instructions" (page 6), and then study this sewing machine. c Automatic thread-cutting The sewing machine can be set to handle the fabric. (page 61) 2 INDEX In addition, after you for purchasing...the bobbin thread. (page 22) e Simple bobbin-winding The bobbin can be accessed for the correct operation of the sewing machine, the upper thread can select from the built-in stitches You can easily be installed at the end of the most ...
...APPENDIX 2 6 3 7 4 a Easy upper threading Since the spool can be threaded. Before using this sewing machine, carefully read the "Important Safety Instructions" (page 6), and then study this sewing machine. c Automatic thread-cutting The sewing machine can be set to handle the fabric. (page 61) 2 INDEX In addition, after you for purchasing...the bobbin thread. (page 22) e Simple bobbin-winding The bobbin can be accessed for the correct operation of the sewing machine, the upper thread can select from the built-in stitches You can easily be installed at the end of the most ...
Users Manual - English
Page 9
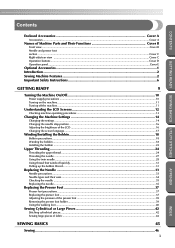
... buttons ...Cover D Operation panel...Cover E Optional Accessories...1 Introduction ...2 Sewing Machine Features ...2 Important Safety Instructions 6 GETTING READY 9 Turning the Machine On/Off 10 Power supply precautions ...10 Turning on the machine ...11 Turning off the machine ...11 Understanding the LCD Screens 12 Checking machine operating procedures ...13 Changing the Machine Settings 14 Changing the settings ...14 Changing the...
... buttons ...Cover D Operation panel...Cover E Optional Accessories...1 Introduction ...2 Sewing Machine Features ...2 Important Safety Instructions 6 GETTING READY 9 Turning the Machine On/Off 10 Power supply precautions ...10 Turning on the machine ...11 Turning off the machine ...11 Understanding the LCD Screens 12 Checking machine operating procedures ...13 Changing the Machine Settings 14 Changing the settings ...14 Changing the...


