
Accessory Catalog
Page 13
Install and manually thread a twin needle. 2. Sew slowly for details.) Brother Embellishment Feet Pin Tuck Foot 24 Ruffler Foot Pin ... teeth catch a fabric and force it forward into the slot, and stitch slowly. 3. www.brother.com Draw a reference line to sew the first row in one of tucks can be adjusted. 1. SA143 AFJKM Ruffler Foot Makes ruffles... 4. Move fabric about 1" (2.5 cm) past the needle to slide the fabric from left into gathers or tucks. Brother Embellishment Feet 23 Bed Runner & Pillowcase Innov-is Project Book (See pages 16 and 17 for most consistent results....
Install and manually thread a twin needle. 2. Sew slowly for details.) Brother Embellishment Feet Pin Tuck Foot 24 Ruffler Foot Pin ... teeth catch a fabric and force it forward into the slot, and stitch slowly. 3. www.brother.com Draw a reference line to sew the first row in one of tucks can be adjusted. 1. SA143 AFJKM Ruffler Foot Makes ruffles... 4. Move fabric about 1" (2.5 cm) past the needle to slide the fabric from left into gathers or tucks. Brother Embellishment Feet 23 Bed Runner & Pillowcase Innov-is Project Book (See pages 16 and 17 for most consistent results....

Accessory Catalog
Page 34
...-is designed to last a long time. This pack gives you just the right color for Brother® Embroidery Machines, but compatible with a high nap such as decorative sewing. Designed for high speed embroidery stitching, made in a fun assortment of a special and sophisticated... and applications when it is important that can stand on your sewing counter or can illustrate more of colors specifically designed for Brother Embroidery machines, but compatible with a stabilizer. Consult your instruction manual for our embroidery only machines, PE750D and PE700II. Pacesetter embroidery ...
...-is designed to last a long time. This pack gives you just the right color for Brother® Embroidery Machines, but compatible with a high nap such as decorative sewing. Designed for high speed embroidery stitching, made in a fun assortment of a special and sophisticated... and applications when it is important that can stand on your sewing counter or can illustrate more of colors specifically designed for Brother Embroidery machines, but compatible with a stabilizer. Consult your instruction manual for our embroidery only machines, PE750D and PE700II. Pacesetter embroidery ...
Users Manual - English
Page 1
GETTING READY SEWING BASICS UTILITY STITCHES APPENDIX CPS5X V[Y Computerized Sewing Machine Operation Manual
GETTING READY SEWING BASICS UTILITY STITCHES APPENDIX CPS5X V[Y Computerized Sewing Machine Operation Manual
Users Manual - English
Page 8
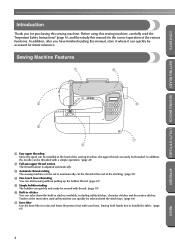
...You can select from the built-in stitches available, including utility stitches, character stitches and decorative stitches. c Automatic thread-cutting The sewing machine can be set to raise and lower the presser foot with a simple operation. (page 24) b Full auto upper thread... adjusted automatically. In addition, after you for purchasing this sewing machine. CONTENTS Introduction Thank you have finished reading this manual, store it where it can quickly be accessed for future reference. Before using this sewing machine, carefully read the "Important Safety Instructions" (page...
...You can select from the built-in stitches available, including utility stitches, character stitches and decorative stitches. c Automatic thread-cutting The sewing machine can be set to raise and lower the presser foot with a simple operation. (page 24) b Full auto upper thread... adjusted automatically. In addition, after you for purchasing this sewing machine. CONTENTS Introduction Thank you have finished reading this manual, store it where it can quickly be accessed for future reference. Before using this sewing machine, carefully read the "Important Safety Instructions" (page...
Users Manual - English
Page 12
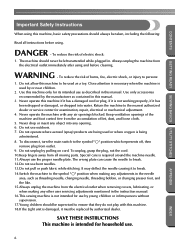
... when the machine is intended for its intended use . 6 APPENDIX INDEX Use this machine only for household use as contained in this manual. 3. Never drop or insert any adjustments in the needle area, such as a toy. To disconnect, turn the main switch to ...object into water. Do not unplug by the manufacturer as described in the instruction manual. 16.This sewing machine is not intended for examination, repair, electrical or mechanical adjustment. 4. CONTENTS GETTING READY SEWING BASICS UTILITY STITCHES Important Safety Instructions When using . To reduce the risk of lint...
... when the machine is intended for its intended use . 6 APPENDIX INDEX Use this machine only for household use as contained in this manual. 3. Never drop or insert any adjustments in the needle area, such as a toy. To disconnect, turn the main switch to ...object into water. Do not unplug by the manufacturer as described in the instruction manual. 16.This sewing machine is not intended for examination, repair, electrical or mechanical adjustment. 4. CONTENTS GETTING READY SEWING BASICS UTILITY STITCHES Important Safety Instructions When using . To reduce the risk of lint...
Users Manual - English
Page 14
... adjustment In the event a malfunction occurs or adjustment is required, first follow the troubleshooting table in the back of the most advanced computerized household sewing machines. Be sure to inspect and adjust the machine yourself. For a longer service life 1. Do not use or store the machine near ...turn off the power switch and unplug the cord when: • Operation is one of the operation manual to keep your local authorized Brother dealer. To fully enjoy all the features, we suggest that you study the manual before using the machine. Plug the machine directly into the wall.
... adjustment In the event a malfunction occurs or adjustment is required, first follow the troubleshooting table in the back of the most advanced computerized household sewing machines. Be sure to inspect and adjust the machine yourself. For a longer service life 1. Do not use or store the machine near ...turn off the power switch and unplug the cord when: • Operation is one of the operation manual to keep your local authorized Brother dealer. To fully enjoy all the features, we suggest that you study the manual before using the machine. Plug the machine directly into the wall.
Users Manual - English
Page 19
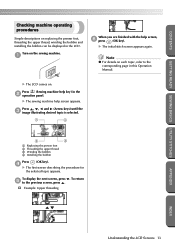
...X The initial stitch screen appears again. To display the next screen, press e to the corresponding page in this Operation Manual. X The LCD comes on the sewing machine. Note z For details on each topic, refer to the previous screen, press . † Example: Upper threading . X... procedure for the selected topic appears. To return APPENDIX INDEX Understanding the LCD Screens 13 a When you are finished with the help screen appears. Press (Sewing machine help key) in the LCD. Press , , and (Arrow keys) until the c image illustrating desired topic is selected. 1 2 3 4...
...X The initial stitch screen appears again. To display the next screen, press e to the corresponding page in this Operation Manual. X The LCD comes on the sewing machine. Note z For details on each topic, refer to the previous screen, press . † Example: Upper threading . X... procedure for the selected topic appears. To return APPENDIX INDEX Understanding the LCD Screens 13 a When you are finished with the help screen appears. Press (Sewing machine help key) in the LCD. Press , , and (Arrow keys) until the c image illustrating desired topic is selected. 1 2 3 4...
Users Manual - English
Page 34
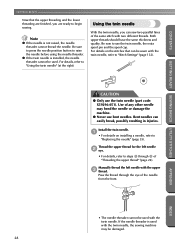
...the needle position button to "Using the twin needle" (at the right). For details on installing a needle, refer to "Stitch Settings" (page 132). Manually thread the left needle b eye. • For details, refer to steps a through the eye of the same stitch with the twin needle. Pass the...-051). Install the twin needle. a • For details on the stitches that the upper threading and the lower threading are ready to begin sewing. GETTING READY CONTENTS Now that can be used with two different threads. z If the twin needle is not raised, the needle threader cannot thread...
...the needle position button to "Using the twin needle" (at the right). For details on installing a needle, refer to "Stitch Settings" (page 132). Manually thread the left needle b eye. • For details, refer to steps a through the eye of the same stitch with the twin needle. Pass the...-051). Install the twin needle. a • For details on the stitches that the upper threading and the lower threading are ready to begin sewing. GETTING READY CONTENTS Now that can be used with two different threads. z If the twin needle is not raised, the needle threader cannot thread...
Users Manual - English
Page 35
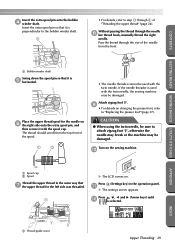
... settings screen appears. Attach zigzag foot "J". j a Spool cap b Spool Thread the upper thread in the operation panel. CONTENTS GETTING READY SEWING BASICS UTILITY STITCHES Insert the extra spool pin onto the bobbin d winder shaft. Place the upper thread spool for the left side was threaded...the spool. 1 2 • The needle threader cannot be used with the twin needle, the sewing machine may be damaged. Pass the thread through the needle h bar thread hook, manually thread the right needle. APPENDIX INDEX a Thread guide cover Upper Threading 29 i • For ...
... settings screen appears. Attach zigzag foot "J". j a Spool cap b Spool Thread the upper thread in the operation panel. CONTENTS GETTING READY SEWING BASICS UTILITY STITCHES Insert the extra spool pin onto the bobbin d winder shaft. Place the upper thread spool for the left side was threaded...the spool. 1 2 • The needle threader cannot be used with the twin needle, the sewing machine may be damaged. Pass the thread through the needle h bar thread hook, manually thread the right needle. APPENDIX INDEX a Thread guide cover Upper Threading 29 i • For ...

Users Manual - English
Page 58
...needle. b 1 a Presser foot lever Pull the fabric to the left side of the machine to cut them. 1 APPENDIX a Thread cutter INDEX 52 SEWING BASICS CONTENTS Memo z The machine can be set so that the threads are cut automatically, refer to "Automatically cutting the thread" (page 58). ■... Using the manual thread cutter When sewing with thread thicker than #30, nylon or metallic threads, or other special threads, use the thread cutter on setting the machine so that...
...needle. b 1 a Presser foot lever Pull the fabric to the left side of the machine to cut them. 1 APPENDIX a Thread cutter INDEX 52 SEWING BASICS CONTENTS Memo z The machine can be set so that the threads are cut automatically, refer to "Automatically cutting the thread" (page 58). ■... Using the manual thread cutter When sewing with thread thicker than #30, nylon or metallic threads, or other special threads, use the thread cutter on setting the machine so that...
Users Manual - English
Page 74
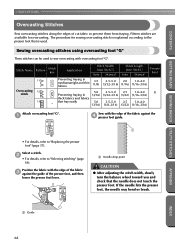
... and check that fray easily Stitch Width [mm (inch.)] Auto Manual 3.5 2.5-5.0 (1/8) (3/32-3/16) 5.0 2.5-5.0 (3/16) (3/32-3/16) 5.0 3.5-5.0 (3/16) (1/8-3/16) Stitch Length [mm (inch.)] Auto Manual 2.0 1.0-4.0 (1/16) (1/16-3/16) 2.5 1.0-4.0 (3/32) (1/16-3/16) 2.5 1.0-4.0 (3/32) (1/16-3/16) Presser Foot G Attach overcasting foot "G". APPENDIX 1 a Guide INDEX 68 Sewing overcasting stitches using overcasting foot "G" Three stitches can be used...
... and check that fray easily Stitch Width [mm (inch.)] Auto Manual 3.5 2.5-5.0 (1/8) (3/32-3/16) 5.0 2.5-5.0 (3/16) (3/32-3/16) 5.0 3.5-5.0 (3/16) (1/8-3/16) Stitch Length [mm (inch.)] Auto Manual 2.0 1.0-4.0 (1/16) (1/16-3/16) 2.5 1.0-4.0 (3/32) (1/16-3/16) 2.5 1.0-4.0 (3/32) (1/16-3/16) Presser Foot G Attach overcasting foot "G". APPENDIX 1 a Guide INDEX 68 Sewing overcasting stitches using overcasting foot "G" Three stitches can be used...

Users Manual - English
Page 75
...Manual 1.4 0.0-4.0 (1/16) (0-3/16) 1.4 0.3-4.0 (1/16) (1/64-3/16) 1.0 0.2-4.0 (1/16) (1/64-3/16) 1.0 0.2-4.0 (1/16) (1/64-3/16) Presser Foot J 14 Overcasting 15 stitch 16 - b • For details, refer to "Adjusting the pressure of the presser foot" (page 39). Select a stitch. CONTENTS GETTING READY SEWING BASICS UTILITY STITCHES Sewing... overcasting stitches using zigzag foot "J" Seven stitches can be used to sew overcasting stitches with the c needle dropping ...
...Manual 1.4 0.0-4.0 (1/16) (0-3/16) 1.4 0.3-4.0 (1/16) (1/64-3/16) 1.0 0.2-4.0 (1/16) (1/64-3/16) 1.0 0.2-4.0 (1/16) (1/64-3/16) Presser Foot J 14 Overcasting 15 stitch 16 - b • For details, refer to "Adjusting the pressure of the presser foot" (page 39). Select a stitch. CONTENTS GETTING READY SEWING BASICS UTILITY STITCHES Sewing... overcasting stitches using zigzag foot "J" Seven stitches can be used to sew overcasting stitches with the c needle dropping ...
Users Manual - English
Page 76
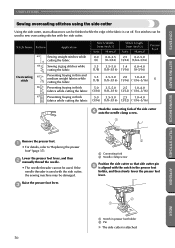
... "Replacing the presser foot" (page 37). GETTING READY SEWING BASICS UTILITY STITCHES UTILITY STITCHES CONTENTS Sewing overcasting stitches using the side cutter Using the side cutter, seam allowances can be damaged. Raise the presser foot lever. Lower the presser foot lever, and then b manually thread the needle. • The needle threader cannot be...
... "Replacing the presser foot" (page 37). GETTING READY SEWING BASICS UTILITY STITCHES UTILITY STITCHES CONTENTS Sewing overcasting stitches using the side cutter Using the side cutter, seam allowances can be damaged. Raise the presser foot lever. Lower the presser foot lever, and then b manually thread the needle. • The needle threader cannot be...
Users Manual - English
Page 78
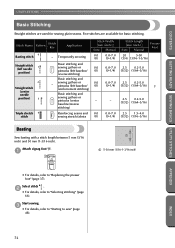
... Name Pattern Stitch Key Application 6 Basting stitch - Temporarily securing Stitch Width [mm (inch.)] Auto Manual 0.0 0.0-7.0 (0) (0-1/4) Straight stitch 1 (left needle position) 2 Straight stitch (center needle position) 3 Basic stitching and sewing gathers or 0.0 pintucks (left baseline/ 0.0 (0) reinforcement stitching) Basic stitching and sewing gathers or pintucks (center - INDEX 72 b • For details, refer to "Selecting stitching...
... Name Pattern Stitch Key Application 6 Basting stitch - Temporarily securing Stitch Width [mm (inch.)] Auto Manual 0.0 0.0-7.0 (0) (0-1/4) Straight stitch 1 (left needle position) 2 Straight stitch (center needle position) 3 Basic stitching and sewing gathers or 0.0 pintucks (left baseline/ 0.0 (0) reinforcement stitching) Basic stitching and sewing gathers or pintucks (center - INDEX 72 b • For details, refer to "Selecting stitching...

Users Manual - English
Page 80
...until the needle slightly f catches the fold of skirts and pants with a blind hem. UTILITY STITCHES CONTENTS GETTING READY SEWING BASICS UTILITY STITCHES Blind Hem Stitching Secure the bottoms of the hem. Select a stitch. APPENDIX a Wrong side of fabric...fabrics Blind hem stitching on stretch fabrics Stitch Width [mm (inch.)] Auto Manual 0.0 (0) 3← - 3→ 0.0 (0) 3← - 3→ Stitch Length [mm (inch.)] Auto Manual 2.0 1.0-3.5 (1/16) (1/16-1/8) 2.0 1.0-3.5 (1/16) (1/16-1/8) Presser Foot R Sew a blind hem according to "Selecting stitching" (page 66). Fold the...
...until the needle slightly f catches the fold of skirts and pants with a blind hem. UTILITY STITCHES CONTENTS GETTING READY SEWING BASICS UTILITY STITCHES Blind Hem Stitching Secure the bottoms of the hem. Select a stitch. APPENDIX a Wrong side of fabric...fabrics Blind hem stitching on stretch fabrics Stitch Width [mm (inch.)] Auto Manual 0.0 (0) 3← - 3→ 0.0 (0) 3← - 3→ Stitch Length [mm (inch.)] Auto Manual 2.0 1.0-3.5 (1/16) (1/16-1/8) 2.0 1.0-3.5 (1/16) (1/16-1/8) Presser Foot R Sew a blind hem according to "Selecting stitching" (page 66). Fold the...
Users Manual - English
Page 82
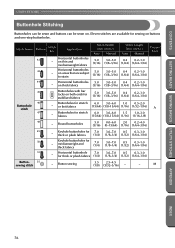
... 0.4 0.2-1.0 on thick fabrics (3/16) (1/8-3/16) (1/64) (1/64-1/16) 45 46 Buttonhole stitch 47 Buttonholes with bar tacks on both ends for sewing on . Button sewing 3.5 2.5-4.5 (1/8) (3/32-3/16) - - Buttonholes for stretch 6.0 3.0-6.0 1.0 0.5-2.0 or knit fabrics (15/64) (1/8-15/64) (1/16) (1/32...Stitch Name Pattern Stitch Key Application Stitch Width [mm (inch.)] Auto Manual Stitch Length [mm (inch.)] Auto Manual Presser Foot 42 - UTILITY STITCHES CONTENTS GETTING READY SEWING BASICS UTILITY STITCHES Buttonhole Stitching Buttonholes can be sewn and buttons can be...
... 0.4 0.2-1.0 on thick fabrics (3/16) (1/8-3/16) (1/64) (1/64-1/16) 45 46 Buttonhole stitch 47 Buttonholes with bar tacks on both ends for sewing on . Button sewing 3.5 2.5-4.5 (1/8) (3/32-3/16) - - Buttonholes for stretch 6.0 3.0-6.0 1.0 0.5-2.0 or knit fabrics (15/64) (1/8-15/64) (1/16) (1/32...Stitch Name Pattern Stitch Key Application Stitch Width [mm (inch.)] Auto Manual Stitch Length [mm (inch.)] Auto Manual Presser Foot 42 - UTILITY STITCHES CONTENTS GETTING READY SEWING BASICS UTILITY STITCHES Buttonhole Stitching Buttonholes can be sewn and buttons can be...

Users Manual - English
Page 89
.... 1 a Wrong side of the fabric. Stitch Name Pattern Stitch Key Application Straight stitch (center 3 needle position) Attaching zippers Sewing concealed seams and pintucks Stitch Width [mm (inch.)] Auto Manual Stitch Length [mm (inch.)] Auto Manual Presser Foot - - 2.5 0.2-5.0 I (3/32) (1/64-3/16) There are many methods for inserting a centered zipper and a side zipper are described...
.... 1 a Wrong side of the fabric. Stitch Name Pattern Stitch Key Application Straight stitch (center 3 needle position) Attaching zippers Sewing concealed seams and pintucks Stitch Width [mm (inch.)] Auto Manual Stitch Length [mm (inch.)] Auto Manual Presser Foot - - 2.5 0.2-5.0 I (3/32) (1/64-3/16) There are many methods for inserting a centered zipper and a side zipper are described...

Users Manual - English
Page 94
...UTILITY STITCHES CONTENTS Zipper/piping Insertion A zipper and piping can be sewn in place. GETTING READY SEWING BASICS UTILITY STITCHES APPENDIX Note z Use a screw driver to step - c Loosen the positioning screw on adjustable zipper/piping foot...Inserting a centered zipper Slide the presser foot over either the left needle position) Attaching zippers Sewing concealed seams and piping Stitch Width [mm (inch.)] Auto Manual 0.0 0.0-7.0 (0) (0-1/4) Stitch Length [mm (inch.)] Auto Manual Presser Foot 2.5 0.2-5.0 (3/32) (1/64-3/16) There are many methods for inserting a...
...UTILITY STITCHES CONTENTS Zipper/piping Insertion A zipper and piping can be sewn in place. GETTING READY SEWING BASICS UTILITY STITCHES APPENDIX Note z Use a screw driver to step - c Loosen the positioning screw on adjustable zipper/piping foot...Inserting a centered zipper Slide the presser foot over either the left needle position) Attaching zippers Sewing concealed seams and piping Stitch Width [mm (inch.)] Auto Manual 0.0 0.0-7.0 (0) (0-1/4) Stitch Length [mm (inch.)] Auto Manual Presser Foot 2.5 0.2-5.0 (3/32) (1/64-3/16) There are many methods for inserting a...
Users Manual - English
Page 96
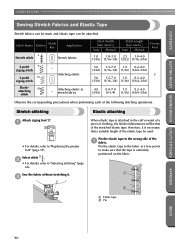
... to stretch fabrics Stitch Width [mm (inch.)] Auto Manual Stitch Length [mm (inch.)] Auto Manual Presser Foot 1.0 1.0-3.0 2.5 1.0-4.0 (1/16) (1/16-1/8)... (3/32) (1/16-3/16) 5.0 1.5-7.0 1.0 0.2-4.0 (3/16) (1/16-1/4) (1/16) (1/64-3/16) J 5.0 1.5-7.0 1.0 0.2-4.0 (3/16) (1/16-1/4) (1/16) (1/64-3/16) 4.0 0.0-7.0 1.0 0.2-4.0 (3/16) (0-1/4) (1/16) (1/64-3/16) Observe the corresponding precautions when performing each of the a fabric. Attaching elastic - a J • For details, refer to "Selecting stitching" (page 66). Sew...
... to stretch fabrics Stitch Width [mm (inch.)] Auto Manual Stitch Length [mm (inch.)] Auto Manual Presser Foot 1.0 1.0-3.0 2.5 1.0-4.0 (1/16) (1/16-1/8)... (3/32) (1/16-3/16) 5.0 1.5-7.0 1.0 0.2-4.0 (3/16) (1/16-1/4) (1/16) (1/64-3/16) J 5.0 1.5-7.0 1.0 0.2-4.0 (3/16) (1/16-1/4) (1/16) (1/64-3/16) 4.0 0.0-7.0 1.0 0.2-4.0 (3/16) (0-1/4) (1/16) (1/64-3/16) Observe the corresponding precautions when performing each of the a fabric. Attaching elastic - a J • For details, refer to "Selecting stitching" (page 66). Sew...

Users Manual - English
Page 98
... (3/16) (0-1/4) (1/16) (1/64-3/16) 23 Joining stitch - Straight stitch quilting that can be used for sewing appliqués, patchwork and quilts are described below. Stitch Name Pattern Stitch Key Application 7 Zigzag stitch 60 Attaching appliqu...Manual 1.4 0.0-4.0 (1/16) (0-3/16) 1.4 0.0-4.0 (1/16) (0-3/16) Presser Foot 19 Appliqué stitch 61 Attaching appliqués 3.5 2.5-5.0 2.5 1.6-4.0 (1/8) (3/32-3/16) (3/32) (1/16-3/16) - Stippling 7.0 1.0-7.0 1.6 1.0-4.0 (1/4) (1/16-1/4) (1/16) (1/16-3/16) APPENDIX INDEX 92 UTILITY STITCHES CONTENTS GETTING READY SEWING...
... (3/16) (0-1/4) (1/16) (1/64-3/16) 23 Joining stitch - Straight stitch quilting that can be used for sewing appliqués, patchwork and quilts are described below. Stitch Name Pattern Stitch Key Application 7 Zigzag stitch 60 Attaching appliqu...Manual 1.4 0.0-4.0 (1/16) (0-3/16) 1.4 0.0-4.0 (1/16) (0-3/16) Presser Foot 19 Appliqué stitch 61 Attaching appliqués 3.5 2.5-5.0 2.5 1.6-4.0 (1/8) (3/32-3/16) (3/32) (1/16-3/16) - Stippling 7.0 1.0-7.0 1.6 1.0-4.0 (1/4) (1/16-1/4) (1/16) (1/16-3/16) APPENDIX INDEX 92 UTILITY STITCHES CONTENTS GETTING READY SEWING...


