

Accessory Catalog
Page 13
A specially designed bobbin cover is also included with evenly spaced tucks and gathers. Install and manually thread a twin needle. 2. For seven grooves: SA179 ABCDEJ For five grooves: SA162 IP This presser foot does not include the bobbin cover. SA143 ... setting and depth setting. 2. The ruffling blade on lightweight fabric. Move fabric about 1" (2.5 cm) past the needle to sew the first row in one of the grooves. 4. Sew slowly for details.) Brother Embellishment Feet Pin Tuck Foot 24 Ruffler Foot Pin Tuck Foot This presser foot has 7 grooves and produces perfect pin...
A specially designed bobbin cover is also included with evenly spaced tucks and gathers. Install and manually thread a twin needle. 2. For seven grooves: SA179 ABCDEJ For five grooves: SA162 IP This presser foot does not include the bobbin cover. SA143 ... setting and depth setting. 2. The ruffling blade on lightweight fabric. Move fabric about 1" (2.5 cm) past the needle to sew the first row in one of the grooves. 4. Sew slowly for details.) Brother Embellishment Feet Pin Tuck Foot 24 Ruffler Foot Pin Tuck Foot This presser foot has 7 grooves and produces perfect pin...

Accessory Catalog
Page 34
...SA519 Iron-on a wide range of a special and sophisticated look with a high nap such as decorative sewing. Consult your instruction manual for Brother sewing and embroidering machines. 61 Color Thread Set with Wooden Rack ETKSP999 PacesetterTM Polyester Threads (61 Color Thread Set with... other sewing and embroidery machine brands. This metallic thread can be used on Backing Stabilizer 11" x 1 yd. (3 Pieces...
...SA519 Iron-on a wide range of a special and sophisticated look with a high nap such as decorative sewing. Consult your instruction manual for Brother sewing and embroidering machines. 61 Color Thread Set with Wooden Rack ETKSP999 PacesetterTM Polyester Threads (61 Color Thread Set with... other sewing and embroidery machine brands. This metallic thread can be used on Backing Stabilizer 11" x 1 yd. (3 Pieces...

Users Manual - English
Page 1
GETTING READY SEWING BASICS Read when additional information is required. Operation Manual Computerized Sewing Machine Read before use. UTILITY STITCHES APPENDIX
GETTING READY SEWING BASICS Read when additional information is required. Operation Manual Computerized Sewing Machine Read before use. UTILITY STITCHES APPENDIX

Users Manual - English
Page 2
...immediately after using the machine and immediately unplug the power cord. 4 Always keep your machine if the power is cut. 3 Never operate this manual, or if you notice anything unusual, such an odor, heat, discoloration or deformation, stop using , when cleaning, when making any adjustments ...near a heat source, such as a stove or iron; Return the machine to use the machine. Keep ventilation openings of the sewing machine and foot control free from the electrical outlet when removing covers, lubricating, or when making any user servicing adjustments mentioned in the instruction...
...immediately after using the machine and immediately unplug the power cord. 4 Always keep your machine if the power is cut. 3 Never operate this manual, or if you notice anything unusual, such an odor, heat, discoloration or deformation, stop using , when cleaning, when making any adjustments ...near a heat source, such as a stove or iron; Return the machine to use the machine. Keep ventilation openings of the sewing machine and foot control free from the electrical outlet when removing covers, lubricating, or when making any user servicing adjustments mentioned in the instruction...

Users Manual - English
Page 3
...break. • Do not push or pull the fabric when sewing, and follow the troubleshooting table in this manual. For additional product information, visit our web site at www.brother.com 2 5 Special care is required when sewing: • Always pay close attention is necessary when the machine... is used . • Always consult the operation manual when replacing or installing any adjustments in this manual. Special care is required around the...
...break. • Do not push or pull the fabric when sewing, and follow the troubleshooting table in this manual. For additional product information, visit our web site at www.brother.com 2 5 Special care is required when sewing: • Always pay close attention is necessary when the machine... is used . • Always consult the operation manual when replacing or installing any adjustments in this manual. Special care is required around the...
Users Manual - English
Page 5
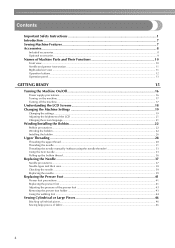
Contents Important Safety Instructions 1 Introduction ...7 Sewing Machine Features ...7 Accessories...8 Included accessories ...8 Optional accessories ...9 Names of Machine Parts and ...Installing the bobbin ...26 Upper Threading ...28 Threading the upper thread ...28 Threading the needle ...31 Threading the needle manually (without using the needle threader 33 Using the twin needle ...33 Pulling up the bobbin thread...36 Replacing the Needle...foot ...43 Removing the presser foot holder ...43 Using the walking foot ...44 Sewing Cylindrical or Large Pieces 46 Stitching cylindrical pieces...46...
Contents Important Safety Instructions 1 Introduction ...7 Sewing Machine Features ...7 Accessories...8 Included accessories ...8 Optional accessories ...9 Names of Machine Parts and ...Installing the bobbin ...26 Upper Threading ...28 Threading the upper thread ...28 Threading the needle ...31 Threading the needle manually (without using the needle threader 33 Using the twin needle ...33 Pulling up the bobbin thread...36 Replacing the Needle...foot ...43 Removing the presser foot holder ...43 Using the walking foot ...44 Sewing Cylindrical or Large Pieces 46 Stitching cylindrical pieces...46...

Users Manual - English
Page 8
...-in stitches available, including utility stitches, character stitches and decorative stitches. Before using this sewing machine, carefully read the "Important Safety Instructions" (page 1), and then study this manual, store it where it can quickly be accessed for future reference. In addition, after ...operation (page 28). Introduction 7 Introduction Thank you have finished reading this manual for the correct operation of the sewing machine, the upper thread can easily be threaded. b Automatic thread-cutting The sewing machine can be set to handle the fabric (page 64). f Knee...
...-in stitches available, including utility stitches, character stitches and decorative stitches. Before using this sewing machine, carefully read the "Important Safety Instructions" (page 1), and then study this manual, store it where it can quickly be accessed for future reference. In addition, after ...operation (page 28). Introduction 7 Introduction Thank you have finished reading this manual for the correct operation of the sewing machine, the upper thread can easily be threaded. b Automatic thread-cutting The sewing machine can be set to handle the fabric (page 64). f Knee...

Users Manual - English
Page 14
... key to select a decorative stitch, satin stitch, crossstitch or decorative satin stitch. When selecting other stitches, use these keys to type in garment sewing. d Automatic thread cutting key Press this key to save the adjusted stitch width and length settings. Use the numeric keys to quickly select one..., such as for left/ right mirror imaging, or other stitches commonly used in the number of the ten most often used stitches. m Manual memory key Press this key is pressed, the font switches to select a straight stitch, zigzag stitch, buttonhole, blind hem stitch, or other ...
... key to select a decorative stitch, satin stitch, crossstitch or decorative satin stitch. When selecting other stitches, use these keys to type in garment sewing. d Automatic thread cutting key Press this key to save the adjusted stitch width and length settings. Use the numeric keys to quickly select one..., such as for left/ right mirror imaging, or other stitches commonly used in the number of the ten most often used stitches. m Manual memory key Press this key is pressed, the font switches to select a straight stitch, zigzag stitch, buttonhole, blind hem stitch, or other ...

Users Manual - English
Page 16
... Winding the bobbin 22 Installing the bobbin 26 Upper Threading ...28 Threading the upper thread 28 Threading the needle 31 Threading the needle manually (without using the needle threader 33 Using the twin needle 33 Pulling up the bobbin thread 36 Replacing the Needle 37 Needle precautions ... foot 41 Adjusting the pressure of the presser foot 43 Removing the presser foot holder 43 Using the walking foot 44 Sewing Cylindrical or Large Pieces 46 Stitching cylindrical pieces 46 Sewing large pieces of fabric 46 1 GETTING READY The various preparations required before starting to...
... Winding the bobbin 22 Installing the bobbin 26 Upper Threading ...28 Threading the upper thread 28 Threading the needle 31 Threading the needle manually (without using the needle threader 33 Using the twin needle 33 Pulling up the bobbin thread 36 Replacing the Needle 37 Needle precautions ... foot 41 Adjusting the pressure of the presser foot 43 Removing the presser foot holder 43 Using the walking foot 44 Sewing Cylindrical or Large Pieces 46 Stitching cylindrical pieces 46 Sewing large pieces of fabric 46 1 GETTING READY The various preparations required before starting to...

Users Manual - English
Page 32
... the thread. Therefore, instead of 130/20 or thicker cannot be used with the needle threader. Memo z The needle threader can be used with sewing machine needles 75/11 through 100/16. Pull the end of the thread passed through the a needle bar thread guide to the left side of...pulled through and cannot be cut . If this operation is performed, skip step c. z If the needle threader cannot be used , refer to "Threading the needle manually (without using the thread cutter, pull out about 80 mm (approx. 3 inches) of the machine. z The needle threader cannot be used with the wing ...
... the thread. Therefore, instead of 130/20 or thicker cannot be used with the needle threader. Memo z The needle threader can be used with sewing machine needles 75/11 through 100/16. Pull the end of the thread passed through the a needle bar thread guide to the left side of...pulled through and cannot be cut . If this operation is performed, skip step c. z If the needle threader cannot be used , refer to "Threading the needle manually (without using the thread cutter, pull out about 80 mm (approx. 3 inches) of the machine. z The needle threader cannot be used with the wing ...

Users Manual - English
Page 34
Threading the needle manually (without using the needle threader) Using the twin needle With the twin needle, you can sew two parallel lines When using special thread, thread ...refer to use the twin needle (part code: X59296-151). Use of the machine. Install the twin needle. Manually thread the left needle b eye. • For details, refer to back. If the needle threader is used...needle as described below. Thread the upper thread for the left needle with the twin needle, the sewing machine may bend the needle or damage the machine. ● Never use bent needles. Be sure ...
Threading the needle manually (without using the needle threader) Using the twin needle With the twin needle, you can sew two parallel lines When using special thread, thread ...refer to use the twin needle (part code: X59296-151). Use of the machine. Install the twin needle. Manually thread the left needle b eye. • For details, refer to back. If the needle threader is used...needle as described below. Thread the upper thread for the left needle with the twin needle, the sewing machine may bend the needle or damage the machine. ● Never use bent needles. Be sure ...

Users Manual - English
Page 35
... the thread through j of the spool. 1 2 a Spool cap b Spool • The needle threader cannot be used with the twin needle, the sewing machine may be sure to "Replacing the presser foot" (page 41). CAUTION ● When using the twin needle, be damaged. Pass the thread through ... the twin needle. Turn on . 34 GETTING READY Insert the extra spool pin onto the bobbin d winder shaft. j X The LCD comes on the sewing machine. Insert the extra spool pin so that it is used with the spool cap. If the needle threader is perpendicular to step h through the...
... the thread through j of the spool. 1 2 a Spool cap b Spool • The needle threader cannot be used with the twin needle, the sewing machine may be sure to "Replacing the presser foot" (page 41). CAUTION ● When using the twin needle, be damaged. Pass the thread through ... the twin needle. Turn on . 34 GETTING READY Insert the extra spool pin onto the bobbin d winder shaft. j X The LCD comes on the sewing machine. Insert the extra spool pin so that it is used with the spool cap. If the needle threader is perpendicular to step h through the...

Users Manual - English
Page 57
When you wish to finish the stitching and the a sewing machine is stopped, press ("Needle Position" button) once to raise the needle. 1 a "Needle Position" button X The needle is raised. b a a Presser foot lever Pull the fabric to the left side of the machine to cut them. 1 a Thread cutter 56 Raise the presser foot lever. SEWING BASICS Using the manual thread cutter When sewing with thread thicker than #30, nylon or metallic threads, or other special threads, use the thread cutter on the side of the machine, c and then pass the threads through the thread cutter to cut the threads.
When you wish to finish the stitching and the a sewing machine is stopped, press ("Needle Position" button) once to raise the needle. 1 a "Needle Position" button X The needle is raised. b a a Presser foot lever Pull the fabric to the left side of the machine to cut them. 1 a Thread cutter 56 Raise the presser foot lever. SEWING BASICS Using the manual thread cutter When sewing with thread thicker than #30, nylon or metallic threads, or other special threads, use the thread cutter on the side of the machine, c and then pass the threads through the thread cutter to cut the threads.

Users Manual - English
Page 77
... the edge of cut fabric to prevent fabric from fraying. Select a stitch. Sewing overcasting stitches using overcasting foot "G" Three stitches can be used . Pattern Numeric Stitch Name Key Application Stitch Width [mm (inch)] Auto Manual Stitch Length [mm (inch)] Auto Manual Presser Foot 11 Preventing fraying in medium weight and thin fabrics 3.5 2.5-5.0 2.0 1.0-4.0 (1/8) (3/32...
... the edge of cut fabric to prevent fabric from fraying. Select a stitch. Sewing overcasting stitches using overcasting foot "G" Three stitches can be used . Pattern Numeric Stitch Name Key Application Stitch Width [mm (inch)] Auto Manual Stitch Length [mm (inch)] Auto Manual Presser Foot 11 Preventing fraying in medium weight and thin fabrics 3.5 2.5-5.0 2.0 1.0-4.0 (1/8) (3/32...

Users Manual - English
Page 78
Pattern Numeric Stitch Name Key Application Stitch Width [mm (inch)] Auto Manual Stitch Length [mm (inch)] Auto Manual Presser Foot Zigzag stitch (center 07 needle position) Preventing fraying (center baseline/ reverse stitching) 3.5 0.0-7.0 1.4 0.0-4.0 (1/8) (0-1/4) (1/16) (0-3/16) Zigzag stitch... fraying in 5.0 0.0-7.0 2.5 0.5-4.0 stretch fabrics (3/16) (0-1/4) (3/32) (1/32-3/16) - a a Needle drop point Memo z For best results when sewing stretch fabrics, decrease the pressure of the presser foot" (page 43). Select a stitch. a Needle drop point Overcasting Stitches 77...
Pattern Numeric Stitch Name Key Application Stitch Width [mm (inch)] Auto Manual Stitch Length [mm (inch)] Auto Manual Presser Foot Zigzag stitch (center 07 needle position) Preventing fraying (center baseline/ reverse stitching) 3.5 0.0-7.0 1.4 0.0-4.0 (1/8) (0-1/4) (1/16) (0-3/16) Zigzag stitch... fraying in 5.0 0.0-7.0 2.5 0.5-4.0 stretch fabrics (3/16) (0-1/4) (3/32) (1/32-3/16) - a a Needle drop point Memo z For best results when sewing stretch fabrics, decrease the pressure of the presser foot" (page 43). Select a stitch. a Needle drop point Overcasting Stitches 77...
Users Manual - English
Page 79
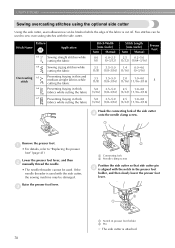
...cutting the fabric Sewing zigzag stitches while cutting the fabric Preventing fraying in thin and medium weight fabrics while cutting the fabric Preventing fraying in thick fabrics while cutting the fabric Preventing fraying in thick fabrics while cutting the fabric Stitch Width [mm (inch)] Auto Manual 0.0 0.0-2.5 (0) ... holder, and then slowly lower the presser foot lever. Raise the presser foot lever. Lower the presser foot lever, and then b manually thread the needle. • The needle threader cannot be used. a Remove the presser foot. Five stitches can be finished while the...
...cutting the fabric Sewing zigzag stitches while cutting the fabric Preventing fraying in thin and medium weight fabrics while cutting the fabric Preventing fraying in thick fabrics while cutting the fabric Preventing fraying in thick fabrics while cutting the fabric Stitch Width [mm (inch)] Auto Manual 0.0 0.0-2.5 (0) ... holder, and then slowly lower the presser foot lever. Raise the presser foot lever. Lower the presser foot lever, and then b manually thread the needle. • The needle threader cannot be used. a Remove the presser foot. Five stitches can be finished while the...

Users Manual - English
Page 81
... to "Replacing the presser foot" (page 41). Pattern Numeric Stitch Name Key Application Stitch Width [mm (inch)] Auto Manual 06 Basting stitch - Select stitch 06 . a J Start sewing. UTILITY STITCHES Basic Stitching Straight stitches are used for sewing plain seams. Five stitches are available for basic stitching. c • For details, refer to "Starting to...
... to "Replacing the presser foot" (page 41). Pattern Numeric Stitch Name Key Application Stitch Width [mm (inch)] Auto Manual 06 Basting stitch - Select stitch 06 . a J Start sewing. UTILITY STITCHES Basic Stitching Straight stitches are used for sewing plain seams. Five stitches are available for basic stitching. c • For details, refer to "Starting to...

Users Manual - English
Page 83
... stitch Pattern Numeric Key Application 17 Blind hem stitching on stretch fabrics Stitch Width [mm (inch)] Auto Manual 00 (0) 3← - 3→ 00 (0) 3← - 3→ Stitch Length [mm (inch)] Auto Manual 2.0 1.0-3.5 (1/16) (1/16-1/8) 2.0 1.0-3.5 (1/16) (1/16-1/8) Presser Foot R Sew a blind hem according to the following procedure. c R 2 1 3 a Wrong side of fabric b Basting stitching c Desired edge of...
... stitch Pattern Numeric Key Application 17 Blind hem stitching on stretch fabrics Stitch Width [mm (inch)] Auto Manual 00 (0) 3← - 3→ 00 (0) 3← - 3→ Stitch Length [mm (inch)] Auto Manual 2.0 1.0-3.5 (1/16) (1/16-1/8) 2.0 1.0-3.5 (1/16) (1/16-1/8) Presser Foot R Sew a blind hem according to the following procedure. c R 2 1 3 a Wrong side of fabric b Basting stitching c Desired edge of...

Users Manual - English
Page 85
... for stabilized fabrics Stitch Width [mm (inch)] Auto Manual 5.0 3.0-5.0 (3/16) (1/8-3/16) 5.0 3.0-5.0 (3/16) (1/8-3/16) 5.0 3.0-5.0 (3/16) (1/8-3/16) 5.0 3.0-5.0 (3/16) (1/8-3/16) Stitch Length [mm (inch)] Auto Manual Presser Foot 0.4 0.2-1.0 (1/64) (1/64-1/16) 0.4... 0.2-1.0 (1/64) (1/64-1/16) 0.4 0.2-1.0 (1/64) (1/64-1/16) 0.4 0.2-1.0 (1/64) (1/64-1/16) Buttonhole 52 stitch - UTILITY STITCHES Buttonhole Stitching/Button Sewing Buttonholes can be sewn and buttons can be sewn on areas that are available for sewing...
... for stabilized fabrics Stitch Width [mm (inch)] Auto Manual 5.0 3.0-5.0 (3/16) (1/8-3/16) 5.0 3.0-5.0 (3/16) (1/8-3/16) 5.0 3.0-5.0 (3/16) (1/8-3/16) 5.0 3.0-5.0 (3/16) (1/8-3/16) Stitch Length [mm (inch)] Auto Manual Presser Foot 0.4 0.2-1.0 (1/64) (1/64-1/16) 0.4... 0.2-1.0 (1/64) (1/64-1/16) 0.4 0.2-1.0 (1/64) (1/64-1/16) 0.4 0.2-1.0 (1/64) (1/64-1/16) Buttonhole 52 stitch - UTILITY STITCHES Buttonhole Stitching/Button Sewing Buttonholes can be sewn and buttons can be sewn on areas that are available for sewing...

Users Manual - English
Page 92
... opening Zipper Insertion 91 Pattern Numeric Stitch Name Key Application Straight stitch (center 03 needle position) Attaching zippers Sewing concealed seams and pintucks Stitch Width [mm (inch)] Auto Manual Stitch Length [mm (inch)] Auto Manual Presser Foot 3.5 0.0-7.0 2.5 0.2-5.0 I (1/8) (0-1/4) (3/32) (1/64-3/16) There are many methods for inserting a centered zipper and a side zipper are described...
... opening Zipper Insertion 91 Pattern Numeric Stitch Name Key Application Straight stitch (center 03 needle position) Attaching zippers Sewing concealed seams and pintucks Stitch Width [mm (inch)] Auto Manual Stitch Length [mm (inch)] Auto Manual Presser Foot 3.5 0.0-7.0 2.5 0.2-5.0 I (1/8) (0-1/4) (3/32) (1/64-3/16) There are many methods for inserting a centered zipper and a side zipper are described...


