

Accessory Catalog
Page 13
... card to get started. Move fabric about 1" (2.5 cm) past the needle to slide the fabric from left into gathers or tucks. www.brother.com Install and manually thread a twin needle. 2. The ruffling blade on lightweight fabric. Draw a reference line to sew the first row in one of the grooves...setting. 2. Adjust the amount of tuck or gather by placing the completed row in the center position. 3. Sew slowly for details.) Brother Embellishment Feet Pin Tuck Foot 24 Ruffler Foot Pin Tuck Foot This presser foot has 7 grooves and produces perfect pin tucks and corded pin...
... card to get started. Move fabric about 1" (2.5 cm) past the needle to slide the fabric from left into gathers or tucks. www.brother.com Install and manually thread a twin needle. 2. The ruffling blade on lightweight fabric. Draw a reference line to sew the first row in one of the grooves...setting. 2. Adjust the amount of tuck or gather by placing the completed row in the center position. 3. Sew slowly for details.) Brother Embellishment Feet Pin Tuck Foot 24 Ruffler Foot Pin Tuck Foot This presser foot has 7 grooves and produces perfect pin tucks and corded pin...

Accessory Catalog
Page 34
... embroidery thread spools 300 meters (328 yards). Individual colors are also available (sold in the 61 color set of colors specifically designed for Brother Embroidery machines, but compatible with a stabilizer. Make sure you just the right color for each design. Individual colors are also available at ... series, PC and ULT series machines and the PE-400D and Innov-is Project Book (See page 33 for details.) www.brother.com Consult your instruction manual for advice on the top surface of a special and sophisticated look with Wooden Rack) Our high sheen 100% polyester mini king...
... embroidery thread spools 300 meters (328 yards). Individual colors are also available (sold in the 61 color set of colors specifically designed for Brother Embroidery machines, but compatible with a stabilizer. Make sure you just the right color for each design. Individual colors are also available at ... series, PC and ULT series machines and the PE-400D and Innov-is Project Book (See page 33 for details.) www.brother.com Consult your instruction manual for advice on the top surface of a special and sophisticated look with Wooden Rack) Our high sheen 100% polyester mini king...
Users Manual - English
Page 2
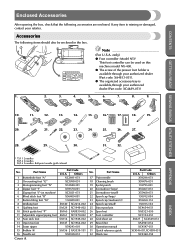
... accessories are enclosed. Part Name 1 Buttonhole foot "A" 2 Overcasting foot "G" 3 Monogramming foot "N" 4 Zipper foot "I" 5 Zigzag foot "J" (on this machine model NX-400. ● The screw of the presser foot holder is available through your authorized dealer (Part code: XA4813-051). ● The organized accessory tray is missing...piping foot 12 Non stick foot 13 Open toe foot 14 Seam ripper 15 Bobbin (4) 16 Needle set 29 Knee lifter 30 Operation manual 31 Quick reference guide 32 Hard case Part Code U.S.A. only) ● Foot controller: Model N5V This foot controller can be enclosed ...
... accessories are enclosed. Part Name 1 Buttonhole foot "A" 2 Overcasting foot "G" 3 Monogramming foot "N" 4 Zipper foot "I" 5 Zigzag foot "J" (on this machine model NX-400. ● The screw of the presser foot holder is available through your authorized dealer (Part code: XA4813-051). ● The organized accessory tray is missing...piping foot 12 Non stick foot 13 Open toe foot 14 Seam ripper 15 Bobbin (4) 16 Needle set 29 Knee lifter 30 Operation manual 31 Quick reference guide 32 Hard case Part Code U.S.A. only) ● Foot controller: Model N5V This foot controller can be enclosed ...
Users Manual - English
Page 8
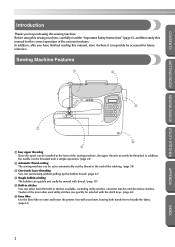
...page 61) APPENDIX INDEX 2 Before using this sewing machine, carefully read the "Important Safety Instructions" (page 6), and then study this manual for the correct operation of the stitching. (page 58) 3 One-touch lower threading You can start sewing without pulling up the ...available, including utility stitches, character stitches and decorative stitches. CONTENTS GETTING READY SEWING BASICS UTILITY STITCHES Introduction Thank you have finished reading this manual, store it where it can quickly be accessed for future reference. Sewing Machine Features 1 4 5 2 6 3 1 Easy upper ...
...page 61) APPENDIX INDEX 2 Before using this sewing machine, carefully read the "Important Safety Instructions" (page 6), and then study this manual for the correct operation of the stitching. (page 58) 3 One-touch lower threading You can start sewing without pulling up the ...available, including utility stitches, character stitches and decorative stitches. CONTENTS GETTING READY SEWING BASICS UTILITY STITCHES Introduction Thank you have finished reading this manual, store it where it can quickly be accessed for future reference. Sewing Machine Features 1 4 5 2 6 3 1 Easy upper ...
Users Manual - English
Page 12
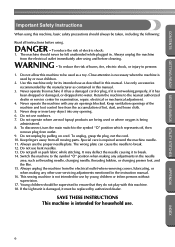
... cord or plug, if it is not working properly, if it has been dropped or damaged, or dropped into any adjustments in this manual. 3. Never operate this machine to be supervised to the symbol "{" position when making any object into water. Always use outdoors. 7....symbol "{" position which represents off, then remove plug from the electrical outlet when removing covers, lubricating, or when making any opening. 6. Use this manual. Do not use . 6 APPENDIX INDEX Do not operate where aerosol (spray) products are being administered. 8. To disconnect, turn the main switch...
... cord or plug, if it is not working properly, if it has been dropped or damaged, or dropped into any adjustments in this manual. 3. Never operate this machine to be supervised to the symbol "{" position when making any object into water. Always use outdoors. 7....symbol "{" position which represents off, then remove plug from the electrical outlet when removing covers, lubricating, or when making any opening. 6. Use this manual. Do not use . 6 APPENDIX INDEX Do not operate where aerosol (spray) products are being administered. 8. To disconnect, turn the main switch...
Users Manual - English
Page 14
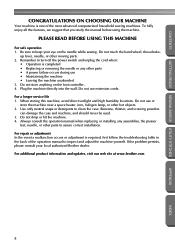
...the needle while sewing. If the problem persists, please consult your eye on the foot controller. 4. Be sure to keep your local authorized Brother dealer. Do not touch the hand wheel, thread take- Remember to assure correct installation. When storing this machine, avoid direct sunlight and high...sewing machines. CONTENTS GETTING READY SEWING BASICS UTILITY STITCHES CONGRATULATIONS ON CHOOSING OUR MACHINE Your machine is one of the operation manual to clean the case. Use only neutral soaps or detergents to inspect and adjust the machine yourself. Always consult the operation...
...the needle while sewing. If the problem persists, please consult your eye on the foot controller. 4. Be sure to keep your local authorized Brother dealer. Do not touch the hand wheel, thread take- Remember to assure correct installation. When storing this machine, avoid direct sunlight and high...sewing machines. CONTENTS GETTING READY SEWING BASICS UTILITY STITCHES CONGRATULATIONS ON CHOOSING OUR MACHINE Your machine is one of the operation manual to clean the case. Use only neutral soaps or detergents to inspect and adjust the machine yourself. Always consult the operation...

Users Manual - English
Page 19
X The initial stitch screen appears again. Press (sewing machine help screen appears. To 5 return to the corresponding page in this Operation Manual. 3 4 1 Replacing the presser foot 2 Threading the upper thread 3 Winding the bobbin 4 Installing the bobbin Press (OK key). 4 X The first screen describing the procedure for the ...
X The initial stitch screen appears again. Press (sewing machine help screen appears. To 5 return to the corresponding page in this Operation Manual. 3 4 1 Replacing the presser foot 2 Threading the upper thread 3 Winding the bobbin 4 Installing the bobbin Press (OK key). 4 X The first screen describing the procedure for the ...
Users Manual - English
Page 35
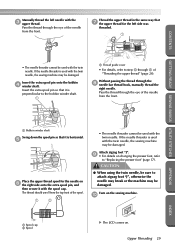
... is perpendicular to the bobbin winder shaft. 1 1 Thread guide cover • For details, refer to step 8 through the 8 needle bar thread hook, manually thread the right needle. CONTENTS Manually thread the left side was threaded. 1 • The needle threader cannot be used with the twin needle. Insert the extra spool pin so...
... is perpendicular to the bobbin winder shaft. 1 1 Thread guide cover • For details, refer to step 8 through the 8 needle bar thread hook, manually thread the right needle. CONTENTS Manually thread the left side was threaded. 1 • The needle threader cannot be used with the twin needle. Insert the extra spool pin so...
Users Manual - English
Page 59
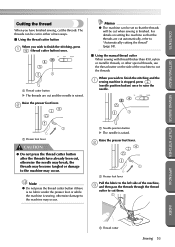
... stitching, press 1 (thread cutter button) once. 1 1 Thread cutter button X The threads are cut automatically, refer to "Automatically cutting the thread" (page 58). ■ Using the manual thread cutter When sewing with thread thicker than #30, nylon or metallic threads, or other special threads, use the thread cutter on setting the machine...
... stitching, press 1 (thread cutter button) once. 1 1 Thread cutter button X The threads are cut automatically, refer to "Automatically cutting the thread" (page 58). ■ Using the manual thread cutter When sewing with thread thicker than #30, nylon or metallic threads, or other special threads, use the thread cutter on setting the machine...
Users Manual - English
Page 76
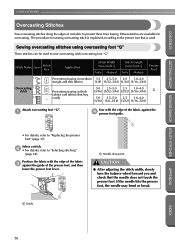
... fabric with the edge of cut fabric to prevent them from fraying. Stitch Name Pattern Stitch Key Application Stitch Width [mm (inch.)] Auto Manual Stitch Length [mm (inch.)] Auto Manual Presser Foot 11 Preventing fraying in medium 3.5 2.5-5.0 2.0 1.0-4.0 weight and thin fabrics (1/8) (3/32-3/16) (1/16) (1/16-3/16) Overcasting 12 stitch 13 Preventing fraying...
... fabric with the edge of cut fabric to prevent them from fraying. Stitch Name Pattern Stitch Key Application Stitch Width [mm (inch.)] Auto Manual Stitch Length [mm (inch.)] Auto Manual Presser Foot 11 Preventing fraying in medium 3.5 2.5-5.0 2.0 1.0-4.0 weight and thin fabrics (1/8) (3/32-3/16) (1/16) (1/16-3/16) Overcasting 12 stitch 13 Preventing fraying...
Users Manual - English
Page 77
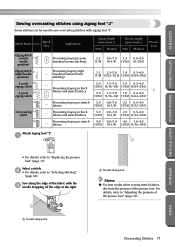
... Overcasting 15 stitch 16 Preventing fraying (center baseline/reverse stitching) Preventing fraying (right - Preventing fraying in stretch fabrics Stitch Width [mm (inch.)] Auto Manual Stitch Length [mm (inch.)] Auto Manual Presser Foot 3.5 0.0-7.0 1.4 0.0-4.0 (1/8) (0-1/4) (1/16) (0-3/16) 3.5 2.5-5.0 1.4 0.3-4.0 (1/8) (3/32-3/16) (1/16) (1/64-3/16) 5.0 1.5-7.0 1.0 0.2-4.0 (3/16) (1/16-1/4) (1/16) (1/64-3/16) J 5.0 1.5-7.0 1.0 0.2-4.0 (3/16) (1/16-1/4) (1/16) (1/64-3/16) 5.0 0.0-7.0 2.5 0.5-4.0 (3/16) (0-1/4) (3/32) (1/32...
... Overcasting 15 stitch 16 Preventing fraying (center baseline/reverse stitching) Preventing fraying (right - Preventing fraying in stretch fabrics Stitch Width [mm (inch.)] Auto Manual Stitch Length [mm (inch.)] Auto Manual Presser Foot 3.5 0.0-7.0 1.4 0.0-4.0 (1/8) (0-1/4) (1/16) (0-3/16) 3.5 2.5-5.0 1.4 0.3-4.0 (1/8) (3/32-3/16) (1/16) (1/64-3/16) 5.0 1.5-7.0 1.0 0.2-4.0 (3/16) (1/16-1/4) (1/16) (1/64-3/16) J 5.0 1.5-7.0 1.0 0.2-4.0 (3/16) (1/16-1/4) (1/16) (1/64-3/16) 5.0 0.0-7.0 2.5 0.5-4.0 (3/16) (0-1/4) (3/32) (1/32...
Users Manual - English
Page 78
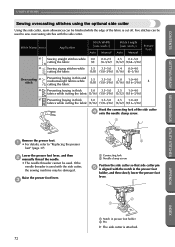
...(3/32) (1/16-3/16) Hook the connecting fork of the fabric is cut off. Stitch Name Pattern Application Stitch Width [mm (inch.)] Auto Manual Stitch Length [mm (inch.)] Auto Manual Presser Foot 63 Sewing straight stitches while 0.0 0.0-2.5 2.5 0.2-5.0 cutting the fabric (0) (0-3/32) (3/32) (1/64-3/16) 64 Sewing zigzag stitches ...cutter, seam allowances can be used to "Replacing the presser foot" (page 37). Lower the presser foot lever, and then 2 manually thread the needle. • The needle threader cannot be finished while the edge of the side cutter 4 onto the needle clamp ...
...(3/32) (1/16-3/16) Hook the connecting fork of the fabric is cut off. Stitch Name Pattern Application Stitch Width [mm (inch.)] Auto Manual Stitch Length [mm (inch.)] Auto Manual Presser Foot 63 Sewing straight stitches while 0.0 0.0-2.5 2.5 0.2-5.0 cutting the fabric (0) (0-3/32) (3/32) (1/64-3/16) 64 Sewing zigzag stitches ...cutter, seam allowances can be used to "Replacing the presser foot" (page 37). Lower the presser foot lever, and then 2 manually thread the needle. • The needle threader cannot be finished while the edge of the side cutter 4 onto the needle clamp ...
Users Manual - English
Page 80
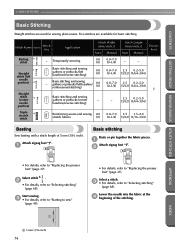
Stitch Name Pattern Stitch Key Application Stitch Width [mm (inch.)] Auto Manual Stitch Length [mm (inch.)] Auto Manual Presser Foot Basting 6 stitch - Start sewing. 3 • For details, refer to "Starting to sew" (page 49). • For details, refer to "Replacing the presser foot" (...
Stitch Name Pattern Stitch Key Application Stitch Width [mm (inch.)] Auto Manual Stitch Length [mm (inch.)] Auto Manual Presser Foot Basting 6 stitch - Start sewing. 3 • For details, refer to "Starting to sew" (page 49). • For details, refer to "Replacing the presser foot" (...
Users Manual - English
Page 82
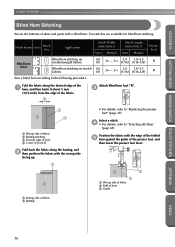
Stitch Name Pattern Stitch Key Application Stitch Width [mm (inch.)] Auto Manual Stitch Length [mm (inch.)] Auto Manual Presser Foot 17 Blind hem stitch 18 Blind hem stitching on mediumweight fabrics 0.0 (0) 3← - 3→ 2.0 (1/16) 1.0-3.5 (1/16-1/8) R Blind hem stitching on stretch 0.0 fabrics (0) 3← - 3→ 2.0 (1/...
Stitch Name Pattern Stitch Key Application Stitch Width [mm (inch.)] Auto Manual Stitch Length [mm (inch.)] Auto Manual Presser Foot 17 Blind hem stitch 18 Blind hem stitching on mediumweight fabrics 0.0 (0) 3← - 3→ 2.0 (1/16) 1.0-3.5 (1/16-1/8) R Blind hem stitching on stretch 0.0 fabrics (0) 3← - 3→ 2.0 (1/...
Users Manual - English
Page 84
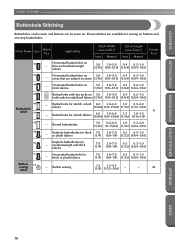
... 5.0 3.0-5.0 0.4 0.2-1.0 (3/16) (1/8-3/16) (1/64) (1/64-1/16) 45 Buttonholes with bar tacks on - Stitch Name Pattern Stitch Key Application Stitch Width [mm (inch.)] Auto Manual Stitch Length [mm (inch.)] Auto Manual Presser Foot 42 Horizontal buttonholes on 5.0 3.0-5.0 0.4 0.2-1.0 both ends for sewing on . Horizontal buttonholes on 5.0 3.0-5.0 0.4 0.2-1.0 areas that are available for stabilized fabrics (3/16) (1/8-3/16...
... 5.0 3.0-5.0 0.4 0.2-1.0 (3/16) (1/8-3/16) (1/64) (1/64-1/16) 45 Buttonholes with bar tacks on - Stitch Name Pattern Stitch Key Application Stitch Width [mm (inch.)] Auto Manual Stitch Length [mm (inch.)] Auto Manual Presser Foot 42 Horizontal buttonholes on 5.0 3.0-5.0 0.4 0.2-1.0 both ends for sewing on . Horizontal buttonholes on 5.0 3.0-5.0 0.4 0.2-1.0 areas that are available for stabilized fabrics (3/16) (1/8-3/16...
Users Manual - English
Page 91
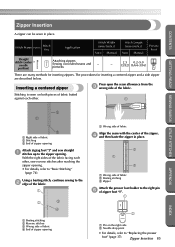
... Attach the presser foot holder to the right pin 5 of the fabric. Stitch Name Pattern Stitch Key Application Stitch Width [mm (inch.)] Auto Manual Stitch Length [mm (inch.)] Auto Manual Presser Foot Straight stitch (center 3 needle position) Attaching zippers Sewing concealed seams and - Stitching is sewn on the right side 2 Needle drop...
... Attach the presser foot holder to the right pin 5 of the fabric. Stitch Name Pattern Stitch Key Application Stitch Width [mm (inch.)] Auto Manual Stitch Length [mm (inch.)] Auto Manual Presser Foot Straight stitch (center 3 needle position) Attaching zippers Sewing concealed seams and - Stitching is sewn on the right side 2 Needle drop...
Users Manual - English
Page 95
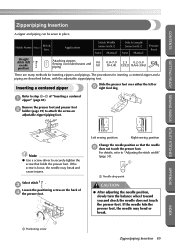
... STITCHES Zipper/piping Insertion A zipper and piping can be sewn in place. Stitch Name Pattern Stitch Key Application Stitch Width [mm (inch.)] Auto Manual Stitch Length [mm (inch.)] Auto Manual Presser Foot Straight stitch (left or 5 right feed dog. Inserting a centered zipper Slide the presser foot over either the left 1 needle position...
... STITCHES Zipper/piping Insertion A zipper and piping can be sewn in place. Stitch Name Pattern Stitch Key Application Stitch Width [mm (inch.)] Auto Manual Stitch Length [mm (inch.)] Auto Manual Presser Foot Straight stitch (left or 5 right feed dog. Inserting a centered zipper Slide the presser foot over either the left 1 needle position...
Users Manual - English
Page 97
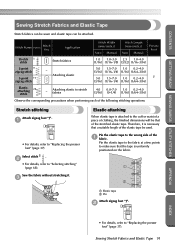
Stitch Name Pattern Stitch Key Application Stitch Width [mm (inch.)] Auto Manual Stitch Length [mm (inch.)] Auto Manual Presser Foot Stretch 5 stitch Stretch fabrics 1.0 1.0-3.0 2.5 1.0-4.0 (1/16) (1/16-1/8) (3/32) (1/16-3/16) 2-point 9 zigzag stitch 3-point 10 zigzag stitch - Therefore, it . 3 Elastic attaching When elastic tape ...
Stitch Name Pattern Stitch Key Application Stitch Width [mm (inch.)] Auto Manual Stitch Length [mm (inch.)] Auto Manual Presser Foot Stretch 5 stitch Stretch fabrics 1.0 1.0-3.0 2.5 1.0-4.0 (1/16) (1/16-1/8) (3/32) (1/16-3/16) 2-point 9 zigzag stitch 3-point 10 zigzag stitch - Therefore, it . 3 Elastic attaching When elastic tape ...
Users Manual - English
Page 99
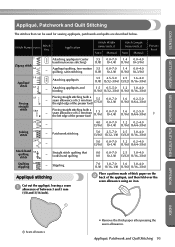
... thick paper on the 2 back of between 3 and 5 mm (1/8 and 3/16 inch). Stitch Name Pattern Stitch Key Application Stitch Width [mm (inch.)] Auto Manual Stitch Length [mm (inch.)] Auto Manual Presser Foot 7 Zigzag stitch 60 Attaching appliqués (center baseline/reverse stitching) 3.5 0.0-7.0 1.4 0.0-4.0 (1/8) (0-1/4) (1/16) (0-3/16) - Appliqué quilting, free-motion 3.5 quilting, satin stitching...
... thick paper on the 2 back of between 3 and 5 mm (1/8 and 3/16 inch). Stitch Name Pattern Stitch Key Application Stitch Width [mm (inch.)] Auto Manual Stitch Length [mm (inch.)] Auto Manual Presser Foot 7 Zigzag stitch 60 Attaching appliqués (center baseline/reverse stitching) 3.5 0.0-7.0 1.4 0.0-4.0 (1/8) (0-1/4) (1/16) (0-3/16) - Appliqué quilting, free-motion 3.5 quilting, satin stitching...
Users Manual - English
Page 106
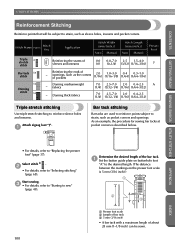
... of pockets 2.0 (1/16) 1.0-3.0 (1/16-1/8) 0.4 0.3-1.0 (1/64) (1/64-1/16) 52 Darning stitch 53 - Stitch Name Pattern Stitch Key Application Stitch Width [mm (inch.)] Auto Manual Stitch Length [mm (inch.)] Auto Manual Presser Foot Triple 4 stretch stitch Reinforcing the seams of openings, such as sleeve holes, inseams and pocket corners. As an example, the procedure...
... of pockets 2.0 (1/16) 1.0-3.0 (1/16-1/8) 0.4 0.3-1.0 (1/64) (1/64-1/16) 52 Darning stitch 53 - Stitch Name Pattern Stitch Key Application Stitch Width [mm (inch.)] Auto Manual Stitch Length [mm (inch.)] Auto Manual Presser Foot Triple 4 stretch stitch Reinforcing the seams of openings, such as sleeve holes, inseams and pocket corners. As an example, the procedure...


