Basic Users Guide
Page 5
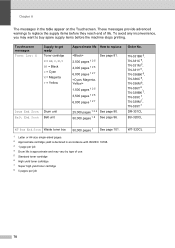
.... 50,000 pages 1 6) WT-320CL (Approx. 50,000 pages) 1 LT-320CL (MFC-L8600CDW and MFC-L8850CDW) LT-325CL (MFC-L9550CDW) LG3077001 LEN137001 (English for USA and Canada) LEN137002 (French for Canada) LEN138001 (English... for USA and Canada) LEN138002 (French for Canada) 1 Letter or A4 size single-sided pages. 2 Approximate cartridge yield is declared in accordance with ISO/IEC 19798. 3 Standard toner cartridge 4 High yield toner cartridge 5 Super High yield toner...
.... 50,000 pages 1 6) WT-320CL (Approx. 50,000 pages) 1 LT-320CL (MFC-L8600CDW and MFC-L8850CDW) LT-325CL (MFC-L9550CDW) LG3077001 LEN137001 (English for USA and Canada) LEN137002 (French for Canada) LEN138001 (English... for USA and Canada) LEN138002 (French for Canada) 1 Letter or A4 size single-sided pages. 2 Approximate cartridge yield is declared in accordance with ISO/IEC 19798. 3 Standard toner cartridge 4 High yield toner cartridge 5 Super High yield toner...
Basic Users Guide
Page 10
... a PDF file using ControlCenter4 (Windows 73 How to scan a document as a PDF file using the Touchscreen 75 A Routine maintenance 77 Replacing supplies 77 Replacing the toner cartridges 81 Cleaning the corona wires 87 Replacing the drum unit 90 Replacing the belt unit 96 Replacing the waste...
... a PDF file using ControlCenter4 (Windows 73 How to scan a document as a PDF file using the Touchscreen 75 A Routine maintenance 77 Replacing supplies 77 Replacing the toner cartridges 81 Cleaning the corona wires 87 Replacing the drum unit 90 Replacing the belt unit 96 Replacing the waste...
Basic Users Guide
Page 11
... Fax...216 Copy ...217 Scanner ...218 Printer ...219 Interfaces ...220 Network...221 Direct Print feature 222 Computer requirements 223 Supplies ...224 Important information for the toner cartridge life 225 E Index 227 ix
... Fax...216 Copy ...217 Scanner ...218 Printer ...219 Interfaces ...220 Network...221 Direct Print feature 222 Computer requirements 223 Supplies ...224 Important information for the toner cartridge life 225 E Index 227 ix
Basic Users Guide
Page 22
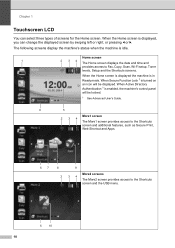
... features, such as Secure Print, Web Shortcut and Apps. 67 8 9 More2 screens 2 34 The More2 screen provides access to Fax, Copy, Scan, Wi-Fi setup, Toner levels, Setup and the Shortcuts screens.
... features, such as Secure Print, Web Shortcut and Apps. 67 8 9 More2 screens 2 34 The More2 screen provides access to Fax, Copy, Scan, Wi-Fi setup, Toner levels, Setup and the Shortcuts screens.
Basic Users Guide
Page 23
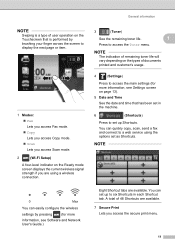
...are using the options set up Shortcuts. You can quickly copy, scan, send a fax and connect to a web service using a wireless connection. 3 (Toner) See the remaining toner life. 1 Press to display the next page or item. 1 Modes: Fax Lets you access Fax mode. Copy Lets you access...are available. NOTE 0 Max You can easily configure the wireless settings by brushing your finger across the screen to access the Toner menu. NOTE The indication of remaining toner life will vary depending on page 13). 5 Date and Time See the date and time that is a type of ...
...are using the options set up Shortcuts. You can quickly copy, scan, send a fax and connect to a web service using a wireless connection. 3 (Toner) See the remaining toner life. 1 Press to display the next page or item. 1 Modes: Fax Lets you access Fax mode. Copy Lets you access...are available. NOTE 0 Max You can easily configure the wireless settings by brushing your finger across the screen to access the Toner menu. NOTE The indication of remaining toner life will vary depending on page 13). 5 Date and Time See the date and time that is a type of ...
Basic Users Guide
Page 25
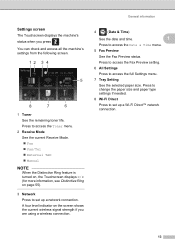
.... 7 Tray Setting See the selected paper size. You can check and access all the machine's settings from the following screen. 12 3 4 5 8 7 6 1 Toner See the remaining toner life. Press to access the Toner menu. 2 Receive Mode See the current Receive Mode. Fax Fax/Tel External TAD Manual NOTE When the...
.... 7 Tray Setting See the selected paper size. You can check and access all the machine's settings from the following screen. 12 3 4 5 8 7 6 1 Toner See the remaining toner life. Press to access the Toner menu. 2 Receive Mode See the current Receive Mode. Fax Fax/Tel External TAD Manual NOTE When the...
Basic Users Guide
Page 89
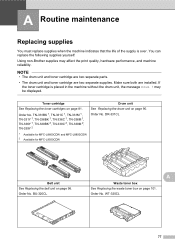
.... may affect the print quality, hardware performance, and machine reliability. Toner cartridge See Replacing the toner cartridges on page 96. BU-320CL A Waste toner box See Replacing the waste toner box on page 90. If the toner cartridge is over. Order No. A Routine maintenance A Replacing supplies ...: Using non-Brother supplies may be displayed. Order No. TN-331BK 1, TN-331C 1, TN-331M 1, TN-331Y 1, TN-336BK 1, TN-336C 1, TN-336M 1, TN-336Y 1, TN-339BK 2, TN-339C 2, TN-339M 2, TN-339Y 2 1 Available for MFC-L8600CDW and MFC-L8850CDW 2 Available for MFC-L9550CDW Drum unit...
.... may affect the print quality, hardware performance, and machine reliability. Toner cartridge See Replacing the toner cartridges on page 96. BU-320CL A Waste toner box See Replacing the waste toner box on page 90. If the toner cartridge is over. Order No. A Routine maintenance A Replacing supplies ...: Using non-Brother supplies may be displayed. Order No. TN-331BK 1, TN-331C 1, TN-331M 1, TN-331Y 1, TN-336BK 1, TN-336C 1, TN-336M 1, TN-336Y 1, TN-339BK 2, TN-339C 2, TN-339M 2, TN-339Y 2 1 Available for MFC-L8600CDW and MFC-L8850CDW 2 Available for MFC-L9550CDW Drum unit...
Basic Users Guide
Page 90
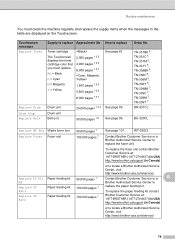
...336BK 6, TN-336C 6, TN-336M 6, TN-336Y 6, TN-339BK 7, TN-339C 7, TN-339M 7, TN-339Y 7 DR-331CL BU-320CL WT Box End Soon Waste toner box 50,000 pages 1 See page 101. 1 Letter or A4 size single-sided pages. 2 Approximate cartridge yield is declared in the table appear on the...End Soon Drum unit Belt unit Approximate life How to buy spare supply items before they reach end of use. 5 Standard toner cartridge 6 High yield toner cartridge 7 Super high yield toner cartridge 8 5 pages per job WT-320CL 78 These messages provide advanced warnings to replace the supply items before the machine...
...336BK 6, TN-336C 6, TN-336M 6, TN-336Y 6, TN-339BK 7, TN-339C 7, TN-339M 7, TN-339Y 7 DR-331CL BU-320CL WT Box End Soon Waste toner box 50,000 pages 1 See page 101. 1 Letter or A4 size single-sided pages. 2 Approximate cartridge yield is declared in the table appear on the...End Soon Drum unit Belt unit Approximate life How to buy spare supply items before they reach end of use. 5 Standard toner cartridge 6 High yield toner cartridge 7 Super high yield toner cartridge 8 5 pages per job WT-320CL 78 These messages provide advanced warnings to replace the supply items before the machine...
Basic Users Guide
Page 91
... page 96. To replace the fuser unit contact Brother Customer Service at : 1-877-BROTHER (1-877-276-8437) (in USA) http://www.brother.ca/support (in the table are displayed on the Touchscreen. Touchscreen messages Replace Toner Supply to replace Approximate life Toner cartridge The Touchscreen displays the toner cartridge color that you must clean the machine...
... page 96. To replace the fuser unit contact Brother Customer Service at : 1-877-BROTHER (1-877-276-8437) (in USA) http://www.brother.ca/support (in the table are displayed on the Touchscreen. Touchscreen messages Replace Toner Supply to replace Approximate life Toner cartridge The Touchscreen displays the toner cartridge color that you must clean the machine...
Basic Users Guide
Page 92
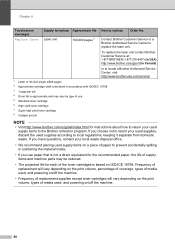
... per job 4 Drum life is approximate and may vary by type of use. 5 Standard toner cartridge 6 High yield toner cartridge 7 Super high yield toner cartridge 8 5 pages per job NOTE • Visit http://www.brother.com/original/index.html for instructions about how to return your used , and powering on a... piece of paper to the Brother collection program. If you choose not to return your local waste disposal office. • We recommend placing used supply items on /off the machine. • Frequency of replacement supplies except toner cartridges will vary depending on the print ...
... per job 4 Drum life is approximate and may vary by type of use. 5 Standard toner cartridge 6 High yield toner cartridge 7 Super high yield toner cartridge 8 5 pages per job NOTE • Visit http://www.brother.com/original/index.html for instructions about how to return your used , and powering on a... piece of paper to the Brother collection program. If you choose not to return your local waste disposal office. • We recommend placing used supply items on /off the machine. • Frequency of replacement supplies except toner cartridges will vary depending on the print ...

Basic Users Guide
Page 93
... for MFC-L8600CDW and MFC-L8850CDW and approximately 6,000 pages 4 (Black, Cyan, Magenta, Yellow) for MFC-L9550CDW. 1 Standard toner cartridge 2 High yield toner cartridge 3 Super high yield toner cartridge 4 Approximate cartridge yield is a good idea to keep a new toner cartridge ready...count will A reset the Replace Toner mode. Toner Low: X A If the Touchscreen displays Toner Low: X, buy toner cartridges, contact Brother Customer Service. • We recommend that you use only Genuine Brother Brand toner cartridges. The High Yield toner cartridge can print approximately 4,000 ...
... for MFC-L8600CDW and MFC-L8850CDW and approximately 6,000 pages 4 (Black, Cyan, Magenta, Yellow) for MFC-L9550CDW. 1 Standard toner cartridge 2 High yield toner cartridge 3 Super high yield toner cartridge 4 Approximate cartridge yield is a good idea to keep a new toner cartridge ready...count will A reset the Replace Toner mode. Toner Low: X A If the Touchscreen displays Toner Low: X, buy toner cartridges, contact Brother Customer Service. • We recommend that you use only Genuine Brother Brand toner cartridges. The High Yield toner cartridge can print approximately 4,000 ...
Basic Users Guide
Page 94
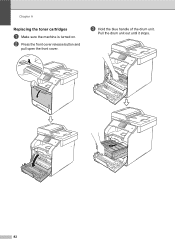
b Press the front cover release button and pull open the front cover. Pull the drum unit out until it stops. 82 c Hold the blue handle of the drum unit. Chapter A Replacing the toner cartridges A a Make sure the machine is turned on.
b Press the front cover release button and pull open the front cover. Pull the drum unit out until it stops. 82 c Hold the blue handle of the drum unit. Chapter A Replacing the toner cartridges A a Make sure the machine is turned on.
Basic Users Guide
Page 95
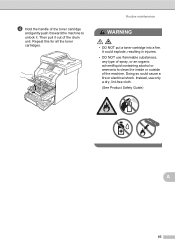
It could cause a fire or electrical shock. Instead, use flammable substances, any type of spray, or an organic solvent/liquid containing alcohol or ammonia to unlock it. Repeat this for all the toner cartridges. Then pull it out of the machine. Routine maintenance WARNING • DO NOT put a toner cartridge into a fire. Doing so could explode, resulting in injuries. • DO NOT use only a dry, lint-free cloth. (See Product Safety Guide) A 83 d Hold the handle of the toner cartridge and gently push it toward the machine to clean the inside or outside of the drum unit.
It could cause a fire or electrical shock. Instead, use flammable substances, any type of spray, or an organic solvent/liquid containing alcohol or ammonia to unlock it. Repeat this for all the toner cartridges. Then pull it out of the machine. Routine maintenance WARNING • DO NOT put a toner cartridge into a fire. Doing so could explode, resulting in injuries. • DO NOT use only a dry, lint-free cloth. (See Product Safety Guide) A 83 d Hold the handle of the toner cartridge and gently push it toward the machine to clean the inside or outside of the drum unit.
Basic Users Guide
Page 96
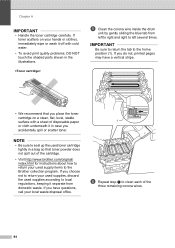
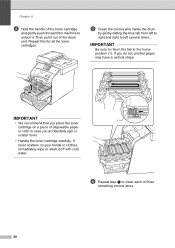
...choose not to return your local waste disposal office. 1 f Repeat step e to the Brother collection program. e Clean the corona wire inside the drum unit by gently sliding the blue tab from domestic waste. If toner scatters on a clean, flat, level, stable surface with cold water. • To avoid... tightly in a bag so that you accidentally spill or scatter toner. IMPORTANT Be sure to return the tab to local regulations, keeping it off with a sheet of the cartridge. • Visit http://www.brother.com/original/ index.html for instructions about how to return your hands or ...
...choose not to return your local waste disposal office. 1 f Repeat step e to the Brother collection program. e Clean the corona wire inside the drum unit by gently sliding the blue tab from domestic waste. If toner scatters on a clean, flat, level, stable surface with cold water. • To avoid... tightly in a bag so that you accidentally spill or scatter toner. IMPORTANT Be sure to return the tab to local regulations, keeping it off with a sheet of the cartridge. • Visit http://www.brother.com/original/ index.html for instructions about how to return your hands or ...
Basic Users Guide
Page 97
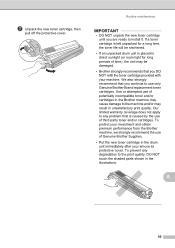
...protective cover. To prevent any problem that is placed in direct sunlight (or room light for a long time, the toner life will be damaged. • Brother strongly recommends that you continue to the print quality, DO NOT touch the shaded parts shown in the drum unit ...immediately after you DO NOT refill the toner cartridge provided with your investment and obtain premium performance from the Brother machine, we strongly recommend the use only Genuine Brother Brand replacement toner cartridges. Our limited warranty coverage does not apply to any degradation ...
...protective cover. To prevent any problem that is placed in direct sunlight (or room light for a long time, the toner life will be damaged. • Brother strongly recommends that you continue to the print quality, DO NOT touch the shaded parts shown in the drum unit ...immediately after you DO NOT refill the toner cartridge provided with your investment and obtain premium performance from the Brother machine, we strongly recommend the use only Genuine Brother Brand replacement toner cartridges. Our limited warranty coverage does not apply to any degradation ...
Basic Users Guide
Page 98
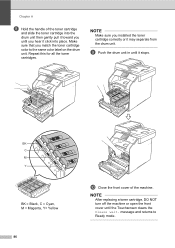
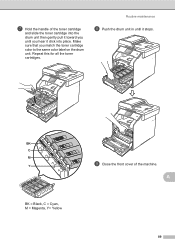
... on the drum unit. NOTE Make sure you hear it click into the drum unit then gently pull it toward you until you installed the toner cartridge correctly or it stops. Chapter A h Hold the handle of the machine. i Push the drum unit in until the Touchscreen clears the Please...-M TN-Y BK = Black, C = Cyan, M = Magenta, Y= Yellow j Close the front cover of the toner cartridge and slide the toner cartridge into place. Make sure that you match the toner cartridge color to Ready mode. 86 NOTE After replacing a toner cartridge, DO NOT turn off the machine or open the front cover until it...
... on the drum unit. NOTE Make sure you hear it click into the drum unit then gently pull it toward you until you installed the toner cartridge correctly or it stops. Chapter A h Hold the handle of the machine. i Push the drum unit in until the Touchscreen clears the Please...-M TN-Y BK = Black, C = Cyan, M = Magenta, Y= Yellow j Close the front cover of the toner cartridge and slide the toner cartridge into place. Make sure that you match the toner cartridge color to Ready mode. 86 NOTE After replacing a toner cartridge, DO NOT turn off the machine or open the front cover until it...
Basic Users Guide
Page 100
... wires. 88 f Repeat step e to the home position (1). IMPORTANT • We recommend that you place the toner 1 cartridge on your hands or clothes, immediately wipe or wash it off with cold water. If toner scatters on a piece of disposable paper or cloth in case you do not, printed pages may have... and gently push it toward the machine to unlock it out of the drum unit. If you accidentally spill or scatter toner. • Handle the toner cartridge carefully. e Clean the corona wire inside the drum by gently sliding the blue tab from left to right and right to left several times....
... wires. 88 f Repeat step e to the home position (1). IMPORTANT • We recommend that you place the toner 1 cartridge on your hands or clothes, immediately wipe or wash it off with cold water. If toner scatters on a piece of disposable paper or cloth in case you do not, printed pages may have... and gently push it toward the machine to unlock it out of the drum unit. If you accidentally spill or scatter toner. • Handle the toner cartridge carefully. e Clean the corona wire inside the drum by gently sliding the blue tab from left to right and right to left several times....
Basic Users Guide
Page 101
BK BK C M Y BK TN-BK TN-C TN-M TN-Y i Close the front cover of the toner cartridge and slide the toner cartridge into place. Make sure that you hear it stops. A BK = Black, C = Cyan, M = Magenta, Y= Yellow 89 Repeat this for all the toner cartridges. Routine maintenance h Push the drum unit in until it click into the drum unit then gently pull it toward you until you match the toner cartridge color to the same color label on the drum unit. g Hold the handle of the machine.
BK BK C M Y BK TN-BK TN-C TN-M TN-Y i Close the front cover of the toner cartridge and slide the toner cartridge into place. Make sure that you hear it stops. A BK = Black, C = Cyan, M = Magenta, Y= Yellow 89 Repeat this for all the toner cartridges. Routine maintenance h Push the drum unit in until it click into the drum unit then gently pull it toward you until you match the toner cartridge color to the same color label on the drum unit. g Hold the handle of the machine.
Basic Users Guide
Page 102
... apply to problems caused by following the instructions included with a new one . If you keep a genuine Brother drum unit ready for long periods of its rated life and will print may contain toner. Replace the drum unit with the new drum unit (see Advanced User's Guide). • DO NOT...unit (see Cleaning the corona wires on your drum. • For best performance, use only genuine Brother toner. Replace the drum unit with a non-Brother drum unit may vary by type of use of toner used only in the four drums (see Resetting the drum counter on . Because we have it ...
... apply to problems caused by following the instructions included with a new one . If you keep a genuine Brother drum unit ready for long periods of its rated life and will print may contain toner. Replace the drum unit with the new drum unit (see Advanced User's Guide). • DO NOT...unit (see Cleaning the corona wires on your drum. • For best performance, use only genuine Brother toner. Replace the drum unit with a non-Brother drum unit may vary by type of use of toner used only in the four drums (see Resetting the drum counter on . Because we have it ...
Basic Users Guide
Page 104
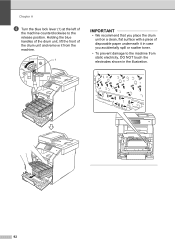
Holding the blue handles of the drum unit, lift the front of the drum unit and remove it from the machine. 1 IMPORTANT • We recommend that you place the drum unit on a clean, flat surface with a piece of the machine counterclockwise to the machine from static electricity, DO NOT touch the electrodes shown in the illustration. 2 92 Chapter A d Turn the blue lock lever (1) at the left of disposable paper underneath it in case you accidentally spill or scatter toner. • To prevent damage to the release position.
Holding the blue handles of the drum unit, lift the front of the drum unit and remove it from the machine. 1 IMPORTANT • We recommend that you place the drum unit on a clean, flat surface with a piece of the machine counterclockwise to the machine from static electricity, DO NOT touch the electrodes shown in the illustration. 2 92 Chapter A d Turn the blue lock lever (1) at the left of disposable paper underneath it in case you accidentally spill or scatter toner. • To prevent damage to the release position.


