Basic Users Guide
Page 28
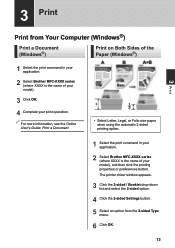
...printer driver window appears. 3 Click the 2-sided / Booklet drop-down list and select the 2-sided option. 4 Click the 2-sided Settings button. 5 Select an option from Your Computer (Windows®) Print a Document (Windows®) Print on Both Sides of the Paper (Windows®) 1 Select the print command in your application. 2 Select Brother MFC...size paper when using the automatic 2‑sided printing option. 1 Select the print command in your application. 2 Select Brother MFC-XXXX series (where XXXX is the name of your model). 3 Click OK. 4 Complete your model), and then click the...
...printer driver window appears. 3 Click the 2-sided / Booklet drop-down list and select the 2-sided option. 4 Click the 2-sided Settings button. 5 Select an option from Your Computer (Windows®) Print a Document (Windows®) Print on Both Sides of the Paper (Windows®) 1 Select the print command in your application. 2 Select Brother MFC...size paper when using the automatic 2‑sided printing option. 1 Select the print command in your application. 2 Select Brother MFC-XXXX series (where XXXX is the name of your model). 3 Click OK. 4 Complete your model), and then click the...
Basic Users Guide
Page 29
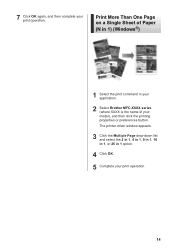
Print More Than One Page on a Single Sheet of Paper (N in 1) (Windows®) 1 Select the print command in 1 option. 4 Click OK. 5 Complete your model), and then click the printing properties or preferences button. The printer driver window appears. 3 Click the Multiple Page drop-down list and select the 2 in 1, 4 in 1, 9 in 1, 16 in 1, or 25 in your application. 2 Select Brother MFC-XXXX series (where XXXX is the name of your print operation. 14 7 Click OK again, and then complete your print operation.
Print More Than One Page on a Single Sheet of Paper (N in 1) (Windows®) 1 Select the print command in 1 option. 4 Click OK. 5 Complete your model), and then click the printing properties or preferences button. The printer driver window appears. 3 Click the Multiple Page drop-down list and select the 2 in 1, 4 in 1, 9 in 1, 16 in 1, or 25 in your application. 2 Select Brother MFC-XXXX series (where XXXX is the name of your print operation. 14 7 Click OK again, and then complete your print operation.
Basic Users Guide
Page 31
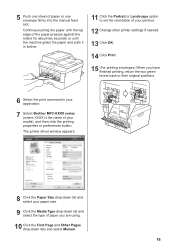
The printer driver window appears. 8 Click the Paper Size drop-down list and select your paper size. 9 Click the Media Type drop-down list and select the type of your application. 7 Select Brother MFC-XXXX series (where XXXX is the name of paper you have finished printing, return the two green levers back to... grabs the paper and pulls it in further. 11 Click the Portrait or Landscape option to set the orientation of your printout. 12 Change other printer settings if needed. 13 Click OK. 14 Click Print. 15 (For printing envelopes) When you are using. 10 Click the First Page and Other ...
The printer driver window appears. 8 Click the Paper Size drop-down list and select your paper size. 9 Click the Media Type drop-down list and select the type of your application. 7 Select Brother MFC-XXXX series (where XXXX is the name of paper you have finished printing, return the two green levers back to... grabs the paper and pulls it in further. 11 Click the Portrait or Landscape option to set the orientation of your printout. 12 Change other printer settings if needed. 13 Click OK. 14 Click Print. 15 (For printing envelopes) When you are using. 10 Click the First Page and Other ...
Basic Users Guide
Page 33
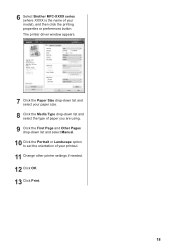
6 Select Brother MFC-XXXX series (where XXXX is the name of your model), and then click the printing properties or preferences button. The printer driver window appears. 7 Click the Paper Size drop-down list and select your paper size. 8 Click the Media Type drop-down list and select the type of paper you are using. 9 Click the First Page and Other Pages drop-down list and select Manual. 10 Click the Portrait or Landscape option to set the orientation of your printout. 11 Change other printer settings if needed. 12 Click OK. 13 Click Print. 18
6 Select Brother MFC-XXXX series (where XXXX is the name of your model), and then click the printing properties or preferences button. The printer driver window appears. 7 Click the Paper Size drop-down list and select your paper size. 8 Click the Media Type drop-down list and select the type of paper you are using. 9 Click the First Page and Other Pages drop-down list and select Manual. 10 Click the Portrait or Landscape option to set the orientation of your printout. 11 Change other printer settings if needed. 12 Click OK. 13 Click Print. 18
Basic Users Guide
Page 61
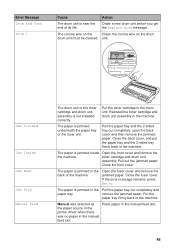
... paper is jammed inside Open the front cover and remove the the machine. If the error message remains, press Retry. the paper source in the printer driver when there was selected as Place paper in the drum unit. Cause Action The drum unit is jammed in the machine. Close the back...
... paper is jammed inside Open the front cover and remove the the machine. If the error message remains, press Retry. the paper source in the printer driver when there was selected as Place paper in the drum unit. Cause Action The drum unit is jammed in the machine. Close the back...
Basic Users Guide
Page 63
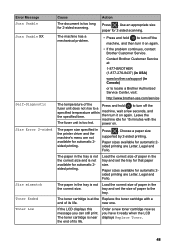
... 15 minutes with a end of paper to turn off the machine, and then turn it on again. • If the problem continues, contact Brother Customer Service. Contact Brother Customer Service at the Replace the toner cartridge with the The fuser unit is not Load the correct size of paper in the tray...-276-8437) (in USA) www.brother.ca/support (in the tray is not the correct size and is near the end of paper in the the correct size. power on again. Paper sizes available for automatic 2sided printing. The paper size specified in the printer driver and the machine's menu are not...
... 15 minutes with a end of paper to turn off the machine, and then turn it on again. • If the problem continues, contact Brother Customer Service. Contact Brother Customer Service at the Replace the toner cartridge with the The fuser unit is not Load the correct size of paper in the tray...-276-8437) (in USA) www.brother.ca/support (in the tray is not the correct size and is near the end of paper in the the correct size. power on again. Paper sizes available for automatic 2sided printing. The paper size specified in the printer driver and the machine's menu are not...
Basic Users Guide
Page 67
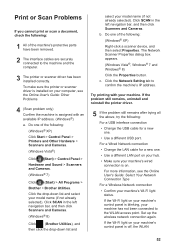
...For a USB interface connection • Change the USB cable for a new one of the following: (Windows® XP) Click Start > Control Panel > Printers and Other Hardware > Scanners and Cameras. (Windows Vista®) Click (Start) > Control Panel > Hardware and Sound > Scanners and Cameras. (Windows®... 7) Click (Start) > All Programs > Brother > Brother Utilities. Click the drop-down list and select your machine has not been connected to the WLAN access point. Click the Network Setting tab to...
...For a USB interface connection • Change the USB cable for a new one of the following: (Windows® XP) Click Start > Control Panel > Printers and Other Hardware > Scanners and Cameras. (Windows Vista®) Click (Start) > Control Panel > Hardware and Sound > Scanners and Cameras. (Windows®... 7) Click (Start) > All Programs > Brother > Brother Utilities. Click the drop-down list and select your machine has not been connected to the WLAN access point. Click the Network Setting tab to...

Basic Users Guide
Page 68
For more information, see the Online User's Guide: Introduction to Your Brother Machine If you cannot print on both sides of paper, check the following: 6 Change the paper size setting in the printer driver to Letter, Legal, or Folio. 53 A Troubleshooting connection setting is disabled. Enable the WLAN connection and set up the wireless network connection.
For more information, see the Online User's Guide: Introduction to Your Brother Machine If you cannot print on both sides of paper, check the following: 6 Change the paper size setting in the printer driver to Letter, Legal, or Folio. 53 A Troubleshooting connection setting is disabled. Enable the WLAN connection and set up the wireless network connection.


