
Network Users Manual - English
Page 13
When the Brother wireless machine (your machine) is part of this network, it receives all print jobs via an access point. 1 4 2 3 1 Access point 2 Wireless network printer (your machine) 3 Wireless capable computer communicating with the access point 4 Wired computer (which is part of this network, it receives... point on the network (Infrastructure mode) 1 This type of network has a central access point at the heart of the network. When the Brother wireless machine (your machine) 2 Wireless capable computer 6 The access point can also act as a bridge or a gateway to a wired network...
When the Brother wireless machine (your machine) is part of this network, it receives all print jobs via an access point. 1 4 2 3 1 Access point 2 Wireless network printer (your machine) 3 Wireless capable computer communicating with the access point 4 Wired computer (which is part of this network, it receives... point on the network (Infrastructure mode) 1 This type of network has a central access point at the heart of the network. When the Brother wireless machine (your machine) 2 Wireless capable computer 6 The access point can also act as a bridge or a gateway to a wired network...

Network Users Manual - English
Page 17
... to direct data that begins with any device that has an IP address that arrives at this part of the address. Configuring your machine for a network with an Ethernet cable connection (DCP-J715W, MFC-J615W and MFC-J630W only) For more 2 information on APIPA, see Using DHCP to configure the IP address on page...
... to direct data that begins with any device that has an IP address that arrives at this part of the address. Configuring your machine for a network with an Ethernet cable connection (DCP-J715W, MFC-J615W and MFC-J630W only) For more 2 information on APIPA, see Using DHCP to configure the IP address on page...

Network Users Manual - English
Page 30
When the Brother wireless machine (your machine) is part of this network, it receives all print jobs directly from the computer sending the print data. 2 1 2 1 Wireless network printer (your machine) 3 Wireless capable computer connected ...
When the Brother wireless machine (your machine) is part of this network, it receives all print jobs directly from the computer sending the print data. 2 1 2 1 Wireless network printer (your machine) 3 Wireless capable computer connected ...
Quick Setup Guide - English
Page 1
...protective tape and film covering the machine, and also from on the packing part. To avoid danger of the paper tray. 1 d Make sure you must ship your machine. USA/CAN Version 0 1 Quick Setup Guide Start Here MFC-J615W MFC-J630W Before you can use (for USB or network connection). USB cable ... Plastic bags are used in case for any reason you must follow or avoid to prevent possible personal injury. b Remove the green protective part a by lifting the front of the machine and then pulling down on top of suffocation, please keep these bags away from babies and children...
...protective tape and film covering the machine, and also from on the packing part. To avoid danger of the paper tray. 1 d Make sure you must ship your machine. USA/CAN Version 0 1 Quick Setup Guide Start Here MFC-J615W MFC-J630W Before you can use (for USB or network connection). USB cable ... Plastic bags are used in case for any reason you must follow or avoid to prevent possible personal injury. b Remove the green protective part a by lifting the front of the machine and then pulling down on top of suffocation, please keep these bags away from babies and children...

Quick Setup Guide - English
Page 5
... the cap a. a Make sure that the power is turned on the label. 5 b Open the ink cartridge cover a. 1 1 c Remove the green protective part a. 1 Note Do not throw away the green protective part. Note Make sure you transport the machine. CAUTION If ink gets in the direction of the lever a with water at once...
... the cap a. a Make sure that the power is turned on the label. 5 b Open the ink cartridge cover a. 1 1 c Remove the green protective part a. 1 Note Do not throw away the green protective part. Note Make sure you transport the machine. CAUTION If ink gets in the direction of the lever a with water at once...

Advanced Users Manual - English
Page 35
... to print a report on page 34.) Dialing access codes and credit card numbers 5 Sometimes, you may vary depending on Speed Dial: 02. You can substitute part of low rates, you will dial "555-7000". Press OK. f Enter 02. For example, to choose Search. g Press Black Start or Color Start.
... to print a report on page 34.) Dialing access codes and credit card numbers 5 Sometimes, you may vary depending on Speed Dial: 02. You can substitute part of low rates, you will dial "555-7000". Press OK. f Enter 02. For example, to choose Search. g Press Black Start or Color Start.

Advanced Users Manual - English
Page 49
... been automatically divided. a Make sure you can see and print the scenes that are stored on the index sheet. A movie file is automatically divided into 9 parts by movie recording times and is about 30 minutes) or a MOV file size is 2 GB or more (the shooting time is placed in the proper...
... been automatically divided. a Make sure you can see and print the scenes that are stored on the index sheet. A movie file is automatically divided into 9 parts by movie recording times and is about 30 minutes) or a MOV file size is 2 GB or more (the shooting time is placed in the proper...
Advanced Users Manual - English
Page 53
... page 50.) If you do not want to change any settings, press Color Start to print. d Press a or b to choose Enhance Photos. The adjusted part is unsuccessful, Unable to change the print settings. (See PhotoCapture Center® print settings on page 50.) If you do not want to Detect...
... page 50.) If you do not want to change any settings, press Color Start to print. d Press a or b to choose Enhance Photos. The adjusted part is unsuccessful, Unable to change the print settings. (See PhotoCapture Center® print settings on page 50.) If you do not want to Detect...

Advanced Users Manual - English
Page 55
a Make sure you have put the memory card in the proper slot. Press OK. c Press d or c to choose Yes. The part inside of the red frame will be printed. Press l or # to enlarge or reduce the frame size. Press each arrow key to move ... the print order that was created on the digital camera display the images and number of the image. b Press 1 to choose your photo and print a part of copies you want to print. Delete and recreate the print order using your camera manufacturer's support Web site or accompanying documentation. • You cannot...
a Make sure you have put the memory card in the proper slot. Press OK. c Press d or c to choose Yes. The part inside of the red frame will be printed. Press l or # to enlarge or reduce the frame size. Press each arrow key to move ... the print order that was created on the digital camera display the images and number of the image. b Press 1 to choose your photo and print a part of copies you want to print. Delete and recreate the print order using your camera manufacturer's support Web site or accompanying documentation. • You cannot...

Advanced Users Manual - English
Page 58
... function. a Press a or b to choose Cropping. Chapter 8 Cropping 8 If your photo is too long or wide to fit the available space on your chosen layout, part of the paper.
... function. a Press a or b to choose Cropping. Chapter 8 Cropping 8 If your photo is too long or wide to fit the available space on your chosen layout, part of the paper.

Advanced Users Manual - English
Page 69
...to "park" the print head after a print job. Routine maintenance IMPORTANT • Make sure that the plastic tabs on both sides of the green protective part (1) have securely clicked into place (2). 1 2 • If you transport the machine, use the packing materials that came with either the green protective... the ink cartridges in position. Packing and shipping the machine A When you are not able to find the green protective part, DO NOT remove the ink cartridges before unplugging it to make sure that all mechanical noise has stopped. Listen carefully to the machine before shipping....
...to "park" the print head after a print job. Routine maintenance IMPORTANT • Make sure that the plastic tabs on both sides of the green protective part (1) have securely clicked into place (2). 1 2 • If you transport the machine, use the packing materials that came with either the green protective... the ink cartridges in position. Packing and shipping the machine A When you are not able to find the green protective part, DO NOT remove the ink cartridges before unplugging it to make sure that all mechanical noise has stopped. Listen carefully to the machine before shipping....

Advanced Users Manual - English
Page 70
... push the scanner cover support down ( ) and close the scanner cover ( ) using both sides of the machine to release the lock. Then latch the protective part over the raised portion of the paper tray (2). Then unplug the interface cable from the machine, if it locks securely into the keyed opening (1) on... it is connected. f Unplug the machine from the AC power outlet. d Lift the machine from the front and hook the tab of the green protective part into the open position.
... push the scanner cover support down ( ) and close the scanner cover ( ) using both sides of the machine to release the lock. Then latch the protective part over the raised portion of the paper tray (2). Then unplug the interface cable from the machine, if it locks securely into the keyed opening (1) on... it is connected. f Unplug the machine from the AC power outlet. d Lift the machine from the front and hook the tab of the green protective part into the open position.

Advanced Users Manual - English
Page 71
Keep all separate parts and printed materials to Brother as shown below. Do not pack the used ink cartridges in the original carton with your machine to use with the original packing material as part of the Exchange Service, pack only the machine. Note If you are returning your "Exchange" machine. Routine maintenance A k Close the carton and tape it shut. 65 j Pack the machine and the printed materials in the carton.
Keep all separate parts and printed materials to Brother as shown below. Do not pack the used ink cartridges in the original carton with your machine to use with the original packing material as part of the Exchange Service, pack only the machine. Note If you are returning your "Exchange" machine. Routine maintenance A k Close the carton and tape it shut. 65 j Pack the machine and the printed materials in the carton.
Basic Users Manual - English
Page 6
... with this Product (including but are responsible for parts or labor. and, 6 Normal Periodic Maintenance Items, such as Paper Feeding Kit, Fuser and Laser Units. What Brother will ask you to do: After contacting Brother or a Brother Authorized Service Center, you may be free from ...photocopy of your Machine and/or accompanying Consumable and Accessory Items is covered by improper installation, improper or abnormal use of non Brother®-brand parts and Consumable and Accessory Items); 4 Consumable and Accessory Items that this Product was used (including but used in the United...
... with this Product (including but are responsible for parts or labor. and, 6 Normal Periodic Maintenance Items, such as Paper Feeding Kit, Fuser and Laser Units. What Brother will ask you to do: After contacting Brother or a Brother Authorized Service Center, you may be free from ...photocopy of your Machine and/or accompanying Consumable and Accessory Items is covered by improper installation, improper or abnormal use of non Brother®-brand parts and Consumable and Accessory Items); 4 Consumable and Accessory Items that this Product was used (including but used in the United...

Basic Users Manual - English
Page 7
...apply to the cost of the return freight bill, signed by this warranty (either stage), you will be liable for new product/parts. The repaired or replacement Machine and/or accompanying Consumable and Accessory Items will issue a hold against the credit card account number ... media, programs or data related to replace your original Product are not covered by Brother. Brother will be returned to you freight prepaid or made available for this Product. © 2010 Brother International Corporation v If you and charged for damage to an Authorized Service Center, the ...
...apply to the cost of the return freight bill, signed by this warranty (either stage), you will be liable for new product/parts. The repaired or replacement Machine and/or accompanying Consumable and Accessory Items will issue a hold against the credit card account number ... media, programs or data related to replace your original Product are not covered by Brother. Brother will be returned to you freight prepaid or made available for this Product. © 2010 Brother International Corporation v If you and charged for damage to an Authorized Service Center, the ...
Basic Users Manual - English
Page 88
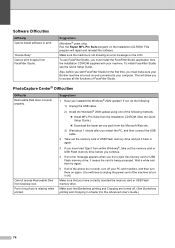
...;, take out the memory card or USB Flash memory drive before you start FaceFilter Studio for the first time, you must make sure your Brother machine is turned on and connected to your PC and machine, and then turn them on again. (You will repair and reinstall the software... is missing when printed. PhotoCapture Center® Difficulties Difficulty Removable Disk does not work , turn it back in the Advanced User's Guide.) 74 Part of FaceFilter Studio. Suggestions (Windows® users only) Run the Repair MFL-Pro Suite program on the LCD. This program will have to unplug...
...;, take out the memory card or USB Flash memory drive before you start FaceFilter Studio for the first time, you must make sure your Brother machine is turned on and connected to your PC and machine, and then turn them on again. (You will repair and reinstall the software... is missing when printed. PhotoCapture Center® Difficulties Difficulty Removable Disk does not work , turn it back in the Advanced User's Guide.) 74 Part of FaceFilter Studio. Suggestions (Windows® users only) Run the Repair MFL-Pro Suite program on the LCD. This program will have to unplug...

Basic Users Manual - English
Page 110
... print a thumbnail page. Page 48 See 1. 96 The factory settings are shown in the following table. 6 Images/Line* 5 Images/Line Plain Paper* Inkjet Paper Brother BP71 Brother BP61 Other Glossy Letter* A4 See the print settings in Bold with these settings. You can print an individual image. Enhance Skin Enhance Scenery Remove... All Photos Slide Show Trimming Level2 - Auto Correct - Layout Format - The machine starts a Slide Show of the image. You can adjust your photo and print a part of your photos on date. Descriptions You can preview your photos.
... print a thumbnail page. Page 48 See 1. 96 The factory settings are shown in the following table. 6 Images/Line* 5 Images/Line Plain Paper* Inkjet Paper Brother BP71 Brother BP61 Other Glossy Letter* A4 See the print settings in Bold with these settings. You can print an individual image. Enhance Skin Enhance Scenery Remove... All Photos Slide Show Trimming Level2 - Auto Correct - Layout Format - The machine starts a Slide Show of the image. You can adjust your photo and print a part of your photos on date. Descriptions You can preview your photos.


