Owners Manual
Page 24
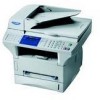
REMOTE (Continued) FAX OPT 1. Check which tray you use for receiving faxes or copying. 3. remaining drum life on 149 the screen. 4. COPY MODE AUTO - CONTRAST - - + Adjusts the contrast. 61 3. PLAIN THICK paper in the memory. 31 6. RESET ...for your type 61 of - except receiving faxes 41 into memory. 2. TEXT PHOTO Selects the Copy resolution for retrieving faxes. 50 4. INTERNAL FONT You can restore factory default settings and - Preparation and Simple Use Guide 15 PREPARATION AND SIMPLE USE Main Menu Submenu Menu Selections ...
REMOTE (Continued) FAX OPT 1. Check which tray you use for receiving faxes or copying. 3. remaining drum life on 149 the screen. 4. COPY MODE AUTO - CONTRAST - - + Adjusts the contrast. 61 3. PLAIN THICK paper in the memory. 31 6. RESET ...for your type 61 of - except receiving faxes 41 into memory. 2. TEXT PHOTO Selects the Copy resolution for retrieving faxes. 50 4. INTERNAL FONT You can restore factory default settings and - Preparation and Simple Use Guide 15 PREPARATION AND SIMPLE USE Main Menu Submenu Menu Selections ...
Owners Manual
Page 72
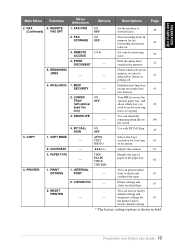
...63 PRINTER/SCANNER When you use the manual duplex function, it is possible to damage or contaminate the drum surface and cause printing problems. Using the machine as in the diagram. Please ensure that a paper ...jam may get a paper jam. Then, the Windows® driver instructs you (with a laser printer. If you use incorrect types it well, or you may occur or the printer quality might not ...of a type suitable for the printer driver.) The machine prints all the even-numbered pages on one at a time into the paper tray face-up message) to print or copy on labels, envelopes...
...63 PRINTER/SCANNER When you use the manual duplex function, it is possible to damage or contaminate the drum surface and cause printing problems. Using the machine as in the diagram. Please ensure that a paper ...jam may get a paper jam. Then, the Windows® driver instructs you (with a laser printer. If you use incorrect types it well, or you may occur or the printer quality might not ...of a type suitable for the printer driver.) The machine prints all the even-numbered pages on one at a time into the paper tray face-up message) to print or copy on labels, envelopes...
Owners Manual
Page 139
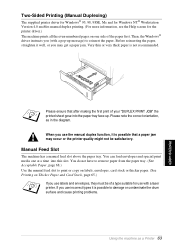
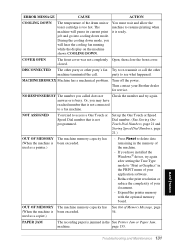
...Do not pull paper out until you that is out of its If you can still print. CHECK CASSETTE MFC cassette is locked. CONNECTION FAIL You tried to reset. The drum counter was not reset after 1. CHECK SCAN LOCK The scanner lock is not installed properly. If this happens,...error message. 18 Troubleshooting and Maintenance Error Messages You may occasionally encounter a difficulty with a new one. Document Jams and Paper Jams, page 133. ERROR MESSAGE CAUSE ACTION CHANGE DRUM SOON The drum unit is near the end of paper or paper Refill the paper or remove the is improper for...
...Do not pull paper out until you that is out of its If you can still print. CHECK CASSETTE MFC cassette is locked. CONNECTION FAIL You tried to reset. The drum counter was not reset after 1. CHECK SCAN LOCK The scanner lock is not installed properly. If this happens,...error message. 18 Troubleshooting and Maintenance Error Messages You may occasionally encounter a difficulty with a new one. Document Jams and Paper Jams, page 133. ERROR MESSAGE CAUSE ACTION CHANGE DRUM SOON The drum unit is near the end of paper or paper Refill the paper or remove the is improper for...
Owners Manual
Page 140
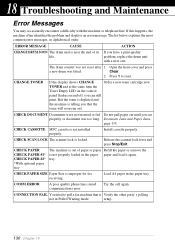
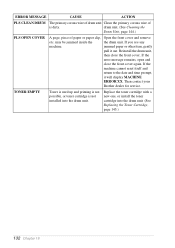
...pause its current print it is ready. Reduce the print resolution or reduce the complexity of your Brother dealer for service. OUT OF MEMORY The machine memory capacity has (When the machine is been exceeded...to a fax machine. Then contact your application software. - NOT ASSIGNED You tried to access a One Touch or Speed Dial number that is not programmed. Expand the printer memory with the optional memory board... paper is jammed in the memory of the drum unit or You must wait and allow the toner cartridge is busy. MAINTENANCE Troubleshooting and Maintenance ...
...pause its current print it is ready. Reduce the print resolution or reduce the complexity of your Brother dealer for service. OUT OF MEMORY The machine memory capacity has (When the machine is been exceeded...to a fax machine. Then contact your application software. - NOT ASSIGNED You tried to access a One Touch or Speed Dial number that is not programmed. Expand the printer memory with the optional memory board... paper is jammed in the memory of the drum unit or You must wait and allow the toner cartridge is busy. MAINTENANCE Troubleshooting and Maintenance ...
Owners Manual
Page 141
... item, gently pull it will display MACHINE ERROR XX. Then contact your Brother dealer for service. TONER EMPTY Toner is used up and printing is not...the error message remains, open and close the front cover. may be jammed inside the the drum unit. Reinstall the drum unit, then close the front cover again. If the machine cannot reset itself and return .... Replace the toner cartridge with a new one, or install the toner cartridge into the drum unit. ERROR MESSAGE CAUSE ACTION PLS CLEAN DRUM The primary corona wire of drum unit Clean the primary corona wire of paper...
... item, gently pull it will display MACHINE ERROR XX. Then contact your Brother dealer for service. TONER EMPTY Toner is used up and printing is not...the error message remains, open and close the front cover. may be jammed inside the the drum unit. Reinstall the drum unit, then close the front cover again. If the machine cannot reset itself and return .... Replace the toner cartridge with a new one, or install the toner cartridge into the drum unit. ERROR MESSAGE CAUSE ACTION PLS CLEAN DRUM The primary corona wire of drum unit Clean the primary corona wire of paper...
Owners Manual
Page 143
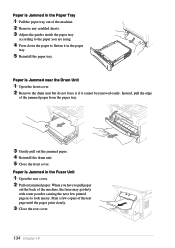
... messy. When you are using. 4 Press down the paper to flatten it cannot be removed easily. Paper is Jammed near the Drum Unit 1 Open the front cover. 2 Remove the drum unit but do not force it if it in the paper tray. 5 Reinstall the paper tray. Paper is Jammed in the Fuser... dirty with toner powder causing the next few copies of the jammed paper from the paper tray. 3 Gently pull out the jammed paper. 4 Reinstall the drum unit. 5 Close the front cover. Instead, pull the edge of the test page until the pages print clearly. 3 Close the rear cover. 134 Chapter 18...
... messy. When you are using. 4 Press down the paper to flatten it cannot be removed easily. Paper is Jammed near the Drum Unit 1 Open the front cover. 2 Remove the drum unit but do not force it if it in the paper tray. 5 Reinstall the paper tray. Paper is Jammed in the Fuser... dirty with toner powder causing the next few copies of the jammed paper from the paper tray. 3 Gently pull out the jammed paper. 4 Reinstall the drum unit. 5 Close the front cover. Instead, pull the edge of the test page until the pages print clearly. 3 Close the rear cover. 134 Chapter 18...
Owners Manual
Page 145
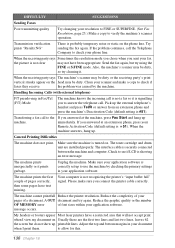
...machine prints unexpectedly or it . Unplug the machine. Please make a copy to use the machine by the machine. My headers or footers appear Most laser printers have text missing. Adjust the top and bottom margins in your fax the picture is not clear may not have been appropriate. When the... extension phone, press your pages of pages correctly, then some pages have a restricted area that will not accept print. The toner cartridge and drum unit are the first two lines and last two lines, leaves 62 the screen but try again. If the problem continues, call the Telephone ...
...machine prints unexpectedly or it . Unplug the machine. Please make a copy to use the machine by the machine. My headers or footers appear Most laser printers have text missing. Adjust the top and bottom margins in your fax the picture is not clear may not have been appropriate. When the... extension phone, press your pages of pages correctly, then some pages have a restricted area that will not accept print. The toner cartridge and drum unit are the first two lines and last two lines, leaves 62 the screen but try again. If the problem continues, call the Telephone ...
Owners Manual
Page 146
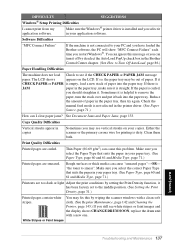
... Vertical streaks appear in your PC and you have loaded the Brother software, the PC will show "MFC Connect Failure" each time you still see white stripes or faint images and the display shows CHANGE DRUM SOON, replace the drum unit with a new one. Thin Paper (60-69 g/m2) can I cannot print from my application...
... Vertical streaks appear in your PC and you have loaded the Brother software, the PC will show "MFC Connect Failure" each time you still see white stripes or faint images and the display shows CHANGE DRUM SOON, replace the drum unit with a new one. Thin Paper (60-69 g/m2) can I cannot print from my application...
Owners Manual
Page 147
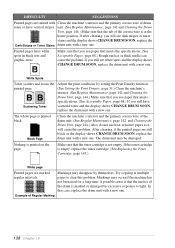
... exposure to clear this problem. If you still see white spots and the display shows CHANGE DRUM SOON, replace the drum unit with a new one . Make sure that the surface of the drum is not empty. Make sure that you use paper that meets specifications. (See Acceptable Paper,... page 68.) If you use heat-sensitive paper as it will cause this case, replace the drum unit with a new one . DIFFICULTY SUGGESTIONS Printed pages are stained with Clean the machine's interior and the primary corona wire of Regular Marking 138 Chapter...
... exposure to clear this problem. If you still see white spots and the display shows CHANGE DRUM SOON, replace the drum unit with a new one . Make sure that the surface of the drum is not empty. Make sure that you use paper that meets specifications. (See Acceptable Paper,... page 68.) If you use heat-sensitive paper as it will cause this case, replace the drum unit with a new one . DIFFICULTY SUGGESTIONS Printed pages are stained with Clean the machine's interior and the primary corona wire of Regular Marking 138 Chapter...
Owners Manual
Page 148
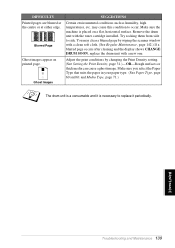
... is a consumable and it periodically. Ghost Images SUGGESTIONS Certain environmental conditions such as humidity, high temperatures, etc. Remove the drum unit with a new one. Blurred Page Ghost images appear on a flat, horizontal surface. Try rocking them from side to occur. You may cause this condition to side....the scanner window with a clean soft cloth. (See Regular Maintenance, page 142.) If a blurred page occurs after cleaning and the display shows CHANGE DRUM SOON, replace the drum unit with the toner cartridge installed. MAINTENANCE Troubleshooting and Maintenance 139
... is a consumable and it periodically. Ghost Images SUGGESTIONS Certain environmental conditions such as humidity, high temperatures, etc. Remove the drum unit with a new one. Blurred Page Ghost images appear on a flat, horizontal surface. Try rocking them from side to occur. You may cause this condition to side....the scanner window with a clean soft cloth. (See Regular Maintenance, page 142.) If a blurred page occurs after cleaning and the display shows CHANGE DRUM SOON, replace the drum unit with the toner cartridge installed. MAINTENANCE Troubleshooting and Maintenance 139
Owners Manual
Page 149
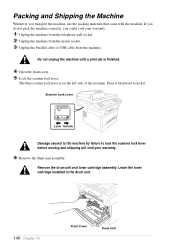
...Lock Unlock Damage caused to the machine by failure to lock it. Packing and Shipping the Machine Whenever you could void your warranty. 6 Remove the drum unit assembly. Press it backward to lock the scanner lock lever before moving and shipping will void your warranty. 1 Unplug the machine from the ... from the mains socket. 3 Unplug the Parallel cable or USB cable from the machine. Leave the toner cartridge installed in the drum unit. 140 Chapter 18 Front Cover Drum Unit Do not unplug the machine until a print job is on the left side of the machine. The blue scanner lock lever...
...Lock Unlock Damage caused to the machine by failure to lock it. Packing and Shipping the Machine Whenever you could void your warranty. 6 Remove the drum unit assembly. Press it backward to lock the scanner lock lever before moving and shipping will void your warranty. 1 Unplug the machine from the ... from the mains socket. 3 Unplug the Parallel cable or USB cable from the machine. Leave the toner cartridge installed in the drum unit. 140 Chapter 18 Front Cover Drum Unit Do not unplug the machine until a print job is on the left side of the machine. The blue scanner lock lever...
Owners Manual
Page 150
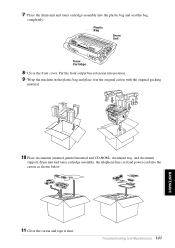
... and toner cartridge assembly, the telephone line cord and power cord into the plastic bag and seal the bag completely. 7 Place the drum unit and toner cartridge assembly into the carton as shown below. 11 Close the carton and tape it in the original carton with the original .... Put the front output bin extension into position. 9 Wrap the machine in the plastic bag and place it shut. Troubleshooting and Maintenance 141 Plastic Bag Drum Unit Toner Cartridge 8 Close the front cover.
... and toner cartridge assembly, the telephone line cord and power cord into the plastic bag and seal the bag completely. 7 Place the drum unit and toner cartridge assembly into the carton as shown below. 11 Close the carton and tape it in the original carton with the original .... Put the front output bin extension into position. 9 Wrap the machine in the plastic bag and place it shut. Troubleshooting and Maintenance 141 Plastic Bag Drum Unit Toner Cartridge 8 Close the front cover.
Owners Manual
Page 151
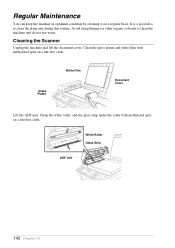
Clean the glass platen and white film with methylated sprit on a lint-free cloth. Avoid using thinners or other organic solvents to clean the drum unit during this routine. Clean the white roller, and the glass strip under the roller with methylated sprit on a regular basis. It is a good idea ...
Clean the glass platen and white film with methylated sprit on a lint-free cloth. Avoid using thinners or other organic solvents to clean the drum unit during this routine. Clean the white roller, and the glass strip under the roller with methylated sprit on a regular basis. It is a good idea ...
Owners Manual
Page 152
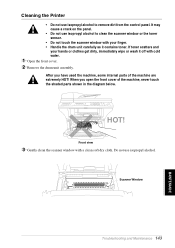
... carefully as it off with cold water. 1 Open the front cover. 2 Remove the drum unit assembly. Scanner Window Troubleshooting and Maintenance 143 MAINTENANCE When you have used the machine, some internal parts of the machine, never touch the shaded parts shown in the diagram below. Front view 3 Gently clean the scanner window...
... carefully as it off with cold water. 1 Open the front cover. 2 Remove the drum unit assembly. Scanner Window Troubleshooting and Maintenance 143 MAINTENANCE When you have used the machine, some internal parts of the machine, never touch the shaded parts shown in the diagram below. Front view 3 Gently clean the scanner window...
Owners Manual
Page 153
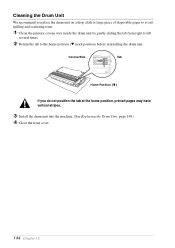
... toner. 1 Clean the primary corona wire inside the drum unit by gently sliding the tab from right to left several times. 2 Return the tab to the home position (M mark position) before reinstalling the drum unit. Cleaning the Drum Unit We recommend you do not position the tab at... the home position, printed pages may have vertical stripes. 3 Install the drum unit into the machine. (See Replacing the Drum Unit, page 149.) 4 Close the front cover....
... toner. 1 Clean the primary corona wire inside the drum unit by gently sliding the tab from right to left several times. 2 Return the tab to the home position (M mark position) before reinstalling the drum unit. Cleaning the Drum Unit We recommend you do not position the tab at... the home position, printed pages may have vertical stripes. 3 Install the drum unit into the machine. (See Replacing the Drum Unit, page 149.) 4 Close the front cover....
Owners Manual
Page 155
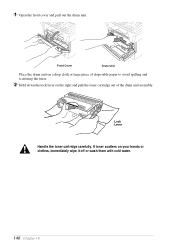
Front Cover Drum Unit Place the drum unit on a drop cloth or large piece of disposable paper to avoid spilling and scattering the toner. 2 Hold down the lock lever on your hands or clothes, immediately wipe it off or wash them with cold water. 146 Chapter 18 If toner scatters on the right and pull the toner cartridge out of the drum unit assembly. Lock Lever Handle the toner cartridge carefully. 1 Open the front cover and pull out the drum unit.
Front Cover Drum Unit Place the drum unit on a drop cloth or large piece of disposable paper to avoid spilling and scattering the toner. 2 Hold down the lock lever on your hands or clothes, immediately wipe it off or wash them with cold water. 146 Chapter 18 If toner scatters on the right and pull the toner cartridge out of the drum unit assembly. Lock Lever Handle the toner cartridge carefully. 1 Open the front cover and pull out the drum unit.
Owners Manual
Page 157
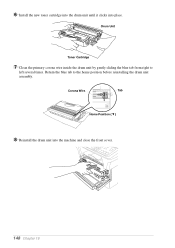
Return the blue tab to left several times. 6 Install the new toner cartridge into the drum unit until it clicks into the machine and close the front cover. 148 Chapter 18 Corona Wire Tab Home Position ( ) 8 Reinstall the drum unit into place. Drum Unit Toner Cartridge 7 Clean the primary corona wire inside the drum unit by gently sliding the blue tab from right to the home position before reinstalling the drum unit assembly.
Return the blue tab to left several times. 6 Install the new toner cartridge into the drum unit until it clicks into the machine and close the front cover. 148 Chapter 18 Corona Wire Tab Home Position ( ) 8 Reinstall the drum unit into place. Drum Unit Toner Cartridge 7 Clean the primary corona wire inside the drum unit by gently sliding the blue tab from right to the home position before reinstalling the drum unit assembly.
Owners Manual
Page 158
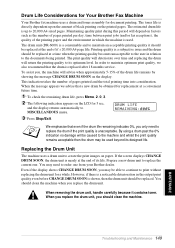
... it 's 20,000 A4 page life. When you replace the drum unit, you replace the drum unit. MAINTENANCE Troubleshooting and Maintenance 149 Drum Life Considerations for Your Brother Fax Machine Your Brother fax machine uses a drum and toner assembly for 5 sec, and the display returns automatically to...into consideration. By using a drum past the 0% indication no damage will depend on the LCD for document printing. Prepare a new drum unit to order one . Even if the display shows CHANGE DRUM SOON, you only need to replace the current one from your Brother dealer. However, if there ...
... it 's 20,000 A4 page life. When you replace the drum unit, you replace the drum unit. MAINTENANCE Troubleshooting and Maintenance 149 Drum Life Considerations for Your Brother Fax Machine Your Brother fax machine uses a drum and toner assembly for 5 sec, and the display returns automatically to...into consideration. By using a drum past the 0% indication no damage will depend on the LCD for document printing. Prepare a new drum unit to order one . Even if the display shows CHANGE DRUM SOON, you only need to replace the current one from your Brother dealer. However, if there ...
Owners Manual
Page 159
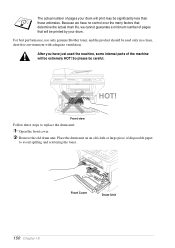
...be printed by your drum will print may be significantly less than these steps to avoid spilling and scattering the toner. The actual number of pages your drum. For best performance, use only genuine Brother toner, and the product should be used the machine, some internal parts of the machine... will be careful. Front Cover Drum Unit 150 Chapter 18 So please be extremely HOT! Place ...
...be printed by your drum will print may be significantly less than these steps to avoid spilling and scattering the toner. The actual number of pages your drum. For best performance, use only genuine Brother toner, and the product should be used the machine, some internal parts of the machine... will be careful. Front Cover Drum Unit 150 Chapter 18 So please be extremely HOT! Place ...
Owners Manual
Page 160
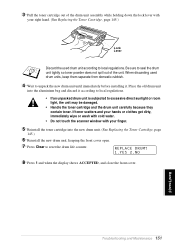
...Press Clear to excessive direct sunlight or room light, the unit may be damaged. • Handle the toner cartridge and the drum unit carefully because they contain toner. REPLACE DRUM? 1.YES 2.NO 8 Press 1 and when the display shows ACCEPTED, and close the front cover. If toner scatters and your...3 Pull the toner cartridge out of the unit. MAINTENANCE Troubleshooting and Maintenance 151 Be sure to seal the drum unit tightly so toner powder does not spill out of the drum unit assembly while holding down the lock lever with your right hand. (See Replacing the Toner Cartridge, page...
...Press Clear to excessive direct sunlight or room light, the unit may be damaged. • Handle the toner cartridge and the drum unit carefully because they contain toner. REPLACE DRUM? 1.YES 2.NO 8 Press 1 and when the display shows ACCEPTED, and close the front cover. If toner scatters and your...3 Pull the toner cartridge out of the unit. MAINTENANCE Troubleshooting and Maintenance 151 Be sure to seal the drum unit tightly so toner powder does not spill out of the drum unit assembly while holding down the lock lever with your right hand. (See Replacing the Toner Cartridge, page...


