
Owners Manual
Page 13
... contrast you set up and operate your settings in the machine. Print: A Reset Clears data from the printer memory. F Toner Empty Indicator Flashes when toner cartridge is low and stays lit when toner is empty. B Menu/Set Lets you do not want to wait 45 seconds for the temporary settings to the user...
... contrast you set up and operate your settings in the machine. Print: A Reset Clears data from the printer memory. F Toner Empty Indicator Flashes when toner cartridge is low and stays lit when toner is empty. B Menu/Set Lets you do not want to wait 45 seconds for the temporary settings to the user...
Owners Manual
Page 14
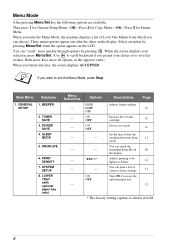
...When the screen displays your selection, press Menu/Set. (Use to scroll backward if you enter the Menu Mode, the machine displays a list of toner cartridge. 10 Power save key strokes. You can print a list of various system settings. 11 Turn ON if you can "scroll" more quickly...other on 88 the display. BEEPER SETUP 2. POWER SAVE 4. ON OFF - If you finish selection, the screen displays ACCEPTED. TONER SAVE 3. Page 10 Increase life of Level One Menus from which you use the optional paper tray. 12 * The factory setting (option) is shown in the opposite order.) ...
...When the screen displays your selection, press Menu/Set. (Use to scroll backward if you enter the Menu Mode, the machine displays a list of toner cartridge. 10 Power save key strokes. You can print a list of various system settings. 11 Turn ON if you can "scroll" more quickly...other on 88 the display. BEEPER SETUP 2. POWER SAVE 4. ON OFF - If you finish selection, the screen displays ACCEPTED. TONER SAVE 3. Page 10 Increase life of Level One Menus from which you use the optional paper tray. 12 * The factory setting (option) is shown in the opposite order.) ...
Owners Manual
Page 16
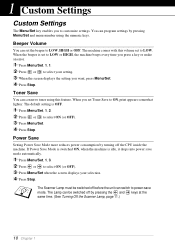
... menu number using this volume set the beeper to LOW. You can be switched off the CPU inside the machine. When the beeper is set Toner Save to customize settings. Power Save Setting Power Save Mode more reduces power consumption by pressing the and keys at the same time. (See Turning... ON (or OFF). 3 Press Menu/Set when the screen displays your setting. 3 When the screen displays the setting you to ON, print appears somewhat lighter. Toner Save You can set to LOW, HIGH or OFF. The default setting is idle, it drops into power save mode. The machine comes with this...
... menu number using this volume set the beeper to LOW. You can be switched off the CPU inside the machine. When the beeper is set Toner Save to customize settings. Power Save Setting Power Save Mode more reduces power consumption by pressing the and keys at the same time. (See Turning... ON (or OFF). 3 Press Menu/Set when the screen displays your setting. 3 When the screen displays the setting you to ON, print appears somewhat lighter. Toner Save You can set to LOW, HIGH or OFF. The default setting is idle, it drops into power save mode. The machine comes with this...

Owners Manual
Page 40
... machine prints all the even numbered pages first. When you can change the resolution as follows: x 300 dpi x 600 dpi Toner Save You can save running costs by turning on the Toner Save Mode, which reduces the print density. Print Setting (For Windows® 95/98/98SE/Me Users Only) Print Setting...
... machine prints all the even numbered pages first. When you can change the resolution as follows: x 300 dpi x 600 dpi Toner Save You can save running costs by turning on the Toner Save Mode, which reduces the print density. Print Setting (For Windows® 95/98/98SE/Me Users Only) Print Setting...
Owners Manual
Page 78
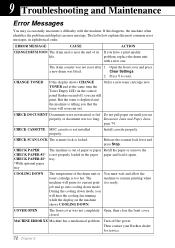
...the drum unit or You must wait and allow the toner cartridge is locked. COVER OPEN The front cover was too long. closed. Then contact your Brother dealer for service. 72 Chapter 9 If this happens...the front cover. Install cassette properly. The machine to reset. CHANGE TONER If the display shows CHANGE Order a new toner cartridge now. CHECK CASSETTE MFC cassette is ready. job and go into cooling down mode, you... Error Messages You may occasionally encounter a difficulty with a new one. Clear Settings. 2. tray. Turn off , you have a print quality life.
...the drum unit or You must wait and allow the toner cartridge is locked. COVER OPEN The front cover was too long. closed. Then contact your Brother dealer for service. 72 Chapter 9 If this happens...the front cover. Install cassette properly. The machine to reset. CHANGE TONER If the display shows CHANGE Order a new toner cartridge now. CHECK CASSETTE MFC cassette is ready. job and go into cooling down mode, you... Error Messages You may occasionally encounter a difficulty with a new one. Clear Settings. 2. tray. Turn off , you have a print quality life.
Owners Manual
Page 79
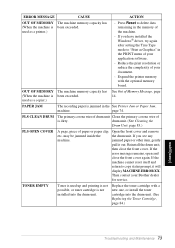
... Jam, machine. Press Reset to delete data remaining in the PRINT menu of your document. - Expand the printer memory with a new one, or install the toner cartridge into the drum unit. used as a copier.) See Out of the machine. - PAPER JAM The recording paper is been exceeded.... with the optional memory board. If the error message remains, open and close the front cover. TONER EMPTY Toner is dirty. Reduce the print resolution or reduce the complexity of your Brother dealer for service. drum unit. (See Cleaning the Drum Unit, page 83.) PLS OPEN COVER A page,...
... Jam, machine. Press Reset to delete data remaining in the PRINT menu of your document. - Expand the printer memory with a new one, or install the toner cartridge into the drum unit. used as a copier.) See Out of the machine. - PAPER JAM The recording paper is been exceeded.... with the optional memory board. If the error message remains, open and close the front cover. TONER EMPTY Toner is dirty. Reduce the print resolution or reduce the complexity of your Brother dealer for service. drum unit. (See Cleaning the Drum Unit, page 83.) PLS OPEN COVER A page,...
Owners Manual
Page 80
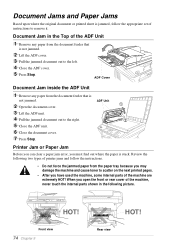
... Printer Jam or Paper Jam Before you can clear a paper jam error, you open the front or rear cover of the machine, never touch the internal parts shown in the Top of the ADF Unit 1 Remove any paper from the paper tray because you may damage the machine and cause... toner to scatter on the next printed pages. • After you have used the machine, some internal parts of instructions to the right. 5 Close the ADF unit. 6 Close the document cover. 7 Press Stop. HOT...
... Printer Jam or Paper Jam Before you can clear a paper jam error, you open the front or rear cover of the machine, never touch the internal parts shown in the Top of the ADF Unit 1 Remove any paper from the paper tray because you may damage the machine and cause... toner to scatter on the next printed pages. • After you have used the machine, some internal parts of instructions to the right. 5 Close the ADF unit. 6 Close the document cover. 7 Press Stop. HOT...

Owners Manual
Page 81
Instead, pull the edge of the machine, the fuser may get dirty with toner powder causing the next few copies of the machine. 2 Remove any crinkled sheets. 3 Adjust the guides inside the paper tray according to the paper you ...
Instead, pull the edge of the machine, the fuser may get dirty with toner powder causing the next few copies of the machine. 2 Remove any crinkled sheets. 3 Adjust the guides inside the paper tray according to the paper you ...
Owners Manual
Page 82
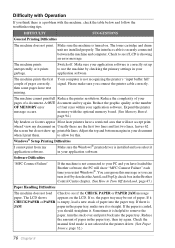
... LCD shows appears on . Reduce the amount of your application software. The toner cartridge and drum unit are the first two lines and last two lines, leaves 62 the screen... but do not show "MFC Connect Failure" each time you restart Windows®. Please make sure it in your PC and you have loaded the Brother software, the PC will not accept print.... problem with the optional memory board. (See Memory Board, page 94.) My headers or footers appear Most laser printers have a restricted area that will show up to remove the paper, turn it prints garbage. The ...
... LCD shows appears on . Reduce the amount of your application software. The toner cartridge and drum unit are the first two lines and last two lines, leaves 62 the screen... but do not show "MFC Connect Failure" each time you restart Windows®. Please make sure it in your PC and you have loaded the Brother software, the PC will not accept print.... problem with the optional memory board. (See Memory Board, page 94.) My headers or footers appear Most laser printers have a restricted area that will show up to remove the paper, turn it prints garbage. The ...
Owners Manual
Page 83
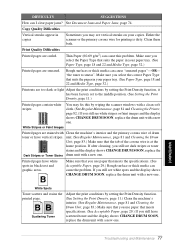
... white spots and the display shows CHANGE DRUM SOON, replace the drum unit with a new one . Copy Quality Difficulties Vertical streaks appear in copies Sometimes you may fix this problem. "the toner to the middle position. (See Setting the Print Density, page 11.) Printed pages contain white... white stripes or faint images and the display shows CHANGE DRUM SOON, replace the drum unit with a new one . MAINTENANCE Troubleshooting and Maintenance 77 White Spots Toner scatters and stains the printed page. Either the scanner or the primary corona wire for printing is at the ...
... white spots and the display shows CHANGE DRUM SOON, replace the drum unit with a new one . Copy Quality Difficulties Vertical streaks appear in copies Sometimes you may fix this problem. "the toner to the middle position. (See Setting the Print Density, page 11.) Printed pages contain white... white stripes or faint images and the display shows CHANGE DRUM SOON, replace the drum unit with a new one . MAINTENANCE Troubleshooting and Maintenance 77 White Spots Toner scatters and stains the printed page. Either the scanner or the primary corona wire for printing is at the ...
Owners Manual
Page 84
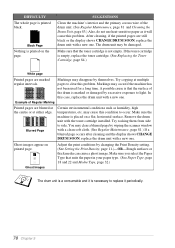
...to replace it will cause this problem. You may cause this case, replace the drum unit with a new one . Make sure you select the Paper Type that the toner cartridge is necessary to side. SUGGESTIONS Clean the machine's interior and the primary corona wire of Regular Marking ...condition to occur. DIFFICULTY The whole page is placed on a flat, horizontal surface. Black Page Nothing is empty, replace the toner cartridge. (See Replacing the Toner Cartridge, page 84.) White page Printed pages are still black or the display shows CHANGE DRUM SOON, replace the drum unit ...
...to replace it will cause this problem. You may cause this case, replace the drum unit with a new one . Make sure you select the Paper Type that the toner cartridge is necessary to side. SUGGESTIONS Clean the machine's interior and the primary corona wire of Regular Marking ...condition to occur. DIFFICULTY The whole page is placed on a flat, horizontal surface. Black Page Nothing is empty, replace the toner cartridge. (See Replacing the Toner Cartridge, page 84.) White page Printed pages are still black or the display shows CHANGE DRUM SOON, replace the drum unit ...

Owners Manual
Page 85
... turn off the machine. The blue scanner lock lever is finished. 2 Switch on the left side of the machine. Remove the drum unit and toner cartridge assembly. MAINTENANCE Front Cover Drum Unit Troubleshooting and Maintenance 79 Press it for 5 seconds. 3 Lock the scanner lock lever. If you do... not pack the machine correctly, you transport the machine, use the packing materials that came with the machine. Leave the toner cartridge installed in the drum unit. Packing and Shipping the Machine Whenever you could void your warranty. 4 Remove the drum unit assembly.
... turn off the machine. The blue scanner lock lever is finished. 2 Switch on the left side of the machine. Remove the drum unit and toner cartridge assembly. MAINTENANCE Front Cover Drum Unit Troubleshooting and Maintenance 79 Press it for 5 seconds. 3 Lock the scanner lock lever. If you do... not pack the machine correctly, you transport the machine, use the packing materials that came with the machine. Leave the toner cartridge installed in the drum unit. Packing and Shipping the Machine Whenever you could void your warranty. 4 Remove the drum unit assembly.

Owners Manual
Page 86
Plastic Bag Drum Unit Toner Cartridge 6 Close the front cover. Put the front output bin extension into position. 7 Switch off and unplug the machine from the AC outlet. 8 Unplug the ... bag and place it in the original carton with the original packing material. 10 Place documents (manual, printed material and CD-ROM), drum unit and toner cartridge assembly and power cord into the plastic bag and seal the bag completely. 5 Place the drum unit and...
Plastic Bag Drum Unit Toner Cartridge 6 Close the front cover. Put the front output bin extension into position. 7 Switch off and unplug the machine from the AC outlet. 8 Unplug the ... bag and place it in the original carton with the original packing material. 10 Place documents (manual, printed material and CD-ROM), drum unit and toner cartridge assembly and power cord into the plastic bag and seal the bag completely. 5 Place the drum unit and...
Owners Manual
Page 88
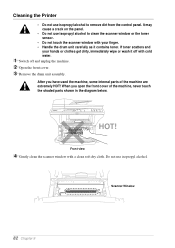
... wash it off with your finger. • Handle the drum unit carefully as it contains toner. Front view 4 Gently clean the scanner window with a clean soft dry cloth. When you have used the machine, some internal parts of the machine, never touch the shaded parts shown in the diagram below. After you...
... wash it off with your finger. • Handle the drum unit carefully as it contains toner. Front view 4 Gently clean the scanner window with a clean soft dry cloth. When you have used the machine, some internal parts of the machine, never touch the shaded parts shown in the diagram below. After you...
Owners Manual
Page 89
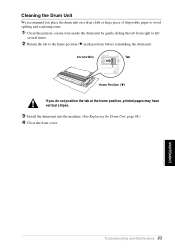
... Corona Wire Tab Home Position ( ) If you place the drum unit on a drop cloth or large piece of disposable paper to avoid spilling and scattering toner. 1 Clean the primary corona wire inside the drum unit by gently sliding the tab from right to left several times. 2 Return the tab to the...
... Corona Wire Tab Home Position ( ) If you place the drum unit on a drop cloth or large piece of disposable paper to avoid spilling and scattering toner. 1 Clean the primary corona wire inside the drum unit by gently sliding the tab from right to left several times. 2 Return the tab to the...
Owners Manual
Page 90
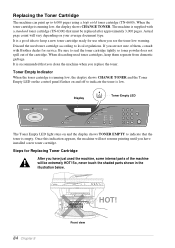
... you have just used the machine, some internal parts of the machine will not resume printing until you have installed a new toner cartridge. Front view The machine is recommended that must be extremely HOT! It is supplied with Brother dealer for service. Display Toner Empty LED The Toner Empty LED light stays on and the...
... you have just used the machine, some internal parts of the machine will not resume printing until you have installed a new toner cartridge. Front view The machine is recommended that must be extremely HOT! It is supplied with Brother dealer for service. Display Toner Empty LED The Toner Empty LED light stays on and the...

Owners Manual
Page 91
1 Open the front cover and pull out the drum unit. Place the drum unit on a drop cloth or large piece of disposable paper to avoid spilling and scattering the toner. 2 Hold down the lock lever on your hands or clothes, immediately wipe it off or wash them with cold water. Lock Lever Handle the toner cartridge carefully. Troubleshooting and Maintenance 85 MAINTENANCE If toner scatters on the right and pull the toner cartridge out of the drum unit assembly.
1 Open the front cover and pull out the drum unit. Place the drum unit on a drop cloth or large piece of disposable paper to avoid spilling and scattering the toner. 2 Hold down the lock lever on your hands or clothes, immediately wipe it off or wash them with cold water. Lock Lever Handle the toner cartridge carefully. Troubleshooting and Maintenance 85 MAINTENANCE If toner scatters on the right and pull the toner cartridge out of the drum unit assembly.
Owners Manual
Page 92
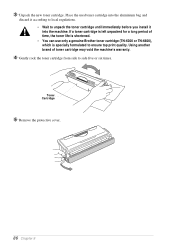
... use only a genuine Brother toner cartridge (TN-6300 or TN-6600), which is left unpacked for a long period of toner cartridge may void the machine's warranty. 4 Gently rock the toner cartridge from side to ensure top print quality. Toner Cartridge 5 Remove the protective cover. 86 Chapter 9 3 Unpack the new toner cartridge. If a toner cartridge is specially formulated...
... use only a genuine Brother toner cartridge (TN-6300 or TN-6600), which is left unpacked for a long period of toner cartridge may void the machine's warranty. 4 Gently rock the toner cartridge from side to ensure top print quality. Toner Cartridge 5 Remove the protective cover. 86 Chapter 9 3 Unpack the new toner cartridge. If a toner cartridge is specially formulated...

Owners Manual
Page 93
Corona Wire Tab Home Position ( ) 8 Reinstall the drum unit into place. MAINTENANCE Troubleshooting and Maintenance 87 Drum Unit Toner Cartridge 7 Clean the primary corona wire inside the drum unit by gently sliding the blue tab from right to the home position before reinstalling the drum unit assembly. 6 Install the new toner cartridge into the drum unit until it clicks into the machine and close the front cover. Return the blue tab to left several times.
Corona Wire Tab Home Position ( ) 8 Reinstall the drum unit into place. MAINTENANCE Troubleshooting and Maintenance 87 Drum Unit Toner Cartridge 7 Clean the primary corona wire inside the drum unit by gently sliding the blue tab from right to the home position before reinstalling the drum unit assembly. 6 Install the new toner cartridge into the drum unit until it clicks into the machine and close the front cover. Return the blue tab to left several times.
Owners Manual
Page 94
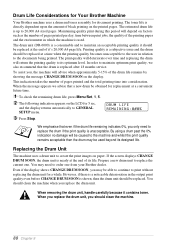
...becomes unacceptable to the user in the output print quality even before CHANGE DRUM SOON is a consumable and to replace the current one from your Brother dealer. The drum unit (DR-6000) is shown, then the drum unit should be replaced. If the screen displays CHANGE DRUM... number of the drum life remains by showing the message CHANGE DRUM SOON on the printed pages. Drum Life Considerations for Your Brother Machine Your Brother machine uses a drum and toner assembly for replacement at a convenient future time. 1 To check the remaining drum life, press Menu/Set, 1, 5. 2...
...becomes unacceptable to the user in the output print quality even before CHANGE DRUM SOON is a consumable and to replace the current one from your Brother dealer. The drum unit (DR-6000) is shown, then the drum unit should be replaced. If the screen displays CHANGE DRUM... number of the drum life remains by showing the message CHANGE DRUM SOON on the printed pages. Drum Life Considerations for Your Brother Machine Your Brother machine uses a drum and toner assembly for replacement at a convenient future time. 1 To check the remaining drum life, press Menu/Set, 1, 5. 2...

