Users Manual - English
Page 148
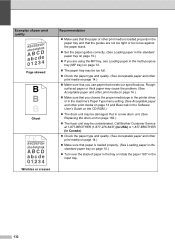
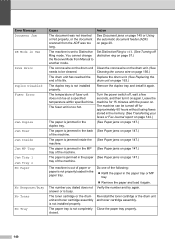
...-276-8437) (in USA) or 1-877-BROTHER (in Canada). „ Check the paper type and quality. (See Acceptable paper and other print media on page 14.) „ Make sure that paper is ... you are using the MP tray, see Loading paper in the Software User's Guide on the CD-ROM.) „ The drum unit may be contaminated. Examples of paper in the tray or rotate the paper 180° in a new drum unit. (See Replacing the drum unit on page 163.) „ The fuser unit may be damaged.
...-276-8437) (in USA) or 1-877-BROTHER (in Canada). „ Check the paper type and quality. (See Acceptable paper and other print media on page 14.) „ Make sure that paper is ... you are using the MP tray, see Loading paper in the Software User's Guide on the CD-ROM.) „ The drum unit may be contaminated. Examples of paper in the tray or rotate the paper 180° in a new drum unit. (See Replacing the drum unit on page 163.) „ The fuser unit may be damaged.
Users Manual - English
Page 151
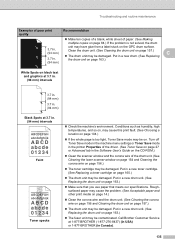
...wire of the drum unit. (See Cleaning the laser scanner window on page 154 and Cleaning the corona wire on page 156.) „ The toner cartridge may be contaminated. Clean the drum unit. (See Cleaning the drum unit on page 157.) C „ The drum unit may be damaged. ...page 27 or Advanced tab in a new drum unit. (See Replacing the drum unit on page 163.) „ The fuser unit may be damaged. Call Brother Customer Service at 3.7 in a new toner cartridge. (See Replacing a toner cartridge on page 160.) „ The drum unit may be on. Troubleshooting and routine maintenance Examples...
...wire of the drum unit. (See Cleaning the laser scanner window on page 154 and Cleaning the corona wire on page 156.) „ The toner cartridge may be contaminated. Clean the drum unit. (See Cleaning the drum unit on page 157.) C „ The drum unit may be damaged. ...page 27 or Advanced tab in a new drum unit. (See Replacing the drum unit on page 163.) „ The fuser unit may be damaged. Call Brother Customer Service at 3.7 in a new toner cartridge. (See Replacing a toner cartridge on page 160.) „ The drum unit may be on. Troubleshooting and routine maintenance Examples...
Users Manual - English
Page 152
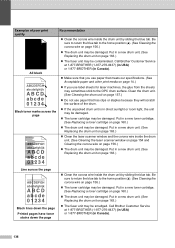
...unit. (See Replacing the drum unit on page 163.) „ Clean the laser scanner window and the corona wire inside the drum unit. (See Cleaning the laser scanner window on page 154 and Cleaning the corona wire on page 163.) „ The fuser unit may be contaminated. Put in a new drum unit. (See Replacing the drum unit... the home position (a). (See Cleaning the corona wire on page 163.) „ The fuser unit may be smudged. Call Brother Customer Service at 1-877-BROTHER (1-877-276-8437) (in USA) or 1-877-BROTHER (in Canada). 136 Examples of the drum. „ If the unpacked drum...
...unit. (See Replacing the drum unit on page 163.) „ Clean the laser scanner window and the corona wire inside the drum unit. (See Cleaning the laser scanner window on page 154 and Cleaning the corona wire on page 163.) „ The fuser unit may be contaminated. Put in a new drum unit. (See Replacing the drum unit... the home position (a). (See Cleaning the corona wire on page 163.) „ The fuser unit may be smudged. Call Brother Customer Service at 1-877-BROTHER (1-877-276-8437) (in USA) or 1-877-BROTHER (in Canada). 136 Examples of the drum. „ If the unpacked drum...
Users Manual - English
Page 156
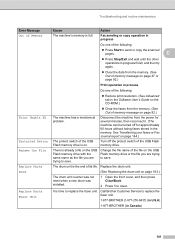
... not properly loaded in the paper tray. The machine is out of paper or paper is jammed in the MP (See Paper jams on . Do one of the machine. Remove the duplex tray and install it again. Close the paper tray properly. 140 Error Message Document Jam DR Mode in Use... not rise at a specified temperature within specified time. The paper is not completely closed. The fuser unit is busy. The number you dialed does not answer or is too hot. Replace the drum unit. (See Replacing the drum unit on page 163.) The duplex tray is jammed inside the (See Paper jams on page 147.) of...
... not properly loaded in the paper tray. The machine is out of paper or paper is jammed in the MP (See Paper jams on . Do one of the machine. Remove the duplex tray and install it again. Close the paper tray properly. 140 Error Message Document Jam DR Mode in Use... not rise at a specified temperature within specified time. The paper is not completely closed. The fuser unit is busy. The number you dialed does not answer or is too hot. Replace the drum unit. (See Replacing the drum unit on page 163.) The duplex tray is jammed inside the (See Paper jams on page 147.) of...
Users Manual - English
Page 157
... 92.) Print Unable XX The machine has a mechanical problem. Replace the drum unit. Call Brother Customer Service to replace the fuser unit. Replace Parts Fuser Unit It is time to replace the fuser unit. 1-877-BROTHER (1-877-276-8437) (in U.S.A) 1-877-BROTHER (in progress Do one of the following : „ Press Start to reset. Disconnect...memory drive with the same name as the file you are trying to save . Replace Parts The drum unit is full. Drum (See Replacing the drum unit on page 163.) The drum unit counter was not reset when a new drum was installed. 1 Open the front ...
... 92.) Print Unable XX The machine has a mechanical problem. Replace the drum unit. Call Brother Customer Service to replace the fuser unit. Replace Parts Fuser Unit It is time to replace the fuser unit. 1-877-BROTHER (1-877-276-8437) (in U.S.A) 1-877-BROTHER (in progress Do one of the following : „ Press Start to reset. Disconnect...memory drive with the same name as the file you are trying to save . Replace Parts The drum unit is full. Drum (See Replacing the drum unit on page 163.) The drum unit counter was not reset when a new drum was installed. 1 Open the front ...
Users Manual - English
Page 181
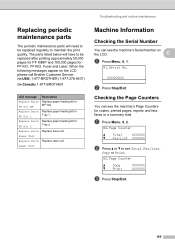
... Menu, 8, 1. 81.Serial No. Fuser Unit Replace Parts Replace laser unit. Checking the Page Counters C You can see the machine's Serial Number on the LCD please call Brother Customer Service: (in USA) 1-877-BROTHER (1-877-276-8437) (in Canada) 1-877-BROTHER C LCD message Replace Parts PF Kit MP Replace Parts PF Kit 1 Replace Parts PF Kit 2 Replace Parts Description Replace paper feeding kit for...
... Menu, 8, 1. 81.Serial No. Fuser Unit Replace Parts Replace laser unit. Checking the Page Counters C You can see the machine's Serial Number on the LCD please call Brother Customer Service: (in USA) 1-877-BROTHER (1-877-276-8437) (in Canada) 1-877-BROTHER C LCD message Replace Parts PF Kit MP Replace Parts PF Kit 1 Replace Parts PF Kit 2 Replace Parts Description Replace paper feeding kit for...

Service Manual
Page 21
Machine life: 200,000 pages MTBF (Meantime between failure): Up to 4000 hours MTTR (Meantime to repair): Average 0.5 hours Monthly volume: 30,000 pages Periodical replacement parts: Parts Approximate Life (pages) Fuser unit 100,000 Laser unit 100,000 PF kit China MP: 25,000 Tray 1/2: 100,000 India MP: 12,000 Tray 1/2: 80,000 Others MP: 50,000 Tray 1/2: 100,000 * As for periodical replacement parts, refer to maintain the product. 2.5 Service Information These are key service information to CHAPTER 4 in the Service Manual. 1-8 Confidential
Machine life: 200,000 pages MTBF (Meantime between failure): Up to 4000 hours MTTR (Meantime to repair): Average 0.5 hours Monthly volume: 30,000 pages Periodical replacement parts: Parts Approximate Life (pages) Fuser unit 100,000 Laser unit 100,000 PF kit China MP: 25,000 Tray 1/2: 100,000 India MP: 12,000 Tray 1/2: 80,000 Others MP: 50,000 Tray 1/2: 100,000 * As for periodical replacement parts, refer to maintain the product. 2.5 Service Information These are key service information to CHAPTER 4 in the Service Manual. 1-8 Confidential
Service Manual
Page 73
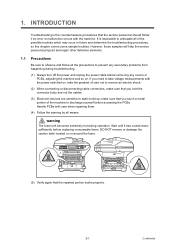
...(2) When connecting or disconnecting cable connectors, make sure that the service personnel should follow all the precautions to discharge yourself before replacing consumable items. DO NOT remove or damage the caution label located on . INTRODUCTION Troubleshooting is impossible to static build up; ... them. (4) Follow the warning by all of the machine to prevent any secondary problems from happening during operation. warning The fuser unit becomes extremely hot during troubleshooting. (1) Always turn off the power and unplug the power cable before removing any covers or PCBs...
...(2) When connecting or disconnecting cable connectors, make sure that the service personnel should follow all the precautions to discharge yourself before replacing consumable items. DO NOT remove or damage the caution label located on . INTRODUCTION Troubleshooting is impossible to static build up; ... them. (4) Follow the warning by all of the machine to prevent any secondary problems from happening during operation. warning The fuser unit becomes extremely hot during troubleshooting. (1) Always turn off the power and unplug the power cable before removing any covers or PCBs...
Service Manual
Page 77
... toner cartridge that is not installed properly. Replace the fuser unit. 3-15 It is indicated on the LCD Error Message Access Error Cartridge Error Replace Parts Drum Replace Parts Fuser Unit Replace Parts Laser Unit Replace Parts PF Kit MP Replace Parts PF Kit 1 Replace Parts PF Kit 2 Comm.Error Connection Fail Type of Replace the drum unit. Replace the PF Kit MP. 3-14 It is...
... toner cartridge that is not installed properly. Replace the fuser unit. 3-15 It is indicated on the LCD Error Message Access Error Cartridge Error Replace Parts Drum Replace Parts Fuser Unit Replace Parts Laser Unit Replace Parts PF Kit MP Replace Parts PF Kit 1 Replace Parts PF Kit 2 Comm.Error Connection Fail Type of Replace the drum unit. Replace the PF Kit MP. 3-14 It is...

Service Manual
Page 78
...minutes. 3-20 Cover is Open The front cover is not closed completely. Do one of the following: Turn the power switch off, wait a few seconds, and then turn it again. 3-16 Fuser Error The temperature of fuser unit does not rise at a specified temperature within specified time. Jam Duplex The paper...fed properly, or the document scanned from the back of the machine. 3-24 Jam Inside The paper is not installed properly. The drum unit has reached Replace the drum unit. Remove the duplex tray and install it on . 3-17 3-19 3-20 3-21 3-37 Init Unable XX The machine has a mechanical...
...minutes. 3-20 Cover is Open The front cover is not closed completely. Do one of the following: Turn the power switch off, wait a few seconds, and then turn it again. 3-16 Fuser Error The temperature of fuser unit does not rise at a specified temperature within specified time. Jam Duplex The paper...fed properly, or the document scanned from the back of the machine. 3-24 Jam Inside The paper is not installed properly. The drum unit has reached Replace the drum unit. Remove the duplex tray and install it on . 3-17 3-19 3-20 3-21 3-37 Init Unable XX The machine has a mechanical...

Service Manual
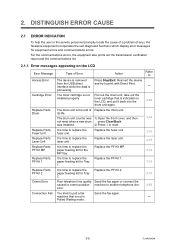
Page 81
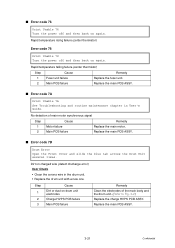
...end user to quickly find out the problem. 3.1 Error Indication Error codes Problem 1E Replacement time of the drum unit 1F Two or more optional trays are installed 24 Internal temperature sensor failure 35 EEPROM of main PCB failure 36 HVPS PCB during standby failure ...53 Replacement time of the paper feed kit T2 Replacement time of the fuser 54 unit 55 Replacement time of the laser unit 56 Back cover opened 57 Paper jam (Duplex tray) 58 Fuser unit failure Refer Error to: codes Problem 3-12 59 Fuser unit failure (Detect fuser failure at start-up) 3-12 63 Replace toner...
...end user to quickly find out the problem. 3.1 Error Indication Error codes Problem 1E Replacement time of the drum unit 1F Two or more optional trays are installed 24 Internal temperature sensor failure 35 EEPROM of main PCB failure 36 HVPS PCB during standby failure ...53 Replacement time of the paper feed kit T2 Replacement time of the fuser 54 unit 55 Replacement time of the laser unit 56 Back cover opened 57 Paper jam (Duplex tray) 58 Fuser unit failure Refer Error to: codes Problem 3-12 59 Fuser unit failure (Detect fuser failure at start-up) 3-12 63 Replace toner...

Service Manual
Page 87
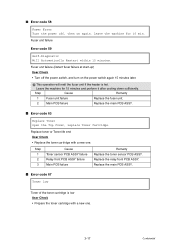
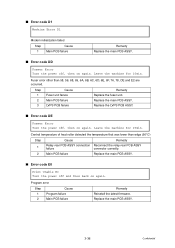
... 54 Replace Parts Fuser Unit Replacement time of the fuser unit User Check • Replace the fuser unit with a new one. ■ Error code 52 Replace Parts PF Kit 1 Replacement time of the paper feed kit T1 User Check • Replace the paper feed kit T1 with a new one. Step 1 Cause Remedy Replacement time of the fuser unit Replace the fuser unit. ■ Error code 55 Replace Parts Laser Unit Replacement time of the laser unit...
... 54 Replace Parts Fuser Unit Replacement time of the fuser unit User Check • Replace the fuser unit with a new one. ■ Error code 52 Replace Parts PF Kit 1 Replacement time of the paper feed kit T1 User Check • Replace the paper feed kit T1 with a new one. Step 1 Cause Remedy Replacement time of the fuser unit Replace the fuser unit. ■ Error code 55 Replace Parts Laser Unit Replacement time of the laser unit...
Service Manual
Page 89
... at start-up) User Check • Turn off , then on the power switch again 15 minutes later. Replace toner or Toner life end User Check • Replace the toner cartridge with a new one . Fuser unit failure Error code 59 Self-Diagnostic Will Automatically Restart within 15 minutes. Leave the machine for 15 minutes and perform...
... at start-up) User Check • Turn off , then on the power switch again 15 minutes later. Replace toner or Toner life end User Check • Replace the toner cartridge with a new one . Fuser unit failure Error code 59 Self-Diagnostic Will Automatically Restart within 15 minutes. Leave the machine for 15 minutes and perform...
Service Manual
Page 90
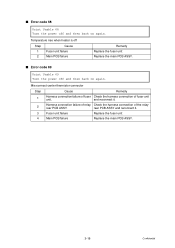
... harness connection of the relay rear PCB ASSY. and reconnect it . 3 Fuser unit failure Replace the fuser unit 4 Main PCB failure Replace the main PCB ASSY. 3-18 Confidential rear PCB ASSY and reconnect it . 2 Harness connection failure of relay Check the harness connection of fuser unit unit. ■ Error code 68 Print Unable 68 Turn the power off and...
... harness connection of the relay rear PCB ASSY. and reconnect it . 3 Fuser unit failure Replace the fuser unit 4 Main PCB failure Replace the main PCB ASSY. 3-18 Confidential rear PCB ASSY and reconnect it . 2 Harness connection failure of relay Check the harness connection of fuser unit unit. ■ Error code 68 Print Unable 68 Turn the power off and...
Service Manual
Page 91
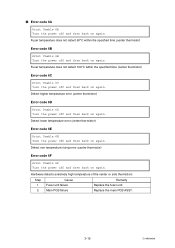
... and then back on again. Hardware detects extremely high temperature of the center or side thermistors Step Cause Remedy 1 Fuser unit failure Replace the fuser unit. 2 Main PCB failure Replace the main PCB ASSY. 3-19 Confidential ■ Error code 6A Print Unable 6A Turn the power off and then... back on again. Fuser temperature does not detect 100°C within the specified time (center thermistor) Error code 6B Print ...
... and then back on again. Hardware detects extremely high temperature of the center or side thermistors Step Cause Remedy 1 Fuser unit failure Replace the fuser unit. 2 Main PCB failure Replace the main PCB ASSY. 3-19 Confidential ■ Error code 6A Print Unable 6A Turn the power off and then... back on again. Fuser temperature does not detect 100°C within the specified time (center thermistor) Error code 6B Print ...
Service Manual
Page 93
... temperature falling failure (center thermistor) Step Cause Remedy 1 Fuser unit failure Replace the fuser unit. 2 Main PCB failure Replace the main PCB ASSY. ■ Error code 7A Print Unable 7A See Troubleshooting and routine maintenance chapter in the drum unit. • Replace the drum unit with a new one. Dirt on drum unit electrodes Charge HVPS PCB failure Main PCB failure Remedy...
... temperature falling failure (center thermistor) Step Cause Remedy 1 Fuser unit failure Replace the fuser unit. 2 Main PCB failure Replace the main PCB ASSY. ■ Error code 7A Print Unable 7A See Troubleshooting and routine maintenance chapter in the drum unit. • Replace the drum unit with a new one. Dirt on drum unit electrodes Charge HVPS PCB failure Main PCB failure Remedy...
Service Manual
Page 108
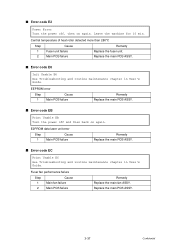
... E0 Print Unable E0 Turn the power off and then back on again. Step Cause Remedy 1 Fuser unit failure Replace the fuser unit. 2 Main PCB failure Replace the main PCB ASSY. 3 LVPS PCB failure Replace the LVPS PCB ASSY. ■ Error code DE Fusser Error Turn the power off, then on... again. Leave the machine for 15min. Replace the main PCB ASSY. 3-36 Confidential Program error Step Cause 1...
... E0 Print Unable E0 Turn the power off and then back on again. Step Cause Remedy 1 Fuser unit failure Replace the fuser unit. 2 Main PCB failure Replace the main PCB ASSY. 3 LVPS PCB failure Replace the LVPS PCB ASSY. ■ Error code DE Fusser Error Turn the power off, then on... again. Leave the machine for 15min. Replace the main PCB ASSY. 3-36 Confidential Program error Step Cause 1...
Service Manual
Page 109
... the machine for 15 min. Central temperature of heat roller detected more than 280°C Step 1 2 Cause Fuser unit failure Main PCB failure Remedy Replace the fuser unit. E2PROM data laser unit error Step 1 Cause Main PCB failure Remedy Replace the main PCB ASSY. ■ Error code EC Print Unable EC See Troubleshooting and routine maintenance chapter in...
... the machine for 15 min. Central temperature of heat roller detected more than 280°C Step 1 2 Cause Fuser unit failure Main PCB failure Remedy Replace the fuser unit. E2PROM data laser unit error Step 1 Cause Main PCB failure Remedy Replace the main PCB ASSY. ■ Error code EC Print Unable EC See Troubleshooting and routine maintenance chapter in...
Service Manual
Page 113
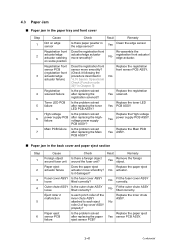
... object Is there a foreign object around fuser unit around the fuser unit? attached to each pinch roller of top cover ASSY properly? Registration front Does the registration front Re-assemble the actuator/edge actuator/edge actuator actuator catching move smoothly? Main PCB failure Is the problem solved after replacing the Highvoltage power supply PCB ASSY...
... object Is there a foreign object around fuser unit around the fuser unit? attached to each pinch roller of top cover ASSY properly? Registration front Does the registration front Re-assemble the actuator/edge actuator/edge actuator actuator catching move smoothly? Main PCB failure Is the problem solved after replacing the Highvoltage power supply PCB ASSY...
Service Manual
Page 115
... over the stack of the fuser unit? Replace the fuser unit. Replace the top cover Yes ASSY. 3-43 Confidential Step Cause Fuser unit dirty 1 Check Is there dirt around the eject roller 2? Step 1 2 Cause Fuser unit dirty Fuser unit failure Check Is there dirt around the entrance of the Yes fuser unit. Turn over the stack of the Yes fuser unit. 4.4 Dirt on Paper - Check if...
... over the stack of the fuser unit? Replace the fuser unit. Replace the top cover Yes ASSY. 3-43 Confidential Step Cause Fuser unit dirty 1 Check Is there dirt around the eject roller 2? Step 1 2 Cause Fuser unit dirty Fuser unit failure Check Is there dirt around the entrance of the Yes fuser unit. Turn over the stack of the Yes fuser unit. 4.4 Dirt on Paper - Check if...


