
Users Manual - English
Page 7
... your original Machine shall become the property of purchase information, together with the Machine that Brother agreed to replace in accordance with the instructions provided by the balance of the limited warranty period remaining on your original Product has expired...with a replacement Machine after receipt of the replacement Machine, supply the required proof of Brother. MFC LIMITED WARRANTY (USA) v Brother will be charged up at Brother's then current published rates. Brother® One-Year Limited Warranty and Replacement Service (USA only) by the courier. If you are ...
... your original Machine shall become the property of purchase information, together with the Machine that Brother agreed to replace in accordance with the instructions provided by the balance of the limited warranty period remaining on your original Product has expired...with a replacement Machine after receipt of the replacement Machine, supply the required proof of Brother. MFC LIMITED WARRANTY (USA) v Brother will be charged up at Brother's then current published rates. Brother® One-Year Limited Warranty and Replacement Service (USA only) by the courier. If you are ...
Users Manual - English
Page 9
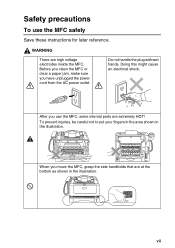
... paper jam, make sure you use the MFC safely Save these instructions for later reference. Doing this might cause an electrical shock. vii To prevent injuries, be careful not to put your fingers in the area shown in the illustration. When you move the MFC, grasp the side handholds that are at ...the bottom as shown in the illustration. After you have unplugged the power cord from the AC power outlet. Do not handle the plug with wet hands. Safety precautions To use the MFC, some internal parts are high voltage ...
... paper jam, make sure you use the MFC safely Save these instructions for later reference. Doing this might cause an electrical shock. vii To prevent injuries, be careful not to put your fingers in the area shown in the illustration. When you move the MFC, grasp the side handholds that are at ...the bottom as shown in the illustration. After you have unplugged the power cord from the AC power outlet. Do not handle the plug with wet hands. Safety precautions To use the MFC, some internal parts are high voltage ...
Users Manual - English
Page 10
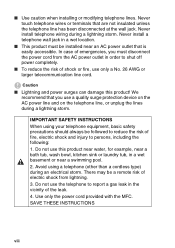
...near a bath tub, wash bowl, kitchen sink or laundry tub, in the vicinity of shock or fire, use this product! SAVE THESE INSTRUCTIONS viii Never install a telephone wall jack in a wet location. ■ This product must disconnect the power cord from lightning. 3. In case... the telephone line, or unplug the lines during a lightning storm. IMPORTANT SAFETY INSTRUCTIONS When using a telephone (other than a cordless type) during a lightning storm. Use only the power cord provided with the MFC. Caution ■ Lightning and power surges can damage this product near water, ...
...near a bath tub, wash bowl, kitchen sink or laundry tub, in the vicinity of shock or fire, use this product! SAVE THESE INSTRUCTIONS viii Never install a telephone wall jack in a wet location. ■ This product must disconnect the power cord from lightning. 3. In case... the telephone line, or unplug the lines during a lightning storm. IMPORTANT SAFETY INSTRUCTIONS When using a telephone (other than a cordless type) during a lightning storm. Use only the power cord provided with the MFC. Caution ■ Lightning and power surges can damage this product near water, ...
Users Manual - English
Page 19
... Compliance Statement (Canada only 11-4 For your safety 11-4 Disconnect device 11-4 LAN connection 11-4 International ENERGY STAR® Compliance Statement 11-5 Laser safety 11-5 FDA regulations 11-6 Important safety instructions 11-7 Trademarks 11-9 Shipment of the MFC 11-9 Troubleshooting and routine maintenance 12-1 Troubleshooting 12-1 Error messages 12-1 Original document jams 12-4 Paper...
... Compliance Statement (Canada only 11-4 For your safety 11-4 Disconnect device 11-4 LAN connection 11-4 International ENERGY STAR® Compliance Statement 11-5 Laser safety 11-5 FDA regulations 11-6 Important safety instructions 11-7 Trademarks 11-9 Shipment of the MFC 11-9 Troubleshooting and routine maintenance 12-1 Troubleshooting 12-1 Error messages 12-1 Original document jams 12-4 Paper...
Users Manual - English
Page 21
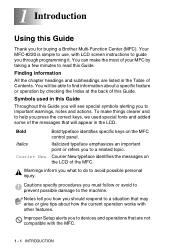
Your MFC-8220 is simple to use, with LCD screen instructions to guide you to a related topic. Courier New typeface identifies the messages on the MFC control panel. You can make things clearer and to help you to important warnings, notes and actions. You will appear...this Guide. Italicized typeface emphasizes an important point or refers you through programming it. Cautions specify procedures you for buying a Brother Multi-Function Center (MFC). Improper Setup alerts you to devices and operations that are listed in this Guide Throughout this Guide you will see special...
Your MFC-8220 is simple to use, with LCD screen instructions to guide you to a related topic. Courier New typeface identifies the messages on the MFC control panel. You can make things clearer and to help you to important warnings, notes and actions. You will appear...this Guide. Italicized typeface emphasizes an important point or refers you through programming it. Cautions specify procedures you for buying a Brother Multi-Function Center (MFC). Improper Setup alerts you to devices and operations that are listed in this Guide Throughout this Guide you will see special...

Users Manual - English
Page 32
...follow the instructions in this guide for fax calling (CNG) tones. If You Subscribe to your Telephone Company's Distinctive Ring Service: You may choose to connect an answering device. jack of CNG tones left for the fax "handshake". The TAD must plug your TAD into a wall jack, both your MFC and ... 1 - 12 However, when you have an external TAD on the same telephone line as a fax number. We do not receive all calls and the MFC "listens" for recording your outgoing message. The recommended setting is four rings on the external TAD when you do not recommend using the toll saver...
...follow the instructions in this guide for fax calling (CNG) tones. If You Subscribe to your Telephone Company's Distinctive Ring Service: You may choose to connect an answering device. jack of CNG tones left for the fax "handshake". The TAD must plug your TAD into a wall jack, both your MFC and ... 1 - 12 However, when you have an external TAD on the same telephone line as a fax number. We do not receive all calls and the MFC "listens" for recording your outgoing message. The recommended setting is four rings on the external TAD when you do not recommend using the toll saver...

Users Manual - English
Page 47
... and programming options. Press Set. All you program your MFC without the User's Guide. Memory Storage If there is a power failure, you will be easy to use the Menu table on -screen instructions to help you need to do is follow the instructions as Overseas Mode, and so on) will not lose... your MFC by pressing Menu followed by -step on page 3-4. For example to set Fax Resolution to Fine...
... and programming options. Press Set. All you program your MFC without the User's Guide. Memory Storage If there is a power failure, you will be easy to use the Menu table on -screen instructions to help you need to do is follow the instructions as Overseas Mode, and so on) will not lose... your MFC by pressing Menu followed by -step on page 3-4. For example to set Fax Resolution to Fine...
Users Manual - English
Page 114
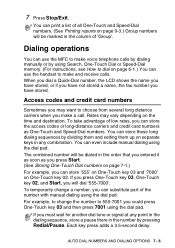
... stored. You can use the handset to make a call. For example, to change a number, you could press One-Touch key 03 and then press 7001 using Search, One-Touch Dial or Speed-Dial memory. (For instructions, see How to dial on the time and destination. Access codes and credit card numbers Sometimes you... sequences by dividing them and setting them up on separate keys in the order that you entered it as soon as One-Touch and Speed-Dial numbers. You can use the MFC to make voice telephone calls by dialing manually or by pressing Redial/Pause. The combined number will be dialed in...
... stored. You can use the handset to make a call. For example, to change a number, you could press One-Touch key 03 and then press 7001 using Search, One-Touch Dial or Speed-Dial memory. (For instructions, see How to dial on the time and destination. Access codes and credit card numbers Sometimes you... sequences by dividing them and setting them up on separate keys in the order that you entered it as soon as One-Touch and Speed-Dial numbers. You can use the MFC to make voice telephone calls by dialing manually or by pressing Redial/Pause. The combined number will be dialed in...

Users Manual - English
Page 115
... increase the length of an extension phone will not release call using the dial pad, One-Touch, Speed-Dial and Search. Pause Press Redial/Pause to send Tone signals (for example, for telephone banking), follow the instructions below. If you pressed Hook/Hold to hear you unless you pick up the handset....) To hang up the handset. -OR- If you have a Pulse dialing service, but need this will not be able to dial, pick up , the MFC will not need to insert a 3.5-...
... increase the length of an extension phone will not release call using the dial pad, One-Touch, Speed-Dial and Search. Pause Press Redial/Pause to send Tone signals (for example, for telephone banking), follow the instructions below. If you pressed Hook/Hold to hear you unless you pick up the handset....) To hang up the handset. -OR- If you have a Pulse dialing service, but need this will not be able to dial, pick up , the MFC will not need to insert a 3.5-...
Users Manual - English
Page 142
... the FCC Rules. A grounded plug should be determined by one or more of the FCC Rules. If this device must... Brother International Corporation 100 Somerset Corporate Boulevard Bridgewater, NJ 08807-0911 USA TEL: (908) 704-1700 declares, that the products Product Name: MFC-8220 comply... with Part 15 of the following two conditions: (1) This device may not cause harmful interference, and (2) this equipment does cause harmful interference to radio or television reception, which can radiate radio frequency energy and, if not installed and used in accordance with the instructions...
... the FCC Rules. A grounded plug should be determined by one or more of the FCC Rules. If this device must... Brother International Corporation 100 Somerset Corporate Boulevard Bridgewater, NJ 08807-0911 USA TEL: (908) 704-1700 declares, that the products Product Name: MFC-8220 comply... with Part 15 of the following two conditions: (1) This device may not cause harmful interference, and (2) this equipment does cause harmful interference to radio or television reception, which can radiate radio frequency energy and, if not installed and used in accordance with the instructions...

Users Manual - English
Page 146
... amperes (USA only). 12 Do not place anything in front of power source indicated on an unstable cart, stand, or table. Important safety instructions 1 Read all of the grounded plug. 10 Do not allow anything to rest on the power cord. The openings should never be placed in... plug, a plug having a third (grounded) pin. Use a damp cloth for ventilation; This product should be placed near water. 6 Do not place this MFC. 9 This product is a safety feature. Do not place anything in the path of power available, call your electrician to the product. 7 Slots and openings in...
... amperes (USA only). 12 Do not place anything in front of power source indicated on an unstable cart, stand, or table. Important safety instructions 1 Read all of the grounded plug. 10 Do not allow anything to rest on the power cord. The openings should never be placed in... plug, a plug having a third (grounded) pin. Use a damp cloth for ventilation; This product should be placed near water. 6 Do not place this MFC. 9 This product is a safety feature. Do not place anything in the path of power available, call your electrician to the product. 7 Slots and openings in...

Users Manual - English
Page 147
...result in damage and will often require extensive work by the operating instructions. For the location of your warranty. Adjust only those controls that use water, a swimming pool or in a wet basement. ■ Do not use the MFC's telephone during an electrical storm (there is damaged or frayed. ...under the following : ■ Do not use this guide. 11 - 8 IMPORTANT INFORMATION Refer all servicing to a Brother Authorized Service Center. 13 Wait until pages have exited the MFC before picking them up. 14 Never push objects of any kind on page i.) 15 Unplug this product through cabinet ...
...result in damage and will often require extensive work by the operating instructions. For the location of your warranty. Adjust only those controls that use water, a swimming pool or in a wet basement. ■ Do not use the MFC's telephone during an electrical storm (there is damaged or frayed. ...under the following : ■ Do not use this guide. 11 - 8 IMPORTANT INFORMATION Refer all servicing to a Brother Authorized Service Center. 13 Wait until pages have exited the MFC before picking them up. 14 Never push objects of any kind on page i.) 15 Unplug this product through cabinet ...

Users Manual - English
Page 209
vii, 11-7 Setup Date and Time 4-1 Station ID (fax header) .... 4-2 Shipping the MFC ... 11-9, 12-19 Sleep Time 4-11 Speed-Dial changing 7-4 storing 7-3 T TAD (telephone answering device), external 1-12, 1-... faxes 12-12 software 12-13 Two-line phone system ..... 1-15 V Volume, setting beeper 4-7 handset 4-9 amplify (for next fax 6-6 Ring Delay, setting 5-2 S Safety instructions ....... commands 8-6 getting your faxes 8-5, 8-6, 8-8 Reports 9-1, 9-3 Auto Dial List 9-3 Fax Activity 9-3 Help List 9-3 Transmission Verification 9-1, 9-3 User Settings 9-3 Resolution copy S-2 ...
vii, 11-7 Setup Date and Time 4-1 Station ID (fax header) .... 4-2 Shipping the MFC ... 11-9, 12-19 Sleep Time 4-11 Speed-Dial changing 7-4 storing 7-3 T TAD (telephone answering device), external 1-12, 1-... faxes 12-12 software 12-13 Two-line phone system ..... 1-15 V Volume, setting beeper 4-7 handset 4-9 amplify (for next fax 6-6 Ring Delay, setting 5-2 S Safety instructions ....... commands 8-6 getting your faxes 8-5, 8-6, 8-8 Reports 9-1, 9-3 Auto Dial List 9-3 Fax Activity 9-3 Help List 9-3 Transmission Verification 9-1, 9-3 User Settings 9-3 Resolution copy S-2 ...
Quick Setup Guide - English
Page 1
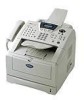
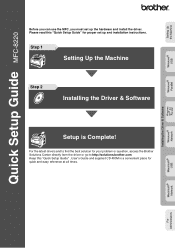
For the latest drivers and to find the best solution for your problem or question, access the Brother Solutions Center directly from the driver or go to http://solutions.brother.com Keep this "Quick Setup Guide" for quick and easy reference at all times. Macintosh®... instructions. Step 1 Setting Up the Machine Step 2 Installing the Driver & Software Windows® Network Setup is Complete! Setting Up the Machine Windows® USB Windows® Parallel Windows NT® 4.0 Parallel Installing the Driver & Software Quick Setup Guide MFC-8220 Before you can use the MFC,...
For the latest drivers and to find the best solution for your problem or question, access the Brother Solutions Center directly from the driver or go to http://solutions.brother.com Keep this "Quick Setup Guide" for quick and easy reference at all times. Macintosh®... instructions. Step 1 Setting Up the Machine Step 2 Installing the Driver & Software Windows® Network Setup is Complete! Setting Up the Machine Windows® USB Windows® Parallel Windows NT® 4.0 Parallel Installing the Driver & Software Quick Setup Guide MFC-8220 Before you can use the MFC,...
Quick Setup Guide - English
Page 16
...installation does not continue automatically, please open the installer menu again by double-clicking the setup.exe program from the root directory of the Brother CD-ROM. Click Install Software. If you see the following screen, click OK to run the setup.exe program from the root ... Application. 2 Turn on your computer. (For Windows® 2000 Professional/XP, you have completed the instructions from Step 1 "Setting Up the Machine" on pages 4 - 11. 1 Switch off and unplug the MFC from the AC outlet and disconnect it from Step 4. 14 If the language screen appears, select your ...
...installation does not continue automatically, please open the installer menu again by double-clicking the setup.exe program from the root directory of the Brother CD-ROM. Click Install Software. If you see the following screen, click OK to run the setup.exe program from the root ... Application. 2 Turn on your computer. (For Windows® 2000 Professional/XP, you have completed the instructions from Step 1 "Setting Up the Machine" on pages 4 - 11. 1 Switch off and unplug the MFC from the AC outlet and disconnect it from Step 4. 14 If the language screen appears, select your ...
Quick Setup Guide - English
Page 17
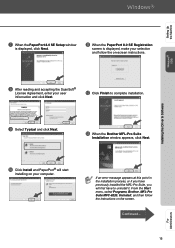
... Setup window is displayed, make your selection and follow the instructions on -screen instructions. A When the PaperPort 8.0 SE Registration screen is displayed, click Next. From the Start menu, select Programs, Brother, MFL-Pro Suite MFC-8220, Uninstall, and then follow the on the screen. If...Installing the Driver & Software 8 After reading and accepting the ScanSoft® License Agreement, enter your computer. C When the Brother MFL-Pro Suite Installation window appears, click Next. 0 Click Install and PaperPort® will first have to complete installation. 9 Select Typical...
... Setup window is displayed, make your selection and follow the instructions on -screen instructions. A When the PaperPort 8.0 SE Registration screen is displayed, click Next. From the Start menu, select Programs, Brother, MFL-Pro Suite MFC-8220, Uninstall, and then follow the on the screen. If...Installing the Driver & Software 8 After reading and accepting the ScanSoft® License Agreement, enter your computer. C When the Brother MFL-Pro Suite Installation window appears, click Next. 0 Click Install and PaperPort® will first have to complete installation. 9 Select Typical...
Quick Setup Guide - English
Page 19
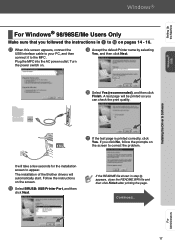
... of the Brother drivers will take a few seconds for the installation screen to correct the problem. Installing the Driver & Software For Administrators 17 Plug the MFC into the AC power outlet. Turn the power switch on the screen. If you can check the print quality. Follow the instructions on . ...Next. Setting Up the Machine Windows® USB Step 2 For Windows® 98/98SE/Me Users Only Make sure that you followed the instructions in step L appears, close the README.WRI file and then click Finish after printing the page. It will automatically start. If the ...
... of the Brother drivers will take a few seconds for the installation screen to correct the problem. Installing the Driver & Software For Administrators 17 Plug the MFC into the AC power outlet. Turn the power switch on the screen. If you can check the print quality. Follow the instructions on . ...Next. Setting Up the Machine Windows® USB Step 2 For Windows® 98/98SE/Me Users Only Make sure that you followed the instructions in step L appears, close the README.WRI file and then click Finish after printing the page. It will automatically start. If the ...
Quick Setup Guide - English
Page 21
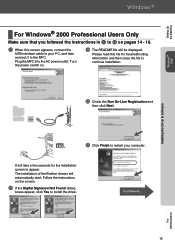
The installation of the Brother drivers will be displayed. Turn the power switch on the screen. J Check the Run On-Line Registration and then click Next. Follow the instructions on . Setting Up the Machine Windows® USB Installing the Driver & Software For Windows® 2000...will automatically start. H If the Digital Signature Not Found dialog boxes appear, click Yes to F on pages 14 - 16. Plug the MFC into the AC power outlet. Please read this screen appears, connect the USB interface cable to your computer. For Administrators 19 Continued... K ...
The installation of the Brother drivers will be displayed. Turn the power switch on the screen. J Check the Run On-Line Registration and then click Next. Follow the instructions on . Setting Up the Machine Windows® USB Installing the Driver & Software For Windows® 2000...will automatically start. H If the Digital Signature Not Found dialog boxes appear, click Yes to F on pages 14 - 16. Plug the MFC into the AC power outlet. Please read this screen appears, connect the USB interface cable to your computer. For Administrators 19 Continued... K ...

Quick Setup Guide - English
Page 25
...If you followed the instructions in step I Check the Run On-Line Registration and then click Next. Continued... 23 For Administrators I , the screen for the installation screen to step K. It will be displayed. The installation of the Brother drivers will appear. Plug the MFC into the AC ...connect it to restart your registration before proceeding to appear. Installing the Driver & Software J Click Finish to the MFC. G When this file for a while. The screens appear one after another, please wait for troubleshooting information and then close the file to F on .
...If you followed the instructions in step I Check the Run On-Line Registration and then click Next. Continued... 23 For Administrators I , the screen for the installation screen to step K. It will be displayed. The installation of the Brother drivers will appear. Plug the MFC into the AC ...connect it to restart your registration before proceeding to appear. Installing the Driver & Software J Click Finish to the MFC. G When this file for a while. The screens appear one after another, please wait for troubleshooting information and then close the file to F on .

Quick Setup Guide - English
Page 28
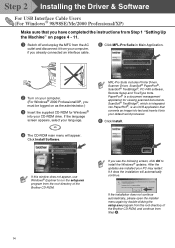
...appears, select your PC may restart. PaperPort® is an OCR application that you have completed the instructions from Step 1 "Setting Up the Machine" on pages 4 - 11. 1 Switch off and unplug the MFC from your computer, if you already connected an interface cable. 5 Click MFL-Pro Suite in Main Application..., please open the installer menu again by double-clicking the setup.exe program from the root directory of the Brother CD-ROM, and continue from the root directory of the Brother CD-ROM. Step 2 Installing the Driver & Software For Parallel Interface Cable Users (For Windows® 95/...
...appears, select your PC may restart. PaperPort® is an OCR application that you have completed the instructions from Step 1 "Setting Up the Machine" on pages 4 - 11. 1 Switch off and unplug the MFC from your computer, if you already connected an interface cable. 5 Click MFL-Pro Suite in Main Application..., please open the installer menu again by double-clicking the setup.exe program from the root directory of the Brother CD-ROM, and continue from the root directory of the Brother CD-ROM. Step 2 Installing the Driver & Software For Parallel Interface Cable Users (For Windows® 95/...


