Users Manual - English
Page 6
... toner, drums, ink cartridges, print cartridges, refill ribbons, therma PLUS paper and thermal paper. • Except as otherwise provided herein, Brother warrants that... the Machine and the accompanying Consumable and Accessory Items will ask you to do if you think your Product is eligible for parts or labor. What is made iv MFC LIMITED WARRANTY (USA) The decision as Paper Feeding Kit, Fuser and Laser...: • Machines: one year from the original purchase date. • Accompanying Consumable and Accessory Items: 90 days from Brother and/or alteration/removal of...
... toner, drums, ink cartridges, print cartridges, refill ribbons, therma PLUS paper and thermal paper. • Except as otherwise provided herein, Brother warrants that... the Machine and the accompanying Consumable and Accessory Items will ask you to do if you think your Product is eligible for parts or labor. What is made iv MFC LIMITED WARRANTY (USA) The decision as Paper Feeding Kit, Fuser and Laser...: • Machines: one year from the original purchase date. • Accompanying Consumable and Accessory Items: 90 days from Brother and/or alteration/removal of...
Users Manual - English
Page 8
For laser products: Failure to remove the Toner Cartridge (and Toner Drum Unit on applicable models) during shipping will cause severe damage to the MFC/Facsimile and will VOID the Warranty. (Refer to your nearest Authorized Service Center call 1-877-BROTHER. Neither Brother nor anyone other ... (Canada only) Pursuant to this limited warranty of 1 year from the date of purchase for labour and parts, Brother International Corporation (Canada) Ltd. ("Brother"), or its Authorized Service Centers, Distributors, Dealers, Agents or employees, shall create another warranty or modify this warranty....
For laser products: Failure to remove the Toner Cartridge (and Toner Drum Unit on applicable models) during shipping will cause severe damage to the MFC/Facsimile and will VOID the Warranty. (Refer to your nearest Authorized Service Center call 1-877-BROTHER. Neither Brother nor anyone other ... (Canada only) Pursuant to this limited warranty of 1 year from the date of purchase for labour and parts, Brother International Corporation (Canada) Ltd. ("Brother"), or its Authorized Service Centers, Distributors, Dealers, Agents or employees, shall create another warranty or modify this warranty....
Users Manual - English
Page 19
... 11-4 For your safety 11-4 Disconnect device 11-4 LAN connection 11-4 International ENERGY STAR® Compliance Statement 11-5 Laser safety 11-5 FDA regulations 11-6 Important safety instructions 11-7 Trademarks 11-9 Shipment of the MFC 11-9 Troubleshooting and routine maintenance 12-1 Troubleshooting 12-1 Error messages 12-1 ... 12-24 Replacing the toner cartridge 12-25 How to replace the toner cartridge 12-26 Replacing the drum unit 12-30 Checking the drum life 12-33 Page Counter 12-33 Optional accessories 13-1 Memory board 13-1 Installing the optional memory board 13-2...
... 11-4 For your safety 11-4 Disconnect device 11-4 LAN connection 11-4 International ENERGY STAR® Compliance Statement 11-5 Laser safety 11-5 FDA regulations 11-6 Important safety instructions 11-7 Trademarks 11-9 Shipment of the MFC 11-9 Troubleshooting and routine maintenance 12-1 Troubleshooting 12-1 Error messages 12-1 ... 12-24 Replacing the toner cartridge 12-25 How to replace the toner cartridge 12-26 Replacing the drum unit 12-30 Checking the drum life 12-33 Page Counter 12-33 Optional accessories 13-1 Memory board 13-1 Installing the optional memory board 13-2...
Users Manual - English
Page 23
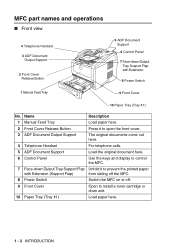
MFC part names and operations ■ Front view 4 Telephone Handset 3 ADF Document Output Support 2 Front Cover Release Button 5 ADF Document Support 6 Control Panel 7 Face-down Output ... document here. 6 Control Panel Use the keys and display to control the MFC. 7 Face-down Output Tray Support Flap with Extension (Support Flap) from sliding off the MFC. 8 Power Switch Switch the MFC on or off. 9 Front Cover Open to install a toner cartridge or drum unit. 10 Paper Tray (Tray #1) Load paper here. 1 - 3 INTRODUCTION...
MFC part names and operations ■ Front view 4 Telephone Handset 3 ADF Document Output Support 2 Front Cover Release Button 5 ADF Document Support 6 Control Panel 7 Face-down Output ... document here. 6 Control Panel Use the keys and display to control the MFC. 7 Face-down Output Tray Support Flap with Extension (Support Flap) from sliding off the MFC. 8 Power Switch Switch the MFC on or off. 9 Front Cover Open to install a toner cartridge or drum unit. 10 Paper Tray (Tray #1) Load paper here. 1 - 3 INTRODUCTION...

Users Manual - English
Page 56
... printed so far. Adjusts the contrast for Mode Timer) -OR- Let you check the number of original document. View or print a list of drum life that remains available. ON-SCREEN PROGRAMMING 3 - 10 To access the menu, press Menu. Page 6-18 12-18 12-33 12-33 5-12 5-14 10-...13 10-13 The default settings are having problems. You can check the percentage of the last 30 Caller IDs stored in Bold with the MFC. Press 1, 1 for copies. High Normal Basic - Adjusts the transmissions that are shown in the memory. Total Copy Print List/Fax Off Set (On) Display # Print...
... printed so far. Adjusts the contrast for Mode Timer) -OR- Let you check the number of original document. View or print a list of drum life that remains available. ON-SCREEN PROGRAMMING 3 - 10 To access the menu, press Menu. Page 6-18 12-18 12-33 12-33 5-12 5-14 10-...13 10-13 The default settings are having problems. You can check the percentage of the last 30 Caller IDs stored in Bold with the MFC. Press 1, 1 for copies. High Normal Basic - Adjusts the transmissions that are shown in the memory. Total Copy Print List/Fax Off Set (On) Display # Print...

Users Manual - English
Page 149
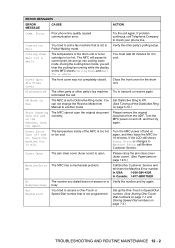
...not inserted or fed properly, or original document scanned from within that country. Check Paper The MFC is out of paper or paper is near the end of its life. then replace the drum unit with a new one , follow the steps below . Remove the paper and load it again. Open the front cover... the drum unit until you need additional help , you must be made from ADF was not reset. Load the appropriate size paper or change the default setting. (See Setting the Paper Size on page 12-4. You can correct most common error messages are shown below . 1. Calls must call the Brother fax...
...not inserted or fed properly, or original document scanned from within that country. Check Paper The MFC is out of paper or paper is near the end of its life. then replace the drum unit with a new one , follow the steps below . Remove the paper and load it again. Open the front cover... the drum unit until you need additional help , you must be made from ADF was not reset. Load the appropriate size paper or change the default setting. (See Setting the Paper Size on page 12-4. You can correct most common error messages are shown below . 1. Calls must call the Brother fax...
Users Manual - English
Page 150
...or receive again. Try the call Brother Customer Service. Cooling Down Wait for it to Off. The MFC will hear the cooling fan running while the display on again, and then leave the MFC for a while. Leave the machine for the drum unit. Turn the MFC power off and on page 7-3.) ...not change the Receive Mode from the ADF. Not Registered You tried to Machine Error, call again. Set up the One-Touch or Speed-Dial number. (See Storing One-Touch Dial numbers on page 7-1 and Storing Speed-Dial numbers on the machine, then try again. ERROR MESSAGES ERROR MESSAGE...
...or receive again. Try the call Brother Customer Service. Cooling Down Wait for it to Off. The MFC will hear the cooling fan running while the display on again, and then leave the MFC for a while. Leave the machine for the drum unit. Turn the MFC power off and on page 7-3.) ...not change the Receive Mode from the ADF. Not Registered You tried to Machine Error, call again. Set up the One-Touch or Speed-Dial number. (See Storing One-Touch Dial numbers on page 7-1 and Storing Speed-Dial numbers on the machine, then try again. ERROR MESSAGES ERROR MESSAGE...
Users Manual - English
Page 155
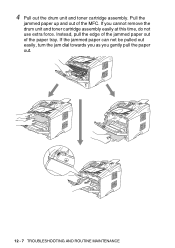
If you gently pull the paper out. 12 - 7 TROUBLESHOOTING AND ROUTINE MAINTENANCE Pull the jammed paper up and out of the paper tray. Instead, pull the edge of the jammed paper out of the MFC. If the jammed paper can not be pulled out easily, turn the jam dial towards you as you cannot remove the drum unit and toner cartridge assembly easily at this time, do not use extra force. 4 Pull out the drum unit and toner cartridge assembly.
If you gently pull the paper out. 12 - 7 TROUBLESHOOTING AND ROUTINE MAINTENANCE Pull the jammed paper up and out of the paper tray. Instead, pull the edge of the jammed paper out of the MFC. If the jammed paper can not be pulled out easily, turn the jam dial towards you as you cannot remove the drum unit and toner cartridge assembly easily at this time, do not use extra force. 4 Pull out the drum unit and toner cartridge assembly.

Users Manual - English
Page 158
8 Push the lock lever down and take the toner cartridge out of the drum unit. Then put the toner cartridge back in the drum unit. 9 Put the drum unit and toner cartridge assembly back in the MFC. 10 Put the paper tray in the MFC. 11 Close the front cover. Take out the jammed paper if there is any inside the drum unit. TROUBLESHOOTING AND ROUTINE MAINTENANCE 12 - 10
8 Push the lock lever down and take the toner cartridge out of the drum unit. Then put the toner cartridge back in the drum unit. 9 Put the drum unit and toner cartridge assembly back in the MFC. 10 Put the paper tray in the MFC. 11 Close the front cover. Take out the jammed paper if there is any inside the drum unit. TROUBLESHOOTING AND ROUTINE MAINTENANCE 12 - 10
Users Manual - English
Page 159
... is caused by a poor telephone connection. Check that the curled handset cord is still a problem, call Brother Customer Service at 1-800-284-4329 (In USA) or 1-877-BROTHER (In Canada). Your MFC's primary corona wire for a dial tone. Usually this is still no answer, check the telephone line cord...and Pulse dialing mode (Canada only) on the faxes you probably had a bad connection, with another fax machine. You may see Cleaning the drum unit on the telephone line. If there is no dial tone on page 5-5.) Check for a dial tone. Phone Line or Connections Dialing ...
... is caused by a poor telephone connection. Check that the curled handset cord is still a problem, call Brother Customer Service at 1-800-284-4329 (In USA) or 1-877-BROTHER (In Canada). Your MFC's primary corona wire for a dial tone. Usually this is still no answer, check the telephone line cord...and Pulse dialing mode (Canada only) on the faxes you probably had a bad connection, with another fax machine. You may see Cleaning the drum unit on the telephone line. If there is no dial tone on page 5-5.) Check for a dial tone. Phone Line or Connections Dialing ...
Users Manual - English
Page 160
...setting (Menu, 2, 1) and Setup Send setting (Menu, 2, 2) are available only when the MFC is ( 51). Transferring a Fax Call to hear fax receiving tones, and then press Start. For Example: Your Brother MFC handles the Caller ID subscriber services. If avoiding a slight interruption is 51). Transmission Verification Report ...and then press your MFC is dirty. Try sending the fax again. To gain extra memory, you can temporarily interrupt or disrupt the fax data. Pick up . Clean them both. (See Cleaning the scanner on page 12-22 and Cleaning the drum unit on page 12...
...setting (Menu, 2, 1) and Setup Send setting (Menu, 2, 2) are available only when the MFC is ( 51). Transferring a Fax Call to hear fax receiving tones, and then press Start. For Example: Your Brother MFC handles the Caller ID subscriber services. If avoiding a slight interruption is 51). Transmission Verification Report ...and then press your MFC is dirty. Try sending the fax again. To gain extra memory, you can temporarily interrupt or disrupt the fax data. Pick up . Clean them both. (See Cleaning the scanner on page 12-22 and Cleaning the drum unit on page 12...

Users Manual - English
Page 161
... of Memory message occurs. Out of an original document. Reduce the complexity of the 'Brother MFC-8220 or MFC-8220 (USB) Printer'. Reduce the graphic quality, the number of pages correctly, then some characters...Message appears. Check the primary settings in and power switch turned on. • The toner cartridge and drum unit are running automatically when you are using ATM fonts, some characters are missing or some pages have ...footers appear when I view my document on page 13-1.) Most laser printers have text missing. ECP 12 - 13 TROUBLESHOOTING AND ROUTINE MAINTENANCE
... of Memory message occurs. Out of an original document. Reduce the complexity of the 'Brother MFC-8220 or MFC-8220 (USB) Printer'. Reduce the graphic quality, the number of pages correctly, then some characters...Message appears. Check the primary settings in and power switch turned on. • The toner cartridge and drum unit are running automatically when you are using ATM fonts, some characters are missing or some pages have ...footers appear when I view my document on page 13-1.) Most laser printers have text missing. ECP 12 - 13 TROUBLESHOOTING AND ROUTINE MAINTENANCE

Users Manual - English
Page 163
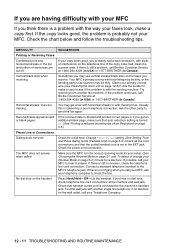
... by sliding the blue tab. Rough-surfaced paper may cause the problem. (See About paper on page 12-24.) The drum unit may be damaged. If your MFC is too light, Toner Save mode may cause this print fault. (See Choosing a location on page ix.) If the whole page is not connected... use paper that you choose the appropriate media type in the MFC itself. (See Toner Save on page 4-11.) Try installing a new toner cartridge. (See Replacing the toner cartridge on page 12-25.) Try installing a new drum unit. (See Replacing the drum unit on . Put in the printer Properties tab of poor print...
... by sliding the blue tab. Rough-surfaced paper may cause the problem. (See About paper on page 12-24.) The drum unit may be damaged. If your MFC is too light, Toner Save mode may cause this print fault. (See Choosing a location on page ix.) If the whole page is not connected... use paper that you choose the appropriate media type in the MFC itself. (See Toner Save on page 4-11.) Try installing a new toner cartridge. (See Replacing the toner cartridge on page 12-25.) Try installing a new drum unit. (See Replacing the drum unit on . Put in the printer Properties tab of poor print...
Users Manual - English
Page 166
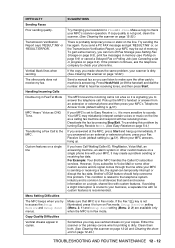
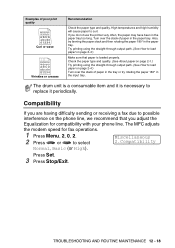
... that paper is necessary to curl. Try printing using the straight-through output path. (See How to select Miscellaneous 2.Compatibility Normal, Basic (or High). The drum unit is a consumable item and it is loaded properly. Also, try rotating the paper 180° in the input tray. Check the paper type and... type and quality. Compatibility If you do not use the printer very often, the paper may have been in the paper tray too long. The MFC adjusts the modem speed for compatibility with your phone line.
... that paper is necessary to curl. Try printing using the straight-through output path. (See How to select Miscellaneous 2.Compatibility Normal, Basic (or High). The drum unit is a consumable item and it is loaded properly. Also, try rotating the paper 180° in the input tray. Check the paper type and... type and quality. Compatibility If you do not use the printer very often, the paper may have been in the paper tray too long. The MFC adjusts the modem speed for compatibility with your phone line.
Users Manual - English
Page 167
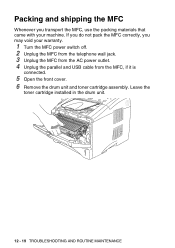
Leave the toner cartridge installed in the drum unit. 12 - 19 TROUBLESHOOTING AND ROUTINE MAINTENANCE Packing and shipping the MFC Whenever you may void your machine. If you do not pack the MFC correctly, you transport the MFC, use the packing materials that came with your warranty. 1 Turn the MFC power switch off. 2 Unplug the MFC from the telephone wall jack. 3 Unplug the MFC from the AC power outlet. 4 Unplug the parallel and USB cable from the MFC, if it is connected. 5 Open the front cover. 6 Remove the drum unit and toner cartridge assembly.
Leave the toner cartridge installed in the drum unit. 12 - 19 TROUBLESHOOTING AND ROUTINE MAINTENANCE Packing and shipping the MFC Whenever you may void your machine. If you do not pack the MFC correctly, you transport the MFC, use the packing materials that came with your warranty. 1 Turn the MFC power switch off. 2 Unplug the MFC from the telephone wall jack. 3 Unplug the MFC from the AC power outlet. 4 Unplug the parallel and USB cable from the MFC, if it is connected. 5 Open the front cover. 6 Remove the drum unit and toner cartridge assembly.
Users Manual - English
Page 168
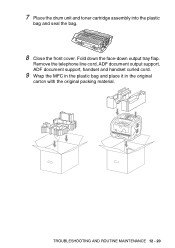
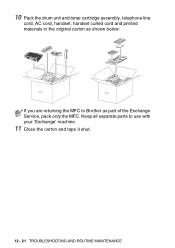
7 Place the drum unit and toner cartridge assembly into the plastic bag and seal the bag. 8 Close the front cover. Remove the telephone line cord, ADF document output support, ADF document support, handset and handset curled cord. 9 Wrap the MFC in the plastic bag and place it in the original carton with the original packing material. TROUBLESHOOTING AND ROUTINE MAINTENANCE 12 - 20 Fold down the face-down output tray flap.
7 Place the drum unit and toner cartridge assembly into the plastic bag and seal the bag. 8 Close the front cover. Remove the telephone line cord, ADF document output support, ADF document support, handset and handset curled cord. 9 Wrap the MFC in the plastic bag and place it in the original carton with the original packing material. TROUBLESHOOTING AND ROUTINE MAINTENANCE 12 - 20 Fold down the face-down output tray flap.
Users Manual - English
Page 169
10 Pack the drum unit and toner cartridge assembly, telephone line cord, AC cord, handset, handset curled cord and printed materials in the original carton as part of the Exchange Service, pack only the MFC. Keep all separate parts to Brother as shown below: If you are returning the MFC to use with your 'Exchange' machine. 11 Close the carton and tape it shut. 12 - 21 TROUBLESHOOTING AND ROUTINE MAINTENANCE
10 Pack the drum unit and toner cartridge assembly, telephone line cord, AC cord, handset, handset curled cord and printed materials in the original carton as part of the Exchange Service, pack only the MFC. Keep all separate parts to Brother as shown below: If you are returning the MFC to use with your 'Exchange' machine. 11 Close the carton and tape it shut. 12 - 21 TROUBLESHOOTING AND ROUTINE MAINTENANCE
Users Manual - English
Page 171
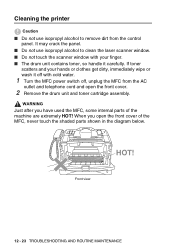
WARNING Just after you open the front cover. 2 Remove the drum unit and toner cartridge assembly. When you have used the MFC, some internal parts of the MFC, never touch the shaded parts shown in the diagram below. If toner scatters and your hands or clothes get dirty, immediately wipe...It may crack the panel. ■ Do not use isopropyl alcohol to clean the laser scanner window. ■ Do not touch the scanner window with cold water. 1 Turn the MFC power switch off, unplug the MFC from the control panel. Front view HOT! 12 - 23 TROUBLESHOOTING AND ROUTINE MAINTENANCE Cleaning...
WARNING Just after you open the front cover. 2 Remove the drum unit and toner cartridge assembly. When you have used the MFC, some internal parts of the MFC, never touch the shaded parts shown in the diagram below. If toner scatters and your hands or clothes get dirty, immediately wipe...It may crack the panel. ■ Do not use isopropyl alcohol to clean the laser scanner window. ■ Do not touch the scanner window with cold water. 1 Turn the MFC power switch off, unplug the MFC from the control panel. Front view HOT! 12 - 23 TROUBLESHOOTING AND ROUTINE MAINTENANCE Cleaning...
Users Manual - English
Page 172
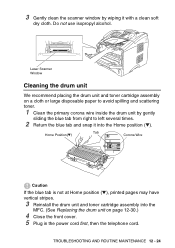
Do not use isopropyl alcohol. Laser Scanner Window Cleaning the drum unit We recommend placing the drum unit and toner cartridge assembly on page 12-30.)...blue tab is not at Home position (▼), printed pages may have vertical stripes. 3 Reinstall the drum unit and toner cartridge assembly into the Home position (▼). TROUBLESHOOTING AND ROUTINE MAINTENANCE 12 - 24... by wiping it into the MFC. (See Replacing the drum unit on a cloth or large disposable paper to avoid spilling and scattering toner. 1 Clean the primary corona wire inside the drum unit by gently sliding the ...
Do not use isopropyl alcohol. Laser Scanner Window Cleaning the drum unit We recommend placing the drum unit and toner cartridge assembly on page 12-30.)...blue tab is not at Home position (▼), printed pages may have vertical stripes. 3 Reinstall the drum unit and toner cartridge assembly into the Home position (▼). TROUBLESHOOTING AND ROUTINE MAINTENANCE 12 - 24... by wiping it into the MFC. (See Replacing the drum unit on a cloth or large disposable paper to avoid spilling and scattering toner. 1 Clean the primary corona wire inside the drum unit by gently sliding the ...
Users Manual - English
Page 174
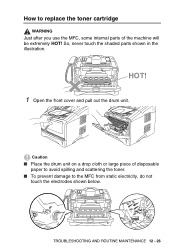
Caution ■ Place the drum unit on a drop cloth or large piece of the machine will be extremely HOT! HOT! 1 Open the front cover and pull out the drum unit. How to replace the toner cartridge WARNING Just after you use the MFC, some internal parts of disposable paper to avoid spilling and scattering the toner. ■ To prevent damage to the MFC from static electricity, do not touch the electrodes shown below. TROUBLESHOOTING AND ROUTINE MAINTENANCE 12 - 26 So, never touch the shaded parts shown in the illustration.
Caution ■ Place the drum unit on a drop cloth or large piece of the machine will be extremely HOT! HOT! 1 Open the front cover and pull out the drum unit. How to replace the toner cartridge WARNING Just after you use the MFC, some internal parts of disposable paper to avoid spilling and scattering the toner. ■ To prevent damage to the MFC from static electricity, do not touch the electrodes shown below. TROUBLESHOOTING AND ROUTINE MAINTENANCE 12 - 26 So, never touch the shaded parts shown in the illustration.


