Users Manual - English and Spanish
Page 1
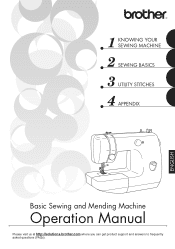
ENGLISH KNOWING YOUR SEWING MACHINE SEWING BASICS UTILITY STITCHES APPENDIX Basic Sewing and Mending Machine Operation Manual Please visit us at http://solutions.brother.com where you can get product support and answers to frequently asked questions (FAQs).
ENGLISH KNOWING YOUR SEWING MACHINE SEWING BASICS UTILITY STITCHES APPENDIX Basic Sewing and Mending Machine Operation Manual Please visit us at http://solutions.brother.com where you can get product support and answers to frequently asked questions (FAQs).
Users Manual - English and Spanish
Page 2
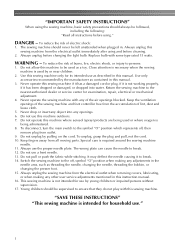
...pull or push the fabric while stitching. It may deflect the needle causing it to persons: 1. Always unplug the sewing machine from outlet. 9. Always unplug this sewing machine only for use as described in the needle area, such as threading the needle, changing the needle, threading the bobbin... safety precautions should always be used by young children or impaired persons without supervision. 17. Never operate this sewing machine. Never operate the sewing machine with this sewing machine if it has a damaged cord or plug, if it has been dropped or damaged, or dropped into any of...
...pull or push the fabric while stitching. It may deflect the needle causing it to persons: 1. Always unplug the sewing machine from outlet. 9. Always unplug this sewing machine only for use as described in the needle area, such as threading the needle, changing the needle, threading the bobbin... safety precautions should always be used by young children or impaired persons without supervision. 17. Never operate this sewing machine. Never operate the sewing machine with this sewing machine if it has a damaged cord or plug, if it has been dropped or damaged, or dropped into any of...
Users Manual - English and Spanish
Page 3
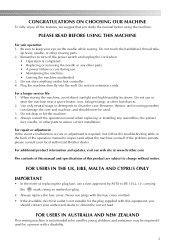
...ASTA to BS 1362, i.e. Do not use • Maintaining the machine • Leaving the machine unattended 3. Use only neutral soaps or detergents to clean the case. FOR USERS IN AUSTRALIA AND NEW ZEALAND This sewing machine is completed • Replacing or removing the needle or any assemblies... to assure correct installation. For additional product information and updates, visit our web site at www.brother.com The contents of this manual and specifications of this machine, avoid direct sunlight and high humidity locations. Benzene, thinner, and scouring powders can damage the ...
...ASTA to BS 1362, i.e. Do not use • Maintaining the machine • Leaving the machine unattended 3. Use only neutral soaps or detergents to clean the case. FOR USERS IN AUSTRALIA AND NEW ZEALAND This sewing machine is completed • Replacing or removing the needle or any assemblies... to assure correct installation. For additional product information and updates, visit our web site at www.brother.com The contents of this manual and specifications of this machine, avoid direct sunlight and high humidity locations. Benzene, thinner, and scouring powders can damage the ...
Users Manual - English and Spanish
Page 4
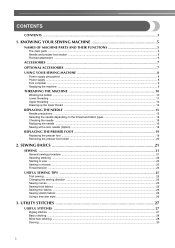
...27 Zigzag stitches ...27 Basic stitching ...28 Blind hem stitching ...28 Darning ...30 3 KNOWING YOUR SEWING MACHINE 5 NAMES OF MACHINE PARTS AND THEIR FUNCTIONS 5 The main parts ...5 Needle and presser foot section ...6 Flat bed attachment ...6 ACCESSORIES ...7 OPTIONAL ...ACCESSORIES 7 USING YOUR SEWING MACHINE 8 Power supply precautions ...8 Power supply ...8 Foot controller ...9 Steadying the machine ...9 THREADING THE MACHINE 10 Winding the bobbin ...10 Lower threading ...11 Upper threading ...13 Drawing up...
...27 Zigzag stitches ...27 Basic stitching ...28 Blind hem stitching ...28 Darning ...30 3 KNOWING YOUR SEWING MACHINE 5 NAMES OF MACHINE PARTS AND THEIR FUNCTIONS 5 The main parts ...5 Needle and presser foot section ...6 Flat bed attachment ...6 ACCESSORIES ...7 OPTIONAL ...ACCESSORIES 7 USING YOUR SEWING MACHINE 8 Power supply precautions ...8 Power supply ...8 Foot controller ...9 Steadying the machine ...9 THREADING THE MACHINE 10 Winding the bobbin ...10 Lower threading ...11 Upper threading ...13 Drawing up...
Users Manual - English and Spanish
Page 6
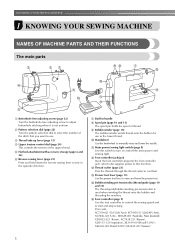
... is used when winding the thread onto the bobbin and threading the machine. KNOWING YOUR SEWING MACHINE 1 KNOWING YOUR SEWING MACHINE NAMES OF MACHINE PARTS AND THEIR FUNCTIONS The main parts a Buttonhole fine-adjusting screw (page 32) Turn the buttonhole fine-adjusting screw to sew in handle h Spool pin (page 10 and 13) The spool pin holds...
... is used when winding the thread onto the bobbin and threading the machine. KNOWING YOUR SEWING MACHINE 1 KNOWING YOUR SEWING MACHINE NAMES OF MACHINE PARTS AND THEIR FUNCTIONS The main parts a Buttonhole fine-adjusting screw (page 32) Turn the buttonhole fine-adjusting screw to sew in handle h Spool pin (page 10 and 13) The spool pin holds...
Users Manual - English and Spanish
Page 8
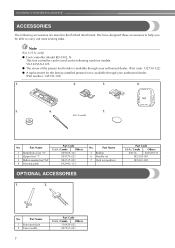
We have designed these accessories to carry out most sewing tasks. only) ● Foot controller: Model KD-1902, N This foot controller can be able to help you be used on the following accessories are stored ... "M" 4 Darning plate Part Code U.S.A. / Canada Others X59369-321 X59370-021 XE2137-001 XA3442-121 No. KNOWING YOUR SEWING MACHINE ACCESSORIES The following machine models: VX-1435/LX-3125. ● The screw of the presser foot holder is available through your authorized dealer. (Part code: 132730-122) ● A replacement for the factory-installed presser ...
We have designed these accessories to carry out most sewing tasks. only) ● Foot controller: Model KD-1902, N This foot controller can be able to help you be used on the following accessories are stored ... "M" 4 Darning plate Part Code U.S.A. / Canada Others X59369-321 X59370-021 XE2137-001 XA3442-121 No. KNOWING YOUR SEWING MACHINE ACCESSORIES The following machine models: VX-1435/LX-3125. ● The screw of the presser foot holder is available through your authorized dealer. (Part code: 132730-122) ● A replacement for the factory-installed presser ...
Users Manual - English and Spanish
Page 9
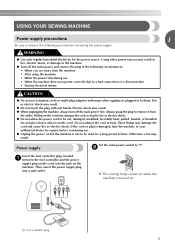
...or plug is damaged, take the machine to your authorized dealer for repairs before continuing use extension cords or multi-plug adapters with wet hands. Otherwise a fire may damage the cord and cause fire or electric shock. USING YOUR SEWING MACHINE Power supply precautions 1 Be sure ...to be cut, damaged, modified, forcefully bent, pulled, twisted, or bundled. X The sewing lamp comes on when the machine is not to observe the following circumstances: • When you ...
...or plug is damaged, take the machine to your authorized dealer for repairs before continuing use extension cords or multi-plug adapters with wet hands. Otherwise a fire may damage the cord and cause fire or electric shock. USING YOUR SEWING MACHINE Power supply precautions 1 Be sure ...to be cut, damaged, modified, forcefully bent, pulled, twisted, or bundled. X The sewing lamp comes on when the machine is not to observe the following circumstances: • When you ...
Users Manual - English and Spanish
Page 10
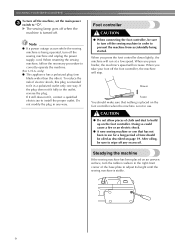
...still does not fit, contact a qualified electrician to correctly operate the machine. (For U.S.A. Doing so could cause a fire or an electric shock. ● A new sewing machine or one blade wider than the other). When restarting the sewing machine, follow the necessary procedure to install the proper outlet. Slower Faster...sure to "{". If the plug does not fit fully in any excess oil. When you press harder, the machine's speed will stop. Steadying the machine If the sewing machine has been placed on the foot controller. CAUTION ● Do not allow pieces of the base plate to ...
...still does not fit, contact a qualified electrician to correctly operate the machine. (For U.S.A. Doing so could cause a fire or an electric shock. ● A new sewing machine or one blade wider than the other). When restarting the sewing machine, follow the necessary procedure to install the proper outlet. Slower Faster...sure to "{". If the plug does not fit fully in any excess oil. When you press harder, the machine's speed will stop. Steadying the machine If the sewing machine has been placed on the foot controller. CAUTION ● Do not allow pieces of the base plate to ...
Users Manual - English and Spanish
Page 11
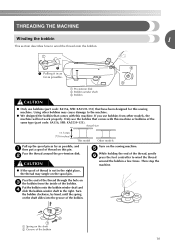
...the same type (part code: SA156, SFB: XA5539-151). a Spring on c the bobbin from other bobbins may tangle on the sewing machine. Using other models, the machine will not work properly. a Pre-tension disk b Bobbin winder shaft c Bobbin CAUTION ● Only use the bobbin that comes with...far as possible. e While holding the end of the thread, gently f press the foot controller to the machine. ● We designed the bobbin that comes with this machine or bobbins of the bobbin 10 Turn the bobbin clockwise, by hand, until the spring on this sewing machine.
...the same type (part code: SA156, SFB: XA5539-151). a Spring on c the bobbin from other bobbins may tangle on the sewing machine. Using other models, the machine will not work properly. a Pre-tension disk b Bobbin winder shaft c Bobbin CAUTION ● Only use the bobbin that comes with...far as possible. e While holding the end of the thread, gently f press the foot controller to the machine. ● We designed the bobbin that comes with this machine or bobbins of the bobbin 10 Turn the bobbin clockwise, by hand, until the spring on this sewing machine.

Users Manual - English and Spanish
Page 12
...sure you slide the bobbin winding shaft to loosen, breaking the needle and resulting in injury. this sewing machine. CAUTION ● Winding the bobbin improperly may tangle around the bobbin, the machine will not operate correctly. CAUTION ● Make sure you could be injured. If bobbins from other... bobbin or bobbins of the same type (part code: SA156, SFB: XA5539-151). KNOWING YOUR SEWING MACHINE Trim the excess thread above the bobbin. Memo ● When the sewing machine is started or the handwheel is wound, when the thread runs low it may cause the thread tension...
...sure you slide the bobbin winding shaft to loosen, breaking the needle and resulting in injury. this sewing machine. CAUTION ● Winding the bobbin improperly may tangle around the bobbin, the machine will not operate correctly. CAUTION ● Make sure you could be injured. If bobbins from other... bobbin or bobbins of the same type (part code: SA156, SFB: XA5539-151). KNOWING YOUR SEWING MACHINE Trim the excess thread above the bobbin. Memo ● When the sewing machine is started or the handwheel is wound, when the thread runs low it may cause the thread tension...
Users Manual - English and Spanish
Page 14
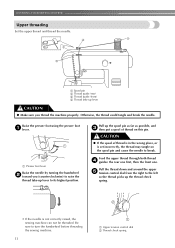
.... Feed the upper thread through both thread d guides: the rear one first, then the front one. Be sure to its highest position. KNOWING YOUR SEWING MACHINE Upper threading Set the upper thread and thread the needle. a Spool pin b Thread guide (rear) c Thread guide (front) d Thread take -up... lever CAUTION ● Make sure you (counterclockwise) to raise the thread take -up lever to turn the handwheel before threading the sewing machine. 13 a Upper tension control dial b Thread check spring CAUTION ● If the spool of thread on this pin. a Presser foot lever ...
.... Feed the upper thread through both thread d guides: the rear one first, then the front one. Be sure to its highest position. KNOWING YOUR SEWING MACHINE Upper threading Set the upper thread and thread the needle. a Spool pin b Thread guide (rear) c Thread guide (front) d Thread take -up... lever CAUTION ● Make sure you (counterclockwise) to raise the thread take -up lever to turn the handwheel before threading the sewing machine. 13 a Upper tension control dial b Thread check spring CAUTION ● If the spool of thread on this pin. a Presser foot lever ...
Users Manual - English and Spanish
Page 16
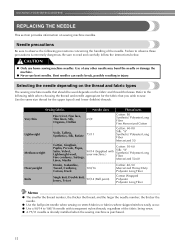
...to the following precautions concerning the handling of the fabric being sewn. ● A 75/11 needle is already installed when the sewing machine is extremely dangerous. Sewing fabrics Needle sizes Thread sizes Very thin Fine tricot, Fine lace, Thin linen, Silk, 65/9 Organza, Chiffon Cotton: 80 ... ● The smaller the thread number, the thicker the thread; KNOWING YOUR SEWING MACHINE REPLACING THE NEEDLE This section provides information on the thread and fabric types The sewing machine needle that you wish to observe the following table when choosing the thread and ...
...to the following precautions concerning the handling of the fabric being sewn. ● A 75/11 needle is already installed when the sewing machine is extremely dangerous. Sewing fabrics Needle sizes Thread sizes Very thin Fine tricot, Fine lace, Thin linen, Silk, 65/9 Organza, Chiffon Cotton: 80 ... ● The smaller the thread number, the thicker the thread; KNOWING YOUR SEWING MACHINE REPLACING THE NEEDLE This section provides information on the thread and fabric types The sewing machine needle that you wish to observe the following table when choosing the thread and ...
Users Manual - English and Spanish
Page 17
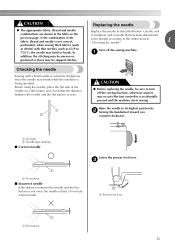
... foot lever 1 a Flat surface 16 In addition, the stitching may be uneven or puckered or there may break while the machine is not correct, particularly when sewing thick fabrics (such as described below. Before using the needle, place the flat side of the fabric, thread and needle is... being operated. a CAUTION ● Before replacing the needle, be sure to turn off the sewing machine. a Flat side b Needle type marking ■ Correct needle 1 a Flat surface ■ Incorrect needle If the distance between the needle and ...
... foot lever 1 a Flat surface 16 In addition, the stitching may be uneven or puckered or there may break while the machine is not correct, particularly when sewing thick fabrics (such as described below. Before using the needle, place the flat side of the fabric, thread and needle is... being operated. a CAUTION ● Before replacing the needle, be sure to turn off the sewing machine. a Flat side b Needle type marking ■ Correct needle 1 a Flat surface ■ Incorrect needle If the distance between the needle and ...
Users Manual - English and Spanish
Page 18
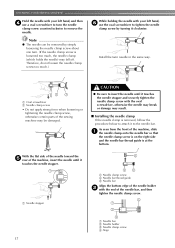
...9679; Be sure to insert the needle until it touches the needle stopper. With the flat side of the needle toward the e rear of the sewing machine may result. ■ Installing the needle clamp If the needle clamp is removed, follow the procedure below to attach it to the needle bar. Note...(which holds the needle) may fall off. As seen from the front of the needle bar, and then tighten the needle clamp screw. KNOWING YOUR SEWING MACHINE Hold the needle with your left hand, and then d use the oval screwdriver to tighten the needle clamp screw by simply loosening the needle clamp...
...9679; Be sure to insert the needle until it touches the needle stopper. With the flat side of the needle toward the e rear of the sewing machine may result. ■ Installing the needle clamp If the needle clamp is removed, follow the procedure below to attach it to the needle bar. Note...(which holds the needle) may fall off. As seen from the front of the needle bar, and then tighten the needle clamp screw. KNOWING YOUR SEWING MACHINE Hold the needle with your left hand, and then d use the oval screwdriver to tighten the needle clamp screw by simply loosening the needle clamp...
Users Manual - English and Spanish
Page 20
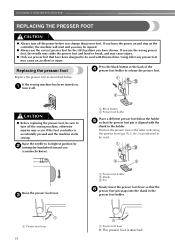
...and bend or break, and may cause an accident or injury. CAUTION ● Before replacing the presser foot, be sure to turn off the sewing machine, otherwise injuries may be injured. ● Always use presser feet that the f presser foot pin snaps into the shank in the holder. ... read. Replace the presser foot as described below the holder e so that the presser foot pin is accidentally pressed and the machine starts sewing. KNOWING YOUR SEWING MACHINE REPLACING THE PRESSER FOOT CAUTION ● Always turn off . Replacing the presser foot Press the black button at the back of...
...and bend or break, and may cause an accident or injury. CAUTION ● Before replacing the presser foot, be sure to turn off the sewing machine, otherwise injuries may be injured. ● Always use presser feet that the f presser foot pin snaps into the shank in the holder. ... read. Replace the presser foot as described below the holder e so that the presser foot pin is accidentally pressed and the machine starts sewing. KNOWING YOUR SEWING MACHINE REPLACING THE PRESSER FOOT CAUTION ● Always turn off . Replacing the presser foot Press the black button at the back of...
Users Manual - English and Spanish
Page 21
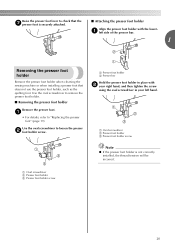
... loosen the presser b foot holder screw. a left side of the presser bar. 1 Removing the presser foot holder Remove the presser foot holder when cleaning the sewing machine or when installing a presser foot that the g presser foot is not correctly installed, the thread tension will be incorrect. Raise the presser foot lever to...
... loosen the presser b foot holder screw. a left side of the presser bar. 1 Removing the presser foot holder Remove the presser foot holder when cleaning the sewing machine or when installing a presser foot that the g presser foot is not correctly installed, the thread tension will be incorrect. Raise the presser foot lever to...
Users Manual - English and Spanish
Page 22
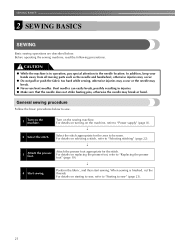
... refer to "Replacing the presser foot" (page 19). ↓ 4 Start sewing. CAUTION ● While the machine is finished, cut the threads. For details on the sewing machine. In addition, keep your hands away from all moving parts such as the ... 3 Attach the presser foot. Before operating the sewing machine, read the following precautions. For details on turning on the machine. Select the stitch appropriate for the stitch. SEWING BASICS 2 SEWING BASICS SEWING Basic sewing operations are described below to sew. 1 Turn on the machine, refer to "Power supply" (page 8). &#...
... refer to "Replacing the presser foot" (page 19). ↓ 4 Start sewing. CAUTION ● While the machine is finished, cut the threads. For details on the sewing machine. In addition, keep your hands away from all moving parts such as the ... 3 Attach the presser foot. Before operating the sewing machine, read the following precautions. For details on turning on the machine. Select the stitch appropriate for the stitch. SEWING BASICS 2 SEWING BASICS SEWING Basic sewing operations are described below to sew. 1 Turn on the machine, refer to "Power supply" (page 8). &#...
Users Manual - English and Spanish
Page 24
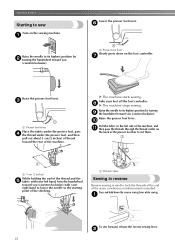
...and then pull out about 5 cm (2 inches) of thread toward you (counterclockwise). Press and hold down on the foot controller. h X The machine stops sewing. j Pull the fabric to its highest position by b turning the handwheel toward you (counterclockwise). f Turn on the back of the stitching. a ... the needle to the left hand, turn the handwheel toward you (counterclockwise) with your left side of the machine, and k then pass the threads through the thread cutter on the sewing machine. a 5 cm (2 inches) While holding the end of the thread and the e fabric with your foot...
...and then pull out about 5 cm (2 inches) of thread toward you (counterclockwise). Press and hold down on the foot controller. h X The machine stops sewing. j Pull the fabric to its highest position by b turning the handwheel toward you (counterclockwise). f Turn on the back of the stitching. a ... the needle to the left hand, turn the handwheel toward you (counterclockwise) with your left side of the machine, and k then pass the threads through the thread cutter on the sewing machine. a 5 cm (2 inches) While holding the end of the thread and the e fabric with your foot...

Users Manual - English and Spanish
Page 26
... the needle was raised, lower the needle by turning the handwheel toward you (counterclockwise). Changing the sewing direction When the stitching reaches a corner, stop the a sewing machine. Leave the needle lowered (in order to its highest position. Sewing thick fabrics ■ If the fabric does not fit under the presser foot If the fabric...
... the needle was raised, lower the needle by turning the handwheel toward you (counterclockwise). Changing the sewing direction When the stitching reaches a corner, stop the a sewing machine. Leave the needle lowered (in order to its highest position. Sewing thick fabrics ■ If the fabric does not fit under the presser foot If the fabric...

Users Manual - English and Spanish
Page 34
... a button between holes 1.6 mm (1/16 inches) 3.2 mm (1/8 inches) 4.8 mm (3/16 inches) Number of the fabric, and then tie it with the sewing machine. Then, slide the button so that the needle correctly goes into the two holes toward you . Measure the distance between the holes in the same... two holes closest to you e (counterclockwise) to the wrong side of dial 2 3 4 Attach the button sewing foot "M". Turn the handwheel toward the rear of the sewing machine, and then sew them in the a button to cut the upper and lower threads, leaving a length of the button. Pull the fabric ...
... a button between holes 1.6 mm (1/16 inches) 3.2 mm (1/8 inches) 4.8 mm (3/16 inches) Number of the fabric, and then tie it with the sewing machine. Then, slide the button so that the needle correctly goes into the two holes toward you . Measure the distance between the holes in the same... two holes closest to you e (counterclockwise) to the wrong side of dial 2 3 4 Attach the button sewing foot "M". Turn the handwheel toward the rear of the sewing machine, and then sew them in the a button to cut the upper and lower threads, leaving a length of the button. Pull the fabric ...


