Users Manual - English and Spanish
Page 2
... INSTRUCTIONS" When using the sewing machine, basic safety precautions should always be supervised to ensure that they do not play with this sewing machine. The sewing machine should never be used as threading the needle, changing the needle, threading the bobbin, or changing the presser foot.... 15. Always unplug this machine outdoors. 7. WARNING - Do not allow this sewing machine if it has a damaged ...
... INSTRUCTIONS" When using the sewing machine, basic safety precautions should always be supervised to ensure that they do not play with this sewing machine. The sewing machine should never be used as threading the needle, changing the needle, threading the bobbin, or changing the presser foot.... 15. Always unplug this machine outdoors. 7. WARNING - Do not allow this sewing machine if it has a damaged ...
Users Manual - English and Spanish
Page 4
... ...5 Needle and presser foot section ...6 Flat bed attachment ...6 ACCESSORIES ...7 OPTIONAL ACCESSORIES 7 USING YOUR SEWING MACHINE 8 Power supply precautions ...8 Power supply ...8 Foot controller ...9 Steadying the machine ...9 THREADING THE MACHINE 10 Winding the bobbin ...10 Lower threading ...11 Upper threading ...13 Drawing up the lower thread ...14 REPLACING THE NEEDLE 15 Needle precautions ...15 Selecting the needle depending on the...
... ...5 Needle and presser foot section ...6 Flat bed attachment ...6 ACCESSORIES ...7 OPTIONAL ACCESSORIES 7 USING YOUR SEWING MACHINE 8 Power supply precautions ...8 Power supply ...8 Foot controller ...9 Steadying the machine ...9 THREADING THE MACHINE 10 Winding the bobbin ...10 Lower threading ...11 Upper threading ...13 Drawing up the lower thread ...14 REPLACING THE NEEDLE 15 Needle precautions ...15 Selecting the needle depending on the...
Users Manual - English and Spanish
Page 6
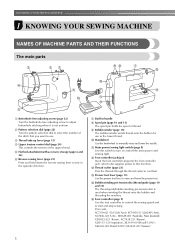
... a Buttonhole fine-adjusting screw (page 32) Turn the buttonhole fine-adjusting screw to adjust buttonhole stitching when it is used when winding the thread onto the bobbin and threading the machine. n Presser foot lever (page 13) Use the presser foot lever to start and stop sewing. b Pattern selection dial (page 22) Turn the pattern...
... a Buttonhole fine-adjusting screw (page 32) Turn the buttonhole fine-adjusting screw to adjust buttonhole stitching when it is used when winding the thread onto the bobbin and threading the machine. n Presser foot lever (page 13) Use the presser foot lever to start and stop sewing. b Pattern selection dial (page 22) Turn the pattern...
Users Manual - English and Spanish
Page 11
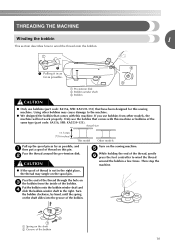
... use the bobbin that comes with this machine. Put the bobbin onto the bobbin winder shaft and d slide the bobbin winder shaft to wind the thread around the pre-tension disk. Pass the thread around the bobbin a few times. e While holding the end of the thread, gently f press the foot controller to the right. THREADING THE MACHINE Winding the bobbin 1 This section...
... use the bobbin that comes with this machine. Put the bobbin onto the bobbin winder shaft and d slide the bobbin winder shaft to wind the thread around the pre-tension disk. Pass the thread around the bobbin a few times. e While holding the end of the thread, gently f press the foot controller to the right. THREADING THE MACHINE Winding the bobbin 1 This section...

Users Manual - English and Spanish
Page 12
... or the handwheel is not a malfunction. ● The needle bar does not move when you follow the instructions carefully. this sewing machine. CAUTION ● Winding the bobbin improperly may cause the thread tension to its highest position by turning a the handwheel toward you turn the power off the foot controller. Use only the...
... or the handwheel is not a malfunction. ● The needle bar does not move when you follow the instructions carefully. this sewing machine. CAUTION ● Winding the bobbin improperly may cause the thread tension to its highest position by turning a the handwheel toward you turn the power off the foot controller. Use only the...
Users Manual - English and Spanish
Page 13
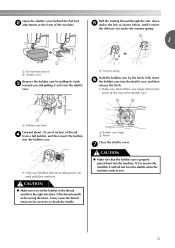
.... 12 If it out from the shuttle when the machine starts to be incorrect or break the needle. If the thread unrolls in the right direction. Open the shuttle cover behind the flat bed b attachment at the top of the machine. a Bobbin case finger b Notch Close the shuttle cover. a ...Tension spring Hold the bobbin case by pulling its latch c toward you set the bobbin so the thread unrolls in the wrong direction, it may cause the thread tension to the left, as shown below, ...
.... 12 If it out from the shuttle when the machine starts to be incorrect or break the needle. If the thread unrolls in the right direction. Open the shuttle cover behind the flat bed b attachment at the top of the machine. a Bobbin case finger b Notch Close the shuttle cover. a ...Tension spring Hold the bobbin case by pulling its latch c toward you set the bobbin so the thread unrolls in the wrong direction, it may cause the thread tension to the left, as shown below, ...
Users Manual - English and Spanish
Page 16
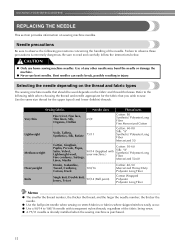
... the fabric that should be used depends on the thread and fabric types The sewing machine needle that you wish to observe the following table when choosing the thread and needle appropriate for the upper (spool) and lower (bobbin) threads. CAUTION ● Only use bent needles. Use of ...the needle. and the larger the needle number, the thicker the needle. ● Use the ball point needle when sewing on sewing machine needles. Refer to the following precautions concerning...
... the fabric that should be used depends on the thread and fabric types The sewing machine needle that you wish to observe the following table when choosing the thread and needle appropriate for the upper (spool) and lower (bobbin) threads. CAUTION ● Only use bent needles. Use of ...the needle. and the larger the needle number, the thicker the needle. ● Use the ball point needle when sewing on sewing machine needles. Refer to the following precautions concerning...

Users Manual - English and Spanish
Page 25
... dial to a lower number. 2 3 5 4 a Wrong side b Surface c Upper thread d Lower thread e Loops appear on the surface of fabric before the next time that the machine is used. Be sure not to a higher number. ■ Bobbin tension is too loose Loops may appear on a scrap of the fabric. Note ● ...The bobbin thread tension has been adjusted at the factory for general use. Solution...
... dial to a lower number. 2 3 5 4 a Wrong side b Surface c Upper thread d Lower thread e Loops appear on the surface of fabric before the next time that the machine is used. Be sure not to a higher number. ■ Bobbin tension is too loose Loops may appear on a scrap of the fabric. Note ● ...The bobbin thread tension has been adjusted at the factory for general use. Solution...

Users Manual - English and Spanish
Page 34
...dial 2 3 4 Attach the button sewing foot "M". Use scissors to cut the upper thread and the bobbin thread at the end of the h stitching to the left side of the machine, g and then cut the upper and lower threads, leaving a length of the button. Measure the distance between holes 1.6 mm (1/16 inches...) 3.2 mm (1/8 inches) 4.8 mm (3/16 inches) Number of the fabric, and then tie it with the sewing machine. b Place the darning plate on with the bobbin thread. f • After sewing for about 10 seconds at a low speed, press and hold down the reverse sewing lever to step a....
...dial 2 3 4 Attach the button sewing foot "M". Use scissors to cut the upper thread and the bobbin thread at the end of the h stitching to the left side of the machine, g and then cut the upper and lower threads, leaving a length of the button. Measure the distance between holes 1.6 mm (1/16 inches...) 3.2 mm (1/8 inches) 4.8 mm (3/16 inches) Number of the fabric, and then tie it with the sewing machine. b Place the darning plate on with the bobbin thread. f • After sewing for about 10 seconds at a low speed, press and hold down the reverse sewing lever to step a....

Users Manual - English and Spanish
Page 38
Pull the bobbin threads to "Selecting stitching" (page 22). a Select the shell tuck stitch (13), and increase b the thread tension. • For details, refer to create gathers. Unfold the fabric, and then iron the tucks d down to "Thread tension" (page 24). Loosen the tension of ...shell tucks". Fold the fabric along the bias. UTILITY STITCHES DECORATIVE STITCHING Various decorative stitches can be sewn with this sewing machine. Gathering Shell tuck stitching Number on dial Stitch name Application 13 Shell tuck stitch Shell tuck stitching The gathers that the ...
Pull the bobbin threads to "Selecting stitching" (page 22). a Select the shell tuck stitch (13), and increase b the thread tension. • For details, refer to create gathers. Unfold the fabric, and then iron the tucks d down to "Thread tension" (page 24). Loosen the tension of ...shell tucks". Fold the fabric along the bias. UTILITY STITCHES DECORATIVE STITCHING Various decorative stitches can be sewn with this sewing machine. Gathering Shell tuck stitching Number on dial Stitch name Application 13 Shell tuck stitch Shell tuck stitching The gathers that the ...

Users Manual - English and Spanish
Page 42
... screwdriver. Otherwise, you clean it. Remove the needle plate by using the machine. a Raise the needle and the presser foot, and b then remove the presser foot and the needle. Use a brush to remove any accumulated lint g and thread from the upper e part of the free arm. Remove the flat bed ...attachment and open the c shuttle cover at the front of the feed dogs and shuttle race body. Attach the bobbin case, the presser foot and k the needle before you...
... screwdriver. Otherwise, you clean it. Remove the needle plate by using the machine. a Raise the needle and the presser foot, and b then remove the presser foot and the needle. Use a brush to remove any accumulated lint g and thread from the upper e part of the free arm. Remove the flat bed ...attachment and open the c shuttle cover at the front of the feed dogs and shuttle race body. Attach the bobbin case, the presser foot and k the needle before you...
Users Manual - English and Spanish
Page 44
... inserted the needle properly. Lightly guide the fabric. There are using is not Attach the presser foot that for example, in the thread. Use the oval screwdriver to the the right. The area around the hole in the presser foot is tangled, for the type ... stitch that is scratched. Turn on the main power switch. The bobbin winder shaft is scratched. Insert the needle properly. Replace the needle. appropriate for this machine. The presser foot you need additional help, the Brother Solutions Center offers the latest FAQs and troubleshooting tips. sew. The...
... inserted the needle properly. Lightly guide the fabric. There are using is not Attach the presser foot that for example, in the thread. Use the oval screwdriver to the the right. The area around the hole in the presser foot is tangled, for the type ... stitch that is scratched. Turn on the main power switch. The bobbin winder shaft is scratched. Insert the needle properly. Replace the needle. appropriate for this machine. The presser foot you need additional help, the Brother Solutions Center offers the latest FAQs and troubleshooting tips. sew. The...

Users Manual - English and Spanish
Page 45
... upper thread. Correctly install the bobbin thread. page 10 You have not threaded the upper thread properly. Replace the bobbin. - 4 The lower thread is tangled The thread is set incorrectly. Reset the bobbin thread correctly. You have not used a bobbin that has been designed for this machine. Only use a bobbin that has been designed for this machine. The bobbin case is scratched. page 10 Bobbin is...
... upper thread. Correctly install the bobbin thread. page 10 You have not threaded the upper thread properly. Replace the bobbin. - 4 The lower thread is tangled The thread is set incorrectly. Reset the bobbin thread correctly. You have not used a bobbin that has been designed for this machine. Only use a bobbin that has been designed for this machine. The bobbin case is scratched. page 10 Bobbin is...

Users Manual - English and Spanish
Page 46
...right combination of fabric. The presser foot that are using is correct for this machine. You have not used bobbin that has been designed for the type of fabric, thread and needle. The thread is bent or blunt. The sewing lamp is tangled in the shuttle race.... Correct the upper threading. Correct the upper threading. Replace the bobbin case. Incorrect bobbins will not work properly. Choose a thread and needle that you are appropriate for this machine. If the thread is damaged. The sewing light bulb does not come on. ...
...right combination of fabric. The presser foot that are using is correct for this machine. You have not used bobbin that has been designed for the type of fabric, thread and needle. The thread is bent or blunt. The sewing lamp is tangled in the shuttle race.... Correct the upper threading. Correct the upper threading. Replace the bobbin case. Incorrect bobbins will not work properly. Choose a thread and needle that you are appropriate for this machine. If the thread is damaged. The sewing light bulb does not come on. ...

Users Manual - English and Spanish
Page 47
... 13 pre-tension disk 10 R relative chart of sewing fabrics, needles and threads .....15 reverse sewing lever 23 S satin stitching 27 seam ripper 32 sewing machine needles 15 shell tuck stitching 37 shuttle hook removal 41 sshpouottllepriance..c..l.e..a..n..i.n..g 1..0..,.. 41 13...fabrics 26 T thick fabrics 25 thin fabrics 26 thread cutter 23 thread guide 13 thread tension 24 trial sewing 25 ttwroiunbnleesehdoleoti.n..g...1..7..,.. 43 18 U upper tension-control dial 24, 42 upper threading 13 W winding the bobbin 10 Z zigzag stitches 25, 27, 35 ...
... 13 pre-tension disk 10 R relative chart of sewing fabrics, needles and threads .....15 reverse sewing lever 23 S satin stitching 27 seam ripper 32 sewing machine needles 15 shell tuck stitching 37 shuttle hook removal 41 sshpouottllepriance..c..l.e..a..n..i.n..g 1..0..,.. 41 13...fabrics 26 T thick fabrics 25 thin fabrics 26 thread cutter 23 thread guide 13 thread tension 24 trial sewing 25 ttwroiunbnleesehdoleoti.n..g...1..7..,.. 43 18 U upper tension-control dial 24, 42 upper threading 13 W winding the bobbin 10 Z zigzag stitches 25, 27, 35 ...
Quick Setup Guide - English and Spanish
Page 1
... our resellers carry genuine Brother parts, accessories and supplies. Brother International Corporation is Wound Incorrectly Use a small pair of scissors to remove thread IH J M K Brother International Corporation recommends the use if the stitching on winder J Handwheel Use for easy and efficient transporting O Thread Guide/Bobbin Winding Pre-tension Disc Used when winding the bobbin and then threading the machine
... our resellers carry genuine Brother parts, accessories and supplies. Brother International Corporation is Wound Incorrectly Use a small pair of scissors to remove thread IH J M K Brother International Corporation recommends the use if the stitching on winder J Handwheel Use for easy and efficient transporting O Thread Guide/Bobbin Winding Pre-tension Disc Used when winding the bobbin and then threading the machine

Quick Setup Guide - English and Spanish
Page 2
... on the front of the machine. 5 6 Pass the thread into the thread tension discs or behind the thread tension dial from the right to the left. 7 Grasp the thread on both . case. 5 6 Remove the retaining ring. 7 Relative Chart of the opening of the bobbin case. Note its highest position...press the foot controller to loosen, and may break the needle. Holding the bobbin case by the latch, align your machine) #100/16 Knits Single knit, Double knit, Jersey, Tricot #90/14 (Ball point) Thread Sizes Cotton: 80 Synthetic/Polyester Long Fiber Fine Mercerized Cotton Cotton: 60-80...
... on the front of the machine. 5 6 Pass the thread into the thread tension discs or behind the thread tension dial from the right to the left. 7 Grasp the thread on both . case. 5 6 Remove the retaining ring. 7 Relative Chart of the opening of the bobbin case. Note its highest position...press the foot controller to loosen, and may break the needle. Holding the bobbin case by the latch, align your machine) #100/16 Knits Single knit, Double knit, Jersey, Tricot #90/14 (Ball point) Thread Sizes Cotton: 80 Synthetic/Polyester Long Fiber Fine Mercerized Cotton Cotton: 60-80...


