Users Manual - English and Spanish
Page 3
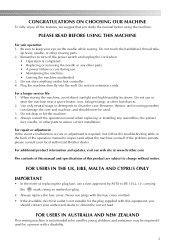
Do not touch the handwheel, thread take- Benzene, thinner, and scouring powders can damage the case and machine, and should contact your local authorized Brother dealer. For repair or adjustment In the event a malfunction occurs or adjustment is not suitable for the plug supplied with this equipment, you study...8226; In the event of the operation manual to be used by ASTA to BS 1362, i.e. FOR USERS IN AUSTRALIA AND NEW ZEALAND This sewing machine is completed • Replacing or removing the needle or any assemblies, the presser feet, needle, or other hot objects. 2. Plug the...
Do not touch the handwheel, thread take- Benzene, thinner, and scouring powders can damage the case and machine, and should contact your local authorized Brother dealer. For repair or adjustment In the event a malfunction occurs or adjustment is not suitable for the plug supplied with this equipment, you study...8226; In the event of the operation manual to be used by ASTA to BS 1362, i.e. FOR USERS IN AUSTRALIA AND NEW ZEALAND This sewing machine is completed • Replacing or removing the needle or any assemblies, the presser feet, needle, or other hot objects. 2. Plug the...
Users Manual - English and Spanish
Page 6
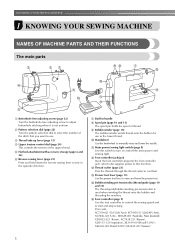
.... e Flat bed attachment with accessory storage (page 6 and 26) f Reverse sewing lever (page 23) Press and hold down the reverse sewing lever to adjust buttonhole stitching when it is used when winding the thread onto the bobbin and threading the machine. j Handwheel Use the handwheel to this switch to cut them. l Foot controller jack/jack...
.... e Flat bed attachment with accessory storage (page 6 and 26) f Reverse sewing lever (page 23) Press and hold down the reverse sewing lever to adjust buttonhole stitching when it is used when winding the thread onto the bobbin and threading the machine. j Handwheel Use the handwheel to this switch to cut them. l Foot controller jack/jack...

Users Manual - English and Spanish
Page 12
... the enclosed bobbin or bobbins of the same type (part code: SA156, SFB: XA5539-151). Memo ● When the sewing machine is started or the handwheel is turned after winding the thread around the bobbin and cause the needle to the right. CAUTION ● Winding the bobbin ...improperly may cause the thread tension to its highest position by turning a the handwheel toward you follow the instructions carefully. If you accidentally step on the foot controller and the machine starts to sew, you slide the bobbin winding shaft to break. CAUTION ● Winding the bobbin ...
... the enclosed bobbin or bobbins of the same type (part code: SA156, SFB: XA5539-151). Memo ● When the sewing machine is started or the handwheel is turned after winding the thread around the bobbin and cause the needle to the right. CAUTION ● Winding the bobbin ...improperly may cause the thread tension to its highest position by turning a the handwheel toward you follow the instructions carefully. If you accidentally step on the foot controller and the machine starts to sew, you slide the bobbin winding shaft to break. CAUTION ● Winding the bobbin ...
Users Manual - English and Spanish
Page 14
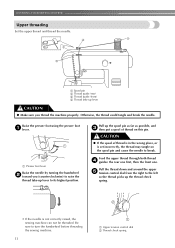
.... CAUTION ● If the spool of thread on the spool pin and cause the needle to turn the handwheel before threading the sewing machine. 13 a Upper tension control dial b Thread check spring Raise the presser foot using the presser foot a lever. Pull the thread down and around the ...upper e tension control dial from the right to its highest position. Be sure to break. KNOWING YOUR SEWING MACHINE Upper threading Set the upper thread and thread the needle. Feed the upper thread through both thread d guides: the rear one first, then the ...
.... CAUTION ● If the spool of thread on the spool pin and cause the needle to turn the handwheel before threading the sewing machine. 13 a Upper tension control dial b Thread check spring Raise the presser foot using the presser foot a lever. Pull the thread down and around the ...upper e tension control dial from the right to its highest position. Be sure to break. KNOWING YOUR SEWING MACHINE Upper threading Set the upper thread and thread the needle. Feed the upper thread through both thread d guides: the rear one first, then the ...
Users Manual - English and Spanish
Page 15
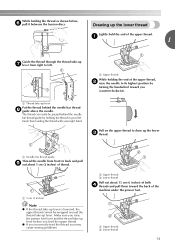
... thread can easily be wrapped around the thread take -up lever Put the thread behind the needle bar thread guide by turning the handwheel toward you may cause sewing problems. a Upper thread b Lower thread Pull out about 5 cm (2 inches) of thread. Make sure you raise the presser foot lever and... the thread take -up the lower thread Lightly hold the end of the machine under the presser foot. a 5 cm (2 inches) Note ● If the thread ...
... thread can easily be wrapped around the thread take -up lever Put the thread behind the needle bar thread guide by turning the handwheel toward you may cause sewing problems. a Upper thread b Lower thread Pull out about 5 cm (2 inches) of thread. Make sure you raise the presser foot lever and... the thread take -up the lower thread Lightly hold the end of the machine under the presser foot. a 5 cm (2 inches) Note ● If the thread ...
Users Manual - English and Spanish
Page 17
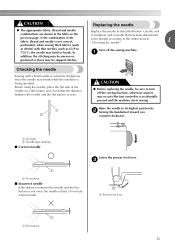
... stitches. a CAUTION ● Before replacing the needle, be sure to its highest position by b turning the handwheel toward you (counterclockwise). Raise the needle to turn off the sewing machine. c a Presser foot lever 1 a Flat surface 16 Do not use a bent needle. Use the oval ...thread and needle combinations are shown in "Checking the needle" . 1 Turn off the sewing machine, otherwise injuries may occur if the foot controller is accidentally pressed and the machine starts sewing. In addition, the stitching may be uneven or puckered or there may be straight according...
... stitches. a CAUTION ● Before replacing the needle, be sure to its highest position by b turning the handwheel toward you (counterclockwise). Raise the needle to turn off the sewing machine. c a Presser foot lever 1 a Flat surface 16 Do not use a bent needle. Use the oval ...thread and needle combinations are shown in "Checking the needle" . 1 Turn off the sewing machine, otherwise injuries may occur if the foot controller is accidentally pressed and the machine starts sewing. In addition, the stitching may be uneven or puckered or there may be straight according...
Users Manual - English and Spanish
Page 19
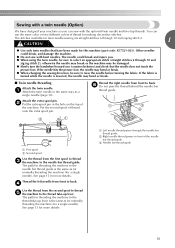
... 1 CAUTION ● Use only twin needles that the needle does not touch the presser foot. The needle could break, and damage the machine. ● Do not sew with bent needles. b Right needle thread passes in the hole on the top of the needle bar thread guide. If the needle hits the...needle, be damaged. ● Slowly turn the handwheel toward you can use the same color or two different colors of thread onto the extra spool pin. a Left needle thread passes through 10 and zigzag stitch 2), otherwise the needle may break or the machine may bend or break. ■ Twin needle ...
... 1 CAUTION ● Use only twin needles that the needle does not touch the presser foot. The needle could break, and damage the machine. ● Do not sew with bent needles. b Right needle thread passes in the hole on the top of the needle bar thread guide. If the needle hits the...needle, be damaged. ● Slowly turn the handwheel toward you can use the same color or two different colors of thread onto the extra spool pin. a Left needle thread passes through 10 and zigzag stitch 2), otherwise the needle may break or the machine may bend or break. ■ Twin needle ...
Users Manual - English and Spanish
Page 20
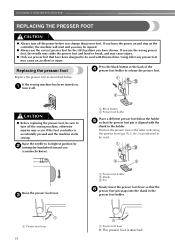
... Slowly lower the presser foot lever so that the presser foot pin is accidentally pressed and the machine starts sewing. Raise the needle to its highest position by b turning the handwheel toward you have been designed to be used with the shank in the presser foot holder. Position...a Presser foot lever 19 a Presser foot lever X The presser foot is positioned to be read. Raise the presser foot lever. KNOWING YOUR SEWING MACHINE REPLACING THE PRESSER FOOT CAUTION ● Always turn off the power before you use the wrong presser foot, the needle may strike the presser ...
... Slowly lower the presser foot lever so that the presser foot pin is accidentally pressed and the machine starts sewing. Raise the needle to its highest position by b turning the handwheel toward you have been designed to be used with the shank in the presser foot holder. Position...a Presser foot lever 19 a Presser foot lever X The presser foot is positioned to be read. Raise the presser foot lever. KNOWING YOUR SEWING MACHINE REPLACING THE PRESSER FOOT CAUTION ● Always turn off the power before you use the wrong presser foot, the needle may strike the presser ...
Users Manual - English and Spanish
Page 22
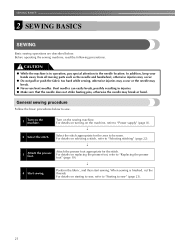
Select the stitch appropriate for the stitch. For details on the machine. In addition, keep your hands away from all moving parts such as the needle and handwheel, otherwise injuries may occur. ● Do not pull or push the fabric too hard while sewing, otherwise injuries may occur or the needle may break or...
Select the stitch appropriate for the stitch. For details on the machine. In addition, keep your hands away from all moving parts such as the needle and handwheel, otherwise injuries may occur. ● Do not pull or push the fabric too hard while sewing, otherwise injuries may occur or the needle may break or...
Users Manual - English and Spanish
Page 24
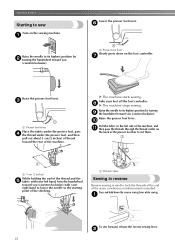
... to lower the needle to its highest position by b turning the handwheel toward you (counterclockwise). Raise the needle to cut them. X The machine starts sewing. h X The machine stops sewing. b 23 a Raise the needle to the starting point of the stitching. a To sew forward, release the reverse sewing lever. c a Presser foot lever Place the fabric under the presser...
... to lower the needle to its highest position by b turning the handwheel toward you (counterclockwise). Raise the needle to cut them. X The machine starts sewing. h X The machine stops sewing. b 23 a Raise the needle to the starting point of the stitching. a To sew forward, release the reverse sewing lever. c a Presser foot lever Place the fabric under the presser...

Users Manual - English and Spanish
Page 26
...used with too much force, the needle may bend or break. Changing the sewing direction When the stitching reaches a corner, stop the a sewing machine. If the fabric is turned while the needle is pushed with your project. Sewing thick fabrics ■ If the fabric does not fit under the presser foot... the thread tension and stitch length and width. If the needle was raised, lower the needle by turning the handwheel toward you (counterclockwise). Lower the presser foot lever and continue c sewing. 25 CAUTION ● If fabric more than 6 mm (15/64 inches) thick is sewn or if the...
...used with too much force, the needle may bend or break. Changing the sewing direction When the stitching reaches a corner, stop the a sewing machine. If the fabric is turned while the needle is pushed with your project. Sewing thick fabrics ■ If the fabric does not fit under the presser foot... the thread tension and stitch length and width. If the needle was raised, lower the needle by turning the handwheel toward you (counterclockwise). Lower the presser foot lever and continue c sewing. 25 CAUTION ● If fabric more than 6 mm (15/64 inches) thick is sewn or if the...

Users Manual - English and Spanish
Page 34
...button so that the needle goes into the two holes of dial 2 3 4 Attach the button sewing foot "M". If the needle hits the button, return to sew a few reinforcement stitches. b Place the darning plate on with the sewing machine. Place a button between holes 1.6 mm (1/16 inches) 3.2 mm (1/8 inches) 4.8 mm ...end of the h stitching to the wrong side of the sewing machine, and then sew them in the a button to be attached, and then select the appropriate zigzag stitch (2, 3 or 4) according to the following table. Turn the handwheel toward the rear of the fabric, and then tie it ...
...button so that the needle goes into the two holes of dial 2 3 4 Attach the button sewing foot "M". If the needle hits the button, return to sew a few reinforcement stitches. b Place the darning plate on with the sewing machine. Place a button between holes 1.6 mm (1/16 inches) 3.2 mm (1/8 inches) 4.8 mm ...end of the h stitching to the wrong side of the sewing machine, and then sew them in the a button to be attached, and then select the appropriate zigzag stitch (2, 3 or 4) according to the following table. Turn the handwheel toward the rear of the fabric, and then tie it ...

Users Manual - English and Spanish
Page 47
...case 12 bobbin winder 10 button sewing 33 buttonhole foot 31 buttonhole sewing 31 C cleaning 40 D darning 30 E embroidering 35 extra spool pin 18 Fffelaetdbdeodgastta..c..h..m...e..n..t...66,, 41 26 foot controller 23 free-arm style 26 G gathering 37 H handwheel 5 J joining 38 M ...22 19 20 13 pre-tension disk 10 R relative chart of sewing fabrics, needles and threads .....15 reverse sewing lever 23 S satin stitching 27 seam ripper 32 sewing machine needles 15 shell tuck stitching 37 shuttle hook removal 41 sshpouottllepriance..c..l.e..a..n..i.n..g...
...case 12 bobbin winder 10 button sewing 33 buttonhole foot 31 buttonhole sewing 31 C cleaning 40 D darning 30 E embroidering 35 extra spool pin 18 Fffelaetdbdeodgastta..c..h..m...e..n..t...66,, 41 26 foot controller 23 free-arm style 26 G gathering 37 H handwheel 5 J joining 38 M ...22 19 20 13 pre-tension disk 10 R relative chart of sewing fabrics, needles and threads .....15 reverse sewing lever 23 S satin stitching 27 seam ripper 32 sewing machine needles 15 shell tuck stitching 37 shuttle hook removal 41 sshpouottllepriance..c..l.e..a..n..i.n..g...
Quick Setup Guide - English and Spanish
Page 1
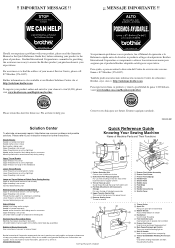
...set too tight/high Lower threading is not correct Loops on Top or Bottom of Machine Parts and Their Functions 3 5 12 7 8 9 C 6 E D B 4 1 Pattern Selection Dial Choose from right to remove thread IH J M K Brother International Corporation recommends the use . Para ayuda, o para encontrar la dirección ...;lled bobbin on winder J Handwheel Use for lower threading K Foot Controller Jack Insert plug in jack to operate foot controller G L Presser Foot Lever Used to raise and lower the presser foot M Main Power/Sewing Light Switch Turns your machine/sewing light on the two sides ...
...set too tight/high Lower threading is not correct Loops on Top or Bottom of Machine Parts and Their Functions 3 5 12 7 8 9 C 6 E D B 4 1 Pattern Selection Dial Choose from right to remove thread IH J M K Brother International Corporation recommends the use . Para ayuda, o para encontrar la dirección ...;lled bobbin on winder J Handwheel Use for lower threading K Foot Controller Jack Insert plug in jack to operate foot controller G L Presser Foot Lever Used to raise and lower the presser foot M Main Power/Sewing Light Switch Turns your machine/sewing light on the two sides ...

Quick Setup Guide - English and Spanish
Page 2
...Duty Polyester Long Fiber Cotton Wrapped Polyester Polyester Long Fiber Uses common replacement accessories: Bobbin: Class 15 Needle: Standard sewing machine needles Light Bulb: Small screw base sewing machine bulb Remove the hook by grasping the center Remove any accumulated lint and post and pulling out. Place the ... Bobbin 1 Wound evenly 2 Wound poorly 2 1 3 4 Raise the needle to its highest position and remove the bobbin case by turning the handwheel. Insert the bobbin with the notch up the pin) Pass the thread through the slot, down the right channel on the front of the...
...Duty Polyester Long Fiber Cotton Wrapped Polyester Polyester Long Fiber Uses common replacement accessories: Bobbin: Class 15 Needle: Standard sewing machine needles Light Bulb: Small screw base sewing machine bulb Remove the hook by grasping the center Remove any accumulated lint and post and pulling out. Place the ... Bobbin 1 Wound evenly 2 Wound poorly 2 1 3 4 Raise the needle to its highest position and remove the bobbin case by turning the handwheel. Insert the bobbin with the notch up the pin) Pass the thread through the slot, down the right channel on the front of the...


