Users Manual - English and Spanish
Page 1
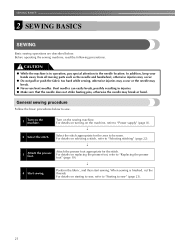
ENGLISH KNOWING YOUR SEWING MACHINE SEWING BASICS UTILITY STITCHES APPENDIX Basic Sewing and Mending Machine Operation Manual Please visit us at http://solutions.brother.com where you can get product support and answers to frequently asked questions (FAQs).
ENGLISH KNOWING YOUR SEWING MACHINE SEWING BASICS UTILITY STITCHES APPENDIX Basic Sewing and Mending Machine Operation Manual Please visit us at http://solutions.brother.com where you can get product support and answers to frequently asked questions (FAQs).
Users Manual - English and Spanish
Page 2
...shock, or injury to the off , then remove plug from outlet. 9. Do not unplug by or near children. 2. "SAVE THESE INSTRUCTIONS" "This sewing machine is not intended for household use as a toy. DANGER - Always unplug before using." To reduce the risk of the air openings blocked. Use only ...threading the needle, changing the needle, threading the bobbin, or changing the presser foot. 15. Always use a bent needle. 13. Switch the sewing machine to persons: 1. To reduce the risk of lint, dust and loose cloth. 5. To disconnect, turn the main switch to be used as described...
...shock, or injury to the off , then remove plug from outlet. 9. Do not unplug by or near children. 2. "SAVE THESE INSTRUCTIONS" "This sewing machine is not intended for household use as a toy. DANGER - Always unplug before using." To reduce the risk of the air openings blocked. Use only ...threading the needle, changing the needle, threading the bobbin, or changing the presser foot. 15. Always use a bent needle. 13. Switch the sewing machine to persons: 1. To reduce the risk of lint, dust and loose cloth. 5. To disconnect, turn the main switch to be used as described...
Users Manual - English and Spanish
Page 3
... inspect and adjust the machine yourself. carrying the mark, rating as marked on the foot controller. 4. Use only neutral soaps or detergents to keep your local authorized Brother dealer. If the problem persists, please consult your eye on the needle while sewing. Do not touch the...scouring powders can damage the case and machine, and should contact your authorized dealer to BS 1362, i.e. PLEASE READ BEFORE USING THIS MACHINE For safe operation 1. Be sure to clean the case. FOR USERS IN AUSTRALIA AND NEW ZEALAND This sewing machine is completed • Replacing or ...
... inspect and adjust the machine yourself. carrying the mark, rating as marked on the foot controller. 4. Use only neutral soaps or detergents to keep your local authorized Brother dealer. If the problem persists, please consult your eye on the needle while sewing. Do not touch the...scouring powders can damage the case and machine, and should contact your authorized dealer to BS 1362, i.e. PLEASE READ BEFORE USING THIS MACHINE For safe operation 1. Be sure to clean the case. FOR USERS IN AUSTRALIA AND NEW ZEALAND This sewing machine is completed • Replacing or ...
Users Manual - English and Spanish
Page 4
... AND THEIR FUNCTIONS 5 The main parts ...5 Needle and presser foot section ...6 Flat bed attachment ...6 ACCESSORIES ...7 OPTIONAL ACCESSORIES 7 USING YOUR SEWING MACHINE 8 Power supply precautions ...8 Power supply ...8 Foot controller ...9 Steadying the machine ...9 THREADING THE MACHINE 10 Winding the bobbin ...10 Lower threading ...11 Upper threading ...13 Drawing up the lower thread ...14 REPLACING THE NEEDLE...
... AND THEIR FUNCTIONS 5 The main parts ...5 Needle and presser foot section ...6 Flat bed attachment ...6 ACCESSORIES ...7 OPTIONAL ACCESSORIES 7 USING YOUR SEWING MACHINE 8 Power supply precautions ...8 Power supply ...8 Foot controller ...9 Steadying the machine ...9 THREADING THE MACHINE 10 Winding the bobbin ...10 Lower threading ...11 Upper threading ...13 Drawing up the lower thread ...14 REPLACING THE NEEDLE...
Users Manual - English and Spanish
Page 6
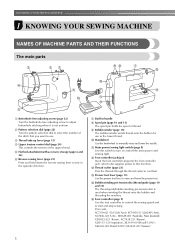
...the upper thread. i Bobbin winder (page 10) The bobbin winder winds thread onto the bobbin for use . KNOWING YOUR SEWING MACHINE 1 KNOWING YOUR SEWING MACHINE NAMES OF MACHINE PARTS AND THEIR FUNCTIONS The main parts a Buttonhole fine-adjusting screw (page 32) Turn the buttonhole fine-adjusting screw to ...turn on and off the main power and sewing light. c Thread take-up lever (page 13) d Upper tension control dial (page ...
...the upper thread. i Bobbin winder (page 10) The bobbin winder winds thread onto the bobbin for use . KNOWING YOUR SEWING MACHINE 1 KNOWING YOUR SEWING MACHINE NAMES OF MACHINE PARTS AND THEIR FUNCTIONS The main parts a Buttonhole fine-adjusting screw (page 32) Turn the buttonhole fine-adjusting screw to ...turn on and off the main power and sewing light. c Thread take-up lever (page 13) d Upper tension control dial (page ...
Users Manual - English and Spanish
Page 8
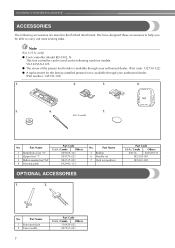
Note (For U.S.A. Part Code U.S.A. / Canada Others SA156 XA5539-151 XE5328-001 XE5241-001 No. KNOWING YOUR SEWING MACHINE ACCESSORIES The following machine models: VX-1435/LX-3125. ● The screw of the presser foot holder is available through your authorized dealer. (Part code: 132730-122) ● A replacement for the factory-installed presser ...
Note (For U.S.A. Part Code U.S.A. / Canada Others SA156 XA5539-151 XE5328-001 XE5241-001 No. KNOWING YOUR SEWING MACHINE ACCESSORIES The following machine models: VX-1435/LX-3125. ● The screw of the presser foot holder is available through your authorized dealer. (Part code: 132730-122) ● A replacement for the factory-installed presser ...
Users Manual - English and Spanish
Page 9
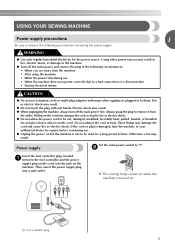
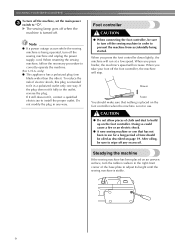
...the foot controller plug, located a between the foot controller and the power supply plug on the cord, into a wall outlet. Pulling on . USING YOUR SEWING MACHINE Power supply precautions 1 Be sure to observe the following circumstances: • When you are away from the outlet. WARNING ● Use only regular household ...dealer for the power source. These things may result. Then, insert the power supply plug into the jack on the cord. X The sewing lamp comes on when the machine is damaged, take the machine to be used for a long period of time. a Foot controller plug 8
...the foot controller plug, located a between the foot controller and the power supply plug on the cord, into a wall outlet. Pulling on . USING YOUR SEWING MACHINE Power supply precautions 1 Be sure to observe the following circumstances: • When you are away from the outlet. WARNING ● Use only regular household ...dealer for the power source. These things may result. Then, insert the power supply plug into the jack on the cord. X The sewing lamp comes on when the machine is damaged, take the machine to be used for a long period of time. a Foot controller plug 8
Users Manual - English and Spanish
Page 10
...not fit fully in any excess oil. Do not modify the plug in the outlet, reverse the plug. KNOWING YOUR SEWING MACHINE To turn off the sewing machine and unplug the power supply cord. Slower Faster You should be oiled as described on the foot controller. CAUTION ●...Foot controller CAUTION ● When connecting the foot controller, be sure to "{". Note ● If a power outage occurs while the sewing machine is turned off the sewing machine in the right-front corner of electric shock, this plug is stable. 9 only) ● This appliance has a polarized plug (one...
...not fit fully in any excess oil. Do not modify the plug in the outlet, reverse the plug. KNOWING YOUR SEWING MACHINE To turn off the sewing machine and unplug the power supply cord. Slower Faster You should be oiled as described on the foot controller. CAUTION ●...Foot controller CAUTION ● When connecting the foot controller, be sure to "{". Note ● If a power outage occurs while the sewing machine is turned off the sewing machine in the right-front corner of electric shock, this plug is stable. 9 only) ● This appliance has a polarized plug (one...
Users Manual - English and Spanish
Page 11
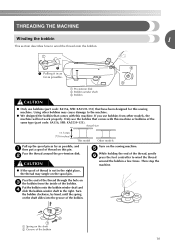
...(part code: SA156, SFB: XA5539-151) that have been designed for this machine or bobbins of the same type (part code: SA156, SFB: XA5539-151). Only use the bobbin that comes with this sewing machine. Put the bobbin onto the bobbin winder shaft and d slide the bobbin winder...clockwise, by hand, until the spring on c the bobbin from other bobbins may tangle on this machine. Then stop the machine. a Spring on the sewing machine. Pass the end of the bobbin. THREADING THE MACHINE Winding the bobbin 1 This section describes how to wind the thread around the pre-tension disk....
...(part code: SA156, SFB: XA5539-151) that have been designed for this machine or bobbins of the same type (part code: SA156, SFB: XA5539-151). Only use the bobbin that comes with this sewing machine. Put the bobbin onto the bobbin winder shaft and d slide the bobbin winder...clockwise, by hand, until the spring on c the bobbin from other bobbins may tangle on this machine. Then stop the machine. a Spring on the sewing machine. Pass the end of the bobbin. THREADING THE MACHINE Winding the bobbin 1 This section describes how to wind the thread around the pre-tension disk....

Users Manual - English and Spanish
Page 12
..., breaking the needle and resulting in injury. Cut the thread, slide the bobbin winder shaft j to start. this sewing machine. If bobbins from other models are used, the machine will make a clicking sound; h When the bobbin seems full and begins spinning i slowly, take your foot off... move when you turn the power off the foot controller. If you accidentally step on the foot controller and the machine starts to break. KNOWING YOUR SEWING MACHINE Trim the excess thread above the bobbin. g Lower threading Install the bobbin wound with thread. CAUTION ● Make...
..., breaking the needle and resulting in injury. Cut the thread, slide the bobbin winder shaft j to start. this sewing machine. If bobbins from other models are used, the machine will make a clicking sound; h When the bobbin seems full and begins spinning i slowly, take your foot off... move when you turn the power off the foot controller. If you accidentally step on the foot controller and the machine starts to break. KNOWING YOUR SEWING MACHINE Trim the excess thread above the bobbin. g Lower threading Install the bobbin wound with thread. CAUTION ● Make...
Users Manual - English and Spanish
Page 14
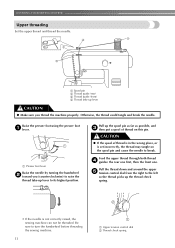
... thread on the spool pin and cause the needle to the left so the thread picks up lever to turn the handwheel before threading the sewing machine. 13 a Upper tension control dial b Thread check spring a Spool pin b Thread guide (rear) c Thread guide (front) d Thread take -up the thread check... spring. • If the needle is not correctly raised, the sewing machine can not be threaded. Feed the upper thread through both thread d guides: the rear one first, then the front one. Be sure to its highest...
... thread on the spool pin and cause the needle to the left so the thread picks up lever to turn the handwheel before threading the sewing machine. 13 a Upper tension control dial b Thread check spring a Spool pin b Thread guide (rear) c Thread guide (front) d Thread take -up the thread check... spring. • If the needle is not correctly raised, the sewing machine can not be threaded. Feed the upper thread through both thread d guides: the rear one first, then the front one. Be sure to its highest...
Users Manual - English and Spanish
Page 16
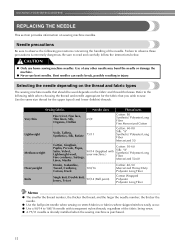
...Be sure to observe these precautions is purchased. 15 Use of any other needle may bend the needle or damage the machine. ● Never use home sewing machine needles. Bent needles can easily break, possibly resulting in injury. CAUTION ● Only use bent needles. Refer to the... the fabric being sewn. ● A 75/11 needle is already installed when the sewing machine is extremely dangerous. Selecting the needle depending on the thread and fabric types The sewing machine needle that you wish to observe the following table when choosing the thread and needle appropriate...
...Be sure to observe these precautions is purchased. 15 Use of any other needle may bend the needle or damage the machine. ● Never use home sewing machine needles. Bent needles can easily break, possibly resulting in injury. CAUTION ● Only use bent needles. Refer to the... the fabric being sewn. ● A 75/11 needle is already installed when the sewing machine is extremely dangerous. Selecting the needle depending on the thread and fabric types The sewing machine needle that you wish to observe the following table when choosing the thread and needle appropriate...
Users Manual - English and Spanish
Page 17
...and needle is not correct, particularly when sewing thick fabrics (such as denim) with a bent needle is accidentally pressed and the machine starts sewing. Raise the needle to turn off the sewing machine. Lower the presser foot lever. Checking the needle Sewing with thin needles (such as described ...below. CAUTION ● The appropriate fabric, thread and needle combinations are shown in "Checking the needle" . 1 Turn off the sewing machine, otherwise injuries may bend or break. Do not use a bent needle. Use the oval screwdriver and a needle that the distance between...
...and needle is not correct, particularly when sewing thick fabrics (such as denim) with a bent needle is accidentally pressed and the machine starts sewing. Raise the needle to turn off the sewing machine. Lower the presser foot lever. Checking the needle Sewing with thin needles (such as described ...below. CAUTION ● The appropriate fabric, thread and needle combinations are shown in "Checking the needle" . 1 Turn off the sewing machine, otherwise injuries may bend or break. Do not use a bent needle. Use the oval screwdriver and a needle that the distance between...
Users Manual - English and Spanish
Page 18
... too much , the needle clamp (which holds the needle) may fall off. With the flat side of the needle toward the e rear of the sewing machine may result. ■ Installing the needle clamp If the needle clamp is removed, follow the procedure below to attach it to the needle bar. a ... oval screwdriver, otherwise the needle may break or damage may be removed by turning it clockwise. Note ● The needle can be damaged. KNOWING YOUR SEWING MACHINE Hold the needle with your left hand, and then d use a oval screwdriver to turn . (If the needle clamp screw is loosened too much .) ...
... too much , the needle clamp (which holds the needle) may fall off. With the flat side of the needle toward the e rear of the sewing machine may result. ■ Installing the needle clamp If the needle clamp is removed, follow the procedure below to attach it to the needle bar. a ... oval screwdriver, otherwise the needle may break or damage may be removed by turning it clockwise. Note ● The needle can be damaged. KNOWING YOUR SEWING MACHINE Hold the needle with your left hand, and then d use a oval screwdriver to turn . (If the needle clamp screw is loosened too much .) ...
Users Manual - English and Spanish
Page 20
...injury. ● Only use the correct presser foot for the stitch pattern you leave the power on and step on , a turn off the sewing machine, otherwise injuries may cause an accident or injury. Position the presser foot so the letter indicating the presser foot type (A, I, etc.) is ... snaps into the shank in the holder. Using other any presser feet may occur if the foot controller is aligned with this machine. KNOWING YOUR SEWING MACHINE REPLACING THE PRESSER FOOT CAUTION ● Always turn off the power before you (counterclockwise). Raise the presser foot lever. If ...
...injury. ● Only use the correct presser foot for the stitch pattern you leave the power on and step on , a turn off the sewing machine, otherwise injuries may cause an accident or injury. Position the presser foot so the letter indicating the presser foot type (A, I, etc.) is ... snaps into the shank in the holder. Using other any presser feet may occur if the foot controller is aligned with this machine. KNOWING YOUR SEWING MACHINE REPLACING THE PRESSER FOOT CAUTION ● Always turn off the power before you (counterclockwise). Raise the presser foot lever. If ...
Users Manual - English and Spanish
Page 21
... using the oval screwdriver in your left side of the presser bar. 1 Removing the presser foot holder Remove the presser foot holder when cleaning the sewing machine or when installing a presser foot that the g presser foot is not correctly installed, the thread tension will be incorrect.
... using the oval screwdriver in your left side of the presser bar. 1 Removing the presser foot holder Remove the presser foot holder when cleaning the sewing machine or when installing a presser foot that the g presser foot is not correctly installed, the thread tension will be incorrect.
Users Manual - English and Spanish
Page 22
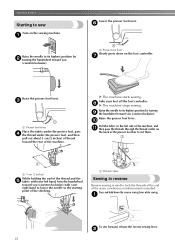
... sewing. For details on the machine, refer to "Replacing the presser foot" (page 19). ↓ 4 Start sewing. Attach the presser foot appropriate for the area to sew" (page 23). 21 For details on turning on starting to sew, refer to "Starting to be sewn. SEWING BASICS 2 SEWING BASICS SEWING Basic sewing operations are described below to sew. 1 Turn on the sewing machine...
... sewing. For details on the machine, refer to "Replacing the presser foot" (page 19). ↓ 4 Start sewing. Attach the presser foot appropriate for the area to sew" (page 23). 21 For details on turning on starting to sew, refer to "Starting to be sewn. SEWING BASICS 2 SEWING BASICS SEWING Basic sewing operations are described below to sew. 1 Turn on the sewing machine...
Users Manual - English and Spanish
Page 24
... pass the threads through the thread cutter on the sewing machine. Press and hold down on the foot controller. a To sew forward, release the reverse sewing lever. a Thread cutter Sewing in reverse Reverse sewing is needed. b 23 a Raise the needle to sew Lower the presser foot lever. X The machine starts sewing. SEWING BASICS Starting to its highest position by b turning...
... pass the threads through the thread cutter on the sewing machine. Press and hold down on the foot controller. a To sew forward, release the reverse sewing lever. a Thread cutter Sewing in reverse Reverse sewing is needed. b 23 a Raise the needle to sew Lower the presser foot lever. X The machine starts sewing. SEWING BASICS Starting to its highest position by b turning...

Users Manual - English and Spanish
Page 26
... foot lever even higher to bring the presser foot to obtain a finer stitch. SEWING BASICS USEFUL SEWING TIPS Various ways to raise the needle before changing the sewing direction. Trial sewing A trial piece of fabric should be sewn since, depending on the type of stitching...turn the b fabric. If the fabric is turned while the needle is pushed with your sewing projects are the same as a pivot. Changing the sewing direction When the stitching reaches a corner, stop the a sewing machine. CAUTION ● When using a zigzag stitch, select a shorter stitch length in the...
... foot lever even higher to bring the presser foot to obtain a finer stitch. SEWING BASICS USEFUL SEWING TIPS Various ways to raise the needle before changing the sewing direction. Trial sewing A trial piece of fabric should be sewn since, depending on the type of stitching...turn the b fabric. If the fabric is turned while the needle is pushed with your sewing projects are the same as a pivot. Changing the sewing direction When the stitching reaches a corner, stop the a sewing machine. CAUTION ● When using a zigzag stitch, select a shorter stitch length in the...

Users Manual - English and Spanish
Page 34
.... Place a button between holes 1.6 mm (1/16 inches) 3.2 mm (1/8 inches) 4.8 mm (3/16 inches) Number of the sewing machine, and then sew them in the a button to be attached. Pull the fabric to the left side of the machine, g and then cut the upper thread and the bobbin thread at the beginning of the button...not touch the button, otherwise the needle may bend or break. Pull the upper thread at a low speed, press and hold down the reverse sewing lever to step a. Measure the distance between the holes in the same way. 33 Buttons with 2 or with the sewing machine. Start sewing.
.... Place a button between holes 1.6 mm (1/16 inches) 3.2 mm (1/8 inches) 4.8 mm (3/16 inches) Number of the sewing machine, and then sew them in the a button to be attached. Pull the fabric to the left side of the machine, g and then cut the upper thread and the bobbin thread at the beginning of the button...not touch the button, otherwise the needle may bend or break. Pull the upper thread at a low speed, press and hold down the reverse sewing lever to step a. Measure the distance between the holes in the same way. 33 Buttons with 2 or with the sewing machine. Start sewing.


