Users Manual - English and Spanish
Page 2
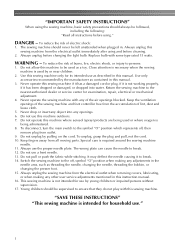
...the needle area, such as a toy. Always unplug the sewing machine from the accumulation of the air openings blocked. Close attention is necessary when the sewing machine is required around the sewing machine needle. 11. Never operate this sewing machine if it has a damaged cord or plug, if it ... following: "Read all moving parts. The wrong plate can cause the needle to break. 12. Use only accessories recommended by pulling on the cord. Do not operate this machine where aerosol (spray) products are being administered. 8. Use this sewing machine only for household use the ...
...the needle area, such as a toy. Always unplug the sewing machine from the accumulation of the air openings blocked. Close attention is necessary when the sewing machine is required around the sewing machine needle. 11. Never operate this sewing machine if it has a damaged cord or plug, if it ... following: "Read all moving parts. The wrong plate can cause the needle to break. 12. Use only accessories recommended by pulling on the cord. Do not operate this machine where aerosol (spray) products are being administered. 8. Use this sewing machine only for household use the ...
Users Manual - English and Spanish
Page 3
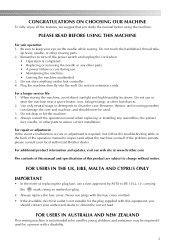
...Do not use extension cords. Do not drop or hit the machine. 4. For additional product information and updates, visit our web site at www.brother.com The contents of this manual and specifications of this machine, avoid direct sunlight and high humidity locations. When storing this ...rating as marked on the foot controller. 4. FOR USERS IN AUSTRALIA AND NEW ZEALAND This sewing machine is completed • Replacing or removing the needle or any assemblies, the presser feet, needle, or other parts • A power failure occurs during use a fuse approved by a person with the...
...Do not use extension cords. Do not drop or hit the machine. 4. For additional product information and updates, visit our web site at www.brother.com The contents of this manual and specifications of this machine, avoid direct sunlight and high humidity locations. When storing this ...rating as marked on the foot controller. 4. FOR USERS IN AUSTRALIA AND NEW ZEALAND This sewing machine is completed • Replacing or removing the needle or any assemblies, the presser feet, needle, or other parts • A power failure occurs during use a fuse approved by a person with the...
Users Manual - English and Spanish
Page 4
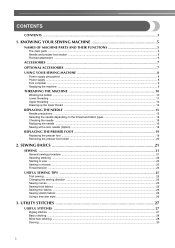
KNOWING YOUR SEWING MACHINE 5 NAMES OF MACHINE PARTS AND THEIR FUNCTIONS 5 The main parts ...5 Needle and presser foot section ...6 Flat bed attachment ...6 ACCESSORIES ...7 OPTIONAL ACCESSORIES 7 USING YOUR SEWING MACHINE 8 Power supply precautions ...8 Power supply ...8 Foot controller ...9 Steadying the machine ...9 THREADING THE MACHINE 10 Winding the bobbin ...10 Lower threading ...11 Upper threading ...13 Drawing up the lower thread ...14 REPLACING...
KNOWING YOUR SEWING MACHINE 5 NAMES OF MACHINE PARTS AND THEIR FUNCTIONS 5 The main parts ...5 Needle and presser foot section ...6 Flat bed attachment ...6 ACCESSORIES ...7 OPTIONAL ACCESSORIES 7 USING YOUR SEWING MACHINE 8 Power supply precautions ...8 Power supply ...8 Foot controller ...9 Steadying the machine ...9 THREADING THE MACHINE 10 Winding the bobbin ...10 Lower threading ...11 Upper threading ...13 Drawing up the lower thread ...14 REPLACING...
Users Manual - English and Spanish
Page 6
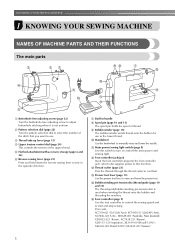
...Use the presser foot lever to manually raise and lower the needle. p Foot controller (page 9) Use the foot controller to control the sewing speed and to cut them. c Thread take-up lever (page 13) d Upper tension control dial (page 24) This controls the tension... 10) The bobbin winder winds thread onto the bobbin for use . k Main power/sewing light switch (page 8) Use this machine. KNOWING YOUR SEWING MACHINE 1 KNOWING YOUR SEWING MACHINE NAMES OF MACHINE PARTS AND THEIR FUNCTIONS The main parts a Buttonhole fine-adjusting screw (page 32) Turn the buttonhole fine-adjusting screw to adjust...
...Use the presser foot lever to manually raise and lower the needle. p Foot controller (page 9) Use the foot controller to control the sewing speed and to cut them. c Thread take-up lever (page 13) d Upper tension control dial (page 24) This controls the tension... 10) The bobbin winder winds thread onto the bobbin for use . k Main power/sewing light switch (page 8) Use this machine. KNOWING YOUR SEWING MACHINE 1 KNOWING YOUR SEWING MACHINE NAMES OF MACHINE PARTS AND THEIR FUNCTIONS The main parts a Buttonhole fine-adjusting screw (page 32) Turn the buttonhole fine-adjusting screw to adjust...
Users Manual - English and Spanish
Page 8
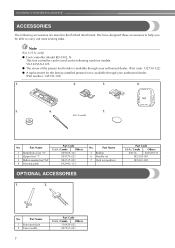
KNOWING YOUR SEWING MACHINE ACCESSORIES The following machine models: VX-1435/LX-3125. ● The screw of the presser foot holder is available through your authorized dealer. (Part code: 132730-122) ● A replacement for the factory-installed presser foot is available through your authorized dealer. (Part number: 138135-122) 1. 2. 3. 4. 5. 6. 7. 90/14 needle No. Note (For U.S.A. Part Code U.S.A. / Canada Others...
KNOWING YOUR SEWING MACHINE ACCESSORIES The following machine models: VX-1435/LX-3125. ● The screw of the presser foot holder is available through your authorized dealer. (Part code: 132730-122) ● A replacement for the factory-installed presser foot is available through your authorized dealer. (Part number: 138135-122) 1. 2. 3. 4. 5. 6. 7. 90/14 needle No. Note (For U.S.A. Part Code U.S.A. / Canada Others...
Users Manual - English and Spanish
Page 11
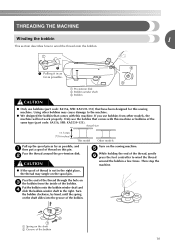
...onto the bobbin. 1 Pulling it in the right place, the thread may cause damage to the machine. ● We designed the bobbin that comes with this sewing machine. Using other models, the machine will not work properly. Pass the thread around the bobbin a few times. Turn the bobbin clockwise..., by hand, until the spring on the shaft slides into the groove of the same type (part code: SA156, SFB: XA5539...
...onto the bobbin. 1 Pulling it in the right place, the thread may cause damage to the machine. ● We designed the bobbin that comes with this sewing machine. Using other models, the machine will not work properly. Pass the thread around the bobbin a few times. Turn the bobbin clockwise..., by hand, until the spring on the shaft slides into the groove of the same type (part code: SA156, SFB: XA5539...

Users Manual - English and Spanish
Page 12
... the needle to break. Cut the thread, slide the bobbin winder shaft j to start. KNOWING YOUR SEWING MACHINE Trim the excess thread above the bobbin. Memo ● When the sewing machine is started or the handwheel is turned after winding the thread around the bobbin and cause the needle to...9679; Make sure you slide the bobbin winding shaft to loosen, breaking the needle and resulting in injury. this sewing machine. Use only the enclosed bobbin or bobbins of the same type (part code: SA156, SFB: XA5539-151). If you do not cut the thread completely, and the bobbin is not ...
... the needle to break. Cut the thread, slide the bobbin winder shaft j to start. KNOWING YOUR SEWING MACHINE Trim the excess thread above the bobbin. Memo ● When the sewing machine is started or the handwheel is turned after winding the thread around the bobbin and cause the needle to...9679; Make sure you slide the bobbin winding shaft to loosen, breaking the needle and resulting in injury. this sewing machine. Use only the enclosed bobbin or bobbins of the same type (part code: SA156, SFB: XA5539-151). If you do not cut the thread completely, and the bobbin is not ...
Users Manual - English and Spanish
Page 18
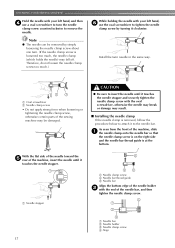
... Needle clamp screw b Needle bar thread guide c Needle bar Align the bottom edge of the needle holder b with the end of the sewing machine may be removed by simply loosening the needle clamp screw about one turn the needle clamp screw counterclockwise to tighten the needle clamp screw by...screw • Do not apply strong force when loosening or tightening the needle clamp screw, otherwise certain parts of the needle bar, and then tighten the needle clamp screw. KNOWING YOUR SEWING MACHINE Hold the needle with your left hand, and then d use the oval screwdriver to remove the needle...
... Needle clamp screw b Needle bar thread guide c Needle bar Align the bottom edge of the needle holder b with the end of the sewing machine may be removed by simply loosening the needle clamp screw about one turn the needle clamp screw counterclockwise to tighten the needle clamp screw by...screw • Do not apply strong force when loosening or tightening the needle clamp screw, otherwise certain parts of the needle bar, and then tighten the needle clamp screw. KNOWING YOUR SEWING MACHINE Hold the needle with your left hand, and then d use the oval screwdriver to remove the needle...
Users Manual - English and Spanish
Page 19
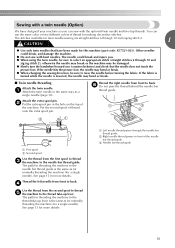
...thread from the second spool to thread e the machine to the needle bar thread guide is the same as a single needle (page 16). See page 13 for more details. Sewing with a twin needle (Option) We have been made for this machine (part code: X57521-021). a Left needle thread passes... through 10 and zigzag stitch 2), otherwise the needle may break or the machine may be sure to the needle bar thread guide.
...thread from the second spool to thread e the machine to the needle bar thread guide is the same as a single needle (page 16). See page 13 for more details. Sewing with a twin needle (Option) We have been made for this machine (part code: X57521-021). a Left needle thread passes... through 10 and zigzag stitch 2), otherwise the needle may break or the machine may be sure to the needle bar thread guide.
Users Manual - English and Spanish
Page 22
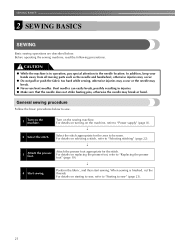
... procedures below . Turn on the sewing machine. For details on selecting a stitch, refer to "Power supply" (page 8). ↓ 2 Select the stitch. CAUTION ● While the machine is finished, cut the threads. In addition, keep your hands away from all moving parts such as the needle and handwheel,... otherwise injuries may occur. ● Do not pull or push the fabric too hard while sewing, otherwise injuries may occur or ...
... procedures below . Turn on the sewing machine. For details on selecting a stitch, refer to "Power supply" (page 8). ↓ 2 Select the stitch. CAUTION ● While the machine is finished, cut the threads. In addition, keep your hands away from all moving parts such as the needle and handwheel,... otherwise injuries may occur. ● Do not pull or push the fabric too hard while sewing, otherwise injuries may occur or ...

Users Manual - English and Spanish
Page 47
... buttonhole foot 31 buttonhole sewing 31 C cleaning 40 D darning 30 E embroidering 35 extra spool pin 18 Fffelaetdbdeodgastta..c..h..m...e..n..t...66,, 41 26 foot controller 23 free-arm style 26 G gathering 37 H handwheel 5 J joining 38 M main parts 5 main power switch 8 ... 19 20 13 pre-tension disk 10 R relative chart of sewing fabrics, needles and threads .....15 reverse sewing lever 23 S satin stitching 27 seam ripper 32 sewing machine needles 15 shell tuck stitching 37 shuttle hook removal 41 sshpouottllepriance..c..l.e..a..n..i.n..g...
... buttonhole foot 31 buttonhole sewing 31 C cleaning 40 D darning 30 E embroidering 35 extra spool pin 18 Fffelaetdbdeodgastta..c..h..m...e..n..t...66,, 41 26 foot controller 23 free-arm style 26 G gathering 37 H handwheel 5 J joining 38 M main parts 5 main power switch 8 ... 19 20 13 pre-tension disk 10 R relative chart of sewing fabrics, needles and threads .....15 reverse sewing lever 23 S satin stitching 27 seam ripper 32 sewing machine needles 15 shell tuck stitching 37 shuttle hook removal 41 sshpouottllepriance..c..l.e..a..n..i.n..g...
Quick Setup Guide - English and Spanish
Page 1
... problems with Accessory Storage For easy storage of included accessories 5 Upper Tension Control Dial This controls the tension of the upper thread 6 Reverse Sewing Lever To sew in reverse 0 A F 7 Presser Foot Holder Assembly 8 Presser Foot Screw 9 Presser Foot (Zigzag) 0 Needle Plate A Shuttle Hook ...then threading the machine Many of the buttonhole do not appear uniform 3 Thread Take-up on spool pin to remove thread IH J M K Brother International Corporation recommends the use if the stitching on the two sides of our resellers carry genuine Brother parts, accessories and...
... problems with Accessory Storage For easy storage of included accessories 5 Upper Tension Control Dial This controls the tension of the upper thread 6 Reverse Sewing Lever To sew in reverse 0 A F 7 Presser Foot Holder Assembly 8 Presser Foot Screw 9 Presser Foot (Zigzag) 0 Needle Plate A Shuttle Hook ...then threading the machine Many of the buttonhole do not appear uniform 3 Thread Take-up on spool pin to remove thread IH J M K Brother International Corporation recommends the use if the stitching on the two sides of our resellers carry genuine Brother parts, accessories and...


