Users Manual - English and Spanish
Page 2
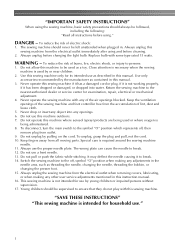
...into any of lint, dust and loose cloth. 5. Switch the sewing machine to be used by the manufacturer as threading the needle, changing the needle, threading the bobbin, or changing the presser foot. 15. Close attention is necessary when the sewing machine is required around the... shock: 1. Young children should be supervised to the symbol "O" position which represents off , symbol "O" position when making any adjustments in the needle area, such as contained in . DANGER - Never drop or insert any object into water. WARNING - Never operate the sewing machine with same...
...into any of lint, dust and loose cloth. 5. Switch the sewing machine to be used by the manufacturer as threading the needle, changing the needle, threading the bobbin, or changing the presser foot. 15. Close attention is necessary when the sewing machine is required around the... shock: 1. Young children should be supervised to the symbol "O" position which represents off , symbol "O" position when making any adjustments in the needle area, such as contained in . DANGER - Never drop or insert any object into water. WARNING - Never operate the sewing machine with same...
Users Manual - English and Spanish
Page 3
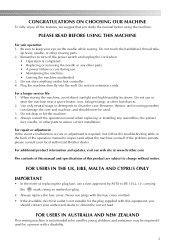
..., the presser feet, needle, or other parts • A power failure occurs during use or store the machine near a space heater, iron, halogen lamp, or other moving parts. 2. Do not touch the handwheel, thread take- Remember to keep your local authorized Brother dealer. For a longer... service life 1. When storing this product are subject to inspect and adjust the machine yourself. If the problem persists, please consult your eye on the needle while sewing. up lever, needle, or other hot objects. 2. ...
..., the presser feet, needle, or other parts • A power failure occurs during use or store the machine near a space heater, iron, halogen lamp, or other moving parts. 2. Do not touch the handwheel, thread take- Remember to keep your local authorized Brother dealer. For a longer... service life 1. When storing this product are subject to inspect and adjust the machine yourself. If the problem persists, please consult your eye on the needle while sewing. up lever, needle, or other hot objects. 2. ...
Users Manual - English and Spanish
Page 4
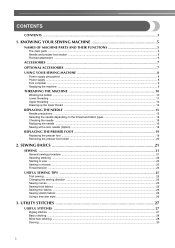
... Basic stitching ...28 Blind hem stitching ...28 Darning ...30 3 CONTENTS CONTENTS ...3 1. KNOWING YOUR SEWING MACHINE 5 NAMES OF MACHINE PARTS AND THEIR FUNCTIONS 5 The main parts ...5 Needle and presser foot section ...6 Flat bed attachment ...6 ACCESSORIES ...7 OPTIONAL ACCESSORIES 7 USING YOUR SEWING MACHINE 8 Power supply precautions ...8 Power supply ...8 Foot controller ...9 Steadying the machine ...9 THREADING...
... Basic stitching ...28 Blind hem stitching ...28 Darning ...30 3 CONTENTS CONTENTS ...3 1. KNOWING YOUR SEWING MACHINE 5 NAMES OF MACHINE PARTS AND THEIR FUNCTIONS 5 The main parts ...5 Needle and presser foot section ...6 Flat bed attachment ...6 ACCESSORIES ...7 OPTIONAL ACCESSORIES 7 USING YOUR SEWING MACHINE 8 Power supply precautions ...8 Power supply ...8 Foot controller ...9 Steadying the machine ...9 THREADING...
Users Manual - English and Spanish
Page 6
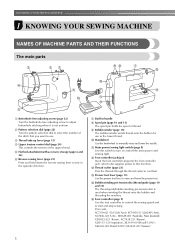
... machine. j Handwheel Use the handwheel to cut them. m Thread cutter (page 23) Pass the threads through the thread cutter to manually raise and lower the needle. l Foot controller jack/jack Insert the foot controller plug into the foot controller jack, which also supplies power to this switch to sew in handle...
... machine. j Handwheel Use the handwheel to cut them. m Thread cutter (page 23) Pass the threads through the thread cutter to manually raise and lower the needle. l Foot controller jack/jack Insert the foot controller plug into the foot controller jack, which also supplies power to this switch to sew in handle...

Users Manual - English and Spanish
Page 7
h Bobbin case i Needle j Needle bar thread guide k Needle clamp screw Use the needle clamp screw to hold the needle in the bag, and then store the bag inside the flat bed attachment. Lift the bottom of the flat bed attachment 1 a toward you,...presser foot holder assembly in the sewing direction. d Feed dogs The feed dogs feed the fabric in place. e Needle plate The needle plate is installed onto the presser foot holder assembly. Needle and presser foot section Flat bed attachment The accessories are not in a compartment inside the compartment. Attach the appropriate...
h Bobbin case i Needle j Needle bar thread guide k Needle clamp screw Use the needle clamp screw to hold the needle in the bag, and then store the bag inside the flat bed attachment. Lift the bottom of the flat bed attachment 1 a toward you,...presser foot holder assembly in the sewing direction. d Feed dogs The feed dogs feed the fabric in place. e Needle plate The needle plate is installed onto the presser foot holder assembly. Needle and presser foot section Flat bed attachment The accessories are not in a compartment inside the compartment. Attach the appropriate...
Users Manual - English and Spanish
Page 8
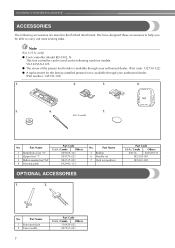
... machine models: VX-1435/LX-3125. ● The screw of the presser foot holder is available through your authorized dealer. (Part code: 132730-122) ● A replacement for the factory-installed presser foot is available through your authorized dealer. (Part number: 138135-122) 1. 2. 3. 4. 5. 6. 7. 90/14 needle No. Part Name 5 Bobbin 6 Needle set 7 Oval screwdriver OPTIONAL...
... machine models: VX-1435/LX-3125. ● The screw of the presser foot holder is available through your authorized dealer. (Part code: 132730-122) ● A replacement for the factory-installed presser foot is available through your authorized dealer. (Part number: 138135-122) 1. 2. 3. 4. 5. 6. 7. 90/14 needle No. Part Name 5 Bobbin 6 Needle set 7 Oval screwdriver OPTIONAL...

Users Manual - English and Spanish
Page 12
... a clicking sound; Use only the enclosed bobbin or bobbins of the same type (part code: SA156, SFB: XA5539-151). Raise the needle to loosen, breaking the needle and resulting in injury. KNOWING YOUR SEWING MACHINE Trim the excess thread above the bobbin. Actual size 11.5 mm (7/16 inches) This model...machine is started or the handwheel is wound, when the thread runs low it may cause the thread tension to loosen, breaking the needle and resulting in injury. 1 2 a Wound evenly b Wound poorly ● The bobbin was designed specifically for this is not a malfunction. ● The...
... a clicking sound; Use only the enclosed bobbin or bobbins of the same type (part code: SA156, SFB: XA5539-151). Raise the needle to loosen, breaking the needle and resulting in injury. KNOWING YOUR SEWING MACHINE Trim the excess thread above the bobbin. Actual size 11.5 mm (7/16 inches) This model...machine is started or the handwheel is wound, when the thread runs low it may cause the thread tension to loosen, breaking the needle and resulting in injury. 1 2 a Wound evenly b Wound poorly ● The bobbin was designed specifically for this is not a malfunction. ● The...
Users Manual - English and Spanish
Page 13
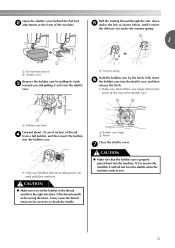
... installed, it may cause the thread tension to sew. 12 Pull the trailing thread through the slot, down e and to be incorrect or break the needle.
... installed, it may cause the thread tension to sew. 12 Pull the trailing thread through the slot, down e and to be incorrect or break the needle.
Users Manual - English and Spanish
Page 14
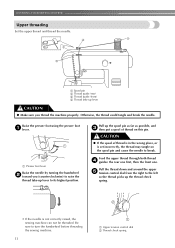
...Raise the presser foot using the presser foot a lever. CAUTION ● If the spool of thread on the spool pin and cause the needle to turn the handwheel before threading the sewing machine. 13 a Upper tension control dial b Thread check spring KNOWING YOUR SEWING MACHINE Upper threading... Set the upper thread and thread the needle. Otherwise, the thread could tangle and break the needle. Be sure to break. Pull the thread down and around the upper e tension control dial from the right to...
...Raise the presser foot using the presser foot a lever. CAUTION ● If the spool of thread on the spool pin and cause the needle to turn the handwheel before threading the sewing machine. 13 a Upper tension control dial b Thread check spring KNOWING YOUR SEWING MACHINE Upper threading... Set the upper thread and thread the needle. Otherwise, the thread could tangle and break the needle. Be sure to break. Pull the thread down and around the upper e tension control dial from the right to...
Users Manual - English and Spanish
Page 15
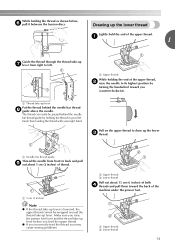
... presser foot. Drawing up g lever from front to draw up lever is lowered, the upper thread cannot be passed behind the needle bar thread h guide above the needle. The thread can easily be wrapped around the thread take -up lever. a Upper thread While holding the thread as shown below... Lightly hold the end of the upper thread. a Upper thread b Lower thread 14 While holding the end of the upper thread, b raise the needle to left hand, then feeding the thread with your left . Make sure you (counterclockwise). a 1 Guide the thread through the thread take -up ...
... presser foot. Drawing up g lever from front to draw up lever is lowered, the upper thread cannot be passed behind the needle bar thread h guide above the needle. The thread can easily be wrapped around the thread take -up lever. a Upper thread While holding the thread as shown below... Lightly hold the end of the upper thread. a Upper thread b Lower thread 14 While holding the end of the upper thread, b raise the needle to left hand, then feeding the thread with your left . Make sure you (counterclockwise). a 1 Guide the thread through the thread take -up ...
Users Manual - English and Spanish
Page 16
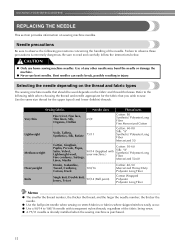
... resulting in injury. Refer to sew. and the larger the needle number, the thicker the needle. ● Use the ball point needle when sewing on sewing machine needles. KNOWING YOUR SEWING MACHINE REPLACING THE NEEDLE This section provides information on stretch fabrics or fabrics where skipped ...Linen, Muslin 90/14 (Supplied with transparent nylon threads, regardless of any other needle may bend the needle or damage the machine. ● Never use home sewing machine needles. Failure to 100/16 needle with your machine.) Cotton: 50-60 Silk: "A" Synthetic/ Polyester Long Fiber...
... resulting in injury. Refer to sew. and the larger the needle number, the thicker the needle. ● Use the ball point needle when sewing on sewing machine needles. KNOWING YOUR SEWING MACHINE REPLACING THE NEEDLE This section provides information on stretch fabrics or fabrics where skipped ...Linen, Muslin 90/14 (Supplied with transparent nylon threads, regardless of any other needle may bend the needle or damage the machine. ● Never use home sewing machine needles. Failure to 100/16 needle with your machine.) Cotton: 50-60 Silk: "A" Synthetic/ Polyester Long Fiber...
Users Manual - English and Spanish
Page 17
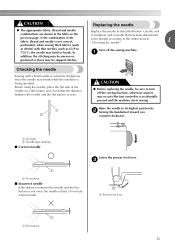
... off the sewing machine, otherwise injuries may occur if the foot controller is accidentally pressed and the machine starts sewing. Checking the needle Sewing with thin needles (such as 65/9 to the instructions in the table on a flat surface and check that has been determined to be straight according to 75/11...
... off the sewing machine, otherwise injuries may occur if the foot controller is accidentally pressed and the machine starts sewing. Checking the needle Sewing with thin needles (such as 65/9 to the instructions in the table on a flat surface and check that has been determined to be straight according to 75/11...
Users Manual - English and Spanish
Page 18
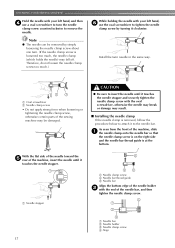
... the e rear of the machine, slide a the needle clamp onto the needle bar so that the needle clamp screw is on the right side and the needle bar thread guide is at the bottom. a Needle stopper a Needle clamp screw b Needle bar thread guide c Needle bar Align the bottom edge of the needle holder b with the end of the sewing...
... the e rear of the machine, slide a the needle clamp onto the needle bar so that the needle clamp screw is on the right side and the needle bar thread guide is at the bottom. a Needle stopper a Needle clamp screw b Needle bar thread guide c Needle bar Align the bottom edge of the needle holder b with the end of the sewing...
Users Manual - English and Spanish
Page 19
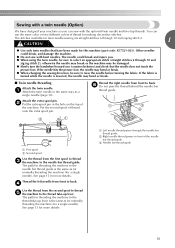
...select an appropriate stitch (straight stitches 6 through 10 and zigzag stitch 2), otherwise the needle may break or the machine may be sure to back. If the fabric is turned while the needle is the same as a single needle (page 16). d Use the thread from the first spool to thread c the ... thread guide. The path for threading the machine to back. See page 13 for more details. Thread the right needle from front to the needle bar thread guide is lowered, the needle may bend or break. ● When changing the sewing direction, be damaged. ● Slowly turn the handwheel toward ...
...select an appropriate stitch (straight stitches 6 through 10 and zigzag stitch 2), otherwise the needle may break or the machine may be sure to back. If the fabric is turned while the needle is the same as a single needle (page 16). d Use the thread from the first spool to thread c the ... thread guide. The path for threading the machine to back. See page 13 for more details. Thread the right needle from front to the needle bar thread guide is lowered, the needle may bend or break. ● When changing the sewing direction, be damaged. ● Slowly turn the handwheel toward ...
Users Manual - English and Spanish
Page 20
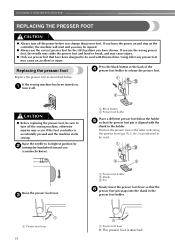
KNOWING YOUR SEWING MACHINE REPLACING THE PRESSER FOOT CAUTION ● Always turn off . If you use the wrong presser foot, the needle may strike the presser foot and bend or break, and may occur if the foot controller is aligned with this machine. Replacing the ...foot below . Raise the presser foot lever. Position the presser foot so the letter indicating the presser foot type (A, I, etc.) is attached. Raise the needle to release the presser foot. CAUTION ● Before replacing the presser foot, be read. Replace the presser foot as described below the holder e so ...
KNOWING YOUR SEWING MACHINE REPLACING THE PRESSER FOOT CAUTION ● Always turn off . If you use the wrong presser foot, the needle may strike the presser foot and bend or break, and may occur if the foot controller is aligned with this machine. Replacing the ...foot below . Raise the presser foot lever. Position the presser foot so the letter indicating the presser foot type (A, I, etc.) is attached. Raise the needle to release the presser foot. CAUTION ● Before replacing the presser foot, be read. Replace the presser foot as described below the holder e so ...
Users Manual - English and Spanish
Page 22
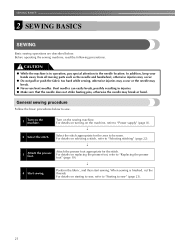
...Starting to "Replacing the presser foot" (page 19). ↓ 4 Start sewing. In addition, keep your hands away from all moving parts such as the needle and handwheel, otherwise injuries may occur. ● Do not pull or push the fabric too hard while sewing, otherwise injuries may occur or the... needle may break or bend. Turn on the machine, refer to "Selecting stitching" (page 22). ↓ 3 Attach the presser foot. For details on replacing...
...Starting to "Replacing the presser foot" (page 19). ↓ 4 Start sewing. In addition, keep your hands away from all moving parts such as the needle and handwheel, otherwise injuries may occur. ● Do not pull or push the fabric too hard while sewing, otherwise injuries may occur or the... needle may break or bend. Turn on the machine, refer to "Selecting stitching" (page 22). ↓ 3 Attach the presser foot. For details on replacing...
Users Manual - English and Spanish
Page 23
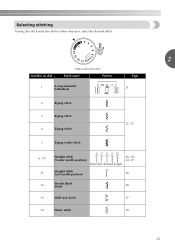
Selecting stitching Turning the stitch selection dial in either direction, select the desired stitch. 2 Number on dial Pattern selection dial Stitch name Pattern Page 1 4-step automatic buttonhole b ac d 31 2 Zigzag stitch 3 Zigzag stitch 4 Zigzag stitch 27, 35 5 Zigzag (satin) stitch 6 -10 11 12 Straight stitch (Center needle position) 6 7 8 9 10 28, 30, 34, 37 Select the desired length. Straight stitch (Left needle position) 28 Stretch blind Stitch 28 13 Shell tuck stitch 37 14 Elastic stitch 38 22
Selecting stitching Turning the stitch selection dial in either direction, select the desired stitch. 2 Number on dial Pattern selection dial Stitch name Pattern Page 1 4-step automatic buttonhole b ac d 31 2 Zigzag stitch 3 Zigzag stitch 4 Zigzag stitch 27, 35 5 Zigzag (satin) stitch 6 -10 11 12 Straight stitch (Center needle position) 6 7 8 9 10 28, 30, 34, 37 Select the desired length. Straight stitch (Left needle position) 28 Stretch blind Stitch 28 13 Shell tuck stitch 37 14 Elastic stitch 38 22
Users Manual - English and Spanish
Page 24
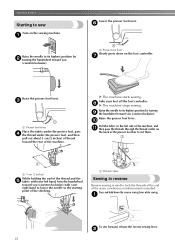
...on the back of thread toward you (counterclockwise). a Thread cutter Sewing in reverse Reverse sewing is used to cut them. Raise the needle to the left hand, turn the handwheel toward you (counterclockwise) with your foot off the foot controller. Press and hold down on... Raise the presser foot lever. j Pull the fabric to its highest position by turning i the handwheel toward you (counterclockwise). a Raise the needle to sew Lower the presser foot lever. f Turn on the foot controller. Raise the presser foot lever. SEWING BASICS Starting to its highest position...
...on the back of thread toward you (counterclockwise). a Thread cutter Sewing in reverse Reverse sewing is used to cut them. Raise the needle to the left hand, turn the handwheel toward you (counterclockwise) with your foot off the foot controller. Press and hold down on... Raise the presser foot lever. j Pull the fabric to its highest position by turning i the handwheel toward you (counterclockwise). a Raise the needle to sew Lower the presser foot lever. f Turn on the foot controller. Raise the presser foot lever. SEWING BASICS Starting to its highest position...

Users Manual - English and Spanish
Page 26
... a zigzag stitch, select a shorter stitch length in the fabric). Raise the presser foot lever, and then turn the b fabric. If the needle was raised, lower the needle by turning the handwheel toward you (counterclockwise). Lower the presser foot lever and continue c sewing. 25 CAUTION ● If fabric more than 6... mm (15/64 inches) thick is sewn or if the fabric is lowered, the needle may not be sure to raise the needle before changing the sewing direction. For the trial sewing, use a piece of fabric and thread that will be sewn since, depending...
... a zigzag stitch, select a shorter stitch length in the fabric). Raise the presser foot lever, and then turn the b fabric. If the needle was raised, lower the needle by turning the handwheel toward you (counterclockwise). Lower the presser foot lever and continue c sewing. 25 CAUTION ● If fabric more than 6... mm (15/64 inches) thick is sewn or if the fabric is lowered, the needle may not be sure to raise the needle before changing the sewing direction. For the trial sewing, use a piece of fabric and thread that will be sewn since, depending...

Users Manual - English and Spanish
Page 28
... stitch with a zigzag stitch, use the zigzag stitches to sew" (page 23). CAUTION ● Slowly turn the handwheel toward you (counterclockwise) and check that the needle does not touch the presser foot. Start sawing. c • For details, refer to "Starting to join together seams and finish them in one operation. UTILITY... 3 UTILITY STITCHES USEFUL STITCHES Zigzag stitches You can use straight stitches at the b beginning of the zigzag stitch for sewing stretch materials. Lower the needle into the fabric at the beginning and end of the stitching. If the...
... stitch with a zigzag stitch, use the zigzag stitches to sew" (page 23). CAUTION ● Slowly turn the handwheel toward you (counterclockwise) and check that the needle does not touch the presser foot. Start sawing. c • For details, refer to "Starting to join together seams and finish them in one operation. UTILITY... 3 UTILITY STITCHES USEFUL STITCHES Zigzag stitches You can use straight stitches at the b beginning of the zigzag stitch for sewing stretch materials. Lower the needle into the fabric at the beginning and end of the stitching. If the...


