
Hand Book - English
Page 1
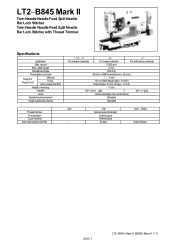
... − #22 DP × 17 #22 Horizontal rotary hook (vertical axis) Standard Standard Thread trimmer Thread wiper Quick reverse Automatic presser bar lifter −400 − −700 Scissors type (Solenoid) Solenoid type Solenoid type Air type −900 · −900S Solenoid type 2000.7 LT2−B845 Mark II, B8450 Mark II 1/11 LT2−B845 Mark II Twin Needle Needle Feed Split Needle Bar Lock Stitcher Twin Needle Needle Feed Split Needle Bar Lock Stitcher with Thread Trimmer Specifications Application Max.
... − #22 DP × 17 #22 Horizontal rotary hook (vertical axis) Standard Standard Thread trimmer Thread wiper Quick reverse Automatic presser bar lifter −400 − −700 Scissors type (Solenoid) Solenoid type Solenoid type Air type −900 · −900S Solenoid type 2000.7 LT2−B845 Mark II, B8450 Mark II 1/11 LT2−B845 Mark II Twin Needle Needle Feed Split Needle Bar Lock Stitcher Twin Needle Needle Feed Split Needle Bar Lock Stitcher with Thread Trimmer Specifications Application Max.
Hand Book - English
Page 2
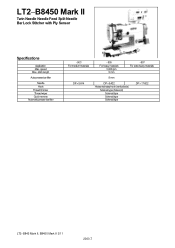
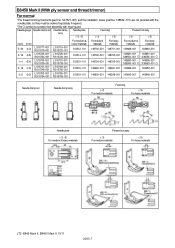
LT2−B8450 Mark II Twin Needle Needle Feed Split Needle Bar Lock Stitcher with Ply Sensor Specifications Application Max. speed Max. .stitch length Auto-presser bar lifter Needle Hook Thread trimmer Thread wiper Quick reverse Automatic presser bar lifter −903 For medium materials DP × 5 #14 −905 For heavy materials 3,000 rpm 5 mm −907 For extra heavy materials 8 mm DP × 5 #22 Horizontal rotary hook (vertical axis) Scissors type (Solenoid) Solenoid type Solenoid type Solenoid type DP × 17 #22 LT2−B845 Mark II, B8450 Mark II 2/11 2000.7
LT2−B8450 Mark II Twin Needle Needle Feed Split Needle Bar Lock Stitcher with Ply Sensor Specifications Application Max. speed Max. .stitch length Auto-presser bar lifter Needle Hook Thread trimmer Thread wiper Quick reverse Automatic presser bar lifter −903 For medium materials DP × 5 #14 −905 For heavy materials 3,000 rpm 5 mm −907 For extra heavy materials 8 mm DP × 5 #22 Horizontal rotary hook (vertical axis) Scissors type (Solenoid) Solenoid type Solenoid type Solenoid type DP × 17 #22 LT2−B845 Mark II, B8450 Mark II 2/11 2000.7
Hand Book - English
Page 3
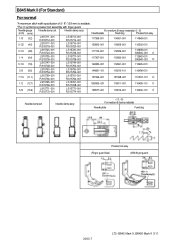
...;001 116512−001 116500−101 ¡ Needle clamp set Needle clamp assy (−3, −5) For medium & heavy materials Needle plate Feed dog Presser foot assy (Finger guard less) (With finger guard) 2000.7 LT2−B845 Mark II, B8450 Mark II 3/11 B845 Mark II (For Standard) For normal *A maximum stitch width specification of 5 / 8" (15.9 mm) is available. *The ¡ symbol is a presser foot assembly with finger guard.
...;001 116512−001 116500−101 ¡ Needle clamp set Needle clamp assy (−3, −5) For medium & heavy materials Needle plate Feed dog Presser foot assy (Finger guard less) (With finger guard) 2000.7 LT2−B845 Mark II, B8450 Mark II 3/11 B845 Mark II (For Standard) For normal *A maximum stitch width specification of 5 / 8" (15.9 mm) is available. *The ¡ symbol is a presser foot assembly with finger guard.
Hand Book - English
Page 4
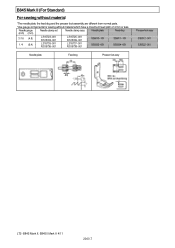
... S36011−101 S36024−001 Needle plate Feed dog Presser foot assy Presser foot assy S36012−001 S36022−001 LT2−B845 Mark II, B8450 Mark II 4/11 2000.7 B845 Mark II (For Standard) For sewing without material *The needle plate, the feed dog and the presser foot assembly are different from normal parts. *Use gauge components for sewing without material which have a maximum feed pitch of 4 mm or less...
... S36011−101 S36024−001 Needle plate Feed dog Presser foot assy Presser foot assy S36012−001 S36022−001 LT2−B845 Mark II, B8450 Mark II 4/11 2000.7 B845 Mark II (For Standard) For sewing without material *The needle plate, the feed dog and the presser foot assembly are different from normal parts. *Use gauge components for sewing without material which have a maximum feed pitch of 4 mm or less...
Hand Book - English
Page 5
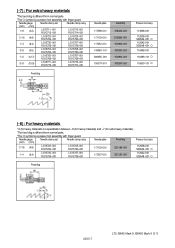
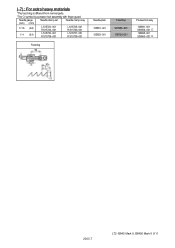
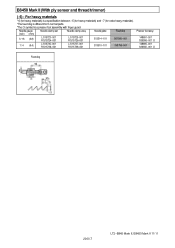
...001 S36548−001 ¡ Feed dog 2000.7 LT2−B845 Mark II, B8450 Mark II 5/11 (−7) : For extra heavy materials *The feed dog is different from normal parts. *The ¡ symbol is a presser foot assembly with finger guard. Needle gauge (inch) (mm) Needle clamp set Needle clamp assy (inch) (mm) 1... ¡ (−6) : For heavy materials *-6 (for heavy materials) is a specification between -5 (for heavy materials) and -7 (for extra heavy materials). *The feed dog is different from normal parts. *The ¡ symbol is a presser foot assembly with finger guard.
...001 S36548−001 ¡ Feed dog 2000.7 LT2−B845 Mark II, B8450 Mark II 5/11 (−7) : For extra heavy materials *The feed dog is different from normal parts. *The ¡ symbol is a presser foot assembly with finger guard. Needle gauge (inch) (mm) Needle clamp set Needle clamp assy (inch) (mm) 1... ¡ (−6) : For heavy materials *-6 (for heavy materials) is a specification between -5 (for heavy materials) and -7 (for extra heavy materials). *The feed dog is different from normal parts. *The ¡ symbol is a presser foot assembly with finger guard.
Hand Book - English
Page 6
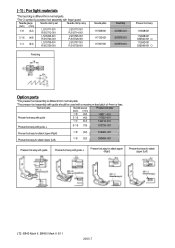
... light materials *The feed dog is different from normal parts. *The ¡ symbol is different from normal parts. *The presser foot assembly with guide should be used with a maximum feed pitch of parts Needle gauge Presser foot assy (inch) (mm) 1 /8 (3.2) 149311−001 Presser foot assy with guide 3 /16 (4.8) 117281−001 1 /4 (6.4) 149312−001 Presser foot assy with guide, L 5 /16 (7.9) S13735−001 Presser foot assy for attach zipper (Right) 1 /8 (3.2) S14080−001 Presser foot assy...
... light materials *The feed dog is different from normal parts. *The ¡ symbol is different from normal parts. *The presser foot assembly with guide should be used with a maximum feed pitch of parts Needle gauge Presser foot assy (inch) (mm) 1 /8 (3.2) 149311−001 Presser foot assy with guide 3 /16 (4.8) 117281−001 1 /4 (6.4) 149312−001 Presser foot assy with guide, L 5 /16 (7.9) S13735−001 Presser foot assy for attach zipper (Right) 1 /8 (3.2) S14080−001 Presser foot assy...
Hand Book - English
Page 7
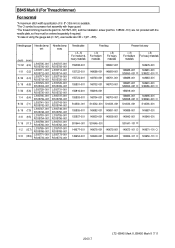
...installation screw (part No. 148539−101) are not provided with finger guard. *The thread trimming fixed knife (part No. Needlegauge Needleclamp Needleclamp set (2 / 32"), use needle size DB × 1(#7 − #18). B845 Mark II (For Thread trimmer) For normal *A maximum stitch width specification of 5 / 8" (15.9 mm) is available. *The ¡ symbol is a presser foot assembly with the needle plate...8722;001 S01644−001 149677−001 149954−001 Feed dog (−3) For medium materials (−5) For heavy materials 148697...LT2−B845 Mark II, B8450 Mark II 7/11
...installation screw (part No. 148539−101) are not provided with finger guard. *The thread trimming fixed knife (part No. Needlegauge Needleclamp Needleclamp set (2 / 32"), use needle size DB × 1(#7 − #18). B845 Mark II (For Thread trimmer) For normal *A maximum stitch width specification of 5 / 8" (15.9 mm) is available. *The ¡ symbol is a presser foot assembly with the needle plate...8722;001 S01644−001 149677−001 149954−001 Feed dog (−3) For medium materials (−5) For heavy materials 148697...LT2−B845 Mark II, B8450 Mark II 7/11
Hand Book - English
Page 8
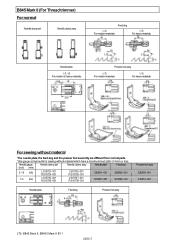
... heavy materials Needle plate (−3, −5) For medium & heavy materials Presser foot assy (−3) For medium materials (−5) For heavy materials For sewing without material *The needle plate, the feed dog and the presser foot assembly are different from normal parts. *Use gauge components for sewing without material which have a maximum feed pitch of 4 mm or less. B845 Mark II (For Thread trimmer) For normal Needle clamp set Needle clamp assy Needle plate Feed dog (inch) (mm...
... heavy materials Needle plate (−3, −5) For medium & heavy materials Presser foot assy (−3) For medium materials (−5) For heavy materials For sewing without material *The needle plate, the feed dog and the presser foot assembly are different from normal parts. *Use gauge components for sewing without material which have a maximum feed pitch of 4 mm or less. B845 Mark II (For Thread trimmer) For normal Needle clamp set Needle clamp assy Needle plate Feed dog (inch) (mm...
Hand Book - English
Page 9
...;001 Feed dog Needle plate 155851−001 155853−001 Feed dog S07905−001 158756−001 Presser foot assy 148691−001 S36556−001 ¡ 148695−001 S36560−001 ¡ 2000.7 LT2−B845 Mark II, B8450 Mark II 9/11 (−7) : For extra heavy materials *The feed dog is different from normal parts. *The ¡ symbol is a presser foot assembly...
...;001 Feed dog Needle plate 155851−001 155853−001 Feed dog S07905−001 158756−001 Presser foot assy 148691−001 S36556−001 ¡ 148695−001 S36560−001 ¡ 2000.7 LT2−B845 Mark II, B8450 Mark II 9/11 (−7) : For extra heavy materials *The feed dog is different from normal parts. *The ¡ symbol is a presser foot assembly...
Hand Book - English
Page 10
... 149942−001 149940−001 Needle clamp set Needle clamp assy Feed dog (−3) For medium materials (−5) For heavy materials Needle plate (−3, −5) For medium & heavy materials Presser foot assy (−3) For medium materials (−5) For heavy materials LT2−B845 Mark II, B8450 Mark II 10/11 2000.7 S07527−001) and the installation screw (part No. 148539−101) are not...
... 149942−001 149940−001 Needle clamp set Needle clamp assy Feed dog (−3) For medium materials (−5) For heavy materials Needle plate (−3, −5) For medium & heavy materials Presser foot assy (−3) For medium materials (−5) For heavy materials LT2−B845 Mark II, B8450 Mark II 10/11 2000.7 S07527−001) and the installation screw (part No. 148539−101) are not...
Hand Book - English
Page 11
...ply sensor and thread trimmer) (−6) : For heavy materials *-6 (for heavy materials) is a specification between -5 (for heavy materials) and -7 (for extra heavy materials). *The feed dog is different from normal parts. *The ¡ symbol is a presser foot assembly with finger guard. Needle gauge Needle clamp set Needle clamp assy Needle plate Feed dog (inch) (mm...001 R:S15738−001 S13510−101 158756−001 Presser foot assy 148691−001 S36556−001 ¡ 148695−001 S36560−001 ¡ Feed dog 2000.7 LT2−B845 Mark II, B8450 Mark II 11/11
...ply sensor and thread trimmer) (−6) : For heavy materials *-6 (for heavy materials) is a specification between -5 (for heavy materials) and -7 (for extra heavy materials). *The feed dog is different from normal parts. *The ¡ symbol is a presser foot assembly with finger guard. Needle gauge Needle clamp set Needle clamp assy Needle plate Feed dog (inch) (mm...001 R:S15738−001 S13510−101 158756−001 Presser foot assy 148691−001 S36556−001 ¡ 148695−001 S36560−001 ¡ Feed dog 2000.7 LT2−B845 Mark II, B8450 Mark II 11/11
Instruction Manual - Multi
Page 1
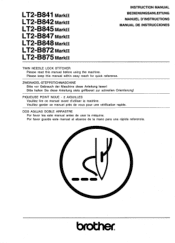
... la mano para una rapida referencia. 4=1 OM all PIQUEUSE POINT NOUE - 2 AIGUILLES Veuillez lire ce manuel avant d'utiliser la machine. Please keep this manual before using the machine. Veuillez garder ce manuel pros de vous pour une verification rapide. LT2-B841 Markll LT2-B842 Markll LT2-B845 nnarkii LT2-B847 MarId' LT2-B848 MarkII LT2-B872 MarkII LT2-B875 MarkII INSTRUCTION MANUAL BEDIENUNGSANLEITUNG MANUEL D'INSTRUCTIONS MANUAL DE INSTRUCCIONES TWIN NEEDLE LOCK STITCHER Please...
... la mano para una rapida referencia. 4=1 OM all PIQUEUSE POINT NOUE - 2 AIGUILLES Veuillez lire ce manuel avant d'utiliser la machine. Please keep this manual before using the machine. Veuillez garder ce manuel pros de vous pour une verification rapide. LT2-B841 Markll LT2-B842 Markll LT2-B845 nnarkii LT2-B847 MarId' LT2-B848 MarkII LT2-B872 MarkII LT2-B875 MarkII INSTRUCTION MANUAL BEDIENUNGSANLEITUNG MANUEL D'INSTRUCTIONS MANUAL DE INSTRUCCIONES TWIN NEEDLE LOCK STITCHER Please...
Instruction Manual - Multi
Page 2
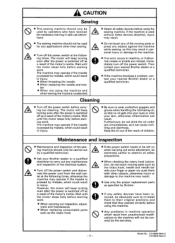
... the machine while sewing, as the rotary hook, needle and needle bar A • Turn off the power switch at the following times, otherwise the damage to the machine may result in safe use beforehand. A Cleaning • Turn off as specified by a qualified technician. Wait until the motor stops fully before using the sewing machine. machine may operate if the treadle is switched off the power switch before starting work . Maintenance and...
... the machine while sewing, as the rotary hook, needle and needle bar A • Turn off the power switch at the following times, otherwise the damage to the machine may result in safe use beforehand. A Cleaning • Turn off as specified by a qualified technician. Wait until the motor stops fully before using the sewing machine. machine may operate if the treadle is switched off the power switch before starting work . Maintenance and...
Instruction Manual - Multi
Page 11
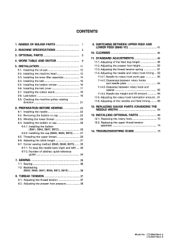
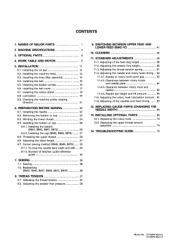
... the presser foot pressure 38 9. Adjusting the thread tension spring 51 11-4. LT2-B840 Mark II LT2-B870 Mark II OPTIONAL PARTS 6 4. Installing the belt 16 5-5. Corner sewing method [B845, B848, B875] 33 6-7-1. Clearances between rotary hook and opener 55 11-4-4. TROUBLESHOOTING GUIDE 75 Model No. WORK TABLE AND MOTOR 9 5. PREPARATION BEFORE SEWING 22 6-1. Installing the needle 22 6-2. To stop the needle bars (right and left) 33 6-7-2. Adjusting of stitches: quick-reference guide 34 7. Replacing the rotary hook 70 13-2. Installing the oil...
... the presser foot pressure 38 9. Adjusting the thread tension spring 51 11-4. LT2-B840 Mark II LT2-B870 Mark II OPTIONAL PARTS 6 4. Installing the belt 16 5-5. Corner sewing method [B845, B848, B875] 33 6-7-1. Clearances between rotary hook and opener 55 11-4-4. TROUBLESHOOTING GUIDE 75 Model No. WORK TABLE AND MOTOR 9 5. PREPARATION BEFORE SEWING 22 6-1. Installing the needle 22 6-2. To stop the needle bars (right and left) 33 6-7-2. Adjusting of stitches: quick-reference guide 34 7. Replacing the rotary hook 70 13-2. Installing the oil...
Instruction Manual - Multi
Page 12
... B872] 26 6-4-2. Threading the upper thread 29 6-6. To stop the needle bars (right and left) 33 6-7-2. Clearance between rotary hooks and needle plate 54 11-4-3. REPLACING GAUGE PARTS (CHANGING THE NEEDLE WIDTH) 64 13. INSTALLING OPTIONAL PARTS 69 13-1. TROUBLESHOOTING GUIDE 75 Model No. MACHINE SPECIFICATIONS 3 3. Installing the oil pan 12 5-2. Installing the bobbin winder 16 5-6. Checking the machine pulley rotating direction 21 6. Winding the lower thread 24 6-4. Adjusting the stitch length 31 6-7. Backtacking [B842, B845, B847, B848...
... B872] 26 6-4-2. Threading the upper thread 29 6-6. To stop the needle bars (right and left) 33 6-7-2. Clearance between rotary hooks and needle plate 54 11-4-3. REPLACING GAUGE PARTS (CHANGING THE NEEDLE WIDTH) 64 13. INSTALLING OPTIONAL PARTS 69 13-1. TROUBLESHOOTING GUIDE 75 Model No. MACHINE SPECIFICATIONS 3 3. Installing the oil pan 12 5-2. Installing the bobbin winder 16 5-6. Checking the machine pulley rotating direction 21 6. Winding the lower thread 24 6-4. Adjusting the stitch length 31 6-7. Backtacking [B842, B845, B847, B848...

Instruction Manual - Multi
Page 63
... de securite. - 48 - Model No. Wait until the motor stops fully before starting work. • When carrying out inspection, adjustment and maintenance • When replacing consumable parts such as a result of the electrical system. • If any safety devices have been removed, be extremely careful to their original positions and check that they operate correctly before using the machine. • Die Wartung und...
... de securite. - 48 - Model No. Wait until the motor stops fully before starting work. • When carrying out inspection, adjustment and maintenance • When replacing consumable parts such as a result of the electrical system. • If any safety devices have been removed, be extremely careful to their original positions and check that they operate correctly before using the machine. • Die Wartung und...
Instruction Manual - Multi
Page 74
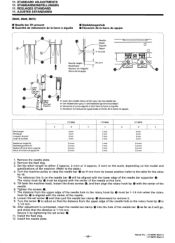
... the hole of the needle hole to raise the needle bar fib by tightening the set screw fe and then pull the needle bar clamp iD downward to the table.) 4. The reference line 6 on the model and specifications of the machine. (Refer to remove it will be 1-1.5 mm when the rotary hook tip is aligned with the lower edge of the needle bar supporter e. After adjustment is completed, insert the needle bar clamp (D into the needle bar...
... the hole of the needle hole to raise the needle bar fib by tightening the set screw fe and then pull the needle bar clamp iD downward to the table.) 4. The reference line 6 on the model and specifications of the machine. (Refer to remove it will be 1-1.5 mm when the rotary hook tip is aligned with the lower edge of the needle bar supporter e. After adjustment is completed, insert the needle bar clamp (D into the needle bar...

Instruction Manual - Multi
Page 79
...Brother. - 64 - REPLACING GAUGE PARTS (CHANGING THE NEEDLE WIDTH) 12. AL • Vor dem Austauschen mull der Netzschalter ausgeschaltet und das Netzkabel aus der Steckdose gezogen werden. ERSETZEN VERSCHIEDENER TEILE (ANDERN DER NADELBREITE) 12. War-ten Sie bis der Motor zum vollstandigen Stillstand gekommen ist, bevor Sie mit dem Arbeiten beginnen. The machine may operate... if the treadle is switched off the power switch and disconnect the power cord before starting work...
...Brother. - 64 - REPLACING GAUGE PARTS (CHANGING THE NEEDLE WIDTH) 12. AL • Vor dem Austauschen mull der Netzschalter ausgeschaltet und das Netzkabel aus der Steckdose gezogen werden. ERSETZEN VERSCHIEDENER TEILE (ANDERN DER NADELBREITE) 12. War-ten Sie bis der Motor zum vollstandigen Stillstand gekommen ist, bevor Sie mit dem Arbeiten beginnen. The machine may operate... if the treadle is switched off the power switch and disconnect the power cord before starting work...

Instruction Manual - Multi
Page 90
... rotary hook, feed dog or other part damaged? Where to check the following before starting work. If it is switched off the power switch and disconnect the power cord before carrying out troubleshooting. LT2-6840 Mark II (English) LT2-6870 Mark II (English) RECHERCHES DE PANNES 14. The motor will keep turning even after the power is incorrect, install the needle correctly. --`1 • Is the machine properly threaded? The machine may operate...
... rotary hook, feed dog or other part damaged? Where to check the following before starting work. If it is switched off the power switch and disconnect the power cord before carrying out troubleshooting. LT2-6840 Mark II (English) LT2-6870 Mark II (English) RECHERCHES DE PANNES 14. The motor will keep turning even after the power is incorrect, install the needle correctly. --`1 • Is the machine properly threaded? The machine may operate...

Instruction Manual - Multi
Page 91
... spring. • Is the needle thread tension and/or bobbin thread tension too low? In such cases, reduce the operating speed by selecting a motor pulley that matches the maximum sewing speed and frequency of the needle hole in the feed dog? AM1.... 6. Adjust the upper and lower thread tensions. • Is the bobbin scratched? FEHLERSUCHE 14. TROUBLESHOOTING GUIDE 14. Is the needle tip blunt? If the needle does not drop into the middle of your particular model and sewing specifications is...
... spring. • Is the needle thread tension and/or bobbin thread tension too low? In such cases, reduce the operating speed by selecting a motor pulley that matches the maximum sewing speed and frequency of the needle hole in the feed dog? AM1.... 6. Adjust the upper and lower thread tensions. • Is the bobbin scratched? FEHLERSUCHE 14. TROUBLESHOOTING GUIDE 14. Is the needle tip blunt? If the needle does not drop into the middle of your particular model and sewing specifications is...


