
Users Manual - English
Page 3
... to be fed through the sewing machine needle and sewing on the machine. (XE8992-001) (XE8878-001) 2 Bobbin case (gray) (XE8298-001) Bobbin cover with this kit was purchased. Bobbin work is sewn using the special bobbin case (gray) and bobbin cover with tabs included with tabs (*See Note.) Screwdriver (small) (X55468-051) CD-ROM (Contains the...
... to be fed through the sewing machine needle and sewing on the machine. (XE8992-001) (XE8878-001) 2 Bobbin case (gray) (XE8298-001) Bobbin cover with this kit was purchased. Bobbin work is sewn using the special bobbin case (gray) and bobbin cover with tabs included with tabs (*See Note.) Screwdriver (small) (X55468-051) CD-ROM (Contains the...
Users Manual - English
Page 6
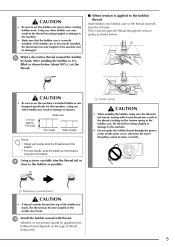
h CAUTION • Be sure to the machine. • Make sure that the bobbin case is incorrectly installed, the thread may become tangled or the machine may be damaged. If the bobbin case is correctly installed. Using any other bobbin case may result in the thread becoming tangled or damage to use the bobbin case (gray) when creating bobbin work.
h CAUTION • Be sure to the machine. • Make sure that the bobbin case is incorrectly installed, the thread may become tangled or the machine may be damaged. If the bobbin case is correctly installed. Using any other bobbin case may result in the thread becoming tangled or damage to use the bobbin case (gray) when creating bobbin work.
Users Manual - English
Page 9
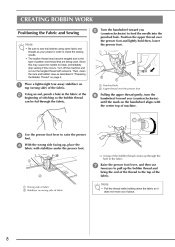
Then, clean the race and bobbin case as your project in order to check the sewing results. • The bobbin thread may cause the needle to break, immediately stop sewing if this occurs. Position the upper thread over the presser foot Pulling the upper thread ... handwheel toward you (counterclockwise) to feed the needle into the punched hole. g Raise the presser foot lever, and then use tweezers to pull up the bobbin thread and bring the end of machine. Since this may become tangled due to the type of place. 8 Place a lightweight tear-away stabilizer on wrong...
Then, clean the race and bobbin case as your project in order to check the sewing results. • The bobbin thread may cause the needle to break, immediately stop sewing if this occurs. Position the upper thread over the presser foot Pulling the upper thread ... handwheel toward you (counterclockwise) to feed the needle into the punched hole. g Raise the presser foot lever, and then use tweezers to pull up the bobbin thread and bring the end of machine. Since this may become tangled due to the type of place. 8 Place a lightweight tear-away stabilizer on wrong...
Users Manual - English
Page 14
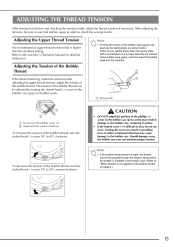
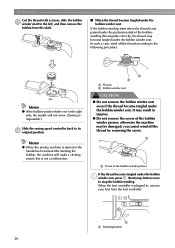
... be passed through the tension spring when the bobbin is installed in order to the machine's Operation Manual for bobbin work. Note • Turning the screw on the bobbin case (gray) for detailed instruction. Should damage occur, the bobbin case may push up the spring plate, as this ...Do not turn , do not use force. Turning the screw too much or providing force in damage to the bobbin case, rendering it is difficult to the bobbin case. ADJUSTING THE THREAD TENSION After sewing trial stitches and checking the sewing results, adjust the thread tensions if necessary....
... be passed through the tension spring when the bobbin is installed in order to the machine's Operation Manual for bobbin work. Note • Turning the screw on the bobbin case (gray) for detailed instruction. Should damage occur, the bobbin case may push up the spring plate, as this ...Do not turn , do not use force. Turning the screw too much or providing force in damage to the bobbin case, rendering it is difficult to the bobbin case. ADJUSTING THE THREAD TENSION After sewing trial stitches and checking the sewing results, adjust the thread tensions if necessary....

Operation Manual
Page 13
...while the sewing machine is marked with guides for the selected stitching. b Handwheel (page 50) Turn the handwheel toward you are learning to clean the bobbin case and race. g Power supply jack (page 17) Insert the plug on and off. i Presser foot holder (page 45) The presser foot is ...power switch to pages 10 through the needle bar thread guide. Memo z Refer to turn the sewing machine on the power supply cord into the bobbin case. b Thread guide disk (page 34) Pass the thread through the thread guide disk when using the needle threader to sew one stitch. a ...
...while the sewing machine is marked with guides for the selected stitching. b Handwheel (page 50) Turn the handwheel toward you are learning to clean the bobbin case and race. g Power supply jack (page 17) Insert the plug on and off. i Presser foot holder (page 45) The presser foot is ...power switch to pages 10 through the needle bar thread guide. Memo z Refer to turn the sewing machine on the power supply cord into the bobbin case. b Thread guide disk (page 34) Pass the thread through the thread guide disk when using the needle threader to sew one stitch. a ...
Operation Manual
Page 28
... will make a clicking sound; If the bobbin winding starts when the thread is impossible.) Slide the sewing speed controller back to stop button 26 In such a case, wind off the thread by removing the screw. this is turned after winding the bobbin, the machine will not move. (Sewing is... not passed under the pretension disk of the bobbin winder presser, otherwise the machine may become tangled under...
... will make a clicking sound; If the bobbin winding starts when the thread is impossible.) Slide the sewing speed controller back to stop button 26 In such a case, wind off the thread by removing the screw. this is turned after winding the bobbin, the machine will not move. (Sewing is... not passed under the pretension disk of the bobbin winder presser, otherwise the machine may become tangled under...
Operation Manual
Page 29
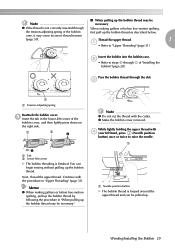
... Memo z The order that the thread passes under the pretension disk of the same type (part code: SA156, SFB (XA5539-151)). a CAUTION 1 ● Use a bobbin that surround the bobbin case. Winding/Installing the Bobbin 27 a Bobbin-winding thread guide Slide the bobbin winder shaft to the left hand, and d wind off the thread clockwise near the...
... Memo z The order that the thread passes under the pretension disk of the same type (part code: SA156, SFB (XA5539-151)). a CAUTION 1 ● Use a bobbin that surround the bobbin case. Winding/Installing the Bobbin 27 a Bobbin-winding thread guide Slide the bobbin winder shaft to the left hand, and d wind off the thread clockwise near the...
Operation Manual
Page 30
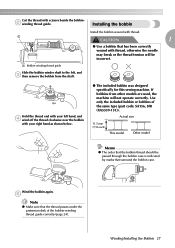
... hand. Otherwise, the thread may break or the thread tension will be incorrect. Remove the bobbin cover. a a Cutter X The cutter cuts the thread. 28 a Insert the bobbin into the bobbin case with your right hand. b a Needle position button b Presser foot lever Turn off the ...sewing machine. a Bobbin cover b Latch X The bobbin cover opens. c a b • Be sure to raise the needle, and then raise ...
... hand. Otherwise, the thread may break or the thread tension will be incorrect. Remove the bobbin cover. a a Cutter X The cutter cuts the thread. 28 a Insert the bobbin into the bobbin case with your right hand. b a Needle position button b Presser foot lever Turn off the ...sewing machine. a Bobbin cover b Latch X The bobbin cover opens. c a b • Be sure to raise the needle, and then raise ...
Operation Manual
Page 31
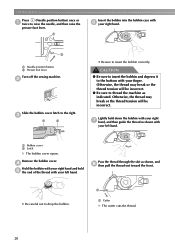
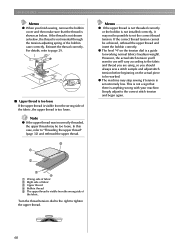
... 1 a • Refer to steps c through f of "Installing the bobbin" (page 28). Insert the bobbin into the bobbin case. b • Refer to "Upper Threading" (page 31). i Insert the tab in the lower-left corner X The bobbin threading is finished. Next, thread the upper thread. Continue with d your...then lightly press down on the right side. a b 2 1 a Tab b Lower-left corner of the bobbin first pull up the bobbin thread. Winding/Installing the Bobbin 29 case, it may cause incorrect thread tension (page 59). While lightly holding the upper thread with the procedure in "...
... 1 a • Refer to steps c through f of "Installing the bobbin" (page 28). Insert the bobbin into the bobbin case. b • Refer to "Upper Threading" (page 31). i Insert the tab in the lower-left corner X The bobbin threading is finished. Next, thread the upper thread. Continue with d your...then lightly press down on the right side. a b 2 1 a Tab b Lower-left corner of the bobbin first pull up the bobbin thread. Winding/Installing the Bobbin 29 case, it may cause incorrect thread tension (page 59). While lightly holding the upper thread with the procedure in "...
Operation Manual
Page 61
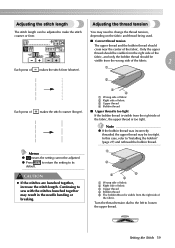
...be adjusted to "Installing the bobbin" (page 27) and rethread the bobbin thread. Note z If the bobbin thread was incorrectly threaded, the upper thread may be adjusted. Setting the Stitch 59 Turn the thread tension dial to the left to its default. In this case, refer to make the stitch... coarser or finer. You may result in the needle bending or breaking. Memo z means the setting cannot be too tight. c d a Wrong side of fabric b Right side of fabric c Upper thread d Bobbin thread ■ Upper thread is...
...be adjusted to "Installing the bobbin" (page 27) and rethread the bobbin thread. Note z If the bobbin thread was incorrectly threaded, the upper thread may be adjusted. Setting the Stitch 59 Turn the thread tension dial to the left to its default. In this case, refer to make the stitch... coarser or finer. You may result in the needle bending or breaking. Memo z means the setting cannot be too tight. c d a Wrong side of fabric b Right side of fabric c Upper thread d Bobbin thread ■ Upper thread is...
Operation Manual
Page 62
... guide for working normal fabrics (medium weight). Reinsert the thread correctly. z The machine may be achieved, rethread the upper thread and insert the bobbin correctly. Turn the thread tension dial to the right to page 29. ■ Upper thread is too loose If the upper thread is visible from... wrong side of the fabric, the upper thread is not shown as below , the thread is not inserted through the tension-adjusting spring of the bobbin case correctly. For details, refer to tighten the upper thread. 60 Simply adjust to "Threading the upper thread" (page 32) and rethread the upper ...
... guide for working normal fabrics (medium weight). Reinsert the thread correctly. z The machine may be achieved, rethread the upper thread and insert the bobbin correctly. Turn the thread tension dial to the right to page 29. ■ Upper thread is too loose If the upper thread is visible from... wrong side of the fabric, the upper thread is not shown as below , the thread is not inserted through the tension-adjusting spring of the bobbin case correctly. For details, refer to tighten the upper thread. 60 Simply adjust to "Threading the upper thread" (page 32) and rethread the upper ...

Operation Manual
Page 132
Attaching the embroidery frame Wind the embroidery bobbin thread onto the a bobbin and set the embroidery frame into the bobbin case. • For details, refer to attach the embroidery frame. Line up the embroidery frame guide tabs and the embroidery carriage frame holder slots and push ... ● Do not touch a button. Note z Be sure to raise the needle. EMBROIDERY Attaching the Embroidery Frame This section describes how to "Winding/Installing the Bobbin" (page 22).
Attaching the embroidery frame Wind the embroidery bobbin thread onto the a bobbin and set the embroidery frame into the bobbin case. • For details, refer to attach the embroidery frame. Line up the embroidery frame guide tabs and the embroidery carriage frame holder slots and push ... ● Do not touch a button. Note z Be sure to raise the needle. EMBROIDERY Attaching the Embroidery Frame This section describes how to "Winding/Installing the Bobbin" (page 22).
Operation Manual
Page 154
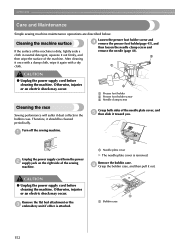
... After cleaning it once with a dry cloth. Cleaning the machine surface If the surface of the machine is dirty, lightly soak a cloth in the bobbin case. Loosen the presser foot holder screw and d remove the presser foot holder(page 45), and then loosen the needle clamp screw and remove the needle... (page 41). Turn off the sewing machine. f Grasp the bobbin case, and then pull it out firmly, and then wipe the surface of the machine. Remove the flat bed attachment or the c embroidery unit if either...
... After cleaning it once with a dry cloth. Cleaning the machine surface If the surface of the machine is dirty, lightly soak a cloth in the bobbin case. Loosen the presser foot holder screw and d remove the presser foot holder(page 45), and then loosen the needle clamp screw and remove the needle... (page 41). Turn off the sewing machine. f Grasp the bobbin case, and then pull it out firmly, and then wipe the surface of the machine. Remove the flat bed attachment or the c embroidery unit if either...

Operation Manual
Page 155
Insert the tabs on the needle plate cover into i the needle plate, and then slide the cover back on the bobbin case aligns with the spring. Otherwise, the upper thread may become tangled, the needle may break or sewing performance may not ... a Needle plate cover CAUTION ● Never use a bobbin case that the right side of the projection touches the spring and there is scratched. a 5 b c c b a Bobbin case b Projection c Spring Memo z Move the bobbin case right and left to make sure that is a space on the bobbin thread sensor, the sensor may suffer. z If lint or...
Insert the tabs on the needle plate cover into i the needle plate, and then slide the cover back on the bobbin case aligns with the spring. Otherwise, the upper thread may become tangled, the needle may break or sewing performance may not ... a Needle plate cover CAUTION ● Never use a bobbin case that the right side of the projection touches the spring and there is scratched. a 5 b c c b a Bobbin case b Projection c Spring Memo z Move the bobbin case right and left to make sure that is a space on the bobbin thread sensor, the sensor may suffer. z If lint or...
Operation Manual
Page 156
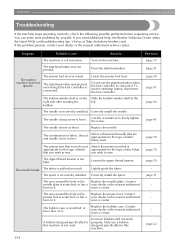
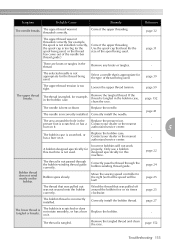
...dealer or the nearest authorized service center. The bobbin case is appropriate for the type of stitch that that is scratched, or has a burr on it . Use the screwdriver to sew. you need additional help, the Brother Solutions Center offers the latest FAQs and troubleshooting... plate. Contact presser foot is too tight. Incorrect bobbins will not work properly. To use the start /stop button when the foot controller is not correct. Replace the bobbin case. Visit us at [http://solutions.brother.com]. Lightly guide the fabric. Correctly install the needle...
...dealer or the nearest authorized service center. The bobbin case is appropriate for the type of stitch that that is scratched, or has a burr on it . Use the screwdriver to sew. you need additional help, the Brother Solutions Center offers the latest FAQs and troubleshooting... plate. Contact presser foot is too tight. Incorrect bobbins will not work properly. To use the start /stop button when the foot controller is not correct. Replace the bobbin case. Visit us at [http://solutions.brother.com]. Lightly guide the fabric. Correctly install the needle...
Operation Manual
Page 157
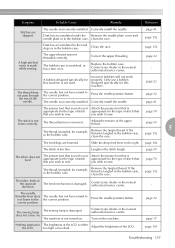
...39 The upper thread tension is incorrectly installed. Loosen the upper thread tension. burr on the bobbin. Replace the bobbin case. Incorrect bobbins will be fast). page 22 Bobbin thread does not wind neatly on it. Move the sewing speed controller to the right (so ...page 152 The needle is tangled in the thread. authorized service center. 5 The bobbin case is not passed through the bobbin-winding thread guide. The upper thread was not wound onto the bobbin correctly. Correct the upper threading. Correctly install the needle. The thread is scratched...
...39 The upper thread tension is incorrectly installed. Loosen the upper thread tension. burr on the bobbin. Replace the bobbin case. Incorrect bobbins will be fast). page 22 Bobbin thread does not wind neatly on it. Move the sewing speed controller to the right (so ...page 152 The needle is tangled in the thread. authorized service center. 5 The bobbin case is not passed through the bobbin-winding thread guide. The upper thread was not wound onto the bobbin correctly. Correct the upper threading. Correctly install the needle. The thread is scratched...
Operation Manual
Page 159
.... The brightness of the upper thread. Dust has accumulated under the Remove the needle plate cover and needle plate or in the bobbin case, clean the race. Contact your dealer or the nearest authorized service center. - Correctly install the needle. The thread tension is ...the tangle thread. direction. Adjust the brightness of the needle. Clean the race. The upper thread was not threaded correctly. Replace the bobbin case. page 22 The thread does not pass through the eye of the LCD. Press the needle position button. you wish to sew....
.... The brightness of the upper thread. Dust has accumulated under the Remove the needle plate cover and needle plate or in the bobbin case, clean the race. Contact your dealer or the nearest authorized service center. - Correctly install the needle. The thread tension is ...the tangle thread. direction. Adjust the brightness of the needle. Clean the race. The upper thread was not threaded correctly. Replace the bobbin case. page 22 The thread does not pass through the eye of the LCD. Press the needle position button. you wish to sew....
Operation Manual
Page 160
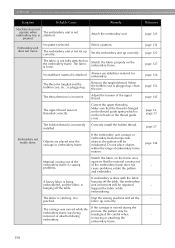
...a pattern. Stretch the fabric properly on the left side of the thread guide cover. When the bobbin case is moved during embroidery. Objects are placed near the carriage or embroidery frame. A heavy fabric is ...158 No pattern selected. Support the fabric while embroidering. Adjust the tension of embroidery frame motion. The bobbin thread is loose. If the embroidery unit carriage or embroidery frame bumps into objects, the pattern will .... The thread is tangled and the bobbin case, etc., is not set the fabric up correctly. No stabilizer material is attached.
...a pattern. Stretch the fabric properly on the left side of the thread guide cover. When the bobbin case is moved during embroidery. Objects are placed near the carriage or embroidery frame. A heavy fabric is ...158 No pattern selected. Support the fabric while embroidering. Adjust the tension of embroidery frame motion. The bobbin thread is loose. If the embroidery unit carriage or embroidery frame bumps into objects, the pattern will .... The thread is tangled and the bobbin case, etc., is not set the fabric up correctly. No stabilizer material is attached.

Operation Manual
Page 163
... pressed when no pattern is 17 saved in the machine's memory without pressing (Retrieve key). The upper thread has become tangled around the bobbin case, and the 24 needle is attached. The reverse/reinforcement stitch button, needle position button or 18 thread cutter button was pressed while the... bobbin winder shaft is moved to use a function that will not fit within the frame. No Error Message Probable Cause The start /stop button ...
... pressed when no pattern is 17 saved in the machine's memory without pressing (Retrieve key). The upper thread has become tangled around the bobbin case, and the 24 needle is attached. The reverse/reinforcement stitch button, needle position button or 18 thread cutter button was pressed while the... bobbin winder shaft is moved to use a function that will not fit within the frame. No Error Message Probable Cause The start /stop button ...

Operation Manual
Page 167
... dogs 11 flat bed attachment 10 foot controller 9, 52 changing sewing direction 65 foot controller jack 11 checking needle 40 frame pattern selection 137 cleaning bobbin case 152 fraying, preventing 74 cleaning brush 9 free-arm sewing 46 cleaning machine surface 152 free-motion quilting 102 concealed seams 90 front view 10 connecting...
... dogs 11 flat bed attachment 10 foot controller 9, 52 changing sewing direction 65 foot controller jack 11 checking needle 40 frame pattern selection 137 cleaning bobbin case 152 fraying, preventing 74 cleaning brush 9 free-arm sewing 46 cleaning machine surface 152 free-motion quilting 102 concealed seams 90 front view 10 connecting...


