Users Manual - English and Spanish
Page 2
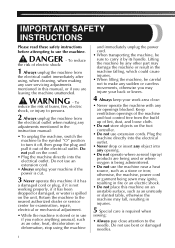
Return the machine to the nearest authorized dealer or service center for examination, repair, electrical or mechanical adjustment. • While the machine is required when sewing: • Always pay close attention to the needle. otherwise, the machine, power cord or garment being administered. • Do not use the machine near a heat ...
Return the machine to the nearest authorized dealer or service center for examination, repair, electrical or mechanical adjustment. • While the machine is required when sewing: • Always pay close attention to the needle. otherwise, the machine, power cord or garment being administered. • Do not use the machine near a heat ...
Users Manual - English and Spanish
Page 3
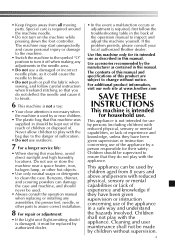
...In the event a malfunction occurs or adjustment is not intended for household use. For additional product information, visit our web site at www.brother.com SAVE THESE INSTRUCTIONS This machine is damaged, it to ensure that this machine was supplied in should be used by children aged from all...use a damaged or incorrect needle plate, as it could cause the needle to break. • Do not push or pull the fabric when sewing, and follow the troubleshooting table in a safe way and understand the hazards involved. Children should be made by persons (including children) with the ...
...In the event a malfunction occurs or adjustment is not intended for household use. For additional product information, visit our web site at www.brother.com SAVE THESE INSTRUCTIONS This machine is damaged, it to ensure that this machine was supplied in should be used by children aged from all...use a damaged or incorrect needle plate, as it could cause the needle to break. • Do not push or pull the fabric when sewing, and follow the troubleshooting table in a safe way and understand the hazards involved. Children should be made by persons (including children) with the ...
Users Manual - English and Spanish
Page 4
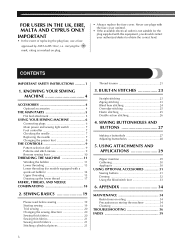
...AND NEEDLE COMBINATIONS 18 2. USING ATTACHMENTS AND APPLICATIONS 29 Zipper insertion 29 Gathering 30 Appliqués 30 USING OPTIONAL ACCESSORIES 31 Sewing buttons 31 Darning 32 Using the blind stitch foot 33 6. Never use a fuse approved by ASTA to obtain the correct... Precautions on plug. • Always replace the fuse cover. SEWING BASICS 19 Please read before sewing 19 Starting sewing 19 Trial sewing 20 Changing the sewing direction 20 Sewing thick fabrics 20 Sewing thin fabrics 21 Sewing stretch fabrics 21 Stitching cylindrical pieces 21 Thread tension 21 3....
...AND NEEDLE COMBINATIONS 18 2. USING ATTACHMENTS AND APPLICATIONS 29 Zipper insertion 29 Gathering 30 Appliqués 30 USING OPTIONAL ACCESSORIES 31 Sewing buttons 31 Darning 32 Using the blind stitch foot 33 6. Never use a fuse approved by ASTA to obtain the correct... Precautions on plug. • Always replace the fuse cover. SEWING BASICS 19 Please read before sewing 19 Starting sewing 19 Trial sewing 20 Changing the sewing direction 20 Sewing thick fabrics 20 Sewing thin fabrics 21 Sewing stretch fabrics 21 Stitching cylindrical pieces 21 Thread tension 21 3....
Users Manual - English and Spanish
Page 5
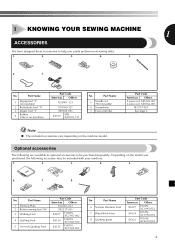
... Americas Others SA127 F003N: XC1945-052 SA134 F018N: XC1976-052 SA132 F016N: XC2215-052 4 Depending on the model you easily perform most sewing tasks. 1. 2. 3. 4. 5. 6. 7. No. Part Name 1 Darning Plate 2 Button sewing foot "M" 3 Walking Foot 4 Quilting Foot 5 1/4-inch Quilting Foot Part Code Americas Others XC6063-021 XE2137-001 SA107 F034N: XC2165-002 SA129...
... Americas Others SA127 F003N: XC1945-052 SA134 F018N: XC1976-052 SA132 F016N: XC2215-052 4 Depending on the model you easily perform most sewing tasks. 1. 2. 3. 4. 5. 6. 7. No. Part Name 1 Darning Plate 2 Button sewing foot "M" 3 Walking Foot 4 Quilting Foot 5 1/4-inch Quilting Foot Part Code Americas Others XC6063-021 XE2137-001 SA107 F034N: XC2165-002 SA129...
Users Manual - English and Spanish
Page 6
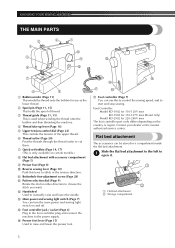
... KD-1902 for 110-120V area KD-1902 for 110-127V area (Brazil only) Model KD-2902 for use this lever to start and stop sewing. Flat bed attachment The accessories can use as the lower thread. 2 Spool pin (Page 11, 15) This holds the spool of thread. 3 ... to the left to the power supply. F D G E G Foot controller (Page 7) You can be stored in either direction to choose the stitch you want. KNOWING YOUR SEWING MACHINE THE MAIN PARTS 3 2 1 4 B 5 A C 6 0 7 8 9 1 Bobbin winder (Page 11) This winds the thread onto the bobbin for 220-240V area The foot controller ...
... KD-1902 for 110-120V area KD-1902 for 110-127V area (Brazil only) Model KD-2902 for use this lever to start and stop sewing. Flat bed attachment The accessories can use as the lower thread. 2 Spool pin (Page 11, 15) This holds the spool of thread. 3 ... to the left to the power supply. F D G E G Foot controller (Page 7) You can be stored in either direction to choose the stitch you want. KNOWING YOUR SEWING MACHINE THE MAIN PARTS 3 2 1 4 B 5 A C 6 0 7 8 9 1 Bobbin winder (Page 11) This winds the thread onto the bobbin for 220-240V area The foot controller ...
Users Manual - English and Spanish
Page 7
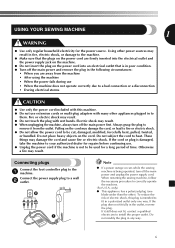
... damage to be cut, damaged, modified, forcefully bent, pulled, twisted, or bundled. b a Note ● If a power outage occurs while the sewing machine is in to install the proper outlet. Always grasp the plug to remove it still does not fit, contact a qualified electrician to them. USING... YOUR SEWING MACHINE 1 WARNING ● Use only regular household electricity for a long period of electric shock, this machine. ● Do not use extension...
... damage to be cut, damaged, modified, forcefully bent, pulled, twisted, or bundled. b a Note ● If a power outage occurs while the sewing machine is in to install the proper outlet. Always grasp the plug to remove it still does not fit, contact a qualified electrician to them. USING... YOUR SEWING MACHINE 1 WARNING ● Use only regular household electricity for a long period of electric shock, this machine. ● Do not use extension...
Users Manual - English and Spanish
Page 8
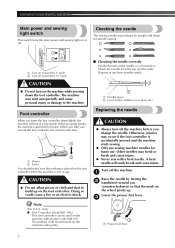
...on the foot controller. Dispose of cloth and dust to the machine. The machine may bend or break and cause injury. ● Never sew with product code 888-X55. When you press the foot controller down the foot controller. A bent needle will easily break and cause injury...the 2 handwheel toward you (counterclockwise) so that nothing is placed on the foot controller when the machine is accidentally pressed and the machine starts sewing. ● Only use . Foot controller When you press harder, the machine's speed will increase. Other needles may start unexpectedly and cause personal...
...on the foot controller. Dispose of cloth and dust to the machine. The machine may bend or break and cause injury. ● Never sew with product code 888-X55. When you press the foot controller down the foot controller. A bent needle will easily break and cause injury...the 2 handwheel toward you (counterclockwise) so that nothing is placed on the foot controller when the machine is accidentally pressed and the machine starts sewing. ● Only use . Foot controller When you press harder, the machine's speed will increase. Other needles may start unexpectedly and cause personal...
Users Manual - English and Spanish
Page 9
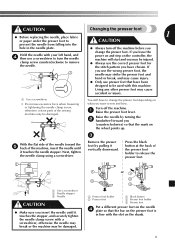
..., the machine will have been designed to be damaged. 3 Remove the presser | Press the black foot by turning the 2 handwheel toward the 5 back of the sewing machine may be damaged. Next, tighten the needle clamp using a screwdriver. 2 3 1 1 Use a screwdriver 2 Needle stopper 3 Needle CAUTION ● Make sure you have chosen. ... falling into the hole in line with this machine. Raise the needle by pulling it touches the needle stopper. If 1 you want to sew and how. You will start and you (counterclockwise) so that have to change the presser foot.
..., the machine will have been designed to be damaged. 3 Remove the presser | Press the black foot by turning the 2 handwheel toward the 5 back of the sewing machine may be damaged. Next, tighten the needle clamp using a screwdriver. 2 3 1 1 Use a screwdriver 2 Needle stopper 3 Needle CAUTION ● Make sure you have chosen. ... falling into the hole in line with this machine. Raise the needle by pulling it touches the needle stopper. If 1 you want to sew and how. You will start and you (counterclockwise) so that have to change the presser foot.
Users Manual - English and Spanish
Page 10
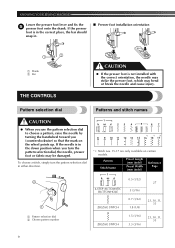
KNOWING YOUR SEWING MACHINE Lower the presser foot lever and fix the 5 presser foot onto the shank. If the needle is in . ■ Presser foot installation orientation 1 2 1 Shank 2 ...
KNOWING YOUR SEWING MACHINE Lower the presser foot lever and fix the 5 presser foot onto the shank. If the needle is in . ■ Presser foot installation orientation 1 2 1 Shank 2 ...
Users Manual - English and Spanish
Page 11
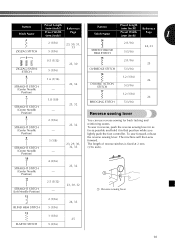
...16) 24, 33 BLIND HEM STITCH 5 (3/16) 13 1 (1/16) 25 ELASTIC STITCH 5 (3/16) 10 The machine will then sew forward. To sew forward, release the reverse sewing lever. Pattern Stitch Name Preset Length (mm (inch)) Preset Width (mm (inch)) Reference Page Pattern Preset Length (mm (inch)) ... DOUBLE ACTION STITCH 5 (3/16) 17 1.2 (1/16) 26 BRIDGING STITCH 5 (3/16) Reverse sewing lever You can use reverse sewing for back tacking and reinforcing seams. To sew in reverse, push the reverse sewing lever in as far as possible and hold it in that position while you lightly push the...
...16) 24, 33 BLIND HEM STITCH 5 (3/16) 13 1 (1/16) 25 ELASTIC STITCH 5 (3/16) 10 The machine will then sew forward. To sew forward, release the reverse sewing lever. Pattern Stitch Name Preset Length (mm (inch)) Preset Width (mm (inch)) Reference Page Pattern Preset Length (mm (inch)) ... DOUBLE ACTION STITCH 5 (3/16) 17 1.2 (1/16) 26 BRIDGING STITCH 5 (3/16) Reverse sewing lever You can use reverse sewing for back tacking and reinforcing seams. To sew in reverse, push the reverse sewing lever in as far as possible and hold it in that position while you lightly push the...
Users Manual - English and Spanish
Page 12
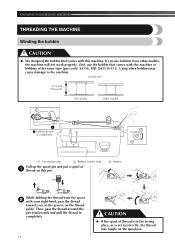
... pin and put a spool of 1 thread on this pin. 3 Bobbin While holding the thread from other bobbins may tangle on the thread guide. KNOWING YOUR SEWING MACHINE THREADING THE MACHINE Winding the bobbin CAUTION ● We designed the bobbin that comes with your right hand, pass the thread toward you use...
... pin and put a spool of 1 thread on this pin. 3 Bobbin While holding the thread from other bobbins may tangle on the thread guide. KNOWING YOUR SEWING MACHINE THREADING THE MACHINE Winding the bobbin CAUTION ● We designed the bobbin that comes with your right hand, pass the thread toward you use...
Users Manual - English and Spanish
Page 13
... cm (3-4 inches) of thread from the hole on the bobbin. 3 1 2 1 1 1 cm (1/2 inch) CAUTION ● Make sure you follow the instructions carefully. Note ● When the sewing machine is started or the handwheel is not a malfunction. ● The needle bar does not move when you do not cut the excess thread completely...
... cm (3-4 inches) of thread from the hole on the bobbin. 3 1 2 1 1 1 cm (1/2 inch) CAUTION ● Make sure you follow the instructions carefully. Note ● When the sewing machine is started or the handwheel is not a malfunction. ● The needle bar does not move when you do not cut the excess thread completely...
Users Manual - English and Spanish
Page 14
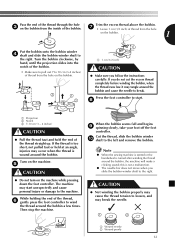
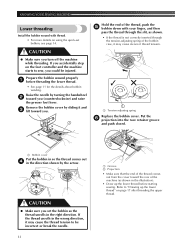
... thread unrolls in the right direction. Raise the needle by turning the handwheel 2 toward you set bobbin, see page 14. KNOWING YOUR SEWING MACHINE Lower threading Install the bobbin wound with your finger, and then pass the thread through the tension-adjusting spring of the thread, push... the 5 bobbin down with thread. • For more details on the foot controller and the machine starts to sew, you could be injured. If the thread unrolls in the wrong direction, it may cause incorrect thread tension. 1 1 Tension-adjusting spring Replace ...
... thread unrolls in the right direction. Raise the needle by turning the handwheel 2 toward you set bobbin, see page 14. KNOWING YOUR SEWING MACHINE Lower threading Install the bobbin wound with your finger, and then pass the thread through the tension-adjusting spring of the thread, push... the 5 bobbin down with thread. • For more details on the foot controller and the machine starts to sew, you could be injured. If the thread unrolls in the wrong direction, it may cause incorrect thread tension. 1 1 Tension-adjusting spring Replace ...
Users Manual - English and Spanish
Page 15
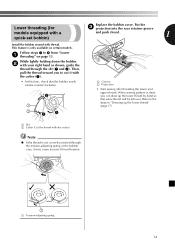
...; If the thread is only available on page 13. Refer to cut it may cause incorrect thread tension. 1 1 Tension-adjusting spring 14 When sewing gathers or darts, you to the steps in "Drawing up the lower thread by hand so that the bobbin easily rotates counterclockwise. 2 1 2 ...3 1 12 1 Groove 2 Projection • Start sewing after threading the lower and upper thread. This feature is not correctly inserted through the slit (1 and 2). Follow steps 1 to 4 from "Lower 1 ...
...; If the thread is only available on page 13. Refer to cut it may cause incorrect thread tension. 1 1 Tension-adjusting spring 14 When sewing gathers or darts, you to the steps in "Drawing up the lower thread by hand so that the bobbin easily rotates counterclockwise. 2 1 2 ...3 1 12 1 Groove 2 Projection • Start sewing after threading the lower and upper thread. This feature is not correctly inserted through the slit (1 and 2). Follow steps 1 to 4 from "Lower 1 ...
Users Manual - English and Spanish
Page 16
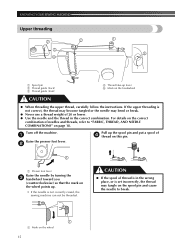
... a spool of needles and threads, refer to break. 1 1 Mark on the handwheel CAUTION ● When threading the upper thread, carefully follow the instructions. KNOWING YOUR SEWING MACHINE Upper threading 2 2 3 4 1 5 1 Spool pin 2 Thread guide (back) 3 Thread guide (front) 4 Thread take-up . • If the needle is set ... spool of 20 or lower. ● Use the needle and the thread in the wrong place, or is not correctly raised, the sewing machine can not be threaded. If the upper threading is not correct, the thread may become tangled or the needle may tangle on the...
... a spool of needles and threads, refer to break. 1 1 Mark on the handwheel CAUTION ● When threading the upper thread, carefully follow the instructions. KNOWING YOUR SEWING MACHINE Upper threading 2 2 3 4 1 5 1 Spool pin 2 Thread guide (back) 3 Thread guide (front) 4 Thread take-up . • If the needle is set ... spool of 20 or lower. ● Use the needle and the thread in the wrong place, or is not correctly raised, the sewing machine can not be threaded. If the upper threading is not correct, the thread may become tangled or the needle may tangle on the...
Users Manual - English and Spanish
Page 17
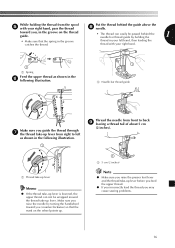
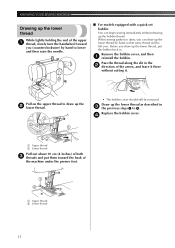
... the thread take-up lever. thread in your left as shown in the following illustration. 1 4 2 1 1 Needle bar thread guide 53 Make sure you may cause sewing problems. 16
... the thread take-up lever. thread in your left as shown in the following illustration. 1 4 2 1 1 Needle bar thread guide 53 Make sure you may cause sewing problems. 16
Users Manual - English and Spanish
Page 18
...the lower thread While lightly holding the end of the arrow, and leave it there without drawing up the bobbin thread. Before you can begin sewing immediately without cutting it. Pull on the upper thread to draw up the lower thread as described in 3 the previous steps 1 to lower ... of the upper 1 thread, slowly turn the handwheel toward the back of the machine under the presser foot. 1 2 1 Upper thread 2 Lower thread 17 When sewing gathers or darts, you draw up the lower thread by hand to 3. Remove the bobbin cover, and then 1 reinstall the bobbin. Pass the thread along...
...the lower thread While lightly holding the end of the arrow, and leave it there without drawing up the bobbin thread. Before you can begin sewing immediately without cutting it. Pull on the upper thread to draw up the lower thread as described in 3 the previous steps 1 to lower ... of the upper 1 thread, slowly turn the handwheel toward the back of the machine under the presser foot. 1 2 1 Upper thread 2 Lower thread 17 When sewing gathers or darts, you draw up the lower thread by hand to 3. Remove the bobbin cover, and then 1 reinstall the bobbin. Pass the thread along...
Users Manual - English and Spanish
Page 19
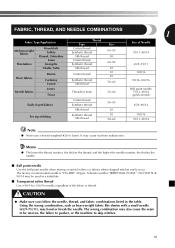
... needle is "HG-4BR" (Organ). and the higher the needle number, the thicker the needle. ■ Ball point needle Use the ball point needle when sewing on stretch fabrics or fabrics where skipped stitches easily occur. Using the wrong combination, such as a substitute. ■ Transparent nylon thread Use a 90/14 to...
... needle is "HG-4BR" (Organ). and the higher the needle number, the thicker the needle. ■ Ball point needle Use the ball point needle when sewing on stretch fabrics or fabrics where skipped stitches easily occur. Using the wrong combination, such as a substitute. ■ Transparent nylon thread Use a 90/14 to...
Users Manual - English and Spanish
Page 20
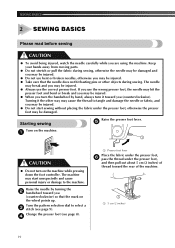
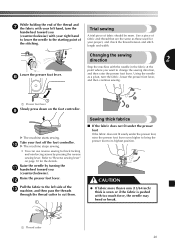
...and you may be damaged. Turning it toward you turn the handwheel by turning the 2 handwheel toward the rear of thread toward you may start sewing without placing the fabric under the presser foot, and then pull out about 5 cm (2 inches) of the machine. 1 1 5 cm (2 ...inches) 19 Turn the pattern selection dial to tangle and damage the needle or fabric, and you are using the machine. SEWING BASICS 2 SEWING BASICS Please read before sewing CAUTION ● To avoid being injured, watch the needle carefully while you may be injured. ● Do not start unexpectedly and...
...and you may be damaged. Turning it toward you turn the handwheel by turning the 2 handwheel toward the rear of thread toward you may start sewing without placing the fabric under the presser foot, and then pull out about 5 cm (2 inches) of the machine. 1 1 5 cm (2 ...inches) 19 Turn the pattern selection dial to tangle and damage the needle or fabric, and you are using the machine. SEWING BASICS 2 SEWING BASICS Please read before sewing CAUTION ● To avoid being injured, watch the needle carefully while you may be injured. ● Do not start unexpectedly and...
Users Manual - English and Spanish
Page 21
... lower the needle to the starting point of the stitching. Raise the needle by pressing the reverse sewing lever. Take your foot off the foot controller. 0 X The machine stops sewing. • You can use reverse sewing for the details. While holding the end of the thread and 7 the fabric with your left ...side of the c machine, and then pass the threads through the thread cutter to cut them. . 1 Sewing thick fabrics ■ If the fabric does not fit under the presser foot If the fabric does not fit easily under the presser foot, raise...
... lower the needle to the starting point of the stitching. Raise the needle by pressing the reverse sewing lever. Take your foot off the foot controller. 0 X The machine stops sewing. • You can use reverse sewing for the details. While holding the end of the thread and 7 the fabric with your left ...side of the c machine, and then pass the threads through the thread cutter to cut them. . 1 Sewing thick fabrics ■ If the fabric does not fit under the presser foot If the fabric does not fit easily under the presser foot, raise...


