

Users Manual - English
Page 16
... Numbers 7-7 Pause 7-7 Hold 7-7 Redial 7-7 Tone/Pulse (For Canada Only 7-7 Telephone Services 8-1 Custom Features 8-1 Distinctive Ring 8-1 What Does Your Telephone Company's "Distinctive Ring" Do 8-1 What Does Brother's "Distinctive Ring" Do 8-1 Do You Have Voice Mail 8-2 Before You Choose the Ring Pattern to Register 8-2 Very Important 8-3 Registering the Distinctive Ring Pattern 8-3 Caller ID...
... Numbers 7-7 Pause 7-7 Hold 7-7 Redial 7-7 Tone/Pulse (For Canada Only 7-7 Telephone Services 8-1 Custom Features 8-1 Distinctive Ring 8-1 What Does Your Telephone Company's "Distinctive Ring" Do 8-1 What Does Brother's "Distinctive Ring" Do 8-1 Do You Have Voice Mail 8-2 Before You Choose the Ring Pattern to Register 8-2 Very Important 8-3 Registering the Distinctive Ring Pattern 8-3 Caller ID...

Users Manual - English
Page 22
Also use for FAX-4100e) number. You will be able to print until the indicator stays on. 2 LCD (Liquid Crystal Display) Displays messages to multiple numbers. (Left Arrow) (Right Arrow) Moves the LCD cursor through 32 in the One Touch keys, hold . Clear Deletes entered data or backs up numbers... you access the Menu and Programming mode. Redial/Pause Redials the last number called. Also inserts a pause in the dialing memory. Control Panel Overview FAX-4100e, FAX-4750e and FAX-5750e have the same control panel keys. 3 2 1 13 14 15 16 12 4 5 67 8 9 10 11 1 Toner Empty ...
Also use for FAX-4100e) number. You will be able to print until the indicator stays on. 2 LCD (Liquid Crystal Display) Displays messages to multiple numbers. (Left Arrow) (Right Arrow) Moves the LCD cursor through 32 in the One Touch keys, hold . Clear Deletes entered data or backs up numbers... you access the Menu and Programming mode. Redial/Pause Redials the last number called. Also inserts a pause in the dialing memory. Control Panel Overview FAX-4100e, FAX-4750e and FAX-5750e have the same control panel keys. 3 2 1 13 14 15 16 12 4 5 67 8 9 10 11 1 Toner Empty ...

Users Manual - English
Page 50
... sending the message and the telephone number of the transmission, the date and time it unlawful for any message via a telephone machine unless such messages clearly contain, in a margin at the top or bottom of each transmitted page, or on the first page of the sending machines or such business, other...
... sending the message and the telephone number of the transmission, the date and time it unlawful for any message via a telephone machine unless such messages clearly contain, in a margin at the top or bottom of each transmitted page, or on the first page of the sending machines or such business, other...

Users Manual - English
Page 51
... are setting certain functions, such as the previous character, press to move the cursor to move the cursor after the last correct letter. Then press Clear; Also, you can access the character you want to enter a blank space, press between numbers and twice Making Corrections If you entered a letter incorrectly and...
... are setting certain functions, such as the previous character, press to move the cursor to move the cursor after the last correct letter. Then press Clear; Also, you can access the character you want to enter a blank space, press between numbers and twice Making Corrections If you entered a letter incorrectly and...

Users Manual - English
Page 67
... you have more than two jobs waiting, use or to select the job you have multiple jobs waiting, use or to Step 2. #002 SALES REPOR 1.CLEAR 2.EXIT 4 Press Stop/Exit. 6-4 SETUP SEND Eject the document by pressing Stop/Exit. To cancel another job, return to scroll through the list. 3 Press Stop...
... you have more than two jobs waiting, use or to select the job you have multiple jobs waiting, use or to Step 2. #002 SALES REPOR 1.CLEAR 2.EXIT 4 Press Stop/Exit. 6-4 SETUP SEND Eject the document by pressing Stop/Exit. To cancel another job, return to scroll through the list. 3 Press Stop...

Users Manual - English
Page 76
... number-OR-Press Stop/Exit. Changing One Touch and Speed Dial Numbers If you to either *O1: BROTHER 1.CHANGE 2.EXIT 1 Press 1 to change , then type over it . 2 Enter a new number and then press... Set. E-mail addresses can be stored in FAX-4100e. 1 Press Menu, 2, 3, 2. 2.SPEED-DIAL 2 Use the dial pad to enter a Speed Dial location, and then... numbers, so you want to erase the number, press Clear when the cursor is already stored, the LCD shows the current name stored at Step 4 for FAX-4100e) SPEED-DIAL? # ENTER & SET KEY 3 Enter...
... number-OR-Press Stop/Exit. Changing One Touch and Speed Dial Numbers If you to either *O1: BROTHER 1.CHANGE 2.EXIT 1 Press 1 to change , then type over it . 2 Enter a new number and then press... Set. E-mail addresses can be stored in FAX-4100e. 1 Press Menu, 2, 3, 2. 2.SPEED-DIAL 2 Use the dial pad to enter a Speed Dial location, and then... numbers, so you want to erase the number, press Clear when the cursor is already stored, the LCD shows the current name stored at Step 4 for FAX-4100e) SPEED-DIAL? # ENTER & SET KEY 3 Enter...

Users Manual - English
Page 85
... and time of the memory, we recommend that you want to select the Caller ID you clear the Caller IDs stored in memory by pressing Clear when the LCD shows each caller ID number or name. Clearing a Caller ID Stored in , information about the first call . 4 Press or to return to select DISPLAY...
... and time of the memory, we recommend that you want to select the Caller ID you clear the Caller IDs stored in memory by pressing Clear when the LCD shows each caller ID number or name. Clearing a Caller ID Stored in , information about the first call . 4 Press or to return to select DISPLAY...

Users Manual - English
Page 95
... settings. 11 - 2 M A K I N G C O P I Press or if you can turn off Fax Storage (see page 9-3). -OR-Print fax messages in memory (see page 5-6). You will need to clear some faxes from memory before you want to select additional settings. -OR- I E S Temporary Copy Settings You can try different combinations of your copies by using...
... settings. 11 - 2 M A K I N G C O P I Press or if you can turn off Fax Storage (see page 9-3). -OR-Print fax messages in memory (see page 5-6). You will need to clear some faxes from memory before you want to select additional settings. -OR- I E S Temporary Copy Settings You can try different combinations of your copies by using...
Users Manual - English
Page 106
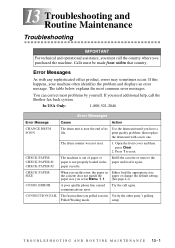
If you see this happens, your machine often identifies the problem and displays an error message. Open the front cover and then press Clear. 2. T R O U B L E S H O O T I N G A N D R O U T I N E M A I N T E N A N C E 13 - 1 The table below explains the most problems by yourself. then replace the drum unit with ... cassette does not match the paper or change the default setting. CHECK PAPER SIZE When you need additional help, call the Brother fax back system. ERROR A poor quality phone line caused communications error. Error Messages As with a new one. You can...
If you see this happens, your machine often identifies the problem and displays an error message. Open the front cover and then press Clear. 2. T R O U B L E S H O O T I N G A N D R O U T I N E M A I N T E N A N C E 13 - 1 The table below explains the most problems by yourself. then replace the drum unit with ... cassette does not match the paper or change the default setting. CHECK PAPER SIZE When you need additional help, call the Brother fax back system. ERROR A poor quality phone line caused communications error. Error Messages As with a new one. You can...

Users Manual - English
Page 109
.... HOT! Front view Rear view 13 - 4 T R O U B L E S H O O T I N G A N D R O U T I N E M A I N T E N A N C E When you must find out where the paper is stuck. See the following diagram. Paper Jam Before you can clear a paper jam error, you open the front or the rear cover, never touch the shaded parts shown in the following three types of the machine..., or were too long. 1 Lift the control panel. 2 Carefully pull the document toward the front of paper jams. WARNING Do not use the machine, some internal parts are extremely HOT!
.... HOT! Front view Rear view 13 - 4 T R O U B L E S H O O T I N G A N D R O U T I N E M A I N T E N A N C E When you must find out where the paper is stuck. See the following diagram. Paper Jam Before you can clear a paper jam error, you open the front or the rear cover, never touch the shaded parts shown in the following three types of the machine..., or were too long. 1 Lift the control panel. 2 Carefully pull the document toward the front of paper jams. WARNING Do not use the machine, some internal parts are extremely HOT!

Users Manual - English
Page 110
Instead, pull the edge of the test page until the pages print clearly. 3 Close the rear cover. Paper is Jammed in the Paper Cassette 1 Pull the paper cassette out of the machine. 2 Remove any crinkled sheets. 3 Adjust the ...
Instead, pull the edge of the test page until the pages print clearly. 3 Close the rear cover. Paper is Jammed in the Paper Cassette 1 Pull the paper cassette out of the machine. 2 Remove any crinkled sheets. 3 Adjust the ...
Users Manual - English
Page 112
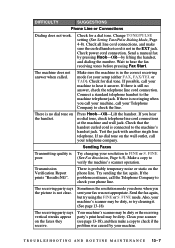
... connection. There is still no dial tone on the phone line. Test the jack with another single line telephone. Make sure the machine is not clear. Transmission Verification Report prints "Results:NG". FINE mode. If possible, call your phone line. Change TONE/PULSE setting (See Setting Tone/Pulse Dialing Mode, Page...
... connection. There is still no dial tone on the phone line. Test the jack with another single line telephone. Make sure the machine is not clear. Transmission Verification Report prints "Results:NG". FINE mode. If possible, call your phone line. Change TONE/PULSE setting (See Setting Tone/Pulse Dialing Mode, Page...
Users Manual - English
Page 116
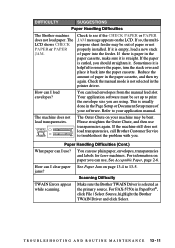
... use ? This is usually done in the Page Setup or Document Setup menu of paper in PaperPort®, click File | Select Source, highlight the Brother TWAIN Driver and click Select. The machine does not load transparencies. Paper Handling Difficulties (Cont.) What paper can I N T E N A N ...C E 13 - 11 For information on the LCD. Make sure the Brother TWAIN Driver is not selected in the paper cassette, make sure it is curled, you . T R O U B L E S H O O T I N G A N D R O U T I N E M A I clear paper See Paper Jam on your machine may be set up to see if the CHECK PAPER or...
... use ? This is usually done in the Page Setup or Document Setup menu of paper in PaperPort®, click File | Select Source, highlight the Brother TWAIN Driver and click Select. The machine does not load transparencies. Paper Handling Difficulties (Cont.) What paper can I N T E N A N ...C E 13 - 11 For information on the LCD. Make sure the Brother TWAIN Driver is not selected in the paper cassette, make sure it is curled, you . T R O U B L E S H O O T I N G A N D R O U T I N E M A I clear paper See Paper Jam on your machine may be set up to see if the CHECK PAPER or...

Users Manual - English
Page 118
... is that the drum was marked or damaged by setting the Print Density setting. In this problem. Black Page Wipe the electric terminals referring to clear this case, replace the drum unit with a new one .
... is that the drum was marked or damaged by setting the Print Density setting. In this problem. Black Page Wipe the electric terminals referring to clear this case, replace the drum unit with a new one .

Users Manual - English
Page 119
... from side to occur. Make sure you use paper that meets the specifications. Blurred Page Certain environmental conditions such as humidity and high temperatures may clear a blurred page by setting the Print the printed page. You may cause this condition to side. Density setting, page 5-4. DIFFICULTY SUGGESTIONS Print Quality Difficulties (CONTINUED...
... from side to occur. Make sure you use paper that meets the specifications. Blurred Page Certain environmental conditions such as humidity and high temperatures may clear a blurred page by setting the Print the printed page. You may cause this condition to side. Density setting, page 5-4. DIFFICULTY SUGGESTIONS Print Quality Difficulties (CONTINUED...

Users Manual - English
Page 129
... cartridge into the new drum unit. (See Replacing the Toner Cartridge, Page 13-20.) 6 Reinstall the new drum unit, keeping the front cover open. 7 Press Clear. 8 Press 1 and when the LCD shows ACCEPTED, and then close the front cover. 1 Open the front cover. 2 Remove the old drum unit. If you have...
... cartridge into the new drum unit. (See Replacing the Toner Cartridge, Page 13-20.) 6 Reinstall the new drum unit, keeping the front cover open. 7 Press Clear. 8 Press 1 and when the LCD shows ACCEPTED, and then close the front cover. 1 Open the front cover. 2 Remove the old drum unit. If you have...


