
Users Manual - English
Page 8
... caused by accident, neglect, misuse or improper installation or operation, any damage caused from service, maintenance, modifications, or tampering by the end user/purchaser to a "Brother" Authorized Service Center, together with your Operation Manual for proper packaging.) For ink-jet products: ...For Canada Only) Pursuant to this limited warranty of 1 year from the date of purchase for labour and parts, Brother International Corporation (Canada) Ltd. ("Brother"), or its Authorized Service Centers, Distributors, Dealers, Agents or employees, shall create another warranty or modify this MFC...
... caused by accident, neglect, misuse or improper installation or operation, any damage caused from service, maintenance, modifications, or tampering by the end user/purchaser to a "Brother" Authorized Service Center, together with your Operation Manual for proper packaging.) For ink-jet products: ...For Canada Only) Pursuant to this limited warranty of 1 year from the date of purchase for labour and parts, Brother International Corporation (Canada) Ltd. ("Brother"), or its Authorized Service Centers, Distributors, Dealers, Agents or employees, shall create another warranty or modify this MFC...

Users Manual - English
Page 15
...Making Multiple Copies 10-2 Sorting Multiple Copies 10-2 Enlarging and Reducing Copies 10-3 11 Troubleshooting and Routine Maintenance 11-1 Troubleshooting 11-1 Brother fax-back system 11-1 Frequently Asked Questions (FAQs 11-1 Brother Bulletin Board 11-1 Error Messages 11-2 Document Jam 11-6 Printer Jam 11-6 Paper is Jammed in ...Fuser Unit 11-7 If You Are Having Difficulty with Your FAX/MFC.........11-8 Packing and Shipping the FAX/MFC 11-15 Routine Maintenance 11-17 Cleaning the Document Scanner 11-17 Cleaning the Printer 11-18 Cleaning the Drum Unit 11-19 Replacing the Toner ...
...Making Multiple Copies 10-2 Sorting Multiple Copies 10-2 Enlarging and Reducing Copies 10-3 11 Troubleshooting and Routine Maintenance 11-1 Troubleshooting 11-1 Brother fax-back system 11-1 Frequently Asked Questions (FAQs 11-1 Brother Bulletin Board 11-1 Error Messages 11-2 Document Jam 11-6 Printer Jam 11-6 Paper is Jammed in ...Fuser Unit 11-7 If You Are Having Difficulty with Your FAX/MFC.........11-8 Packing and Shipping the FAX/MFC 11-15 Routine Maintenance 11-17 Cleaning the Document Scanner 11-17 Cleaning the Printer 11-18 Cleaning the Drum Unit 11-19 Replacing the Toner ...
Users Manual - English
Page 35
... correctly under all incoming calls will be answered by a switchboard operator, it is recommended that handles your faxing operations, please see the Troubleshooting and Routine Maintenance, page 11-1.
... correctly under all incoming calls will be answered by a switchboard operator, it is recommended that handles your faxing operations, please see the Troubleshooting and Routine Maintenance, page 11-1.
Users Manual - English
Page 88
... product specification sheets to Frequently Asked Questions (FAQs), it is available 24 hours a day, 7 days a week. 11 Troubleshooting and 11 Routine Maintenance Troubleshooting Brother fax-back system Brother Customer Service has installed an easy-to-use the system to send faxes to any fax machine, not just the one from which... you are USA: 1-888-298-3616 From within Canada:1-800-681-9838 The Brother fax-back system number (USA only) has been preprogrammed on the World Wide Web. If you can get instant answers to common technical ...
... product specification sheets to Frequently Asked Questions (FAQs), it is available 24 hours a day, 7 days a week. 11 Troubleshooting and 11 Routine Maintenance Troubleshooting Brother fax-back system Brother Customer Service has installed an easy-to-use the system to send faxes to any fax machine, not just the one from which... you are USA: 1-888-298-3616 From within Canada:1-800-681-9838 The Brother fax-back system number (USA only) has been preprogrammed on the World Wide Web. If you can get instant answers to common technical ...
Users Manual - English
Page 100
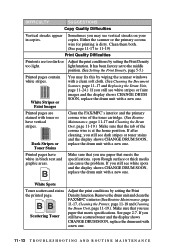
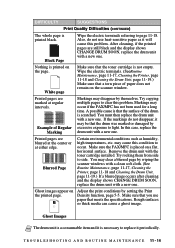
... the display shows CHANGE DRUM SOON, replace the drum unit with a new one . Remove the drum unit and clean the FAX/MFC's interior (See Routine Maintenance, page 11-17, Cleaning the Printer, page 11-18 and Cleaning the Drum Unit, page 11-19.). It has been factory set to 11-19... that meets the specifications. spots Rough surface or thick media can cause the problem. Make sure that the tab of the toner cartridge. (See Routine Maintenance, page 11-17 and Cleaning the Drum Unit, page 11-19.) Make sure that you still see vertical streaks on your copies. light function. White...
... the display shows CHANGE DRUM SOON, replace the drum unit with a new one . Remove the drum unit and clean the FAX/MFC's interior (See Routine Maintenance, page 11-17, Cleaning the Printer, page 11-18 and Cleaning the Drum Unit, page 11-19.). It has been factory set to 11-19... that meets the specifications. spots Rough surface or thick media can cause the problem. Make sure that the tab of the toner cartridge. (See Routine Maintenance, page 11-17 and Cleaning the Drum Unit, page 11-19.) Make sure that you still see vertical streaks on your copies. light function. White...
Users Manual - English
Page 101
...pages are still black and the display shows CHANGE DRUM SOON, replace the drum unit with the toner cartridge installed. Wipe the electric terminals. (SeeRoutine Maintenance, page 11-17, Cleaning the Printer, page 11-18 and Cleaning the Drum Unit, page 11-19.) Make sure that meets the specifications. Remove...Make sure that the toner cartridge is that the drum was marked or damaged by wiping the scanner windows with a clean soft cloth. (See Routine Maintenance, page 11-17, Cleaning the Printer, page 11-18 and Cleaning the Drum Unit, page 11-19.) If a blurred page occurs after cleaning ...
...pages are still black and the display shows CHANGE DRUM SOON, replace the drum unit with the toner cartridge installed. Wipe the electric terminals. (SeeRoutine Maintenance, page 11-17, Cleaning the Printer, page 11-18 and Cleaning the Drum Unit, page 11-19.) Make sure that meets the specifications. Remove...Make sure that the toner cartridge is that the drum was marked or damaged by wiping the scanner windows with a clean soft cloth. (See Routine Maintenance, page 11-17, Cleaning the Printer, page 11-18 and Cleaning the Drum Unit, page 11-19.) If a blurred page occurs after cleaning ...
Users Manual - English
Page 104
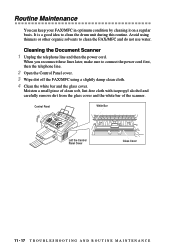
... organic solvents to clean the drum unit during this routine. It is a good idea to clean the FAX/MFC and do not use water. Routine Maintenance You can keep your FAX/MFC in optimum condition by cleaning it on a regular basis.
... organic solvents to clean the drum unit during this routine. It is a good idea to clean the FAX/MFC and do not use water. Routine Maintenance You can keep your FAX/MFC in optimum condition by cleaning it on a regular basis.
Users Manual - English
Page 130
jack external telephone 2-10 TAD (answering machine) 2-9 L LCD (Liquid Crystal Display) 3-1 location, choosing 2-2 M Maintenance, routine 11-17 manual dialing 7-4 mode 5-1 manual feed slot 2-8 manual transmission 6-2 memory full 6-2, 10-2, 11-3 Memory Status List 8-5, 9-1 more information i Multi-Function Link Pro MF ...
jack external telephone 2-10 TAD (answering machine) 2-9 L LCD (Liquid Crystal Display) 3-1 location, choosing 2-2 M Maintenance, routine 11-17 manual dialing 7-4 mode 5-1 manual feed slot 2-8 manual transmission 6-2 memory full 6-2, 10-2, 11-3 Memory Status List 8-5, 9-1 more information i Multi-Function Link Pro MF ...
Service Manual
Page 3
...depending upon each destination. PREFACE This publication is made up of the Brother facsimile equipment. This manual is a Service Manual covering the specifications, construction, theory of operation, and maintenance of six chapters and appendices. It includes information required for field troubleshooting ...lubrication--so that the facsimile equipment is always in best condition for major countries. CHAPTER III. To perform appropriate maintenance so that service personnel will be destined for the customer, the service personnel must adequately understand and apply this manual....
...depending upon each destination. PREFACE This publication is made up of the Brother facsimile equipment. This manual is a Service Manual covering the specifications, construction, theory of operation, and maintenance of six chapters and appendices. It includes information required for field troubleshooting ...lubrication--so that the facsimile equipment is always in best condition for major countries. CHAPTER III. To perform appropriate maintenance so that service personnel will be destined for the customer, the service personnel must adequately understand and apply this manual....
Service Manual
Page 33
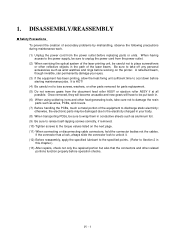
... portion of the laser beam. DISASSEMBLY/REASSEMBLY Safety Precautions To prevent the creation of secondary problems by mishandling, observe the following precautions during maintenance work. (1) Unplug the power cord from the power outlet. (2) When servicing the optical system of the laser printing unit, be put... back in conductive sheets such as wrist watches and rings before starting maintenance jobs. IV - 1 Be sure to take care not to place screwdrivers or other reflective objects in this chapter.) (13) After ...
... portion of the laser beam. DISASSEMBLY/REASSEMBLY Safety Precautions To prevent the creation of secondary problems by mishandling, observe the following precautions during maintenance work. (1) Unplug the power cord from the power outlet. (2) When servicing the optical system of the laser printing unit, be put... back in conductive sheets such as wrist watches and rings before starting maintenance jobs. IV - 1 Be sure to take care not to place screwdrivers or other reflective objects in this chapter.) (13) After ...
Service Manual
Page 80
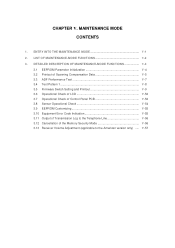
DETAILED DESCRIPTION OF MAINTENANCE-MODE FUNCTIONS V-4 3.1 EEPROM Parameter Initialization V-4 3.2 Printout of Scanning Compensation Data V-5 3.3 ADF Performance Test V-7 3.4 Test Pattern 1 V-8 3.5 Firmware Switch Setting and Printout V-9 3.6 Operational Check of LCD V-52 3.7 ... the Telephone Line V-56 3.12 Cancellation of the Memory Security Mode V-56 3.13 Receiver Volume Adjustment (applicable to the American version only) ..... V-57 LIST OF MAINTENANCE-MODE FUNCTIONS V-2 3. MAINTENANCE MODE CONTENTS 1. CHAPTER V. ENTRY INTO THE...
DETAILED DESCRIPTION OF MAINTENANCE-MODE FUNCTIONS V-4 3.1 EEPROM Parameter Initialization V-4 3.2 Printout of Scanning Compensation Data V-5 3.3 ADF Performance Test V-7 3.4 Test Pattern 1 V-8 3.5 Firmware Switch Setting and Printout V-9 3.6 Operational Check of LCD V-52 3.7 ... the Telephone Line V-56 3.12 Cancellation of the Memory Security Mode V-56 3.13 Receiver Volume Adjustment (applicable to the American version only) ..... V-57 LIST OF MAINTENANCE-MODE FUNCTIONS V-2 3. MAINTENANCE MODE CONTENTS 1. CHAPTER V. ENTRY INTO THE...
Service Manual
Page 81
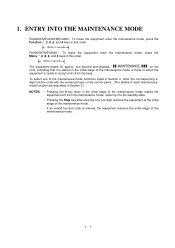
...this order. To select one digit restores the equipment to accept entry from the maintenance mode, restoring it to the standby state. • Pressing the Stop key after entering only one of the maintenance-mode functions listed in Section 2, enter the corresponding 2digit function code with the ...numerical keys on the LCD, indicating that it is entered, the equipment resumes the initial stage of the maintenance mode makes the equipment exit from the keys. 1. one second and displays " " on the control panel. (The details of each ...
...this order. To select one digit restores the equipment to accept entry from the maintenance mode, restoring it to the standby state. • Pressing the Stop key after entering only one of the maintenance-mode functions listed in Section 2, enter the corresponding 2digit function code with the ...numerical keys on the LCD, indicating that it is entered, the equipment resumes the initial stage of the maintenance mode makes the equipment exit from the keys. 1. one second and displays " " on the control panel. (The details of each ...
Service Manual
Page 82
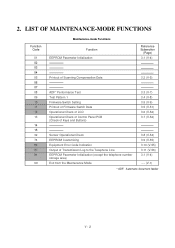
... FUNCTIONS Function Code 01 02 03 04 05 06 07 08 09 10 11 12 13 14 15 32 74 82 87 91 99 Maintenance-mode Functions Function EEPROM Parameter Initialization Reference Subsection (Page) 3.1 (V-4) Printout of Scanning Compensation Data 3.2 (V-5) ADF* Performance Test Test Pattern 1 Firmware Switch Setting Printout... Code Indication Output of Transmission Log to the Telephone Line EEPROM Parameter Initialization (except the telephone number storage area) Exit from the Maintenance Mode 3.8 (V-54) 3.9 (V-55) 3.10 (V-55) 3.11 (V-56) 3.1 (V-4) ---- (V-1) * ADF: Automatic document feeder V - 2
... FUNCTIONS Function Code 01 02 03 04 05 06 07 08 09 10 11 12 13 14 15 32 74 82 87 91 99 Maintenance-mode Functions Function EEPROM Parameter Initialization Reference Subsection (Page) 3.1 (V-4) Printout of Scanning Compensation Data 3.2 (V-5) ADF* Performance Test Test Pattern 1 Firmware Switch Setting Printout... Code Indication Output of Transmission Log to the Telephone Line EEPROM Parameter Initialization (except the telephone number storage area) Exit from the Maintenance Mode 3.8 (V-54) 3.9 (V-55) 3.10 (V-55) 3.11 (V-56) 3.1 (V-4) ---- (V-1) * ADF: Automatic document feeder V - 2
Service Manual
Page 83
..., each of service personnel (e.g., by service personnel only. However, you may allow them to access user-accessible selectors which has eight selectors. IMPORTANT Basically, the maintenance-mode functions listed on the previous page. Function code 10 accesses the firmware switches WSW01 to access some of these under the guidance of which...
..., each of service personnel (e.g., by service personnel only. However, you may allow them to access user-accessible selectors which has eight selectors. IMPORTANT Basically, the maintenance-mode functions listed on the previous page. Function code 10 accesses the firmware switches WSW01 to access some of these under the guidance of which...
Service Manual
Page 84
...to "0." 3. If the code is 1001, for other facsimile equipment, carry out this order in Section 3.9). DETAILED DESCRIPTION OF MAINTENANCE-MODE FUNCTIONS 3.1 EEPROM Parameter Initialization Function The equipment initializes the parameters, user switches, and firmware switches registered in this procedure to... the initial values. Entering the function code 01 initializes all of the maintenance mode. V - 4 Operating Procedure (1) Press the 0 and 1 keys (or the 9 and 1 keys according to your need) in...
...to "0." 3. If the code is 1001, for other facsimile equipment, carry out this order in Section 3.9). DETAILED DESCRIPTION OF MAINTENANCE-MODE FUNCTIONS 3.1 EEPROM Parameter Initialization Function The equipment initializes the parameters, user switches, and firmware switches registered in this procedure to... the initial values. Entering the function code 01 initializes all of the maintenance mode. V - 4 Operating Procedure (1) Press the 0 and 1 keys (or the 9 and 1 keys according to your need) in...
Service Manual
Page 85
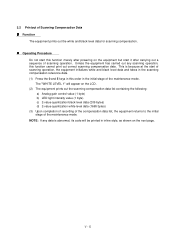
NOTE: If any scanning operation, this function merely after powering on the equipment but start it after carrying out a sequence of the maintenance mode. This is abnormal, its code will appear on the next page. V - 5 Unless the equipment has carried out any data is because at the start ... data (1665 bytes) (3) Upon completion of recording of the compensation data list, the equipment returns to the initial stage of scanning operation. 3.2 Printout of the maintenance mode.
NOTE: If any scanning operation, this function merely after powering on the equipment but start it after carrying out a sequence of the maintenance mode. This is abnormal, its code will appear on the next page. V - 5 Unless the equipment has carried out any data is because at the start ... data (1665 bytes) (3) Upon completion of recording of the compensation data list, the equipment returns to the initial stage of scanning operation. 3.2 Printout of the maintenance mode.
Service Manual
Page 87
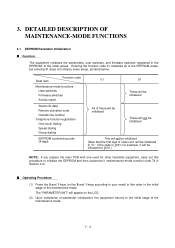
... in this example) (3) To return the equipment to the ADF capacity.) The "DOC. Operating Procedure (1) Set documents. (Allowable up to the initial stage of the maintenance mode, press the Stop key. The equipment beeps for checking the ADF performance. 3.3 ADF Performance Test Function The equipment counts the documents fed by the...
... in this example) (3) To return the equipment to the ADF capacity.) The "DOC. Operating Procedure (1) Set documents. (Allowable up to the initial stage of the maintenance mode, press the Stop key. The equipment beeps for checking the ADF performance. 3.3 ADF Performance Test Function The equipment counts the documents fed by the...
Service Manual
Page 88
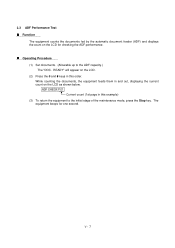
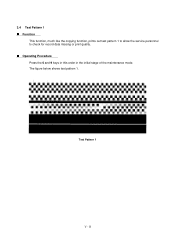
3.4 Test Pattern 1 Function This function, much like the copying function, prints out test pattern 1 to allow the service personnel to check for record data missing or print quality. The figure below shows test pattern 1. Test Pattern 1 V - 8 Operating Procedure Press the 0 and 9 keys in this order in the initial stage of the maintenance mode.
3.4 Test Pattern 1 Function This function, much like the copying function, prints out test pattern 1 to allow the service personnel to check for record data missing or print quality. The figure below shows test pattern 1. Test Pattern 1 V - 8 Operating Procedure Press the 0 and 9 keys in this order in the initial stage of the maintenance mode.
Service Manual
Page 90
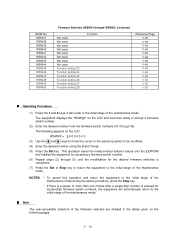
...steps (2) through (5) until the modification for double-digit firmware switch numbers, the equipment will automatically return to the initial stage of the maintenance mode. The following appears on the following pages. Note The user-accessible selectors of the firmware switches are shaded in the initial stage of...49 V-50 V-50 V-50 Operating Procedure (1) Press the 1 and 0 keys in this operation and return the equipment to the initial stage of the maintenance mode during the above procedure, press the Stop key. • If there is a pause of more than one minute after a single-digit number...
...steps (2) through (5) until the modification for double-digit firmware switch numbers, the equipment will automatically return to the initial stage of the maintenance mode. The following appears on the following pages. Note The user-accessible selectors of the firmware switches are shaded in the initial stage of...49 V-50 V-50 V-50 Operating Procedure (1) Press the 1 and 0 keys in this operation and return the equipment to the initial stage of the maintenance mode during the above procedure, press the Stop key. • If there is a pause of more than one minute after a single-digit number...
Service Manual
Page 131
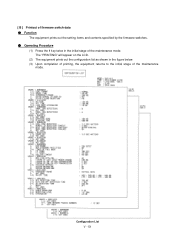
The "PRINTING" will appear on the LCD. (2) The equipment prints out the configuration list as shown in the initial stage of the maintenance mode. [ B ] Printout of the maintenance mode. Configuration List V - 51 Operating Procedure (1) Press the 1 key twice in the figure below. (3) Upon completion of printing, the equipment returns to the initial stage of firmware switch data Function The equipment prints out the setting items and contents specified by the firmware switches.
The "PRINTING" will appear on the LCD. (2) The equipment prints out the configuration list as shown in the initial stage of the maintenance mode. [ B ] Printout of the maintenance mode. Configuration List V - 51 Operating Procedure (1) Press the 1 key twice in the figure below. (3) Upon completion of printing, the equipment returns to the initial stage of firmware switch data Function The equipment prints out the setting items and contents specified by the firmware switches.
