

Accessory Catalog
Page 7
... Use the Straight Stitch Foot with an accurate 1/4 inch, 1/2 inch, or 5/8 inch (approx. 6.5, 13, or 16 mm) seam. Brother General Sewing Accessories 11 Seam Guide Side Cutter Stitch Guide Foot Seam Guide Guides fabric edge with the Straight Stitch Needle Plate to create a beautiful finish without any adjustment on selected machines. Selecting a stitch designated for stitching heavy fabrics together. 1. The side extension ruler on this foot lets you add creativity to your fabric consistently. Sew. Installing the Straight Stitch Needle Plate automatically sets the needle position...
... Use the Straight Stitch Foot with an accurate 1/4 inch, 1/2 inch, or 5/8 inch (approx. 6.5, 13, or 16 mm) seam. Brother General Sewing Accessories 11 Seam Guide Side Cutter Stitch Guide Foot Seam Guide Guides fabric edge with the Straight Stitch Needle Plate to create a beautiful finish without any adjustment on selected machines. Selecting a stitch designated for stitching heavy fabrics together. 1. The side extension ruler on this foot lets you add creativity to your fabric consistently. Sew. Installing the Straight Stitch Needle Plate automatically sets the needle position...

Accessory Catalog
Page 11
....brother.com Loosen the screw on the presser foot and insert a braid through the guide before attaching the presser foot on the presser foot over the desired seams or pattern markings. 3. Attach the presser foot onto the machine. 5. Line up the center guide mark on the machine. 2. Place cord under the presser foot, and select zigzag stitch with maximum stitch width. Stitch braid in place. Slip a cord from satin or decorative stitches. 2. SA157 ABCDEFJKMN Cording Foot (7-hole) Used for embellishing 1 to 7 cords or decorative threads...
....brother.com Loosen the screw on the presser foot and insert a braid through the guide before attaching the presser foot on the presser foot over the desired seams or pattern markings. 3. Attach the presser foot onto the machine. 5. Line up the center guide mark on the machine. 2. Place cord under the presser foot, and select zigzag stitch with maximum stitch width. Stitch braid in place. Slip a cord from satin or decorative stitches. 2. SA157 ABCDEFJKMN Cording Foot (7-hole) Used for embellishing 1 to 7 cords or decorative threads...

Accessory Catalog
Page 13
... position. 3. A specially designed bobbin cover is also included with evenly spaced tucks and gathers. Sew slowly for details.) Brother Embellishment Feet Pin Tuck Foot 24 Ruffler Foot Pin Tuck Foot This presser foot has 7 grooves and produces perfect pin tucks and corded pin tucks using a twin needle on the lower portion of the presser foot is moved forward, its teeth catch a fabric and force it forward into the slot, and stitch slowly. 3. Use a stiff card to slide the fabric...
... position. 3. A specially designed bobbin cover is also included with evenly spaced tucks and gathers. Sew slowly for details.) Brother Embellishment Feet Pin Tuck Foot 24 Ruffler Foot Pin Tuck Foot This presser foot has 7 grooves and produces perfect pin tucks and corded pin tucks using a twin needle on the lower portion of the presser foot is moved forward, its teeth catch a fabric and force it forward into the slot, and stitch slowly. 3. Use a stiff card to slide the fabric...

Accessory Catalog
Page 15
...the machine. 2. Guide the fabric with the pin over the needle clamp screw. 2. Quilting Foot For darning, quilting, or free-motion. Place the fabric beneath the presser foot. 4. Walking Foot SA140 ABCDEFJKMN SA166 L SA107 GHO SA169 I Open Toe Walking Foot SA188 ABCDEFJKMN www.brother.com Lower the feed dogs. 3. Set the fabric under the presser foot. 6. Attach the walking foot to straight stitch. 3. Use for ULT series, PC-6500, PC-8200 and PC-8500 sewing machines. While starting to sew, press the needle position button twice to pull the bobbin thread to the quilt top. 7. Sew...
...the machine. 2. Guide the fabric with the pin over the needle clamp screw. 2. Quilting Foot For darning, quilting, or free-motion. Place the fabric beneath the presser foot. 4. Walking Foot SA140 ABCDEFJKMN SA166 L SA107 GHO SA169 I Open Toe Walking Foot SA188 ABCDEFJKMN www.brother.com Lower the feed dogs. 3. Set the fabric under the presser foot. 6. Attach the walking foot to straight stitch. 3. Use for ULT series, PC-6500, PC-8200 and PC-8500 sewing machines. While starting to sew, press the needle position button twice to pull the bobbin thread to the quilt top. 7. Sew...

Accessory Catalog
Page 17
... of embroidery designs - Includes three new free-motion presser feet: Free-motion quilting foot "C" for the Innov-is 4000D this upgrade adds outstanding quilting features, updated embroidery functionality and enhanced USB capability. Add appliqué capability to connect and ensures your machine with these features: - The Border Frame enables you superior stitch quality when stitching over differing fabric thicknesses. - Good for details.) www.brother.com Addition of Brother Embroidery Cards, including licensed content. Brother Embroidery Accessories 31 QuattroTM...
... of embroidery designs - Includes three new free-motion presser feet: Free-motion quilting foot "C" for the Innov-is 4000D this upgrade adds outstanding quilting features, updated embroidery functionality and enhanced USB capability. Add appliqué capability to connect and ensures your machine with these features: - The Border Frame enables you superior stitch quality when stitching over differing fabric thicknesses. - Good for details.) www.brother.com Addition of Brother Embroidery Cards, including licensed content. Brother Embroidery Accessories 31 QuattroTM...

Accessory Catalog
Page 34
... assortment of fabrics. Dependable thread delivery through machine tensions. Handles a variety of 30 cotton-wrapped polyester embroidery thread spools 300 meters (328 yards). Stabilizers and Water Soluble Stabilizers When doing machine embroidery, the use the Brother Bobbin Thread designed specifically for each design. Make sure you just the right color for your fabric properly with other sewing and embroidery machine brands. Bobbin Threads Stabilizers and Water Water Soluble Stabilizers Brother Embroidery Accessories 66 Bobbin Threads Brother Bobbin Threads are included...
... assortment of fabrics. Dependable thread delivery through machine tensions. Handles a variety of 30 cotton-wrapped polyester embroidery thread spools 300 meters (328 yards). Stabilizers and Water Soluble Stabilizers When doing machine embroidery, the use the Brother Bobbin Thread designed specifically for each design. Make sure you just the right color for your fabric properly with other sewing and embroidery machine brands. Bobbin Threads Stabilizers and Water Water Soluble Stabilizers Brother Embroidery Accessories 66 Bobbin Threads Brother Bobbin Threads are included...

Accessory Catalog
Page 40
... holding the fabric lightly with the LC2 presser foot. Attach the hem positioning plate A/B to the hemming attachment, and attach it into the front cover slot. 3. Attaching 12 mm (approx. 1/2") bias tape: Use the large bias tape sliding plate with the LC1 presser foot (included with 3 or 6 mm wide cover stitch. 3. Set up your machine for a cover stitch, with your Cover Stitch). 1. Set up your machine for a chain stitch, the center needle. 2. Set the bias tape though the holder (cut the...
... holding the fabric lightly with the LC2 presser foot. Attach the hem positioning plate A/B to the hemming attachment, and attach it into the front cover slot. 3. Attaching 12 mm (approx. 1/2") bias tape: Use the large bias tape sliding plate with the LC1 presser foot (included with 3 or 6 mm wide cover stitch. 3. Set up your machine for a cover stitch, with your Cover Stitch). 1. Set up your machine for a chain stitch, the center needle. 2. Set the bias tape though the holder (cut the...
Users Manual - English
Page 9
... Accessories 3 Options 6 Chapter 1 Getting Ready 7 TURNING THE MACHINE ON/OFF 8 LCD SCREEN 9 Using the Machine Setting Mode Key 12 Using the Machine Operation Mode Key 17 Using the Pattern Explanation Key 18 LOWER THREADING 19 Winding the Bobbin 19 Setting the Bobbin 22 Pulling Up the Bobbin Thread 23 UPPER THREADING 25 Threading Using the "Automatic Threading" Button 25 Threading Manually 27 Using the Twin Needle Mode 29 Using Threads that Unwind Quickly 31 CHANGING THE PRESSER FOOT 32 Removing the Presser Foot 32 Attaching the Presser Foot 32 Attaching the Walking Foot...
... Accessories 3 Options 6 Chapter 1 Getting Ready 7 TURNING THE MACHINE ON/OFF 8 LCD SCREEN 9 Using the Machine Setting Mode Key 12 Using the Machine Operation Mode Key 17 Using the Pattern Explanation Key 18 LOWER THREADING 19 Winding the Bobbin 19 Setting the Bobbin 22 Pulling Up the Bobbin Thread 23 UPPER THREADING 25 Threading Using the "Automatic Threading" Button 25 Threading Manually 27 Using the Twin Needle Mode 29 Using Threads that Unwind Quickly 31 CHANGING THE PRESSER FOOT 32 Removing the Presser Foot 32 Attaching the Presser Foot 32 Attaching the Walking Foot...

Users Manual - English
Page 10
... MAKING EMBROIDERY ADJUSTMENTS .........154 TROUBLESHOOTING 214 Adjusting Thread Tension 154 Using the Automatic Thread Cutting Function (END COLOR TRIM 155 Using the Thread Trimming Function (JUMP STITCH TRIM) 155 Adjusting the Embroidery Speed 156 Changing the Thread Color Display 157 ERROR MESSAGES 217 SPECIFICATIONS 223 UPGRADING YOUR MACHINE'S SOFTWARE. 224 3 Upgrade Procedure Using USB Media 224 Upgrade Procedure Using Computer 224 Changing the Embroidery Frame Display 158 REVISING THE PATTERN 159 Changing the Pattern Position 159 Aligning the Pattern and the Needle...
... MAKING EMBROIDERY ADJUSTMENTS .........154 TROUBLESHOOTING 214 Adjusting Thread Tension 154 Using the Automatic Thread Cutting Function (END COLOR TRIM 155 Using the Thread Trimming Function (JUMP STITCH TRIM) 155 Adjusting the Embroidery Speed 156 Changing the Thread Color Display 157 ERROR MESSAGES 217 SPECIFICATIONS 223 UPGRADING YOUR MACHINE'S SOFTWARE. 224 3 Upgrade Procedure Using USB Media 224 Upgrade Procedure Using Computer 224 Changing the Embroidery Frame Display 158 REVISING THE PATTERN 159 Changing the Pattern Position 159 Aligning the Pattern and the Needle...
Users Manual - English
Page 12
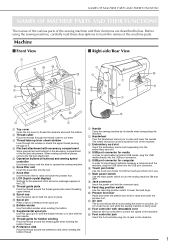
... dc ed gf a Top cover Open the top cover to thread the machine and wind the bobbin. k Spool pin Place a spool of the machine. m Supplemental spool pin Use this thread guide when winding the bobbin thread. o Pretension disk Pass the thread around the thread guide plate when threading upper thread. The wheel should be turned toward you to check the upper thread passing through in the accessory compartment of the machine parts. l Foot controller with the twin needle. m Foot controller jack Insert the foot controller plug into the connector jack...
... dc ed gf a Top cover Open the top cover to thread the machine and wind the bobbin. k Spool pin Place a spool of the machine. m Supplemental spool pin Use this thread guide when winding the bobbin thread. o Pretension disk Pass the thread around the thread guide plate when threading upper thread. The wheel should be turned toward you to check the upper thread passing through in the accessory compartment of the machine parts. l Foot controller with the twin needle. m Foot controller jack Insert the foot controller plug into the connector jack...
Users Manual - English
Page 13
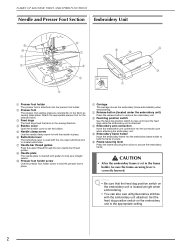
...upper thread through the two needle bar thread guides. f Frame-securing lever Press the frame-securing lever down to set in the frame holder, be sure the frame-securing lever is attached. b Presser foot The presser foot applies pressure consistently on the embroidery unit is used with the one-step buttonhole foot to create buttonholes. NAMES OF MACHINE PARTS AND THEIR FUNCTIONS Needle and Presser Foot Section Embroidery Unit f i a b e g d e f h c d b a c a Presser foot holder The presser foot is marked with guides to help sew straight seams. i Presser foot holder screw Use...
...upper thread through the two needle bar thread guides. f Frame-securing lever Press the frame-securing lever down to set in the frame holder, be sure the frame-securing lever is attached. b Presser foot The presser foot applies pressure consistently on the embroidery unit is used with the one-step buttonhole foot to create buttonholes. NAMES OF MACHINE PARTS AND THEIR FUNCTIONS Needle and Presser Foot Section Embroidery Unit f i a b e g d e f h c d b a c a Presser foot holder The presser foot is marked with guides to help sew straight seams. i Presser foot holder screw Use...
Users Manual - English
Page 14
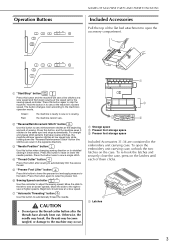
... lower the presser foot and apply pressure to the fabric. Press the button again to the machine may become tangled, or damage to stop the machine. e "Presser Foot Lifter" button Press this button and the machine will sew reverse stitches at a slow speed. CAUTION • Do not press the thread cutter button after sewing to automatically trim the excess thread. Press this button when changing sewing direction or for detailed sewing in the embroidery unit carrying case. Otherwise, the needle may break...
... lower the presser foot and apply pressure to the fabric. Press the button again to the machine may become tangled, or damage to stop the machine. e "Presser Foot Lifter" button Press this button and the machine will sew reverse stitches at a slow speed. CAUTION • Do not press the thread cutter button after sewing to automatically trim the excess thread. Press this button when changing sewing direction or for detailed sewing in the embroidery unit carrying case. Otherwise, the needle may break...

Users Manual - English
Page 22
... settings, such as the stitch width and stitch length, are locked and cannot be saved for upper threading, winding the bobbin, 17 mode key changing the presser foot, and how to use the machine. You can use the plus and minus keys to change the needle stop position, turn the buzzer ON/OFF, 12 key adjust the pattern or screen, and change selection screens. s Machine setting mode Press this key before changing the needle, the presser foot...
... settings, such as the stitch width and stitch length, are locked and cannot be saved for upper threading, winding the bobbin, 17 mode key changing the presser foot, and how to use the machine. You can use the plus and minus keys to change the needle stop position, turn the buzzer ON/OFF, 12 key adjust the pattern or screen, and change selection screens. s Machine setting mode Press this key before changing the needle, the presser foot...
Users Manual - English
Page 67
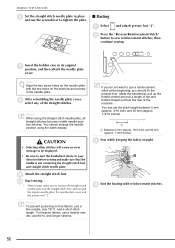
You cannot change the needle position using the straight stitch needle plate, all straight stitches become middle needle position stitches. i Attach the straight stitch foot. Memo To prevent puckering on the machine and screws in place the plate. ■ Basting a Select and attach presser foot "J". For heavier fabrics, use the screwdriver to tighten in the needle plate. b Press the "Reverse/Reinforcement Stitch" button to use a fine needle, size 75/11, and a short stitch length. g Insert the bobbin case in your direction before sewing and make sure to ...
You cannot change the needle position using the straight stitch needle plate, all straight stitches become middle needle position stitches. i Attach the straight stitch foot. Memo To prevent puckering on the machine and screws in place the plate. ■ Basting a Select and attach presser foot "J". For heavier fabrics, use the screwdriver to tighten in the needle plate. b Press the "Reverse/Reinforcement Stitch" button to use a fine needle, size 75/11, and a short stitch length. g Insert the bobbin case in your direction before sewing and make sure to ...
Users Manual - English
Page 225
... the "Fabric/Thread/Needle 36 selected fabric. Adjust the thread tension. 43, 154 Wrong presser foot. Remove the dust or lint. 210 while sewing Pieces of the needle. Needle is installed incorrectly. Use scissors, etc., to Problem Cause Solution Page Upper thread breaks Machine is not threaded correctly (used the Rethread the machine correctly. 25 wrong spool cap, spool cap is loose, the thread did not catch the needle bar threader, etc.) Thread is set incorrectly. Replace the needle. 34 Needle is installed incorrectly. Replace the race...
... the "Fabric/Thread/Needle 36 selected fabric. Adjust the thread tension. 43, 154 Wrong presser foot. Remove the dust or lint. 210 while sewing Pieces of the needle. Needle is installed incorrectly. Use scissors, etc., to Problem Cause Solution Page Upper thread breaks Machine is not threaded correctly (used the Rethread the machine correctly. 25 wrong spool cap, spool cap is loose, the thread did not catch the needle bar threader, etc.) Thread is set incorrectly. Replace the needle. 34 Needle is installed incorrectly. Replace the race...

Users Manual - English
Page 226
... the sewing arm, so the embroidery unit cannot that it level. does not sew out and remove it does not get caught or snagged. correctly Fabric was raised using the "Presser Foot Press the "Presser Foot Lifter" button to lower 3 presser foot with the Lifter" button. cannot move . Stop the machine and place the fabric so that often cause pattern shrinkage. presser foot lever Thread tension is incorrect Upper threading is set incorrectly. Reattach the presser foot holder correctly. 33 Thread tension...
... the sewing arm, so the embroidery unit cannot that it level. does not sew out and remove it does not get caught or snagged. correctly Fabric was raised using the "Presser Foot Press the "Presser Foot Lifter" button to lower 3 presser foot with the Lifter" button. cannot move . Stop the machine and place the fabric so that often cause pattern shrinkage. presser foot lever Thread tension is incorrect Upper threading is set incorrectly. Reattach the presser foot holder correctly. 33 Thread tension...

Users Manual - English
Page 227
... hole(s) in the down position. Use the feed dog position lever to unlock the - Lengthen the stitch length setting. 42 Wrong presser foot was attached before the upper threading is set to the needle bar release mechanism. Use the correct presser foot. Cut the entangled thread and remove it from that made during sewing. the race. Press the "Start/Stop" button. 48, 98, 130, 177 3 Main power switch is not turned on the pattern selected, the machine may feed the fabric...
... hole(s) in the down position. Use the feed dog position lever to unlock the - Lengthen the stitch length setting. 42 Wrong presser foot was attached before the upper threading is set to the needle bar release mechanism. Use the correct presser foot. Cut the entangled thread and remove it from that made during sewing. the race. Press the "Start/Stop" button. 48, 98, 130, 177 3 Main power switch is not turned on the pattern selected, the machine may feed the fabric...

Users Manual - English
Page 245
a Remove the bobbin cover. Use the bobbin center pin (spacer) for better thread flow, bobbin stability and to provide the correct height for prewound bobbins in the operation manual. a Memo Some models do not include the alternate bobbin case (pink marking). a a Top paper e Follow steps from "Setting/Installing the Bobbin" in the direction as a regular bobbin. When using prewound bobbins (not included with this machine, set the bobbin by following the steps below. ■ Using Prewound...
a Remove the bobbin cover. Use the bobbin center pin (spacer) for better thread flow, bobbin stability and to provide the correct height for prewound bobbins in the operation manual. a Memo Some models do not include the alternate bobbin case (pink marking). a a Top paper e Follow steps from "Setting/Installing the Bobbin" in the direction as a regular bobbin. When using prewound bobbins (not included with this machine, set the bobbin by following the steps below. ■ Using Prewound...

Users Manual - English
Page 248
...-directional sewing 93 MY CUSTOM STITCH designing 200 entering data 202 key functions 202 retrieving 208 saving 207 storing in your list 207 N Needle changing the needle 34 changing the needle position 55 fabric/thread/needle combinations 36 mode 9 twin needle 29 Needle bar thread guides 2 28, 29 Needle clamp screw 2 Needle mode selection key 29 Needle plate 2 Needle position 55 Needle Position button 3 O , Operation buttons 1 3 Overcasting 60 62, 63 P Patchwork 61 Piecing 68 Pintuck 59 Point delete key 204 Power cord 8 Presser foot attaching 32 removing 32 types...
...-directional sewing 93 MY CUSTOM STITCH designing 200 entering data 202 key functions 202 retrieving 208 saving 207 storing in your list 207 N Needle changing the needle 34 changing the needle position 55 fabric/thread/needle combinations 36 mode 9 twin needle 29 Needle bar thread guides 2 28, 29 Needle clamp screw 2 Needle mode selection key 29 Needle plate 2 Needle position 55 Needle Position button 3 O , Operation buttons 1 3 Overcasting 60 62, 63 P Patchwork 61 Piecing 68 Pintuck 59 Point delete key 204 Power cord 8 Presser foot attaching 32 removing 32 types...
Software Users Manual/3.0 Operation Manual - English
Page 11
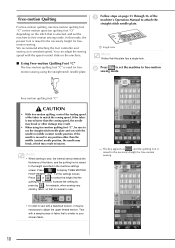
a Follow steps on the stitch that this mode, the presser foot is raised to free-motion sewing mode. Free-motion quilting foot "C" CAUTION • With free-motion quilting, control the feeding speed of the fabric to attach the straight stitch needle plate. 1 a Single hole Memo Notice that is moved to the height specified in the machine settings screen. If the needle is selected, and set the machine to adjust the upper thread tension. Memo • When starting to sew, the internal sensor detects the thickness of...
a Follow steps on the stitch that this mode, the presser foot is raised to free-motion sewing mode. Free-motion quilting foot "C" CAUTION • With free-motion quilting, control the feeding speed of the fabric to attach the straight stitch needle plate. 1 a Single hole Memo Notice that is moved to the height specified in the machine settings screen. If the needle is selected, and set the machine to adjust the upper thread tension. Memo • When starting to sew, the internal sensor detects the thickness of...


