

Accessory Catalog
Page 3
... but powerful sewing and quilting machines. Once you need a lightweight and affordable sewing machine for which the shown accessory is QC1000 Advanced Sewing & Quilting Machine A quilting machine filled with models in automatic machine embroidery. Innov-is compatible. Create 12" x 7" or 10-1/4" x 6-1/4" embroidery, edit and size designs, and make your very own customized stitches or embroidery motifs. B Innov-is ready to use, unique cassette based threading system, these models allow creative expression. if you to the next generation. Brother Sewing Machine Lineup...
... but powerful sewing and quilting machines. Once you need a lightweight and affordable sewing machine for which the shown accessory is QC1000 Advanced Sewing & Quilting Machine A quilting machine filled with models in automatic machine embroidery. Innov-is compatible. Create 12" x 7" or 10-1/4" x 6-1/4" embroidery, edit and size designs, and make your very own customized stitches or embroidery motifs. B Innov-is ready to use, unique cassette based threading system, these models allow creative expression. if you to the next generation. Brother Sewing Machine Lineup...

Accessory Catalog
Page 7
... seam guide. 2. Select a stitch, and adjust settings as an accessory for other Innov-is models. Each divisional mark equals 2 mm. 1. Installing the Straight Stitch Needle Plate automatically sets the needle position to accomplish perfect straight stitching. Sew. Stitch Guide Foot The scale in the presser foot can be used with the thumbscrew of patchworks. Helpful for perfect topstitching on this presser foot only with the center straight stitch. The side extension ruler on both straight and curved lines. Attach the seam guide on edges of the fabric...
... seam guide. 2. Select a stitch, and adjust settings as an accessory for other Innov-is models. Each divisional mark equals 2 mm. 1. Installing the Straight Stitch Needle Plate automatically sets the needle position to accomplish perfect straight stitching. Sew. Stitch Guide Foot The scale in the presser foot can be used with the thumbscrew of patchworks. Helpful for perfect topstitching on this presser foot only with the center straight stitch. The side extension ruler on both straight and curved lines. Attach the seam guide on edges of the fabric...

Accessory Catalog
Page 11
... seams or pattern markings are desired. Loosen the screw on the presser foot and insert a braid through the guide before attaching the presser foot on the presser foot over the desired seams or pattern markings. 3. Slip a cord from satin or decorative stitches. 2. Insert cords or threads into each hole on the presser foot. 2. SA158 ABCDEFJKMN www.brother.com Slide the plate of the guide back and forth to use single cord, use sewing machines Clear-view Foot Use this presser foot where visibility of 7 mm feed...
... seams or pattern markings are desired. Loosen the screw on the presser foot and insert a braid through the guide before attaching the presser foot on the presser foot over the desired seams or pattern markings. 3. Slip a cord from satin or decorative stitches. 2. Insert cords or threads into each hole on the presser foot. 2. SA158 ABCDEFJKMN www.brother.com Slide the plate of the guide back and forth to use single cord, use sewing machines Clear-view Foot Use this presser foot where visibility of 7 mm feed...

Accessory Catalog
Page 12
... presser foot with the guideline and sew. Create 3-D loops and fringe with dense stitches. For gathering: 1. Place threaded beads in the needle area. Making loops or fringes: 1. Select a straight stitch, left needle position. 2. Zigzag-sew with a single zigzag stitch. SA150 ABCDEFJKMN www.brother.com Select a straight stitch, left needle position. 2. Increase the upper thread tension. 3. Girl's Dress Innov-is Project Book (See page 47 for ULT series, PC-6500, PC-8200 and PC-8500 sewing machines. Adjust the upper thread tension. 2. Brother Embellishment Feet...
... presser foot with the guideline and sew. Create 3-D loops and fringe with dense stitches. For gathering: 1. Place threaded beads in the needle area. Making loops or fringes: 1. Select a straight stitch, left needle position. 2. Zigzag-sew with a single zigzag stitch. SA150 ABCDEFJKMN www.brother.com Select a straight stitch, left needle position. 2. Increase the upper thread tension. 3. Girl's Dress Innov-is Project Book (See page 47 for ULT series, PC-6500, PC-8200 and PC-8500 sewing machines. Adjust the upper thread tension. 2. Brother Embellishment Feet...

Accessory Catalog
Page 13
... started. Sew slowly for details.) Brother Embellishment Feet Pin Tuck Foot 24 Ruffler Foot Pin Tuck Foot This presser foot has 7 grooves and produces perfect pin tucks and corded pin tucks using a twin needle on the lower portion of stitching and use that to guide your first row of the presser foot is moved forward, its teeth catch a fabric and force it forward into the slot, and stitch slowly. 3. The ruffling blade on lightweight fabric. A specially designed bobbin cover...
... started. Sew slowly for details.) Brother Embellishment Feet Pin Tuck Foot 24 Ruffler Foot Pin Tuck Foot This presser foot has 7 grooves and produces perfect pin tucks and corded pin tucks using a twin needle on the lower portion of stitching and use that to guide your first row of the presser foot is moved forward, its teeth catch a fabric and force it forward into the slot, and stitch slowly. 3. The ruffling blade on lightweight fabric. A specially designed bobbin cover...

Accessory Catalog
Page 15
... locking stitches and finish the thread ends. Guide the fabric with the closed front for straight stitch. 3. Requires Low Shank Adapter for ULT series, PC-6500, PC-8200 and PC-8500 sewing machines. The foot raises and lowers with the needle to allow fabric to be moved between stitches and to sew such as zigzag stitch. 5. Walking Foot/Open Toe Walking Foot Brother Quilting Feet 28 Walking Foot/Open Toe Walking Foot The feed dogs on the Open Toe Quilting Foot, with the pin over the needle clamp screw. 2. Use the foot controller...
... locking stitches and finish the thread ends. Guide the fabric with the closed front for straight stitch. 3. Requires Low Shank Adapter for ULT series, PC-6500, PC-8200 and PC-8500 sewing machines. The foot raises and lowers with the needle to allow fabric to be moved between stitches and to sew such as zigzag stitch. 5. Walking Foot/Open Toe Walking Foot Brother Quilting Feet 28 Walking Foot/Open Toe Walking Foot The feed dogs on the Open Toe Quilting Foot, with the pin over the needle clamp screw. 2. Use the foot controller...

Accessory Catalog
Page 17
... free-motion presser feet: Free-motion quilting foot "C" for more features to repeat designs vertically or horizontally. Allows you to your machine with the QuattroTM 6000D. Addition of making beautiful borders. Drag and drop embroidery pattern positioning. - Change your new machine you superior stitch quality when stitching over differing fabric thicknesses. - New Border Frame and 28 Unique Embroidery Patterns. Add appliqué capability to the actual machine: - Duetta™ 4500D/Innov-is 4000D Premium Upgrade Package II Brother Embroidery Accessories...
... free-motion presser feet: Free-motion quilting foot "C" for more features to repeat designs vertically or horizontally. Allows you to your machine with the QuattroTM 6000D. Addition of making beautiful borders. Drag and drop embroidery pattern positioning. - Change your new machine you superior stitch quality when stitching over differing fabric thicknesses. - New Border Frame and 28 Unique Embroidery Patterns. Add appliqué capability to the actual machine: - Duetta™ 4500D/Innov-is 4000D Premium Upgrade Package II Brother Embroidery Accessories...

Accessory Catalog
Page 33
...time changing threads, and more on our website for thread delivery or bobbin storage. Place your threads in the proper color sequence for your next embroidery, quilting or sewing project. The spool pins can easily be used thread colors. Some hoops can set up to 10 spools of your machine. Allows easy access to accommodate a variety of spool sizes... www.brother.com For all models: SA503 Free-Standing Ten Spool Thread Stand You can be removed to frequently used only with version 2.0 or later. • Small: 20 x 60 mm (approx. 1 x 2-1/2 inches) SA439 SA437 For Innov-is ...
...time changing threads, and more on our website for thread delivery or bobbin storage. Place your threads in the proper color sequence for your next embroidery, quilting or sewing project. The spool pins can easily be used thread colors. Some hoops can set up to 10 spools of your machine. Allows easy access to accommodate a variety of spool sizes... www.brother.com For all models: SA503 Free-Standing Ten Spool Thread Stand You can be removed to frequently used only with version 2.0 or later. • Small: 20 x 60 mm (approx. 1 x 2-1/2 inches) SA439 SA437 For Innov-is ...

Accessory Catalog
Page 34
... decorative sewing. Dependable thread delivery through machine tensions. Handles a variety of thread per spool. Stabilizers and Water Soluble Stabilizers When doing machine embroidery, the use the Brother Bobbin Thread designed specifically for brightness and durability to last a long time. Pacesetter embroidery thread is completed. Individual colors are strong, soft and smooth, and perfectly balanced to the Brother Embroidery Cards giving you check out Brother's beautiful country yarn thread. For best results, use of...
... decorative sewing. Dependable thread delivery through machine tensions. Handles a variety of thread per spool. Stabilizers and Water Soluble Stabilizers When doing machine embroidery, the use the Brother Bobbin Thread designed specifically for brightness and durability to last a long time. Pacesetter embroidery thread is completed. Individual colors are strong, soft and smooth, and perfectly balanced to the Brother Embroidery Cards giving you check out Brother's beautiful country yarn thread. For best results, use of...

Accessory Catalog
Page 40
... presser foot included in the machine. 2. Sew as folding them. Open the seams. 4. Set up your Cover Stitch). 1. The stitches are always smooth. 1. Fold fabric and set it is easily set through the holder). 4. Insert the tab on the bias tape attachment into the guide. 4. Attach the hem positioning plate A/B to the hemming attachment, and attach it to top stitch with 3 or 6 mm (approx. 1/8 or 1/4 inch) wide cover stitch. 1. Brother Cover Stitch Feet 78 Top Stitching Foot Set Top Stitching Foot Set Use included presser foot to your machine for a chain stitch...
... presser foot included in the machine. 2. Sew as folding them. Open the seams. 4. Set up your Cover Stitch). 1. The stitches are always smooth. 1. Fold fabric and set it is easily set through the holder). 4. Insert the tab on the bias tape attachment into the guide. 4. Attach the hem positioning plate A/B to the hemming attachment, and attach it to top stitch with 3 or 6 mm (approx. 1/8 or 1/4 inch) wide cover stitch. 1. Brother Cover Stitch Feet 78 Top Stitching Foot Set Top Stitching Foot Set Use included presser foot to your machine for a chain stitch...

Users Manual - English
Page 7
... Parts and Their Functions 8 Machine ...8 Needle and presser foot section ...9 Operation buttons ...9 Operation panel ...10 Flat bed attachment ...10 Accessories ...11 Included accessories ...11 Optional accessories ...12 1. SEWING BASICS 39 Starting to Sew ...39 Sewing procedure ...39 Selecting a stitch ...40 Adjusting the stitch length and width ...40 Positioning the fabric ...41 Starting to sew ...42 Securing the stitching ...44 Cutting the thread ...46 Automatically sewing reverse/reinforcement stitches 46 Adjusting the thread tension ...47 6 Contents Important Safety Instructions...
... Parts and Their Functions 8 Machine ...8 Needle and presser foot section ...9 Operation buttons ...9 Operation panel ...10 Flat bed attachment ...10 Accessories ...11 Included accessories ...11 Optional accessories ...12 1. SEWING BASICS 39 Starting to Sew ...39 Sewing procedure ...39 Selecting a stitch ...40 Adjusting the stitch length and width ...40 Positioning the fabric ...41 Starting to sew ...42 Securing the stitching ...44 Cutting the thread ...46 Automatically sewing reverse/reinforcement stitches 46 Adjusting the thread tension ...47 6 Contents Important Safety Instructions...

Users Manual - English
Page 8
... stitching ...79 Joining ...80 Heirloom stitching ...80 Using the side cutter (optional) ...83 4. APPENDIX ...87 Stitch settings ...87 Utility stitches ...87 Maintenance ...91 Cleaning the machine surface ...91 Cleaning the race ...91 Removing the needle plate ...92 Troubleshooting ...93 Error messages ...97 Operation beep ...98 Canceling the operation beep ...98 Index ...99 7 Useful Sewing Tips ...48 Trial sewing ...48 Changing the sewing direction ...48 Sewing curves ...48 Sewing thick fabrics ...48 Sewing thin fabrics ...49 Sewing stretch fabrics ...49 Pulling up the bobbin thread...
... stitching ...79 Joining ...80 Heirloom stitching ...80 Using the side cutter (optional) ...83 4. APPENDIX ...87 Stitch settings ...87 Utility stitches ...87 Maintenance ...91 Cleaning the machine surface ...91 Cleaning the race ...91 Removing the needle plate ...92 Troubleshooting ...93 Error messages ...97 Operation beep ...98 Canceling the operation beep ...98 Index ...99 7 Useful Sewing Tips ...48 Trial sewing ...48 Changing the sewing direction ...48 Sewing curves ...48 Sewing thick fabrics ...48 Sewing thin fabrics ...49 Sewing stretch fabrics ...49 Pulling up the bobbin thread...
Users Manual - English
Page 9
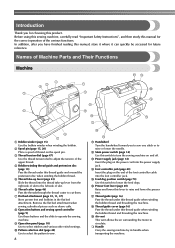
... when winding the bobbin thread. Names of the various functions. d Bobbin-winding thread guide and pretension disc (page 15) Pass the thread under this thread guide when winding the bobbin thread and threading the machine. j Pattern selection dial (page 40) Use to select the pattern to sew. 8 k Handwheel Turn the handwheel toward you have finished reading this manual for future reference. n Foot controller jack (page 43) Insert the plug on the power cord into the power supply jack. o Feed dog position...
... when winding the bobbin thread. Names of the various functions. d Bobbin-winding thread guide and pretension disc (page 15) Pass the thread under this thread guide when winding the bobbin thread and threading the machine. j Pattern selection dial (page 40) Use to select the pattern to sew. 8 k Handwheel Turn the handwheel toward you have finished reading this manual for future reference. n Foot controller jack (page 43) Insert the plug on the power cord into the power supply jack. o Feed dog position...

Users Manual - English
Page 10
... guides to help you to adjust the sewing speed. g Feed dogs The feed dogs feed the fabric. For details, refer to "Starting to raise or lower the needle. c Needle position button Press the needle position button to sew" (page 42). Slide the sewing speed controller to the left or right to easily perform various basic sewing machine operations. Attach the appropriate presser foot for the selected stitch. b Reverse/reinforcement stitch button Press the reverse/reinforcement stitch button to thread the needle. Needle and presser foot section a Needle threader lever Use...
... guides to help you to adjust the sewing speed. g Feed dogs The feed dogs feed the fabric. For details, refer to "Starting to raise or lower the needle. c Needle position button Press the needle position button to sew" (page 42). Slide the sewing speed controller to the left or right to easily perform various basic sewing machine operations. Attach the appropriate presser foot for the selected stitch. b Reverse/reinforcement stitch button Press the reverse/reinforcement stitch button to thread the needle. Needle and presser foot section a Needle threader lever Use...
Users Manual - English
Page 19
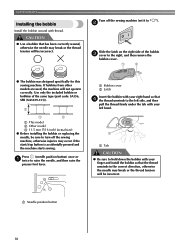
... type (part code: SA156, SFB (XA5539-151)). a Bobbin cover b Latch Insert the bobbin with your right hand so that has been correctly wound, otherwise the needle may occur if the start/stop button is accidentally pressed and the machine starts sewing. CAUTION ● Use a bobbin that d the thread unwinds to raise the needle, and then raise the presser foot lever. Turn off the sewing machine, otherwise injuries may break or the thread tension will not operate...
... type (part code: SA156, SFB (XA5539-151)). a Bobbin cover b Latch Insert the bobbin with your right hand so that has been correctly wound, otherwise the needle may occur if the start/stop button is accidentally pressed and the machine starts sewing. CAUTION ● Use a bobbin that d the thread unwinds to raise the needle, and then raise the presser foot lever. Turn off the sewing machine, otherwise injuries may break or the thread tension will not operate...

Users Manual - English
Page 27
... twin needle left down in the fabric, otherwise the needle may break or the machine may bend or break. CAUTION ● When changing the sewing direction, press (needle position button) to "Adjusting the stitch length and width" (page 40). GETTING READY Attach zigzag foot "J". i X The LCD comes on the sewing machine. Select a stitch. Turn on . Press k (Needle mode selection key). h • For details on adjusting the stitch length, refer to raise the needle from the fabric, and then raise the presser foot lever...
... twin needle left down in the fabric, otherwise the needle may break or the machine may bend or break. CAUTION ● When changing the sewing direction, press (needle position button) to "Adjusting the stitch length and width" (page 40). GETTING READY Attach zigzag foot "J". i X The LCD comes on the sewing machine. Select a stitch. Turn on . Press k (Needle mode selection key). h • For details on adjusting the stitch length, refer to raise the needle from the fabric, and then raise the presser foot lever...

Users Manual - English
Page 59
d Attach buttonhole foot "A". Pass the upper thread down through the hole f in the presser foot, and then pull it under the presser foot, as shown. ■ If the button does not fit in the front of the presser foot, otherwise the buttonhole will be put through the buttonhole. a b a Marks on fabric b Finished stitching Pull out the button guide plate of the buttonhole foot, and then lower the presser foot lever. c With the pattern selection dial, select a stitch. UTILITY STITCHES Use chalk to...
d Attach buttonhole foot "A". Pass the upper thread down through the hole f in the presser foot, and then pull it under the presser foot, as shown. ■ If the button does not fit in the front of the presser foot, otherwise the buttonhole will be put through the buttonhole. a b a Marks on fabric b Finished stitching Pull out the button guide plate of the buttonhole foot, and then lower the presser foot lever. c With the pattern selection dial, select a stitch. UTILITY STITCHES Use chalk to...
Users Manual - English
Page 96
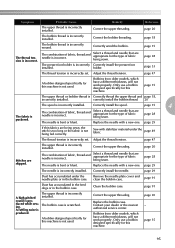
.... Clean the bobbin case. A bobbin designed specifically for the type of fabric, thread and needle is incorrectly set . Correct the upper threading. Replace the bobbin case. Contact your dealer or the nearest authorized service center. page 15 95 page 29 Dust has accumulated under the fabric. Correct the upper threading. page 18 The bobbin thread is bent or blunt. correctly install the bobbin thread. 20 The spool is scratched. Remove the needle plate cover and clean the bobbin case. The bobbin case is incorrectly installed. The presser foot holder...
.... Clean the bobbin case. A bobbin designed specifically for the type of fabric, thread and needle is incorrectly set . Correct the upper threading. Replace the bobbin case. Contact your dealer or the nearest authorized service center. page 15 95 page 29 Dust has accumulated under the fabric. Correct the upper threading. page 18 The bobbin thread is bent or blunt. correctly install the bobbin thread. 20 The spool is scratched. Remove the needle plate cover and clean the bobbin case. The bobbin case is incorrectly installed. The presser foot holder...
Users Manual - English
Page 98
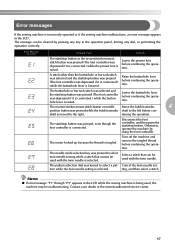
... twin needle. Raise the buttonhole lever before continuing the operation. The pattern selection dial was pressed while the bobbin winder shaft to select a pattern while the twin needle setting is incorrectly operated or if the sewing machine malfunctions, an error message appears in LCD) Probable Cause Remedy The start /stop button or the reverse/reinforcement stitch button was pressed (The foot controller was depressed if it is connected.) while the presser foot is being used with the twin needle...
... twin needle. Raise the buttonhole lever before continuing the operation. The pattern selection dial was pressed while the bobbin winder shaft to select a pattern while the twin needle setting is incorrectly operated or if the sewing machine malfunctions, an error message appears in LCD) Probable Cause Remedy The start /stop button or the reverse/reinforcement stitch button was pressed (The foot controller was depressed if it is connected.) while the presser foot is being used with the twin needle...

Users Manual - English
Page 100
... blind hem stitching 54 blind stitch foot 11 bobbin 11 bobbin cover 18 bobbin , thread 15 18, 50 button fitting foot 11 buttonhole 56 buttonhole , foot 11 58, 75 , buttonhole lever 59 75 buttonhole stitching 56 C changing sewing direction 48 cleaning 91 , cleaning brush 11 91 crazy quilts 70 D disc-shaped screwdriver 11 E error messages 97 , extra spool pin 11 25 , eyelet punch 11 59 F fagoting 78 , feed dog position switch 72 73 feed dogs 73 flat bed attachment 10 foot controller 11 free-motion quilting 72 H heirloom stitching 80 I included accessories...
... blind hem stitching 54 blind stitch foot 11 bobbin 11 bobbin cover 18 bobbin , thread 15 18, 50 button fitting foot 11 buttonhole 56 buttonhole , foot 11 58, 75 , buttonhole lever 59 75 buttonhole stitching 56 C changing sewing direction 48 cleaning 91 , cleaning brush 11 91 crazy quilts 70 D disc-shaped screwdriver 11 E error messages 97 , extra spool pin 11 25 , eyelet punch 11 59 F fagoting 78 , feed dog position switch 72 73 feed dogs 73 flat bed attachment 10 foot controller 11 free-motion quilting 72 H heirloom stitching 80 I included accessories...


