
Users Manual - English
Page 62
Features in the PCL printer driver (For Windows®) You can access the Basic tab by accessing the Brother Solutions Center at http://solutions.brother.com The screens in the General tab of the Brother HL-7050 series Properties screen. 1 2 Change the settings for Paper Size, Multiple Page, Orientation and so on. 1 Select Paper size, Multiple page, Orientation...
Features in the PCL printer driver (For Windows®) You can access the Basic tab by accessing the Brother Solutions Center at http://solutions.brother.com The screens in the General tab of the Brother HL-7050 series Properties screen. 1 2 Change the settings for Paper Size, Multiple Page, Orientation and so on. 1 Select Paper size, Multiple page, Orientation...
Users Manual - English
Page 63
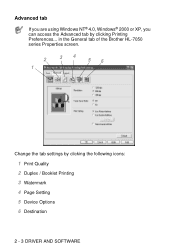
in the General tab of the Brother HL-7050 series Properties screen. 2 1 34 56 Change the tab settings by clicking Printing Preferences... Advanced tab If you are using Windows NT® 4.0, Windows® 2000 or XP, you can access the Advanced tab by clicking the following icons: 1 Print Quality 2 Duplex / Booklet Printing 3 Watermark 4 Page Setting 5 Device Options 6 Destination 2 - 3 DRIVER AND SOFTWARE
in the General tab of the Brother HL-7050 series Properties screen. 2 1 34 56 Change the tab settings by clicking Printing Preferences... Advanced tab If you are using Windows NT® 4.0, Windows® 2000 or XP, you can access the Advanced tab by clicking the following icons: 1 Print Quality 2 Duplex / Booklet Printing 3 Watermark 4 Page Setting 5 Device Options 6 Destination 2 - 3 DRIVER AND SOFTWARE

Users Manual - English
Page 70
Support tab If you are using Windows NT® 4.0, Windows® 2000 or XP, you can print the Configuration page (Print Settings) and the internal fonts list. in the General tab of the Brother HL-7050 series Properties screen. ■ You can download the latest driver by accessing the Brother Solutions Center at http://solutions.brother.com ■ You can see the printer driver version. ■ You can check the current driver settings. ■ You can access the Support tab by clicking Printing Preferences... DRIVER AND SOFTWARE 2 - 10
Support tab If you are using Windows NT® 4.0, Windows® 2000 or XP, you can print the Configuration page (Print Settings) and the internal fonts list. in the General tab of the Brother HL-7050 series Properties screen. ■ You can download the latest driver by accessing the Brother Solutions Center at http://solutions.brother.com ■ You can see the printer driver version. ■ You can check the current driver settings. ■ You can access the Support tab by clicking Printing Preferences... DRIVER AND SOFTWARE 2 - 10

Users Manual - English
Page 72
Layout tab If you are using Windows NT® 4.0, Windows® 2000 or XP, you installed. DRIVER AND SOFTWARE 2 - 12 in the Orientation, Print on Both Sides, Page Order and Page Per Sheet. Device Settings tab Select the options you can change the Layout setting by clicking Printing Preferences... You can access the Layout tab by selecting the setting in the General tab of the Brother HL-7050 BR-Script3 Properties screen.
Layout tab If you are using Windows NT® 4.0, Windows® 2000 or XP, you installed. DRIVER AND SOFTWARE 2 - 12 in the Orientation, Print on Both Sides, Page Order and Page Per Sheet. Device Settings tab Select the options you can change the Layout setting by clicking Printing Preferences... You can access the Layout tab by selecting the setting in the General tab of the Brother HL-7050 BR-Script3 Properties screen.

Users Manual - English
Page 73
Advanced Options If you are using Windows NT® 4.0, Windows® 2000 or XP, you can access the Brother HL-7050 BR-Script3 Advanced Options tab by clicking Advanced... button in the Layout tab or the Paper / Quality tab. 1 2 2 - 13 DRIVER AND SOFTWARE Paper / Quality tab Select the paper source.
Advanced Options If you are using Windows NT® 4.0, Windows® 2000 or XP, you can access the Brother HL-7050 BR-Script3 Advanced Options tab by clicking Advanced... button in the Layout tab or the Paper / Quality tab. 1 2 2 - 13 DRIVER AND SOFTWARE Paper / Quality tab Select the paper source.

Quick Setup Guide - English
Page 1
... Your Printer Step 2 Installing the Driver Windows® USB Windows® Parallel Installing the Driver Windows® Network Quick Setup Guide HL-7050 series Macintosh ® USB Macintosh ® Network USB Parallel Network USB Network Peer-toPeer (LPR) page 14 Peer-toPeer (NetBIOS) page 16 Network Shared Printer page ...install the driver. Setting Up Your Printer Read this "Quick Setup Guide" and supplied CD-ROM in a convenient place for your problem or question, access the Brother Solutions Center directly from the CD-ROM/Driver or go to http://solutions.brother.com Keep...
... Your Printer Step 2 Installing the Driver Windows® USB Windows® Parallel Installing the Driver Windows® Network Quick Setup Guide HL-7050 series Macintosh ® USB Macintosh ® Network USB Parallel Network USB Network Peer-toPeer (LPR) page 14 Peer-toPeer (NetBIOS) page 16 Network Shared Printer page ...install the driver. Setting Up Your Printer Read this "Quick Setup Guide" and supplied CD-ROM in a convenient place for your problem or question, access the Brother Solutions Center directly from the CD-ROM/Driver or go to http://solutions.brother.com Keep...

Quick Setup Guide - English
Page 13
..., and then connect it to "2. Windows® USB Installing the Driver ON OFF 2 Select the Brother HL-7050 series icon. 9 Click the Finish button. 3 From the File menu, select Set as the Default Printer (For Windows® 2000/XP Users Only) 1 Click Start and Printers and Faxes. Setting Your Printer as Default printer. The setup is now complete. For...
..., and then connect it to "2. Windows® USB Installing the Driver ON OFF 2 Select the Brother HL-7050 series icon. 9 Click the Finish button. 3 From the File menu, select Set as the Default Printer (For Windows® 2000/XP Users Only) 1 Click Start and Printers and Faxes. Setting Your Printer as Default printer. The setup is now complete. For...
Network Users Manual - English
Page 61
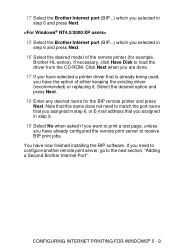
...E-mail addresses cannot have the option of either keeping the existing driver (recommended) or replacing it. Enter your Windows® 95/98/Me/NT4.0/2000/XP system using the standard Windows® 95/98/Me/NT4.0/2000/XP printer setup procedure. You will then be asked to re-start your ... for the remote print server (for example, Brother HL-series). To do not know this , go the Start button, select Settings and then Printers. 12 Select Add Printer to begin the printer installation. 13 Click Next when you get the Add Printer Wizard window. (For Windows® 95/98/Me users) 14 Select Local...
...E-mail addresses cannot have the option of either keeping the existing driver (recommended) or replacing it. Enter your Windows® 95/98/Me/NT4.0/2000/XP system using the standard Windows® 95/98/Me/NT4.0/2000/XP printer setup procedure. You will then be asked to re-start your ... for the remote print server (for example, Brother HL-series). To do not know this , go the Start button, select Settings and then Printers. 12 Select Add Printer to begin the printer installation. 13 Click Next when you get the Add Printer Wizard window. (For Windows® 95/98/Me users) 14 Select Local...
Network Users Manual - English
Page 62
...print jobs. Click Next when you are done. 17 If you have selected a printer driver that you assigned in step 6 and press Next. 16 Select the desired model of either keeping the existing driver (recommended) or replacing it. Note that this name does not need to configure ...used, you have the option of the remote printer (for the BIP remote printer and press Next. Select the desired option and press Next. 18 Enter any desired name for example, Brother HL-series). CONFIGURING INTERNET PRINTING FOR WINDOWS® 5 - 9 17 Select the Brother Internet port (BIP...) which you selected in step...
...print jobs. Click Next when you are done. 17 If you have selected a printer driver that you assigned in step 6 and press Next. 16 Select the desired model of either keeping the existing driver (recommended) or replacing it. Note that this name does not need to configure ...used, you have the option of the remote printer (for the BIP remote printer and press Next. Select the desired option and press Next. 18 Enter any desired name for example, Brother HL-series). CONFIGURING INTERNET PRINTING FOR WINDOWS® 5 - 9 17 Select the Brother Internet port (BIP...) which you selected in step...


