Users Manual - English
Page 4
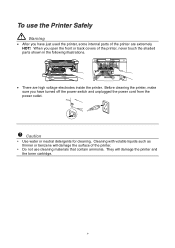
... damage the printer and the toner cartridge. They will damage the surface of the printer. To use cleaning materials that contain ammonia. Before cleaning the printer, make sure you open the front or back covers of the printer are high voltage electrodes inside the printer. When you have just used the printer, some internal parts of the printer, never touch...
... damage the printer and the toner cartridge. They will damage the surface of the printer. To use cleaning materials that contain ammonia. Before cleaning the printer, make sure you open the front or back covers of the printer are high voltage electrodes inside the printer. When you have just used the printer, some internal parts of the printer, never touch...
Users Manual - English
Page 10
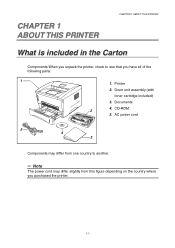
Printer 2. Drum unit assembly (with toner cartridge included) 3. CD-ROM 5. Documents 2 4. AC power cord 5 4 3 Components may differ from one country to see that you purchased the printer. 1-1 CHAPTER 1 1 ABOUT THIS PRINTER CHAPTER 1 ABOUT THIS PRINTER What is included in the Carton Components When you unpack the printer, check to another. ✏ Note The power cord may differ slightly from this figure depending on the country where 0 you have all of the following parts: 1 1.
Printer 2. Drum unit assembly (with toner cartridge included) 3. CD-ROM 5. Documents 2 4. AC power cord 5 4 3 Components may differ from one country to see that you purchased the printer. 1-1 CHAPTER 1 1 ABOUT THIS PRINTER CHAPTER 1 ABOUT THIS PRINTER What is included in the Carton Components When you unpack the printer, check to another. ✏ Note The power cord may differ slightly from this figure depending on the country where 0 you have all of the following parts: 1 1.
Users Manual - English
Page 57
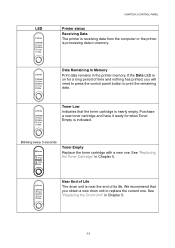
... Paper Alarm need to press the control panel button to replace the current one . Toner Data Blinking every 5 seconds Drum Ready Paper Alarm Toner Data Toner Empty Replace the toner cartridge with a new one . Data 3-3 See "Replacing the Toner Cartridge" in the printer memory. Near End of Life Drum The drum unit is near the end of time...
... Paper Alarm need to press the control panel button to replace the current one . Toner Data Blinking every 5 seconds Drum Ready Paper Alarm Toner Data Toner Empty Replace the toner cartridge with a new one . Data 3-3 See "Replacing the Toner Cartridge" in the printer memory. Near End of Life Drum The drum unit is near the end of time...
Users Manual - English
Page 73
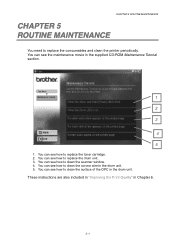
... the drum unit. You can see how to clean the corona wire in Chapter 6. 5-1 You can see how to replace the consumables and clean the printer periodically. You can see how to replace the toner cartridge. 2. CHAPTER 5 ROUTINE MAINTENANCE CHAPTER 5 5 ROUTINE MAINTENANCE You need to clean the scanner window. 4.
... the drum unit. You can see how to clean the corona wire in Chapter 6. 5-1 You can see how to replace the consumables and clean the printer periodically. You can see how to replace the toner cartridge. 2. CHAPTER 5 ROUTINE MAINTENANCE CHAPTER 5 5 ROUTINE MAINTENANCE You need to clean the scanner window. 4.

Users Manual - English
Page 74
... the print density setting for lighter or darker printing, toner consumption varies accordingly. y Wait to indicate that the toner 0 cartridge is nearly empty. y If you install it in the printer. Toner Cartridge CHAPTER 5 ROUTINE MAINTENANCE A new toner cartridge contains enough toner to print approximately 3,000 (standard cartridge) or 6000 (high yield cartridge) A4/Letter-size single-sided pages at about 5% coverage...
... the print density setting for lighter or darker printing, toner consumption varies accordingly. y Wait to indicate that the toner 0 cartridge is nearly empty. y If you install it in the printer. Toner Cartridge CHAPTER 5 ROUTINE MAINTENANCE A new toner cartridge contains enough toner to print approximately 3,000 (standard cartridge) or 6000 (high yield cartridge) A4/Letter-size single-sided pages at about 5% coverage...
Users Manual - English
Page 75
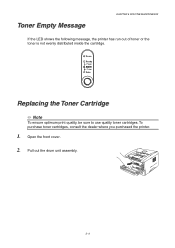
Toner Empty Message CHAPTER 5 ROUTINE MAINTENANCE If the LED shows the following message, the printer has run out of toner or the toner is not evenly distributed inside the cartridge. To 1 purchase toner cartridges, consult the dealer where you purchased the printer. 1. Drum Ready Paper Alarm Toner Data Replacing the Toner Cartridge ✏ Note To ensure optimum print quality, be sure to use quality toner cartridges. Open the front cover. 2. Pull out the drum unit assembly. 5-3
Toner Empty Message CHAPTER 5 ROUTINE MAINTENANCE If the LED shows the following message, the printer has run out of toner or the toner is not evenly distributed inside the cartridge. To 1 purchase toner cartridges, consult the dealer where you purchased the printer. 1. Drum Ready Paper Alarm Toner Data Replacing the Toner Cartridge ✏ Note To ensure optimum print quality, be sure to use quality toner cartridges. Open the front cover. 2. Pull out the drum unit assembly. 5-3

Users Manual - English
Page 76
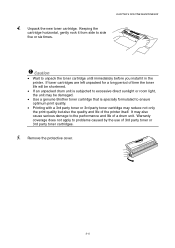
... of the drum unit assembly. ! Caution We recommend that toner powder does not spill out of the cartridge. Press the lock lever down, and then pull the toner cartridge out of the used toner cartridge in accordance with cold water. ✏ Note y Be sure to the printer from static electricity, do not touch the electrodes shown in...
... of the drum unit assembly. ! Caution We recommend that toner powder does not spill out of the cartridge. Press the lock lever down, and then pull the toner cartridge out of the used toner cartridge in accordance with cold water. ✏ Note y Be sure to the printer from static electricity, do not touch the electrodes shown in...
Users Manual - English
Page 77
... room light, the unit may be damaged. • Use a genuine Brother toner cartridge that is specially formulated to ensure optimum print quality. • Printing with a 3rd party toner or 3rd party toner cartridge may also cause serious damage to problems caused by the use of the printer itself. Remove the protective cover. 5-5 Warranty coverage does not apply...
... room light, the unit may be damaged. • Use a genuine Brother toner cartridge that is specially formulated to ensure optimum print quality. • Printing with a 3rd party toner or 3rd party toner cartridge may also cause serious damage to problems caused by the use of the printer itself. Remove the protective cover. 5-5 Warranty coverage does not apply...

Users Manual - English
Page 78
When the toner cartridge is installed correctly, the lock lever is lifted automatically. ! Caution Install the toner cartridge immediately after you hear it may separate from the drum unit. 5-6 Do not touch the shaded parts in the illustration to prevent any degradation to the print quality. 6. Install the new toner cartridge into place. Caution Make sure you install the toner cartridge correctly or it lock into the drum unit until you remove the protective cover. CHAPTER 5 ROUTINE MAINTENANCE !
When the toner cartridge is installed correctly, the lock lever is lifted automatically. ! Caution Install the toner cartridge immediately after you hear it may separate from the drum unit. 5-6 Do not touch the shaded parts in the illustration to prevent any degradation to the print quality. 6. Install the new toner cartridge into place. Caution Make sure you install the toner cartridge correctly or it lock into the drum unit until you remove the protective cover. CHAPTER 5 ROUTINE MAINTENANCE !
Users Manual - English
Page 79
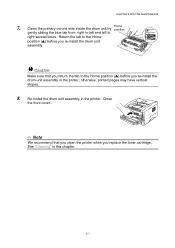
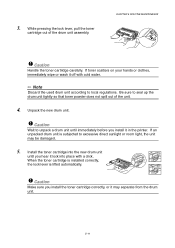
...the blue tab from right to left and left to the Home position (L) before you re-install the drum unit assembly in the printer. Return the tab to the Home position (L) before you re-install the drum unit assembly. ! Re-install the drum unit assembly in ...the printer; Caution Make sure that you clean the printer when you return the tab to right several times. otherwise, printed pages may have vertical stripes. 8. Close the front cover. ✏ Note We recommend that you replace the toner cartridge. 2 See "Cleaning" in this chapter. 5-7
...the blue tab from right to left and left to the Home position (L) before you re-install the drum unit assembly in the printer. Return the tab to the Home position (L) before you re-install the drum unit assembly. ! Re-install the drum unit assembly in ...the printer; Caution Make sure that you clean the printer when you return the tab to right several times. otherwise, printed pages may have vertical stripes. 8. Close the front cover. ✏ Note We recommend that you replace the toner cartridge. 2 See "Cleaning" in this chapter. 5-7
Users Manual - English
Page 83
... installed correctly, the lock lever is subjected to local regulations. While pressing the lock lever, pull the toner cartridge out of the unit. 4. Caution Make sure you install the toner cartridge correctly, or it in the printer. 3. Install the toner cartridge into place with cold water. ✏ Note Discard the used drum unit according to excessive direct...
... installed correctly, the lock lever is subjected to local regulations. While pressing the lock lever, pull the toner cartridge out of the unit. 4. Caution Make sure you install the toner cartridge correctly, or it in the printer. 3. Install the toner cartridge into place with cold water. ✏ Note Discard the used drum unit according to excessive direct...
Users Manual - English
Page 84
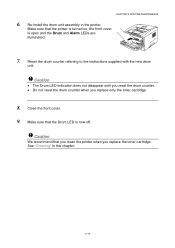
...Caution We recommend that the printer is turned on, the front cover is now off. ! Caution • The Drum LED indication does not disappear until you reset the drum counter. • Do not reset the drum counter when you replace the toner cartridge. Re-install the drum unit... assembly in this chapter. 5-12 Make sure that you clean the printer when you replace only the toner cartridge. 8. See "Cleaning" in the printer. Close the front cover. 9. CHAPTER 5 ROUTINE MAINTENANCE 6.
...Caution We recommend that the printer is turned on, the front cover is now off. ! Caution • The Drum LED indication does not disappear until you reset the drum counter. • Do not reset the drum counter when you replace the toner cartridge. Re-install the drum unit... assembly in this chapter. 5-12 Make sure that you clean the printer when you replace only the toner cartridge. 8. See "Cleaning" in the printer. Close the front cover. 9. CHAPTER 5 ROUTINE MAINTENANCE 6.
Users Manual - English
Page 87
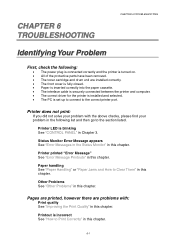
... CHAPTER 6 TROUBLESHOOTING Identifying Your Problem First, check the following: • The power plug is connected correctly and the printer is turned on. • All of the protective parts have been removed. • The toner cartridge and drum unit are problems with the above checks, please find your problem in the following list and...
... CHAPTER 6 TROUBLESHOOTING Identifying Your Problem First, check the following: • The power plug is connected correctly and the printer is turned on. • All of the protective parts have been removed. • The toner cartridge and drum unit are problems with the above checks, please find your problem in the following list and...
Users Manual - English
Page 89
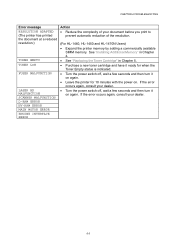
... MALFUNCTION LASER BD MALFUNCTION SCANNER MALFUNCTION D-RAM ERROR NV-RAM ERROR MAIN MOTOR ERROR ENGINE INTERFACE ERROR Action • Reduce the complexity of the resolution. (For HL-1440, HL-1450 and HL-1470N Users) • Expand the printer memory by adding a commercially available SIMM memory. See "Installing Additional Memory" in Chapter 4. • See "Replacing the Toner Cartridge...
... MALFUNCTION LASER BD MALFUNCTION SCANNER MALFUNCTION D-RAM ERROR NV-RAM ERROR MAIN MOTOR ERROR ENGINE INTERFACE ERROR Action • Reduce the complexity of the resolution. (For HL-1440, HL-1450 and HL-1470N Users) • Expand the printer memory by adding a commercially available SIMM memory. See "Installing Additional Memory" in Chapter 4. • See "Replacing the Toner Cartridge...
Users Manual - English
Page 98
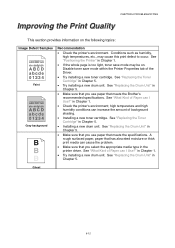
.... A rough surfaced paper, paper that meets the specifications. See "Replacing the Toner Cartridge" in Chapter 1. • If the whole page is too light, toner save mode within the Printer Properties tab of Paper can cause the problem. • Make sure that meets the Brother's recommended specifications. See "Replacing the Drum Unit" in Chapter 5. • Installing...
.... A rough surfaced paper, paper that meets the specifications. See "Replacing the Toner Cartridge" in Chapter 1. • If the whole page is too light, toner save mode within the Printer Properties tab of Paper can cause the problem. • Make sure that meets the Brother's recommended specifications. See "Replacing the Drum Unit" in Chapter 5. • Installing...
Users Manual - English
Page 102
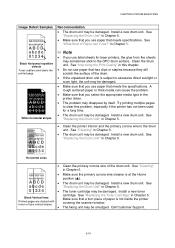
...in Chapter 5. See "Replacing the Drum Unit" in this problem, especially if the printer has not been used for laser printers, the glue from the sheets may be damaged. See "Replacing the Toner Cartridge" in Chapter 5. covering the scanner window. • The fixing unit may sometimes stick... unit. See "Replacing the Drum Unit" in the drum unit. Install a new toner cartridge. ABCDEFGH • Make sure the primary corona wire cleaner is not inside the printer Printed pages are stained with toner or have vertical stripes. Install a new drum unit. Install a new drum unit....
...in Chapter 5. See "Replacing the Drum Unit" in this problem, especially if the printer has not been used for laser printers, the glue from the sheets may be damaged. See "Replacing the Toner Cartridge" in Chapter 5. covering the scanner window. • The fixing unit may sometimes stick... unit. See "Replacing the Drum Unit" in the drum unit. Install a new toner cartridge. ABCDEFGH • Make sure the primary corona wire cleaner is not inside the printer Printed pages are stained with toner or have vertical stripes. Install a new drum unit. Install a new drum unit....
Users Manual - English
Page 103
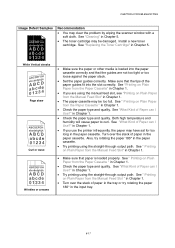
... loose against the paper stack. • Set the paper guides correctly. See "Cleaning" in Chapter 5. • The toner cartridge may be damaged. Install a new toner cartridge. White Vertical streaks AaAa0bBbc1CBdDe2cEfCgdF3hGDie4jHk Page skew Curl or wave • Make sure the paper or other media is loaded properly. ...using the manual feed slot, see "Printing on Plain Paper from the Paper Cassette" in Chapter 1. • If you use the printer infrequently, the paper may clear the problem by wiping the scanner window with a soft cloth. in Chapter 1. • Check the paper ...
... loose against the paper stack. • Set the paper guides correctly. See "Cleaning" in Chapter 5. • The toner cartridge may be damaged. Install a new toner cartridge. White Vertical streaks AaAa0bBbc1CBdDe2cEfCgdF3hGDie4jHk Page skew Curl or wave • Make sure the paper or other media is loaded properly. ...using the manual feed slot, see "Printing on Plain Paper from the Paper Cassette" in Chapter 1. • If you use the printer infrequently, the paper may clear the problem by wiping the scanner window with a soft cloth. in Chapter 1. • Check the paper ...
Users Manual - English
Page 109
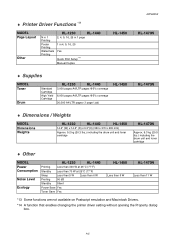
...Printer Driver Functions *13 MODEL Page Layout Other N in 1 Printing Poster Printing Watermark Printing HL-1230 HL-1440 2, 4, 9, 16, 25 in 1 page 1 in 4, 9, 16, 25 Yes Quick Print Setup*14 Manual Duplex APPENDIX HL-1450 HL-1470N ♦ Supplies MODEL Toner Drum Standard Cartridge High Yield Cartridge HL-1230 HL.... 9.2 kg (20.3 lbs.) including the drum unit and toner cartridge HL-1470N Approx. 9.3 kg (20.5 lbs.) including the drum unit and toner cartridge ♦ Other MODEL Power Consumption Noise Level Ecology HL-1230 HL-1440 Printing Less than 340 W at 25°C (77&#...
...Printer Driver Functions *13 MODEL Page Layout Other N in 1 Printing Poster Printing Watermark Printing HL-1230 HL-1440 2, 4, 9, 16, 25 in 1 page 1 in 4, 9, 16, 25 Yes Quick Print Setup*14 Manual Duplex APPENDIX HL-1450 HL-1470N ♦ Supplies MODEL Toner Drum Standard Cartridge High Yield Cartridge HL-1230 HL.... 9.2 kg (20.3 lbs.) including the drum unit and toner cartridge HL-1470N Approx. 9.3 kg (20.5 lbs.) including the drum unit and toner cartridge ♦ Other MODEL Power Consumption Noise Level Ecology HL-1230 HL-1440 Printing Less than 340 W at 25°C (77&#...
Quick Setup Guide - English
Page 1
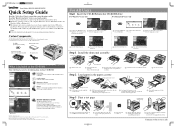
...in the paper cassette. CD-ROM (including User's Guide) Quick Setup Guide Printer Drum unit assembly (with toner cartridge included) AC power cord For All Users Start Insert the CD-ROM into ... to fit the paper size. Select the language you set up the printer. Macintosh® ©2001 Brother Industries, Ltd. Windows and Windows NT are trademarks or registered trademarks of... computers have both a USB and a parallel port. All other countries. 1470QSG Eng_front Black Pantone285 Laser Printer HL-1230/1440/1450/1470N Quick Setup Guide Read the "Safety Sheet" first to ensure that you...
...in the paper cassette. CD-ROM (including User's Guide) Quick Setup Guide Printer Drum unit assembly (with toner cartridge included) AC power cord For All Users Start Insert the CD-ROM into ... to fit the paper size. Select the language you set up the printer. Macintosh® ©2001 Brother Industries, Ltd. Windows and Windows NT are trademarks or registered trademarks of... computers have both a USB and a parallel port. All other countries. 1470QSG Eng_front Black Pantone285 Laser Printer HL-1230/1440/1450/1470N Quick Setup Guide Read the "Safety Sheet" first to ensure that you...


