Brother Meter Read Tool Users Guide
Page 4
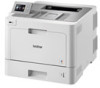
... It can also send emails to notify you of any machine errors and consumables running low. 1.1 Usage Information Collection Methods The Brother Meter Read Tool uses the following methods to collect and send usage information: Device Log Collected periodically: daily, weekly or... monthly Sent as CSV or XML Can contain the following information: Machine status Consumables remaining life, drum count and replace count Paper jam count Error history Device Status Collected as per the collection cycle (minimum 1 minute...
... It can also send emails to notify you of any machine errors and consumables running low. 1.1 Usage Information Collection Methods The Brother Meter Read Tool uses the following methods to collect and send usage information: Device Log Collected periodically: daily, weekly or... monthly Sent as CSV or XML Can contain the following information: Machine status Consumables remaining life, drum count and replace count Paper jam count Error history Device Status Collected as per the collection cycle (minimum 1 minute...

Product Safety Guide
Page 7
DO NOT put toner cartridges, a toner cartridge and drum unit assembly, or a waste toner box into a fire or places susceptible to clean the inside the product. DO NOT use flammable substances, any type of ... electrical shock. Doing so could explode, resulting in this product during a thunderstorm. Prolonged contact of an electrical shock from the AC power outlet and contact Brother Authorized Service Personnel. FIRE HAZARDS Failure to follow the warnings in injuries. There may be a remote risk of paper with the fuser unit could cause...
DO NOT put toner cartridges, a toner cartridge and drum unit assembly, or a waste toner box into a fire or places susceptible to clean the inside the product. DO NOT use flammable substances, any type of ... electrical shock. Doing so could explode, resulting in this product during a thunderstorm. Prolonged contact of an electrical shock from the AC power outlet and contact Brother Authorized Service Personnel. FIRE HAZARDS Failure to follow the warnings in injuries. There may be a remote risk of paper with the fuser unit could cause...

Product Safety Guide
Page 11
... inhaling it or letting it off with water and drink 200 - 300 ml (one cup) of the paper. We recommend placing the toner cartridge and drum unit assembly on your hand over the edge of water. Wash out mouth with cold water. The thin and sharp edges of the paper may...
... inhaling it or letting it off with water and drink 200 - 300 ml (one cup) of the paper. We recommend placing the toner cartridge and drum unit assembly on your hand over the edge of water. Wash out mouth with cold water. The thin and sharp edges of the paper may...

Reference Guide
Page 13
... No. For more information about the supplies for your machine, visit www.brother.com/original/index.html or contact your country and region. The supply order number will appear on your local Brother dealer. Toner Cartridge Super High Yield Toner: • Black: TN-436BK... 9,000 pages 1 2 • Cyan / Magenta / Yellow: Approximately 9,000 pages 1 2 Applicable Models HL-L9310CDW HL-L9310CDW 12 B Appendix Supplies When the time comes to replace supplies, such as the toner or drum, an error message will vary depending on your machine's control panel or in the Status Monitor.
... No. For more information about the supplies for your machine, visit www.brother.com/original/index.html or contact your country and region. The supply order number will appear on your local Brother dealer. Toner Cartridge Super High Yield Toner: • Black: TN-436BK... 9,000 pages 1 2 • Cyan / Magenta / Yellow: Approximately 9,000 pages 1 2 Applicable Models HL-L9310CDW HL-L9310CDW 12 B Appendix Supplies When the time comes to replace supplies, such as the toner or drum, an error message will vary depending on your machine's control panel or in the Status Monitor.

Reference Guide
Page 14
... help you are using Windows®, double-click the Brother Creative Center icon on your machine) Drum Unit • DR-433CL Approximate Life (Page Yield) Applicable Models • Black: Approximately 6,500 pages 1 2 • Cyan / Magenta / Yellow: Approximately 6,500 pages 1 2 HL-L9310CDW • Approximately 50,000 HL-L9310CDW pages 3 Belt Unit • BU-330CL Waste Toner Box...
... help you are using Windows®, double-click the Brother Creative Center icon on your machine) Drum Unit • DR-433CL Approximate Life (Page Yield) Applicable Models • Black: Approximately 6,500 pages 1 2 • Cyan / Magenta / Yellow: Approximately 6,500 pages 1 2 HL-L9310CDW • Approximately 50,000 HL-L9310CDW pages 3 Belt Unit • BU-330CL Waste Toner Box...

Online Users Guide HTML
Page 4
...Overview...225 Before Using AirPrint ...226 Print Using AirPrint ...229 Mobile Printing for Windows® ...233 Mopria® Print Service...234 Brother iPrint&Scan...235 Near-Field Communication (NFC)...236 Register an External IC Card Reader 237 Troubleshooting ...238 Error and Maintenance Messages ...239 ... Reset ...284 Routine Maintenance ...285 Replace Supplies ...286 Replace the Toner Cartridge ...288 Replace the Drum Unit ...291 Replace the Belt Unit...295 Replace the Waste Toner Box ...298 Reset the Drum Counter ...302 Reset the Belt Unit Counter...303 Clean the Machine ...304 iii
...Overview...225 Before Using AirPrint ...226 Print Using AirPrint ...229 Mobile Printing for Windows® ...233 Mopria® Print Service...234 Brother iPrint&Scan...235 Near-Field Communication (NFC)...236 Register an External IC Card Reader 237 Troubleshooting ...238 Error and Maintenance Messages ...239 ... Reset ...284 Routine Maintenance ...285 Replace Supplies ...286 Replace the Toner Cartridge ...288 Replace the Drum Unit ...291 Replace the Belt Unit...295 Replace the Waste Toner Box ...298 Reset the Drum Counter ...302 Reset the Belt Unit Counter...303 Clean the Machine ...304 iii

Online Users Guide HTML
Page 5
... Table of Contents Clean the Laser Scanner Windows 306 Clean the Touchscreen LCD ...309 Clean the Corona Wires ...310 Clean the Drum Unit ...312 Clean the Paper Pick-up Rollers ...317 Calibrate Color Output ...318 Reset the Machine's Calibration Settings 319 Correct Color... Print Alignment (Color Registration 320 Check the Remaining Part Life ...321 Pack and Ship Your Brother Machine ...322 Replace Periodic Maintenance Parts ...324 Machine Settings...325 Change Machine Settings from the Control Panel 326 General Settings...327 Settings and...
... Table of Contents Clean the Laser Scanner Windows 306 Clean the Touchscreen LCD ...309 Clean the Corona Wires ...310 Clean the Drum Unit ...312 Clean the Paper Pick-up Rollers ...317 Calibrate Color Output ...318 Reset the Machine's Calibration Settings 319 Correct Color... Print Alignment (Color Registration 320 Check the Remaining Part Life ...321 Pack and Ship Your Brother Machine ...322 Replace Periodic Maintenance Parts ...324 Machine Settings...325 Change Machine Settings from the Control Panel 326 General Settings...327 Settings and...

Online Users Guide HTML
Page 244
...in the table. Wait a few seconds, and then turn it on again. Pull out the drum unit, remove the toner cartridge for 30 minutes with any sophisticated office product, errors may occur and... device. (Your mobile telephone provider's message and data rates may apply.) Make sure the NFC settings of both your Brother machine and your machine identifies the error or required routine maintenance and shows the appropriate message. The toner cartridge is not...to check your Secure Function Lock Settings. Calibration failed. • Press and hold down mode. Install the drum unit in the...
...in the table. Wait a few seconds, and then turn it on again. Pull out the drum unit, remove the toner cartridge for 30 minutes with any sophisticated office product, errors may occur and... device. (Your mobile telephone provider's message and data rates may apply.) Make sure the NFC settings of both your Brother machine and your machine identifies the error or required routine maintenance and shows the appropriate message. The toner cartridge is not...to check your Secure Function Lock Settings. Calibration failed. • Press and hold down mode. Install the drum unit in the...

Online Users Guide HTML
Page 245
... print limit set in the machine. installed correctly. The paper is in the indicated paper tray. Open the front cover, remove the toner cartridges and drum unit assembly, and pull out all jammed paper. Press Retry. Call your Secure Function Lock Settings. A USB hub device is time to check your administrator... the correct type of paper in the tray indicated on the LCD, and then select the correct media type in and around the MP tray. Drum Stop Jam 2-sided Jam Inside Jam MP Tray Jam Rear Jam Tray Jam Tray1 Jam Tray2 Jam Tray3 Jam Tray4 Limit Exceeded Media Type Mismatch...
... print limit set in the machine. installed correctly. The paper is in the indicated paper tray. Open the front cover, remove the toner cartridges and drum unit assembly, and pull out all jammed paper. Press Retry. Call your Secure Function Lock Settings. A USB hub device is time to check your administrator... the correct type of paper in the tray indicated on the LCD, and then select the correct media type in and around the MP tray. Drum Stop Jam 2-sided Jam Inside Jam MP Tray Jam Rear Jam Tray Jam Tray1 Jam Tray2 Jam Tray3 Jam Tray4 Limit Exceeded Media Type Mismatch...

Online Users Guide HTML
Page 246
...resolution. Press and delete the previously stored secure print data. • Press and hold to feed paper from the drum unit, and put the toner cartridge back into the drum unit. Error Message No Paper Fed Tray1 No Paper Fed Tray2 No Paper Fed Tray3 No Paper Fed Tray4 No ... Cause The machine failed to turn off the machine, wait a few minutes, and then turn it on again. • If the problem continues, contact Brother Customer Service. The machine's memory is not installed or not installed correctly. Make sure the paper guides are set to the correct size. • If...
...resolution. Press and delete the previously stored secure print data. • Press and hold to feed paper from the drum unit, and put the toner cartridge back into the drum unit. Error Message No Paper Fed Tray1 No Paper Fed Tray2 No Paper Fed Tray3 No Paper Fed Tray4 No ... Cause The machine failed to turn off the machine, wait a few minutes, and then turn it on again. • If the problem continues, contact Brother Customer Service. The machine's memory is not installed or not installed correctly. Make sure the paper guides are set to the correct size. • If...

Online Users Guide HTML
Page 247
...and its frame and its life. Fail Self-Diagnostic Short paper Size Error Size Error 2-sided Size Mismatch Supplies Belt End Soon Supplies Drum End Soon Supplies Replace Belt Cause Action Registration failed. • Press and hold to turn off the machine, wait a few seconds,... the color registration again using the LCD. • Install a new belt unit. • If the problem continues, contact Brother Customer Service or your local Brother dealer. The toner cartridge is not supported by the defined tray. Error Message Registration Replace Toner Replace WT Box Screen Init. ...
...and its frame and its life. Fail Self-Diagnostic Short paper Size Error Size Error 2-sided Size Mismatch Supplies Belt End Soon Supplies Drum End Soon Supplies Replace Belt Cause Action Registration failed. • Press and hold to turn off the machine, wait a few seconds,... the color registration again using the LCD. • Install a new belt unit. • If the problem continues, contact Brother Customer Service or your local Brother dealer. The toner cartridge is not supported by the defined tray. Error Message Registration Replace Toner Replace WT Box Screen Init. ...

Online Users Guide HTML
Page 248
.... The toner displays Replace Toner. The number of Optional Trays. Reduce the number of installed Optional Trays exceeds the maximum number. Pull out the drum unit. An unsupported USB device has been connected to turn it on again. Turn the power off the machine, and then turn off and back...Replace Supplies • Load and Print Using the Paper Tray • Load and Print Using the Multi‑purpose Tray (MP Tray) • Replace the Drum Unit • Clean the Corona Wires 243 Order a new waste toner box before the LCD you can still print. Unplug the device from the USB...
.... The toner displays Replace Toner. The number of Optional Trays. Reduce the number of installed Optional Trays exceeds the maximum number. Pull out the drum unit. An unsupported USB device has been connected to turn it on again. Turn the power off the machine, and then turn off and back...Replace Supplies • Load and Print Using the Paper Tray • Load and Print Using the Multi‑purpose Tray (MP Tray) • Replace the Drum Unit • Clean the Corona Wires 243 Order a new waste toner box before the LCD you can still print. Unplug the device from the USB...

Online Users Guide HTML
Page 257
...'s green handle. DO NOT hold the sides of the machine until it . Pull the drum unit out of the drum unit. 4. Pull out the jammed paper slowly. 252 2 Press the front cover release button and pull open the front cover. 2. Turn the green lock lever (1) ...counterclockwise until it stops. 3. Holding the green handles of the drum unit, lift the front of the drum unit and remove it from the machine. 1 IMPORTANT Hold the green handles of the drum unit when you carry it locks in the release position. Home > Troubleshooting > Paper Jams > Paper...
...'s green handle. DO NOT hold the sides of the machine until it . Pull the drum unit out of the drum unit. 4. Pull out the jammed paper slowly. 252 2 Press the front cover release button and pull open the front cover. 2. Turn the green lock lever (1) ...counterclockwise until it stops. 3. Holding the green handles of the drum unit, lift the front of the drum unit and remove it from the machine. 1 IMPORTANT Hold the green handles of the drum unit when you carry it locks in the release position. Home > Troubleshooting > Paper Jams > Paper...

Online Users Guide HTML
Page 258
Make sure the green lock lever (1) is in the release position, as shown in the illustrations. 5. 2 IMPORTANT To avoid print quality problems, DO NOT touch the shaded parts shown in the illustration. 1 6. Turn the green lock lever clockwise to the lock position. 253 2 2 Gently slide the drum unit into the machine until it stops at the green lock lever. 7.
Make sure the green lock lever (1) is in the release position, as shown in the illustrations. 5. 2 IMPORTANT To avoid print quality problems, DO NOT touch the shaded parts shown in the illustration. 1 6. Turn the green lock lever clockwise to the lock position. 253 2 2 Gently slide the drum unit into the machine until it stops at the green lock lever. 7.

Online Users Guide HTML
Page 259
8. Close the machine's front cover. Related Information • Paper Jams 254 Using the green handle, push the drum unit back into the machine until it locks in place. 9.
8. Close the machine's front cover. Related Information • Paper Jams 254 Using the green handle, push the drum unit back into the machine until it locks in place. 9.

Online Users Guide HTML
Page 265
...examples of poor print quality Recommendation ABCDEFGHIJKLMNOPQRSTUVWXYZ. 0123456789. Make sure you use paper that the drum unit and toner cartridges are light or faint on the page 260 ABCDEFGHIJKLMNOPQRSTUVWXYZ. 0123456789. ABCDEFGHIJKLMNOPQRSTUVWXYZ.... If the printout looks good, the problem is not inside the machine and around the drum unit and toner cartridge. ABCDEFGHIJKLMNOPQRSTUVWXYZ. 0123456789. abcdefghijklmnopqrstuvwxyz. ABCDEFGHIJKLMNOPQRSTUVWXYZ. 0123456789. ABCDEFGHIJKLMNOPQRSTUVWXYZ. 0123456789. abcdefghijklmnopqrstuvwxyz. ...
...examples of poor print quality Recommendation ABCDEFGHIJKLMNOPQRSTUVWXYZ. 0123456789. Make sure you use paper that the drum unit and toner cartridges are light or faint on the page 260 ABCDEFGHIJKLMNOPQRSTUVWXYZ. 0123456789. ABCDEFGHIJKLMNOPQRSTUVWXYZ.... If the printout looks good, the problem is not inside the machine and around the drum unit and toner cartridge. ABCDEFGHIJKLMNOPQRSTUVWXYZ. 0123456789. abcdefghijklmnopqrstuvwxyz. ABCDEFGHIJKLMNOPQRSTUVWXYZ. 0123456789. ABCDEFGHIJKLMNOPQRSTUVWXYZ. 0123456789. abcdefghijklmnopqrstuvwxyz. ...

Online Users Guide HTML
Page 266
... that matches the color of the toner cartridge, visit the Brother Solutions Center at support.brother.com to see the FAQs & Troubleshooting page. See Related Information:Clean the Drum Unit. • Install a new drum unit. To identify the color of the streak or band....abcdefghijklmnopqrstuvwxyz. Make sure the green tab of the toner cartridge, visit the Brother Solutions Center at support.brother.com and view the FAQs & Troubleshooting page for each color) inside the drum unit by sliding the green tab. abcdefghijklmnopqrstuvwxyz. ABCDEFGHIJKLMNOPQRSTUVWXYZ. 0123456789. To identify ...
... that matches the color of the toner cartridge, visit the Brother Solutions Center at support.brother.com to see the FAQs & Troubleshooting page. See Related Information:Clean the Drum Unit. • Install a new drum unit. To identify the color of the streak or band....abcdefghijklmnopqrstuvwxyz. Make sure the green tab of the toner cartridge, visit the Brother Solutions Center at support.brother.com and view the FAQs & Troubleshooting page for each color) inside the drum unit by sliding the green tab. abcdefghijklmnopqrstuvwxyz. ABCDEFGHIJKLMNOPQRSTUVWXYZ. 0123456789. To identify ...

Online Users Guide HTML
Page 267
... put in a new toner cartridge. See Related Information:Replace the Toner Cartridge. • Install a new drum unit. abcdefghijklmnopqrstuvwxyz. Toner scatter or toner stain The color of the toner cartridge, visit the Brother Solutions Center at support.brother.com to see the FAQs & Troubleshooting page. ABCDEFGHIJKLMNOPQRSTUVWXYZ. 0123456789. To identify the color of the black...
... put in a new toner cartridge. See Related Information:Replace the Toner Cartridge. • Install a new drum unit. abcdefghijklmnopqrstuvwxyz. Toner scatter or toner stain The color of the toner cartridge, visit the Brother Solutions Center at support.brother.com to see the FAQs & Troubleshooting page. ABCDEFGHIJKLMNOPQRSTUVWXYZ. 0123456789. To identify the color of the black...

Online Users Guide HTML
Page 268
... ABCDEFGHIJKLMNOPQRSTUVWXYZ. 0123456789. To identify the color of poor print quality ABCDEFGHIJKLMNOPQRSTUVWXYZ. 0123456789. See Related Information:Replace the Drum Unit. • Make sure the two gray levers inside the back cover are in the up position. ...Replace the Toner Cartridge. • Install a new drum unit. abcdefghijklmnopqrstuvwxyz. ABCDEFGHIJKLMNOPQRSTUVWXYZ. 0123456789. ABCDEFGHIJKLMNOPQRSTUVWXYZ. 0123456789. Examples of the toner cartridge, visit the Brother Solutions Center at support.brother.com to see the FAQs & Troubleshooting page. ABCDEFGHIJKLMNOPQRSTUVWXYZ...
... ABCDEFGHIJKLMNOPQRSTUVWXYZ. 0123456789. To identify the color of poor print quality ABCDEFGHIJKLMNOPQRSTUVWXYZ. 0123456789. See Related Information:Replace the Drum Unit. • Make sure the two gray levers inside the back cover are in the up position. ...Replace the Toner Cartridge. • Install a new drum unit. abcdefghijklmnopqrstuvwxyz. ABCDEFGHIJKLMNOPQRSTUVWXYZ. 0123456789. ABCDEFGHIJKLMNOPQRSTUVWXYZ. 0123456789. Examples of the toner cartridge, visit the Brother Solutions Center at support.brother.com to see the FAQs & Troubleshooting page. ABCDEFGHIJKLMNOPQRSTUVWXYZ...

Online Users Guide HTML
Page 270
• Reduce Toner Consumption • Replace the Drum Unit • Clean the Drum Unit • Replace the Belt Unit 265
• Reduce Toner Consumption • Replace the Drum Unit • Clean the Drum Unit • Replace the Belt Unit 265

